4-564-744-13(1) Digital HD Video Camera Recorder Getting started Recording/Playback Saving images Operating Guide “Help Guide” (Web manual) Refer to “Help Guide” for in-depth instructions on the many functions of the camera. http://rd1.sony.
Read this first IMPORTANT SAFETY INSTRUCTIONS Before operating the unit, please read this manual thoroughly, and retain it for future reference. Owner’s Record The model and serial numbers are located on the bottom. Record the serial number in the space provided below. Refer to these numbers whenever you call your Sony dealer regarding this product. Model No. HDRSerial No. _________________________ Model No. AC- ____________________ Serial No.
for replacement of the obsolete outlet. • Protect the power cord from being walked on or pinched particularly at plugs, convenience receptacles, and the point where they exit from the apparatus. • Only use attachments/accessories specified by the manufacturer. • Use only with the cart, stand, tripod, bracket, or table specified by the manufacturer, or sold with the apparatus. When a cart is used, use caution when moving the cart/ apparatus combination to avoid injury from tip-over.
For Customers in the U.S.A. and Canada RECYCLING LITHIUM-ION BATTERIES Lithium-Ion batteries are recyclable. You can help preserve our environment by returning your used rechargeable batteries to the collection and recycling location nearest you. For more information regarding recycling of rechargeable batteries, call toll free 1-800-822-8837, or visit http:// www.call2recycle.org/ Caution: Do not handle damaged or leaking Lithium-Ion batteries.
Note: This equipment has been tested and found to comply with the limits for a Class B digital device, pursuant to Part 15 of the FCC Rules. These limits are designed to provide reasonable protection against harmful interference in a residential installation. This equipment generates, uses, and can radiate radio frequency energy and, if not installed and used in accordance with the instructions, may cause harmful interference to radio communications.
This product has been tested and found compliant with the limits set out in the EMC regulation for using connection cables shorter than 3 meters (9.8 feet). The electromagnetic fields at the specific frequencies may influence the picture and sound of this unit.
This manual describes 1080 60icompatible devices and 1080 50i-compatible devices. To check whether your camera is a 1080 60i-compatible device or 1080 50i compatible device, check for the following marks on the bottom of the camera. 1080 60i-compatible device: 60i 1080 50i-compatible device: 50i Learning more about the camcorder (Help Guide) Help Guide is an on-line manual. Refer to it for in-depth instructions on the many functions of the camcorder. Access the Sony support page. http://rd1.sony.
Getting started Supplied items The numbers in ( ) indicate the supplied quantity. • Camcorder (1) • AC Adaptor (1) The shape of the AC Adaptor differs depending on the countries/ regions. • USB connection support cable (1) The USB connection support cable is designed for use with this camcorder only. Use this cable when the Built-in USB Cable of the camcorder is too short for connection.
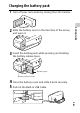
Charging the battery pack 1 Turn off your camcorder by closing the LCD monitor. Getting started the battery cover in the direction of the arrow, 2 Slide and open it. the battery pack while pressing and holding 3 Insert the battery release lever. Battery pack Battery release lever 4 Close the battery cover and slide it back securely. 5 Pull out the Built-in USB Cable.
the AC Adaptor and the camcorder with the 6 Connect USB connection support cable, and connect the AC Adaptor to the wall outlet (wall socket). USB connection support cable Built-in USB Cable AC Adaptor Wall outlet (wall socket) • The POWER/CHG (charge) lamp turns orange. • The POWER/CHG (charge) lamp turns off when the battery pack is fully charged. Disconnect the USB connection support cable from the camcorder. • The shape of the AC Adaptor differs depending on the countries/ regions.
Turning the power on 1 Open the LCD monitor of your camcorder and turn the power on. Getting started the language, the geographical area, Daylight 2 Select Savings or Summer Time, date format, and the date and time. Move the multi-selector towards /// to select the desired item, and then press the center of the selector to complete the selection. • To turn off the power, close the LCD monitor. • To set the date and time again, select [Setup] [ Clock Settings] [Date & Time Setting].
Inserting a memory card 1 Open the cover, and insert the memory card until it clicks. microSD memory card Printed surface Memory Stick Micro™ (M2) media Terminal • The [Preparing image database file. Please wait.] screen appears if you insert a new memory card. Wait until the screen disappears. • Insert the memory card straight in the right direction so that the camcorder can recognize it.
Recording images in a format other than XAVC S SD Speed Class Capacity (operation verified) microSD memory card/ microSDHC memory card/ microSDXC memory card Class 4 or faster Up to 64 GB Memory Stick Micro (Mark2) media – Up to 16 GB Getting started GB 13
Recording/Playback Recording Recording movies 1 Open the lens cover. the LCD monitor, and press START/STOP to 2 Open start recording. Power zoom lever • To stop recording, press START/STOP again. • You can record photos during movie recording by pressing PHOTO (Dual Capture) except when [ SteadyShot] is set to [Intelligent Active]. GB 14 • In the default setting, movies are recorded with AVCHD and MP4 format simultaneously (Dual Video REC).
Shooting photos 1 Open the lens cover. Recording/Playback the LCD monitor and select [MODE] 2 Open (Photo). PHOTO lightly to adjust the focus, then press it 3 Press fully. Power zoom lever • When the focus is adjusted properly, AE/AF lock indicator appears on the LCD monitor.
Playback 1 Open the LCD monitor and press the (View Images) button on the camcorder to enter the playback mode. / to move the desired event to the 2 Select center, and then select the part circled () in the figure.
3 Select the image.
Viewing images at a larger size Connecting the camcorder to a TV 1 Connect the HDMI OUT jack of the camcorder to the HDMI IN jack of a TV using the HDMI cable supplied. Signal flow • If your TV does not have an HDMI jack, connect the Multi Terminal of the camcorder to the video/audio input jacks of the TV using an AV cable (sold separately). Using the built-in projector (HDR-PJ410/PJ440) 1 Press the PROJECTOR button (page 33). 2 Select [Image Shot on This Device].
Saving images Using PlayMemories Home™ What you can do with PlayMemories Home PlayMemories Home allows you to import movies and photos to your computer to use them in a variety of ways. Playing back imported images For Windows, the following functions are also available. Viewing images on Calendar Creating movie discs Saving images Import images from the camcorder.
Connecting an external media device How to connect the device Recorder without a USB jack Connect a recorder to the Multi Terminal of your camcorder using an AV cable (sold separately). Signal flow Insert the battery pack to the camcorder. Connect the AC Adaptor (supplied) to the camcorder. Connect the AV cable (sold separately) to the camcorder. • Movies are copied with standard definition image quality.
Using the Wi-Fi function (HDRCX440/PJ410/ PJ440) Installing PlayMemories Mobile™ on your smartphone http://www.sony.net/pmm/ Android OS Install PlayMemories Mobile from Google play. • Android 4.0 or higher is required to use One-Touch functions (NFC). Install PlayMemories Mobile from App Store. • One-touch functions (NFC) are not available with iOS. Notes • You may not be able to download PlayMemories Mobile from Google play or App store depending on the country or the region.
Transferring MP4 movies and photos to your smartphone 3 Touch the camcorder to the smartphone. One-touch connection with an Android supporting NFC 1 On the smartphone, select [Settings], then, select [More...] to check that [NFC] is enabled. 2 On the camcorder, play back an image to be sent to the smartphone. • You can transfer MP4 movies Notes • Cancel the sleep mode or unlock the screen on the smartphone beforehand.
Return to Home, and start up PlayMemories Mobile. 2 Select the image you want to transfer, and add , and then select . • The SSID and a password are displayed, and the camcorder is ready to be connected with the smartphone. 3 Connect the camcorder to the smartphone, and transfer images. Android Input the password displayed on the camcorder (first time only). Using your smartphone as a wireless remote commander You can record with the camcorder using your smartphone as a wireless remote commander.
Notes • Depending on local electrical interference or the smartphone’s capabilities, the live view images may not be displayed smoothly. Saving movies and photos to your computer via Wi-Fi If the wireless access point has a WPS button On your camcorder, select [Wireless] [ Setting] [WPS Push]. Press the WPS button on the access point you want to register. Connect your computer to a wireless access point or wireless broadband router in advance.
4 Start sending images from the camcorder to the computer. Saving images Press the (View Images) button on your camcorder. Select [Wireless] [ Function] [Send to Computer]. • Images are automatically transferred to and saved on the computer. • Only newly recorded images are transferred. Importing movies and multiple photos may take time.
Customizing your camcorder Using the menus 1 Select . 2 Select a category. Number of the category which is displayed depends on the model. a desired menu 3 Select item. Scroll the menu items up or down. • Select to finish setting the menu or to return to the previous menu screen.
Others Precautions AC Adaptor Do not short-circuit the battery terminal with any metallic objects. This may cause a malfunction. Playing back images with other devices You may not be able to play back images that were recorded on your camcorder with other devices normally. Also, you may not be able to play back images recorded on other devices with your camcorder.
Camcorder temperature If you use the camcorder continuously for a long time, the camcorder gets very warm. This is not a malfunction. Overheat protection Depending on the camcorder and battery temperature, you may be unable to record movies or the power may turn off automatically to protect the camcorder. A message will be displayed on the LCD monitor before the power turns off or you can no longer record movies.
Specifications System Others Signal format: NTSC color, EIA standards (1080 60i compatible models) PAL color, CCIR standards (1080 50i compatible models) HD TV Movie recording format: XAVC S (XAVC S format) Video: MPEG-4 AVC/H.264 Audio: MPEG-4 Linear PCM 2ch (48 kHz/16 bit) AVCHD (AVCHD format Ver.2.0 compatible): Video: MPEG-4 AVC/H.264 Audio: Dolby Digital 2ch Dolby Digital Stereo Creator*1 MP4: Video: MPEG-4 AVC/H.264 Audio: MPEG-4 AAC-LC 2ch *1 Manufactured under license from Dolby Laboratories.
Input/Output connectors HDMI OUT jack: HDMI micro connector PROJECTOR IN jack (HDR-PJ410/ PJ440): HDMI micro connector USB jack: Type A (Built-in USB) USB connector is only for output (For customers in Europe). Multi Terminal LCD monitor Picture: 6.7 cm (2.7 type, aspect ratio 16:9) Total number of pixels: 230 400 (960 × 240) Projector (HDR-PJ410/PJ440) Projection type: DLP Light source: LED (R/G/B) Focus: Manual Throw Distance: 0.5 m (1.
Rechargeable battery pack NP-BX1 Used battery: Lithium-ion battery Maximum voltage: DC 4.2 V Nominal voltage: DC 3.6 V Maximum charge voltage: DC 4.2 V Maximum charge current: 1.89 A Capacity: 4.5 Wh (1 240 mAh) Design and specifications of your camcorder and accessories are subject to change without notice.
• The terms HDMI and HDMI HighDefinition Multimedia Interface, and the HDMI Logo are trademarks or registered trademarks of HDMI Licensing LLC in the United States and other countries. • Microsoft, Windows, and Windows Vista are either registered trademarks or trademarks of Microsoft Corporation in the United States and/or other countries. • Mac and Mac OS are registered trademarks of Apple Inc. in the United States and other countries.
Parts and controls Figures in ( ) are reference pages.
Tripod receptacle Battery cover (9) Battery release lever Battery pack (9) To fasten the grip belt GB 34
Others GB 35
GB Additional information on this product and answers to frequently asked questions can be found at our Customer Support Website. http://www.sony.