4-271-155-11(1) Digital HD Video Camera Recorder Operating Guide Table of contents Getting started Recording/Playback Advanced operations Saving movies and photos with a computer Saving images with an external device Customizing your camcorder Additional information Quick reference HDR-CX560E/CX560VE/CX690E/CX700E/CX700VE
Read this first Before operating the unit, please read this manual thoroughly, and retain it for future reference. WARNING To reduce fire or shock hazard, do not expose the unit to rain or moisture. Do not expose the batteries to excessive heat such as sunshine, fire or the like. CAUTION Use the nearby wall outlet (wall socket) when using the AC Adaptor. Disconnect the AC Adaptor from the wall outlet (wall socket) immediately if any malfunction occurs while using your camcorder.
FOR CUSTOMERS IN EUROPE Hereby, Sony Corporation, declares that this HDR-CX560VE/CX700VE Digital HD Video Camera Recorder is in compliance with the essential requirements and other relevant provisions of the Directive 1999/5/ EC. For details, please access the following URL: http://www.compliance.sony.de/ Notice for the customers in the countries applying EU Directives The manufacturer of this product is Sony Corporation, 1-7-1 Konan Minato-ku Tokyo, 108-0075 Japan.
will help to conserve natural resources. In case of products that for safety, performance or data integrity reasons require a permanent connection with an incorporated battery, this battery should be replaced by qualified service staff only. To ensure that the battery will be treated properly, hand over the product at end-oflife to the applicable collection point for the recycling of electrical and electronic equipment.
Note Supplied items This equipment has been tested and found to comply with the limits for a Class B digital device, pursuant to Part 15 of the FCC Rules. These limits are designed to provide reasonable protection against harmful interference in a residential installation. This equipment generates, uses, and can radiate radio frequency energy and, if not installed and used in accordance with the instructions, may cause harmful interference to radio communications.
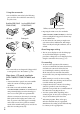
Using the camcorder Do not hold the camcorder by the following parts, and also do not hold the camcorder by the jack covers. Viewfinder (HDR-CX690E/ Lens hood (HDR-CX690E/ CX700E/CX700VE) CX700E/CX700VE) Black points White, red, blue or green points LCD Screen Battery pack Exposing the LCD screen, the viewfinder (HDR-CX690E/CX700E/CX700VE) or the lens to direct sunlight for long periods of time may cause malfunctions. Do not aim at the sun. Doing so might cause your camcorder to malfunction.
Use the camcorder in accordance with local regulations. Notes on playing back You may not be able to play back normally images recorded on your camcorder with other devices. Also, you may not be able to play back images recorded on other devices with your camcorder. Standard (STD) image quality movies recorded on SD memory cards cannot be played on AV equipment of other manufacturers.
About this manual, illustrations and on-screen displays The example images used in this manual for illustration purposes are captured using a digital still camera, and therefore may appear different from images and screen indicators that actually appear on your camcorder. And, the illustrations of your camcorder and its screen indication are exaggerated or simplified for understandability.
Table of contents Read this first.. . . . . . . . . . . . . . . . . . . . . . . . . . . . . . . . . . . . . . . . . . . . . . . . . . . . . . . . . . . . . . . . . . . . . . . . . . . . . . . . . . . . . . . 2 Getting started 11 14 15 17 18 18 Table of contents Step 1: Charging the battery pack.. . . . . . . . . . . . . . . . . . . . . . . . . . . . . . . . . . . . . . . . . . . . . . . . . . . . . . . . . . . . Charging the battery pack abroad.. . . . . . . . . . . . . . . . . . . . . . . . . . . . . .
Saving images with an external device Selecting a method for saving images with an external device.. . . . . . . . . . . . . . . . . . . . . . . . Saving images on an external media device.. . . . . . . . . . . . . . . . . . . . . . . . . . . . . . . . . . . . . . . . . . . . . . . Creating a disc with the DVD writer, DVDirect Express.. . . . . . . . . . . . . . . . . . . . . . . . . . . . . . . . . . . Creating a high definition image quality (HD) disc with a DVD writer, etc., other than DVDirect Express..
Getting started Step 1: Charging the battery pack Getting started DC IN jack Battery pack AC Adaptor Power cord (Mains lead) /CHG (flash/charge) lamp DC plug To the wall outlet (wall socket) Align the mark on the DC plug with that on the DC IN jack. You can charge the “InfoLITHIUM” battery pack (V series) after attaching it to your camcorder. Notes You cannot attach any “InfoLITHIUM” battery pack other than the V series to your camcorder.
4 When the battery is charged, disconnect the AC Adaptor from the DC IN jack of your camcorder. To charge the battery using your computer This method is useful when the AC Adaptor is not available. Turn off the camcorder and attach the battery pack to the camcorder. Connect the camcorder to a running computer using the Built-in USB Cable. To the wall outlet (wall socket) When the battery is fully charged, disconnect the camcorder from the computer (p. 39).
The charging times shown in the table above are measured when charging the camcorder at a temperature of 25 C (77 °F). It is recommended that you charge the battery in a temperature range of 10 C to 30 C (50 °F to 86 °F). * The charging times are measured without using the USB Connection support cable. Tips See page 63 on recording and playing time.
Notes on the AC Adaptor Use the nearby wall outlet (wall socket) when using the AC Adaptor. Disconnect the AC Adaptor from the wall outlet (wall socket) immediately if any malfunction occurs while using your camcorder. Do not use the AC Adaptor placed in a narrow space, such as between a wall and furniture. Do not short-circuit the DC plug of the AC Adaptor or battery terminal with any metallic objects. This may cause a malfunction.
Step 2: Turning the power on, and setting the date and time 1 Open the LCD screen of your camcorder. Your camcorder is turned on and the lens cover is opened. To turn on your camcorder when the LCD screen is open, press POWER. MODE lamp Getting started POWER button 2 Select the desired language, then touch [Next]. Touch the button on the LCD screen 3 Select the desired geographical area with To set the date and time again, touch / , then touch [Next].
4 Set [Summer Time], then touch [Next]. If you set [Summer Time] to [On], the clock advances 1 hour. 5 Select the date format, then touch [Next]. 6 Select the date and time, touch *. [Next] / to set the value, then touch * The confirmation screen appears only when you set the clock for the first time. The clock starts. Notes The date and time does not appear during recording, but they are automatically recorded on the recording media, and can be displayed during playback.
To turn off the power Close the LCD screen. If the viewfinder is pulled out, retract the viewfinder as shown in the illustration below (HDR-CX690E/CX700E/CX700VE). The (Movie) lamp flashes for a few seconds and the camcorder is turned off. Getting started Tips You can turn off the camcorder also by pressing POWER. When [Power On By LCD] is set to [Off], turn off your camcorder by pressing POWER (HDR-CX560E/CX560VE).
Step 3: Preparing the recording media The recording media that can be used differs depending on your camcorder. The following icons are displayed on the screen of your camcorder. HDR-CX690E Memory card HDR-CX560E/CX560VE/ CX700E/CX700VE * Internal memory Memory card * In the default setting, both movies and photos are recorded on this recording media. You can perform recording, playback and editing operations on the selected medium. Tips See page 64 for the recordable time of movies.
Inserting a memory card Notes Set the recording medium to [Memory Card] to record movies and/or photos on a memory card (HDR-CX560E/CX560VE/CX700E/CX700VE). Types of memory card you can use with your camcorder “Memory Stick PRO Duo” media (Mark2) “Memory Stick PROHG Duo” media — Described in this manual Getting started SD Speed Class “Memory Stick PRO Duo” media SD memory card SDHC memory card SDXC memory card Class 4 or faster SD card Operation with all memory cards is not assured.
Open the cover, and insert the memory card with the notched edge in the direction as illustrated until it clicks. Close the cover after inserting the memory card. Access lamp Note the direction of notched corner. The [Preparing image database file. Please wait.] screen appears if you insert a new memory card. Wait until the screen disappears. Close the cover. Notes If [Failed to create a new Image Database File. It may be possible that there is not enough free space.
Recording/Playback Recording In the default setting, movies and photos are recorded on the following media. Movies are recorded with high definition image quality (HD). HDR-CX690E: Memory card HDR-CX560E/CX560VE/CX700E/CX700VE: Internal recording media Tips To change the recording media, see page 18 (HDR-CX560E/CX560VE/CX700E/CX700VE). 1 Fasten the grip belt. Recording/Playback 2 Open the LCD screen of your camcorder. Your camcorder is turned on and the lens cover is opened.
Recording movies (Movie): When recording a movie (Photo): When recording a photo START/STOP button [STBY] [REC] MODE button Press MODE to turn on the (Movie) lamp. Press START/STOP to start recording. To stop recording, press START/STOP again. To display items on the LCD screen again Touch anywhere on the screen except the buttons on the LCD screen so that you can use items. You can change the settings using the [Display Setting] menu.
Capturing a photo Smile Detection frame (Orange) Face Detection frame (White) Notes If you close the LCD screen while recording movies, the camcorder stops recording. The maximum continuous recordable time of movies is about 13 hours. When a movie file exceeds 2 GB, the next movie file is created automatically. It will take several seconds until you can start recording after you turn on the camcorder. You cannot operate your camcorder during this time.
Data code during recording The recording date, time and condition , and coordinates (HDR-CX560VE/CX700VE) are recorded automatically on the recording media. They are not displayed during recording. However, you can check them as [Data Code] during playback. To display them, touch (MENU) [Setup] [ (Playback Settings)] [Data Code] a desired setting .
Tips See page 65 on the recordable number of photos. (MENU) [Image Quality/Size] [ Image Size] To change the image size, touch . a desired setting is displayed. You cannot record photos while Your camcorder flashes automatically when there is insufficient ambient light. The flash does not work in (MENU) [Camera/ the movie recording mode. You can change how your camcorder flashes by .
Selecting the recording mode You can change the quality of the image that you record by touching (MENU) REC Mode]. [Image Quality/Size] [ The types of media that images can be saved on will depend on the recording mode selected. For details on a save operation using the external devices, see page 43.
Adjusting for shooting conditions Recording in dark places (NightShot) When you press NIGHTSHOT, appears, and you can record images even in total darkness. Press NIGHTSHOT again to cancel the NightShot function. Using NightShot in bright places will cause a malfunction of your camcorder. How to use the MANUAL dial Press MANUAL to switch to manual operation mode, and rotate the dial to make the adjustment. Pressing MANUAL switches the operation mode between manual and automatic.
Playback on the camcorder You can enjoy the playback of images with powerful sound through the stereo speakers built into the camcorder. In the default setting, movies and photos that are recorded on the following recording media are played. HDR-CX690E: Memory card HDR-CX560E/CX560VE/CX700E/CX700VE: Internal recording media Tips To change the recording media, see page 18 (HDR-CX560E/CX560VE/CX700E/CX700VE). The camcorder displays recorded images as an event automatically, based on the date and time.
/ : To the previous/next event Event name Change to the movie/photo recording mode Time-line bar Highlight Playback button* Change Event Scale button * Appears only when the image quality is set to [ HD Quality]. The Event Index screen appears when you touch the event that is displayed on the center. Touch an image you want to view. Recording/Playback 4 You can also choose an event by touching on the time-line bar.
Operating the camcorder while playing a movie You can use the functions shown in the figure below while the camcorder is playing a movie. MOVIE/PHOTO] (the default The figure below will be displayed when you select [ MOVIE] by touching the Switch Image Type button on the Event Index setting) or [ screen. Volume adjustment Delete Context To stop* Next Previous To fast-forward* To fast-reverse* To pause*/play * These buttons can be used only when the camcorder is playing a movie.
Viewing photos You can use the functions shown in the figure below while you are viewing photos. The figure PHOTO] by touching the Switch Image Type below will be displayed when you select [ button on the Event Index screen. Delete Context To start/stop slide show Tips To repeat Slideshow, touch [Slideshow Set]. Performing Highlight Playback Press Touch / to select the desired event, then touch [ Highlight].
Playing images on a TV Connection methods and the image quality (high definition (HD) or standard definition (STD)) viewed on the TV screen differ depending on what type of TV is connected, and the connectors used. Output connectors on the camcorder HDMI OUT jack List of connection Connecting to a high definition TV When the recording quality is high definition image quality (HD), the movies are played back in high definition image quality (HD).
Connecting to a non-high-definition 16:9 (wide) or 4:3 TV When you connect with component A/V cable When movies are recorded with high definition image quality (HD), they are played back in standard definition image quality (STD). When movies are recoded with standard image quality (STD), they are played back in standard definition image quality (STD). If you connect only component video plugs, audio signals are not output. Connect the white and red plugs to output audio signals.
When your TV is monaural (When your TV has only one audio input jack) Connect the yellow plug of the A/V connecting cable to the video input jack and connect the white (left channel) or red (right channel) plug to the audio input jack of your TV or VCR. When connecting to your TV via a VCR Connect your camcorder to the LINE IN input on the VCR using the A/V connecting cable. Set the input selector on the VCR to LINE (VIDEO 1, VIDEO 2, etc.).
Advanced operations Deleting movies and photos You can free media space by deleting movies and photos from recording media. Tips If you start playing back an image by selecting it from the Event Index screen, you can delete the image using on the playback screen. To delete all images recorded in the recording media, and recover all the recordable space of the media, format the media. Reduced-size images which enable you to view many images at the same time on an index screen are called “thumbnails.
Saving movies and photos with a computer Useful functions available if you connect the camcorder to a computer (Windows) The software PMB stored in the CD-ROM (supplied) includes functions that enable you to do more with the images recorded with the camcorder.
Preparing a computer (Windows) Step 1 Checking the computer system OS*1 Microsoft Windows XP SP3*2/Windows Vista SP2*3/Windows 7 Others USB port (this must be provided as standard, Hi-Speed USB (USB 2.0 compatible)), Bluray disc/DVD burner (CD-ROM drive is necessary for installation) Either NTFS or exFAT file system is recommended as the hard disk file system. *1 Standard installation is required. Operation is not assured if the OS has been upgraded or in a multi-boot environment.
Double-click the “PMB Launcher” short-cut icon on the computer screen to start “PMB Launcher.” Confirm that your camcorder is not connected to the computer. Follow the instructions that appear on the computer screen to continue the installation. Turn on the computer. Log on as an Administrator for installation. Close all applications running on the computer before installing the software. Place the supplied CD-ROM in the disc drive of your computer.
To disconnect your camcorder from the computer Click the icon at the bottom right of the desktop of the computer [Safely remove USB Mass Storage Device]. Touch [Cancel] [Yes] on the camcorder screen. Disconnect the USB cable. icon may If you are using Windows 7, the not appear on the desktop of the computer. In this case, you can disconnect the camcorder from your computer without following the procedures described above.
Starting PMB (Picture Motion Browser) 1 Double-click the “PMB” short-cut icon on the computer screen. Uploading images to a network service The application software “PMB Portable” is pre-installed in the camcorder. You can enjoy the following functions using the “PMB Portable.” 2 The PMB software starts up. Double-click the “PMB Help” short-cut icon on the computer screen to see how to use “PMB.
Touch [USB Connect] on the camcorder screen. When using Windows 7: The Device Stage* window opens. When using Windows XP/Windows Vista: The AutoPlay wizard is displayed. If the[USB Select] screen does not appear, (MENU) [Setup] touch [ (Connection)] [USB Connect]. * “Device Stage” is a menu of Windows 7, that is used to manage devices (camcorder, camera, etc.) that are connected to the computer. The license agreement screen appears. Select the desired language and click [OK].
Notes on “PMB Portable” You can download the URLs of some websites from a server administered by Sony (hereinafter referred to as the “Sony server”) using “PMB Portable.” You must agree to the following in order to utilize the image uploading service (herein after referred to as “the service”) provided by various websites including those using “PMB Portable.” Depending on the website, registration and fees may be required for use of the service.
Saving images with an external device Selecting a method for saving images with an external device You can save high definition image quality (HD) movies using an external device. Select the method to be used according to the device. External devices External media device Saving images on an external media device with high definition image quality (HD). DVDirect Express DVD writer Saving images on a DVD disc with high definition image quality (HD).
The types of media on which images are saved Refer to “Selecting the recording mode” on page 26. The devices on which the created disc can be played back DVD disc with high definition image quality (HD) AVCHD format playback devices, such as a Sony Blu-ray disc player or a PlayStation3. DVD disc with standard definition image quality (STD) Ordinary DVD playback devices, such as a DVD player. Notes Always maintain your PlayStation3 to use the latest version of the PlayStation3 system software.
Saving images on an external media device You can save movies and photos on an external media device (USB storage devices), such as an external hard disk drive. You can also play back images on the camcorder or another playback device. Notes For this operation, you need the USB Adaptor Cable VMC-UAM1 (sold separately). The USB Adaptor Cable VMC-UAM1 may not be available in some countries/regions. Connect your camcorder to the wall outlet (wall socket) using the supplied AC Adaptor (p. 13).
When connecting an external media device USB Adaptor Cable VMC-UAM1 (sold separately) 5 You cannot use the Built-in USB Cable for this type of connection. Connect the external media device and touch [Copy.] on the camcorder screen. HDR-CX690E: Movies and photos that are stored in the memory card (inserted in the camcorder), and that have not yet been saved on to external media device can be saved on the connected media device at this time.
Saving desired movies and photos You can save desired images in the camcorder to the external media device. Connect the camcorder to the external media device and touch [Play without copying.]. Event View of the external medium is displayed. (MENU) [Edit/ Touch Copy] [Copy] . You cannot copy images from an external media device to the internal recording medium on the camcorder. When you selected [Multiple Images], touch the image to be saved.
Touch [Copy images that have not been copied.]. . Touch Notes If your camcorder does not recognize the external media device, try the following operations. Reconnect the USB Adaptor Cable to your camcorder. If the external media device has the AC power cord (mains lead), connect it to the wall outlet (wall socket). Creating a disc with the DVD writer, DVDirect Express You can create a disc or play back the images on a created disc by using the DVD writer, DVDirect Express (sold separately).
3 Insert an unused disc into the DVD writer, and close the disc tray. 4 Press writer. 5 HDR-CX690E Movies that are stored in the memory card (inserted in the camcorder), and that have not yet been saved on any disc can be saved on the disc at this time. HDR-CX560E/CX560VE/CX700E/ CX700VE Movies that are stored on one of the camcorder’s recording media selected in [Media Select], and that have not yet been saved on any discs can be saved on the disc at this time.
Touch the movie you want to burn on the disc. appears. Remaining Disc capacity Play the created disc to make sure copying was performed correctly before deleting the movies on your camcorder. If [Failed.] or [DISC BURN failed.] appears on the screen, insert another disc into the DVD writer and perform the DISC BURN operation again. Tips Disc creation time to copy movies to the limit of the disc is about 20 to 60 minutes.
Insert a created disc into the DVD writer. The movies on the disc appear on the index screen on the camcorder. Press the play button on the DVD writer. You can also operate by the camcorder screen. After the operation is completed, touch on the camcorder screen and remove the disc when the tray is open. and disconnect the Use the USB cable to connect your camcorder to a disc creation device, which is compatible with high definition image quality (HD) movies, such as a Sony DVD writer.
3 If the [USB Select] screen does not appear, (MENU) [Setup] touch [ (Connection)] [USB Connect]. Touch [USB Connect] on the camcorder screen. 4 The displayed recording media differ depending on the model. Record movies on the connected device. 5 For details, refer to the instruction manuals supplied with the device to be connected. After the operation is completed, touch on the camcorder screen. 6 Disconnect the USB cable.
A/V Remote Connector 2 Connect your camcorder to the recording device (a disc recorder, etc.) with the A/V connecting cable (supplied) or an A/V connecting cable with S VIDEO (sold separately). Input S VIDEO VIDEO 3 Start playback on your camcorder, and record it on the recording device. (Yellow) (White) AUDIO (red) 4 Refer to the instruction manuals supplied with your recording device for details. When dubbing is finished, stop the recording device, and then your camcorder.
Customizing your camcorder Using menus You can enjoy using your camcorder more by making good use of menu operations. The camcorder has various menu items under each of 6 menu categories. Shooting Mode (Items for selecting a shooting mode) p. 55 Camera/Mic (Items for customized shooting) p. 55 Image Quality/Size (Items for setting up image quality or size) p. 56 Playback Function (Items for playback) p. 56 Edit/Copy (Items for editing) p. 57 Setup (Other setup items) p.
Menu lists Shooting Mode Movie........................................... Records movies. Photo............................................ Shoots photos. Smth Slw REC............................ Records fast moving subjects in slow-motion. Golf Shot..................................... Divides two seconds of fast movement into frames which are then recorded as a movie and photos. Camera/Mic Customizing your camcorder (Manual Settings) White Balance..................
(Face) Face Detection................ Adjusts the image quality of the face(s) automatically. Smile Shutter................... Automatically takes a shot whenever a smile is detected. Smile Sensitivity............. Sets the smile detection sensitivity using the smile shutter function. (Flash) Flash.................................... Sets how the flash is activated. Flash Level........................ Sets the brightness of flash. Red Eye Reduction......... Prevents redeye when shooting with flash.
Edit/Copy Delete.......................................... Deletes movies or photos. Protect......................................... Protects movies or photos to avoid deleting. Copy*3. ........................................ HDR-CX560E/CX560VE: Copies images from the selected internal recording medium to the inserted memory card. HDR-CX700E/CX700VE: Copies images back and forth between the selected internal recording medium and the inserted memory card. Direct Copy................................
(General Settings) Beep.................................... Sets whether the camcorder sounds operation beeps or not. LCD Brightness . ............. Adjusts the brightness of the LCD screen. Your Location*2............... Displays the current location on a map. GPS Setting*2................... Sets the GPS signal reception on or off. REC Lamp.......................... Sets the recording lamp to light up or not. Remote Ctrl......................
Getting detailed information from the “Handycam” Handbook The “Handycam” Handbook is a user guide designed to be read on a computer screen. The “Handycam” Handbook is intended to be read when you want to know more about operating your camcorder. 1 To install the “Handycam” Handbook on a Windows computer, place the supplied CD-ROM in the disc drive of your computer. To view the “Handycam” Handbook, double-click the short-cut icon on the computer screen. The installation screen appears.
Additional information Troubleshooting If you run into any problems using your camcorder, follow the steps below. Check the list (p. 60 to 62), and inspect your camcorder. Remove the power source, attach the power source again after about 1 minute, and turn the camcorder on. Press RESET (p. 75) using a pointed object, and turn the camcorder on. If you press RESET, all settings, including the clock setting, are reset. wall outlet (wall socket) (p. 13).
Total number of movie scenes or photos has exceeded the recordable capacity of your camcorder (p. 64). Delete unnecessary images (p. 35). The recording stops. The temperature of your camcorder is extremely high/low. Turn off your camcorder and leave it for a while in a cool/warm place. “PMB” cannot be installed. Check the computer environment or installation procedure required to install “PMB” (p. 37). “PMB” does not work correctly.
No memory card is inserted (p. 19). When the indicator flashes, there is not enough free space for recording images. Delete unnecessary images (p. 35), or format the memory card after storing the images on other media. The Image Database File is damaged. Check the data base file by touching (MENU) [Setup] [ (Media Settings)] [Repair Img. DB F.] the recording medium (HDR-CX560E/CX560VE/CX700E/ CX700VE). The memory card is damaged. Format the memory card with your camcorder (p. 57).
Recording time of movies/number of recordable photos “HD” stands for high definition image quality, and “STD” stands for standard image quality. Expected time of recording and playback with each battery pack Recording time Approximate time available when you use a fully charged battery pack.
Expected recording time of movies Internal recording media [Standard HDR-CX560E/CX560VE High definition image quality (HD) in h (hour) and m (minute) Recording mode Recording time ] [50p Quality [Highest Quality ] ] [High Quality [Standard ] [Long Time (5.
Memory card Expected number of recordable photos High definition image quality (HD) (unit: minute) 2 GB 9 (9) 10 (10) 10 (10) 25 (15) 4 GB 15 (15) 20 (20) 25 (25) 50 (35) 8 GB 35 (35) 40 (40) 60 (60) 105 (80) 16 GB 75 (75) 85 (85) 120 (120) 210 (160) 32 GB 150 (150) 180 (180) 245 (245) 430 (325) 5.1ch* 40 (35) 90 (70) 180 (150) 370 (300) 745 (610) 2ch* 45 (35) 90 (75) 190 (155) 380 (310) 770 (630) You can record the maximum 40,000 photos. Memory card 12.
Precautions On use and care Tips You can also use memory card with a capacity of under 1 GB for recording photos. The following list shows the bit rate, pixels and aspect ratio of each recording mode (movie + audio, etc.). High definition image quality (HD): PS: Max. 28 Mbps 1,920 1,080 pixels/16:9 FX: Max. 24 Mbps 1,920 1,080 pixels/16:9 FH: Approx. 17 Mbps (average) 1,920 1,080 pixels/16:9 HQ: Approx. 9 Mbps (average) 1,440 1,080 pixels/16:9 LP: Approx.
When disconnecting the power cord (mains lead), pull it by the plug and not the cord (lead). Do not damage the power cord (mains lead) such as by placing anything heavy on it. Do not use a deformed or damaged battery pack. Keep metal contacts clean. If the battery electrolytic liquid has leaked: Consult your local authorized Sony service facility. Wash off any liquid that may have contacted your skin. If any liquid gets in your eyes, wash with plenty of water and consult a doctor.
Specifications recommended that you perform [Empty] (See “Getting detailed information from the “Handycam” Handbook” on page 59.) to prevent the recovery of your data. Also, when you dispose of the camcorder, it is recommended that you destroy the actual body of the camcorder. Note on disposal/transfer of memory card Even if you delete data in the memory card or format the memory card on your camcorder or a computer, you may not delete data from the memory card completely.
Lens: G lens 10 (Optical)*2, 14 (Extended)*3, 120 (Digital) Filter diameter: 37 mm (1 1/2 in.) F1.8 ~ 3.4 Focal length: f=3.8 mm ~ 38.0 mm (5/32 in. ~ 1 1/2 in.) When converted to a 35 mm still camera For movies*2: 26.3 mm ~ 263 mm (1 1/16 in. ~ 10 3/8 in.) (16:9) For photos: 26.3 mm ~ 263 mm (1 1/16 in. ~ 10 3/8 in.
AC Adaptor AC-L200C/AC-L200D Power requirements: AC 100 V - 240 V, 50 Hz/60 Hz Current consumption: 0.35 A - 0.18 A Power consumption: 18 W Output voltage: DC 8.4 V* Operating temperature: 0 C to 40 C (32 °F to 104 °F) Storage temperature: –20 C to + 60 C (‒4 °F to +140 °F) Dimensions (approx.): 48 mm 29 mm 81 mm (1 15/16 in. 1 3/16 in. 3 1/4 in.) (w/h/d) excluding the projecting parts Mass (approx.): 170 g (6.
NAVTEQ and the NAVTEQ Maps logo are trademarks of NAVTEQ in the US and other countries. SDXC logo is a trademark of SD-3C, LLC. MultiMediaCard is a trademark of MultiMediaCard Association. All other product names mentioned herein may be the trademarks or registered trademarks of their respective companies. Furthermore, and are not mentioned in each case in this manual.
Quick reference Screen indicators Center Center Left Right Indicator Meaning [STBY]/[REC] Recording status Slide show set NightShot Bottom Left Indicator Warning Playback mode Right Indicator Meaning MENU button 50i Self-timer recording GPS triangulating status Wide Mode 60min Recording/playback/ editing media Fader [Face Detection] set to [Off] [Smile Shutter] set to [Off] Manual focus 0:00:00 Counter (hour:minute: second) 00Min Estimated recording remaining time Scene Selec
Parts and controls Indicator Meaning Figures in ( ) are reference pages. Spot Meter/Fcs/ Spot Meter/ Exposure EV AE Shift Shutter Speed IRIS Intelligent Auto Slide show button 101-0005 Data file name Protected image Flash/ Red Eye Reduction Indicators and their positions are approximate and may differ from what you actually see. Some indicators may not appear, depending on your camcorder model.
Lens (G lens) Attaching the lens hood (HDR-CX690E/ CX700E/CX700VE) Align the lens hood with the camcorder properly, then turn the securing ring of the lens hood in the direction of the arrow. When attaching the lens hood, align the opening section of the lens hood with the flash-emitting section of the camcorder properly. LCD screen/Touch panel If you rotate the LCD panel 180 degrees, you can close the LCD panel with the LCD screen facing out. This is convenient during playback operations.
(View Images) button (28) HDR-CX690E/CX700E/CX700VE NIGHTSHOT button (27) POWER button (15) (USB) jack (45, 48) HDMI OUT jack (32) RESET button Press RESET using a pointed object. Press RESET to initialize all the settings including the clock setting. Memory card access lamp (20) While the lamp is lit or flashing, the camcorder is reading or writing data.
Index A M T A/V connecting cable...........33, 53 Macintosh.....................................37 Maintenance.................................66 MANUAL dial.............................27 Media Select.................................18 Media Settings..............................18 Memory card................................19 “Memory Stick” media................19 “Memory Stick PRO-HG Duo” media.............................................19 “Memory Stick PRO Duo” media................................
Quick reference 77 GB
GB 78
GB Additional information on this product and answers to frequently asked questions can be found at our Customer Support Website. http://www.sony.net/ Printed on 70% or more recycled paper using VOC (Volatile Organic Compound)-free vegetable oil based ink.