filename[E:\SS2007\Models\DC2\2895959111\2895959111DAVHDX265-266267W\Cover\01cov-cel.
filename[E:\SS2007\Models\DC2\2895959111\2895959111DAVHDX265-266267W\gb02reg.fm] WARNING To reduce the risk of fire or electric shock, do not expose this apparatus to rain or moisture. Caution – The use of optical instruments with this product will increase eye hazard. Do not install the appliance in a confined space, such as a bookcase or built-in cabinet. To prevent fire, do not cover the ventilation of the apparatus with news papers, table-cloths, curtains, etc.
filename[E:\SS2007\Models\DC2\2895959111\2895959111DAVHDX265-266267W\gb02reg.fm] 11) Only use attachments/accessories specified by the manufacturer. 12) Use only with the cart, stand, tripod, bracket, or table specified by the manufacturer, or sold with the apparatus. When a cart is used, use caution when moving the cart/apparatus combination to avoid injury from tip-over. masterpage:Right specdef v20061206 Welcome! Thank you for purchasing Sony DVD Home Theatre System.
filename[E:\SS2007\Models\DC2\2895959111\2895959111DAVHDX265-266267W\gb02regTOC.fm] masterpage:Left specdef v20061206 Table of Contents Welcome!................................................3 About This Manual ................................. 6 This System Can Play the Following Discs ................................................. 7 Getting Started – BASIC – Step 1: Connecting the System and TV..............................................10 Step 2: Positioning the System ...
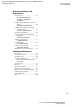
filename[E:\SS2007\Models\DC2\2895959111\2895959111DAVHDX265-266267W\gb02regTOC.fm] masterpage:Right specdef v20061206 Advanced Settings and Adjustments Locking Discs ....................................... 63 (CUSTOM PARENTAL CONTROL, PARENTAL CONTROL) Getting Optimal Surround Sound for a Room .............................................. 66 (SPEAKER FORMATION) Calibrating the Appropriate Settings Automatically ................................. 68 (AUTO CALIBRATION) Using the Setup Display..............
filename[E:\SS2007\Models\DC2\2895959111\2895959111DAVHDX265-266267W\gb03reg.fm] masterpage:Left specdef v20061206 1)MP3 (MPEG1 Audio Layer 3) is a standard format defined by ISO/MPEG which compresses audio data. About This Manual 2) • The instructions in this manual describe the controls on the remote. You can also use the controls on the unit if they have the same or similar names as those on the remote. • The instructions in this manual are for DAVHDX265, DAV-HDX266, and DAVHDX267W.
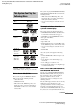
filename[E:\SS2007\Models\DC2\2895959111\2895959111DAVHDX265-266267W\gb03reg.fm] This System Can Play the Following Discs Format of discs Disc logo DVD VIDEO DVD-RW/ DVD-R DVD+RW/ DVD+R masterpage:Right specdef v20061206 The system can play DVD-ROMs/DVD+RWs/ DVD-RWs/DVD+Rs/DVD-Rs recorded in the following formats: – MP3 audio tracks, JPEG image files, and DivX video files* of format conforming to UDF (Universal Disc Format) * Except for United Kingdom and North American models.
filename[E:\SS2007\Models\DC2\2895959111\2895959111DAVHDX265-266267W\gb03reg.fm] view the disc by normal playback. Also some DATA CDs/DATA DVDs created in Packet Write format cannot be played. Music discs encoded with copyright protection technologies This product is designed to play back discs that conform to the Compact Disc (CD) standard. Recently, various music discs encoded with copyright protection technologies are marketed by some record companies.
filename[E:\SS2007\Models\DC2\2895959111\2895959111DAVHDX265-266267W\gb04gsb.fm] masterpage:Right specdef v20061206 Getting Started – BASIC – Inserting batteries into the remote You can control the system using the supplied remote. Insert two R6 (size AA) batteries by matching the 3 and # ends on the batteries to the markings inside the compartment. To use the remote, point it at the remote sensor on the unit. Note • Do not leave the remote in an extremely hot or humid place.
filename[E:\SS2007\Models\DC2\2895959111\2895959111DAVHDX265-266267W\gb04gsb.fm] masterpage:Left specdef v20061206 Getting Started – BASIC – Step 1: Connecting the System and TV The following is the basic connection of the unit to the speakers and TV. For other TV connections, see page 20. For other component connection, see page 24. To accept progressive signals, see page 22. To change the color system (PAL or NTSC), see page 13.
filename[E:\SS2007\Models\DC2\2895959111\2895959111DAVHDX265-266267W\gb04gsb.fm] masterpage:Right specdef v20061206 Tip 1 Connecting the Speakers Required cords The connector and color tube of the speaker cords are the same color as the label of the jacks to be connected. To the SPEAKER jack Color tube (+) (–) Note • Do not catch the speaker cord insulation in the SPEAKER jack. To avoid short-circuiting the speakers Short-circuiting of the speakers may damage the system.
filename[E:\SS2007\Models\DC2\2895959111\2895959111DAVHDX265-266267W\gb04gsb.fm] masterpage:Left specdef v20061206 Getting Started – BASIC – 2 Connecting the TV Required cords A Video cord . Yellow B Audio cord (not supplied) White (L/audio) Red (R/audio) Tip • When you want to output the TV sound or stereo sound of a 2 channel source from the 6 speakers, select the “Dolby Pro Logic,” “Dolby Pro Logic II MOVIE,” or “Dolby Pro Logic II MUSIC” sound field (page 30).
filename[E:\SS2007\Models\DC2\2895959111\2895959111DAVHDX265-266267W\gb04gsb.fm] masterpage:Right specdef v20061206 To connect the FM wire antenna (aerial) Connect the FM wire antenna (aerial) to the FM 75 Ω COAXIAL jack. Getting Started – BASIC – FM wire antenna (aerial) (supplied) FM wire antenna (aerial) (supplied) or FM 75 Ω COAXIAL jack FM 75 Ω COAXIAL jack Note • Be sure to fully extend the FM wire antenna (aerial).
Getting Started – BASIC – filename[E:\SS2007\Models\DC2\2895959111\2895959111DAVHDX265-266267W\gb04gsb.fm] Step 2: Positioning the System masterpage:Left specdef v20061206 Tip • When you change the positions of the speakers, it is recommended that you change the settings. For details, see “Getting Optimal Surround Sound for a Room” (page 66) and “Calibrating the Appropriate Settings Automatically” (page 68).
filename[E:\SS2007\Models\DC2\2895959111\2895959111DAVHDX265-266267W\gb04gsb.fm] LANGUAGE SETUP OSD: MENU: AUDIO: SUBTITLE: ENGLISH ENGLISH FRENCH SPANISH PORTUGUESE Follow the steps below to make the minimum number of basic adjustments for using the system. "/1 5 Press X/x to select a language. The system displays the menu and subtitles in the selected language. 6 Press . The Setup Display for selecting the aspect ratio of the TV to be connected appears.
filename[E:\SS2007\Models\DC2\2895959111\2895959111DAVHDX265-266267W\gb04gsb.fm] 12 Press Note Getting Started – BASIC – masterpage:Left specdef v20061206 • When the wireless kit WAHT-SD1 (supplied with DAV-HDX267W only) is installed, [STANDARD (WIRELESS)] appears instead. . AUTO CALIBRATION Connect calibration mic. Start measurement? 10 Press . 11 Connect the calibration mic to the YES NO A.CAL MIC jack on the front panel and press X/x to select [YES].
filename[E:\SS2007\Models\DC2\2895959111\2895959111DAVHDX265-266267W\gb04gsb.fm] masterpage:Right specdef v20061206 Tip Getting Started – BASIC – • If you change the position of the speakers, reset the speaker settings. See “Getting Optimal Surround Sound for a Room” (page 66) and “Calibrating the Appropriate Settings Automatically” (page 68). • If you want to change any of the settings, see “Using the Setup Display” (page 70).
filename[E:\SS2007\Models\DC2\2895959111\2895959111DAVHDX265-266267W\gb05gsa.fm] Getting Started – ADVANCED – Setting the demonstration mode to on/off 1 2 Turning off the Demonstration 3 "/1 X/x/c, Press SYSTEM MENU. Press X/x repeatedly until “DEMO” appears in the front panel display, then press or c. Press X/x to select a setting. The default setting is underlined. • “DEMO ON”: sets the demonstration mode to on. • “DEMO OFF”: sets the demonstration mode to off.
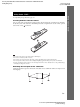
filename[E:\SS2007\Models\DC2\2895959111\2895959111DAVHDX265-266267W\gb05gsa.fm] masterpage:Right specdef v20061206 For the other speakers Installing the Speakers on a Wall 6 to 9 mm (1/4 to 3/8 inch) Installing the speakers on a wall 1 Prepare screws (not supplied) that are suitable for the hole on the back of each speaker. See the illustrations below. 3 Hang the speakers on the screws. 4.
filename[E:\SS2007\Models\DC2\2895959111\2895959111DAVHDX265-266267W\gb05gsa.fm] masterpage:Left specdef v20061206 Connecting the TV (Advanced) Sends the played back DVD image to the connected TV. Check the jacks of your TV, and choose connection method A, B, C, or D. Picture quality improves in order from A (standard) to D (HDMI).
filename[E:\SS2007\Models\DC2\2895959111\2895959111DAVHDX265-266267W\gb05gsa.fm] masterpage:Right specdef v20061206 A To connect to a TV with the VIDEO IN jack Connect the video cord. . Yellow Connect an S video cord (not supplied). To use the S video jack instead of the video jack, your TV monitor must also be connected via an S video jack. S video signals are on a separate bus from the video signals and will not be output through the video jack.
filename[E:\SS2007\Models\DC2\2895959111\2895959111DAVHDX265-266267W\gb05gsa.fm] 2 masterpage:Left specdef v20061206 Press VIDEO FORMAT. The current type of video signals appears in the front panel display. Each time you press VIDEO FORMAT, the display changes as follows: t 720 × 480p* r 1280 × 720p* r 720 × 480p* r 1920 × 1080i* • “720 × 480p*”: Sends 720 × 480p video signals.** • “1280 × 720p*”: Sends 1280 × 720p video signals. • “1920 × 1080i*”: Sends 1920 × 1080i video signals.
filename[E:\SS2007\Models\DC2\2895959111\2895959111DAVHDX265-266267W\gb05gsa.fm] 2 masterpage:Right specdef v20061206 Press VIDEO FORMAT. The current signal appears in the front panel display. Each time you press VIDEO FORMAT, the display changes as follows: t NORMAL (INTERLACE) x NORMAL (INTERLACE) Select this setting when: – your TV does not accept progressive signals, or, – your TV is connected to jacks other than the COMPONENT VIDEO OUT jacks (MONITOR OUT (VIDEO/S VIDEO)).
filename[E:\SS2007\Models\DC2\2895959111\2895959111DAVHDX265-266267W\gb05gsa.fm] masterpage:Left specdef v20061206 Connecting Other Components You can enjoy sound using the speakers of this system by connecting the AUDIO OUT jacks of another component. For video connection of other components, connect directly to the TV.
filename[E:\SS2007\Models\DC2\2895959111\2895959111DAVHDX265-266267W\gb05gsa.fm] masterpage:Right specdef v20061206 To listen to the portable audio source sound through the system Connect the audio output jacks of the portable audio source to the AUDIO IN jack on the front panel of the unit with the stereo mini-plug cord (not supplied).
filename[E:\SS2007\Models\DC2\2895959111\2895959111DAVHDX265-266267W\gb06bas.fm] 4 Basic Operations Playing Discs 5 6 Disc tray Press A. Load a disc. Place one disc on the tray, and then press A. Adjust the volume A Press DISC 1-5. Press the button of the disc number you want. When no disc is in the disc stocker you selected, “NO DISC” appears. Perform next Step while “*DISC-1* (eg., 2-5)” flashes.
filename[E:\SS2007\Models\DC2\2895959111\2895959111DAVHDX265-266267W\gb06bas.fm] masterpage:Right specdef v20061206 To Press Go back to the preceding chapter, track, or scene . (except for JPEG) Turn off the sound temporarily MUTING. To cancel, press it again or VOLUME + to adjust the sound volume. To save the power in standby mode Press "/1 while the system turns on. To cancel standby mode, press "/1 once.
filename[E:\SS2007\Models\DC2\2895959111\2895959111DAVHDX265-266267W\gb06bas.fm] Basic Operations Enjoying the Radio or Other Components FUNCTION Changing the input level of the sound from connected components Distortion may occur when listening to a component connected to the TV/VIDEO jacks on the rear panel or to the AUDIO IN jack on the front panel. This is not a malfunction and will depend on the component connected.
filename[E:\SS2007\Models\DC2\2895959111\2895959111DAVHDX265-266267W\gb06bas.fm] masterpage:Right specdef v20061206 Selecting the Movie or Music Mode You can enjoy TV or VCR sound from all the speakers in this system. For details, see “Step 1: Connecting the System and TV” (page 10), “Connecting the TV (Advanced)” (page 20), and “Connecting Other Components” (page 24). You can choose a suitable sound mode for movies or music.
filename[E:\SS2007\Models\DC2\2895959111\2895959111DAVHDX265-266267W\gb07sou.fm] masterpage:Left specdef v20061206 Automatic outputting of the original sound Sound Adjustments Enjoying Surround Sound by Using Sound Field You can take advantage of surround sound simply by selecting one of the system’s preprogrammed sound fields. They bring exciting and powerful sound of movie theaters into your home.
filename[E:\SS2007\Models\DC2\2895959111\2895959111DAVHDX265-266267W\gb07sou.fm] masterpage:Right specdef v20061206 • When the bilingual broadcast sound is input, Dolby Pro Logic and Dolby Pro Logic II MOVIE/MUSIC are not effective. Using only the front speaker and subwoofer x 2 CHANNEL STEREO Sound Adjustments This mode outputs the sound from the front left and right speakers and subwoofer. Standard 2 channel (stereo) sources completely bypass the sound field processing.
filename[E:\SS2007\Models\DC2\2895959111\2895959111DAVHDX265-266-267W\gb08pla.fm] masterpage:Left specdef v20061206 Opposite direction Various Functions for Playing Discs ×2b t 1m t 2m t 3m Searching for a Particular Point on a Disc 3m (DVD VIDEO/DVD-VR mode/DivX video*/ VIDEO CD only) ×2b (DVD VIDEO only) (Scan, Slow-motion Play, Freeze Frame) * Except for United Kingdom and North American models. With each press, playback speed becomes faster.
filename[E:\SS2007\Models\DC2\2895959111\2895959111DAVHDX265-266-267W\gb08pla.fm] masterpage:Right specdef v20061206 Searching for a Title/ Chapter/Track/Scene, etc. 1 Press DISPLAY. (When playing a DATA CD/DATA DVD with JPEG image files, press DISPLAY twice.) The Control Menu display appears. 2 Press 12(27) (34) T 1:32:55 4 [TITLE], [TRACK], [SCENE] [CHAPTER], [INDEX] If you make a mistake Cancel the number by pressing CLEAR, then select another number.
filename[E:\SS2007\Models\DC2\2895959111\2895959111DAVHDX265-266-267W\gb08pla.fm] masterpage:Left specdef v20061206 Searching by Scene (Picture Navigation) You can divide the TV screen into 9 subscreens and find the desired scene quickly. 1 Resuming Playback from the Point Where You Stopped the Disc (Resume Play) Press PICTURE NAVI during playback. The following display appears. CHAPTER VIEWER 2 ENTER Press PICTURE NAVI repeatedly to select an item.
filename[E:\SS2007\Models\DC2\2895959111\2895959111DAVHDX265-266-267W\gb08pla.fm] masterpage:Right specdef v20061206 Tip • To play from the beginning of the disc, press x twice, then press H. To enjoy a disc that is played before by resume playback (Multi-disc Resume) (DVD VIDEO, VIDEO CD only) (Program Play) You can play the contents of a disc in the order you want by arranging the order of the tracks on the disc to create your own program. You can program up to 99 tracks.
filename[E:\SS2007\Models\DC2\2895959111\2895959111DAVHDX265-266-267W\gb08pla.fm] masterpage:Left specdef v20061206 4 Press c. To change or cancel a program The cursor moves to the track row [T] (in this case, [01]). 1 Follow steps 1 to 3 of “Creating Your Own Program.” 2 Select the program number of the track you want to change or cancel using X/x. PROGRAM ALL CLEAR 1. TRACK – – 2. TRACK – – 3. TRACK – – 4. TRACK – – 5. TRACK – – 6. TRACK – – 7.
filename[E:\SS2007\Models\DC2\2895959111\2895959111DAVHDX265-266-267W\gb08pla.fm] masterpage:Right specdef v20061206 Playing in Random Order (Shuffle Play) Note • Same song may be played repeatedly during MP3 playback. • You can shuffle the tracks on the current disc only. Press DISPLAY repeatedly until the Control Menu display is turned off. Note • You cannot use this function with VIDEO CDs and Super VCDs with PBC playback.
filename[E:\SS2007\Models\DC2\2895959111\2895959111DAVHDX265-266-267W\gb08pla.fm] masterpage:Left specdef v20061206 x When playing a DATA CD or DATA DVD Playing Repeatedly • [OFF]: does not play repeatedly. • [ALL DISCS]: repeats all of the discs. • [ONE DISC]: repeats all of the albums on the current disc. • [ALBUM]: repeats the current album. • [TRACK] (MP3 audio tracks only): repeats the current track. • [FILE] (DivX video files only): repeats the current file.
filename[E:\SS2007\Models\DC2\2895959111\2895959111DAVHDX265-266-267W\gb08pla.fm] masterpage:Right specdef v20061206 Using the DVD’s Menu 1 Press DVD TOP MENU or DVD MENU. The disc’s menu appears on the TV screen. The contents of the menu vary from disc to disc. 2 3 Press C/X/x/c or the number buttons to select the item you want to play or change.
filename[E:\SS2007\Models\DC2\2895959111\2895959111DAVHDX265-266-267W\gb08pla.fm] masterpage:Left specdef v20061206 x When playing a DVD-VR The types of sound tracks recorded on a disc are displayed. The default setting is underlined. Example: • [1: MAIN] (main sound) • [1: SUB] (sub sound) • [1: MAIN+SUB] (main and sub sound) • [2: MAIN] • [2: SUB] • [2: MAIN+SUB] Note • [2: MAIN], [2: SUB], and [2: MAIN+SUB] do not appear when one audio stream is recorded on the disc.
filename[E:\SS2007\Models\DC2\2895959111\2895959111DAVHDX265-266-267W\gb08pla.fm] masterpage:Right specdef v20061206 x When playing a DATA CD (DivX video) or DATA DVD (DivX video) (except for United Kingdom and North American models) Example: MP3 audio Selecting [ORIGINAL] or [PLAY LIST] on a DVD-R/ DVD-RW 1: MP3 128k Bit rate About audio signals 1 Press DISPLAY when the system is in stop mode. The Control Menu display appears. 2 Press X/x to select PLAY LIST], then press [ORIGINAL/ .
filename[E:\SS2007\Models\DC2\2895959111\2895959111DAVHDX265-266-267W\gb08pla.fm] masterpage:Left specdef v20061206 Viewing Information About the Disc When playing a VIDEO CD (without PBC functions) or CD 1 Playing time of the current track 2 Remaining time of the current track 3 Playing time of the disc 4 Remaining time of the disc 5 Disc name 6 Track and index* Viewing the playing time and remaining time in the front panel display * VIDEO CD only.
filename[E:\SS2007\Models\DC2\2895959111\2895959111DAVHDX265-266-267W\gb08pla.fm] masterpage:Right specdef v20061206 2 Press DISPLAY repeatedly to change the time information. The display and the kinds of time that you can check depend on the disc you are playing.
filename[E:\SS2007\Models\DC2\2895959111\2895959111DAVHDX265-266-267W\gb08pla.fm] masterpage:Left specdef v20061206 Checking the date information Changing the Angles (JPEG only) You can check the date information during playback when the Exif* tag is recorded in the JPEG image data. Press DISPLAY twice during playback. The Control Menu display appears. 1(8) 1(20) 01/ 31/ 2007 If various angles (multi-angles) for a scene are recorded on a DVD VIDEO, you can change the viewing angle.
filename[E:\SS2007\Models\DC2\2895959111\2895959111DAVHDX265-266-267W\gb08pla.fm] masterpage:Right specdef v20061206 Displaying the Subtitles * * * Except for United Kingdom and North American models. If subtitles are recorded on a disc, you can turn the subtitles on or off while playing. If multilingual subtitles are recorded on the disc, you can change the subtitle language while playing, or turn the subtitles on or off whenever you want.
filename[E:\SS2007\Models\DC2\2895959111\2895959111DAVHDX265-266-267W\gb08pla.fm] masterpage:Left specdef v20061206 About MP3 Audio Tracks and JPEG Image Files What is MP3/JPEG? MP3 is audio compression technology that satisfies the ISO/MPEG regulations. JPEG is image compression technology. Discs that the system can play You can play back DATA CDs (CD-ROMs/CDRs/CD-RWs) or DATA DVDs (DVD-Rs/DVDRWs/DVD+Rs/DVD+RWs/DVD-ROMs) recorded in MP3 (MPEG1 Audio Layer 3) or JPEG format.
filename[E:\SS2007\Models\DC2\2895959111\2895959111DAVHDX265-266-267W\gb08pla.fm] masterpage:Right specdef v20061206 Playback order of MP3 audio tracks or JPEG image files The playback order of MP3 audio tracks or JPEG image files recorded on a DATA CD or DATA DVD is as follows: Tip • If you add numbers (01, 02, 03, etc.) to the front of the track (or file) names when you store the tracks (or files) in a disc, the tracks (or files) will be played in that order.
filename[E:\SS2007\Models\DC2\2895959111\2895959111DAVHDX265-266-267W\gb08pla.fm] masterpage:Left specdef v20061206 Playing DATA CDs or DATA DVDs with MP3 Audio Tracks and JPEG Image Files Selecting an MP3 audio track or album 1 Load a DATA CD or DATA DVD. The albums recorded on the DATA CD or DATA DVD appear. When an album is being played, its title is shaded. 3( 30) ROCK BEST HIT KARAOKE MY FAVOURITE SONG R&B JAZZ CLASSIC SALSA OF CUBA BOSSA NOVA 2 To stop playback Press x.
filename[E:\SS2007\Models\DC2\2895959111\2895959111DAVHDX265-266-267W\gb08pla.fm] masterpage:Right specdef v20061206 2 Press X/x to select an album. To rotate a JPEG image x When selecting an album When a JPEG image file is displayed on the TV screen, you can rotate the image by 90 degrees. Press X/x while viewing an image. Each time you press X, the image rotates counterclockwise by 90 degrees. Example of when you press X once: Press H to start playing the selected album.
filename[E:\SS2007\Models\DC2\2895959111\2895959111DAVHDX265-266-267W\gb08pla.fm] masterpage:Left specdef v20061206 Playing Audio Tracks and Images as a Slide Show with Sound 7 Press X/x to select the album you want and press H. The system starts playing the selected album. You can turn the album list on and off by pressing DVD MENU repeatedly. Tip You can play a slide show with sound by first placing both MP3 and JPEG files in the same album on a DATA CD or DATA DVD.
filename[E:\SS2007\Models\DC2\2895959111\2895959111DAVHDX265-266-267W\gb08pla.fm] masterpage:Right specdef v20061206 3 Press X/x to select a setting. 3 The default setting is underlined. • [NORMAL]: sets the duration to about 6 to 9 seconds. • [FAST]: sets the duration shorter than [NORMAL]. • [SLOW1]: sets the duration longer than [NORMAL]. • [SLOW2]: sets the duration longer than [SLOW1]. 4 Press . 4 Press .
filename[E:\SS2007\Models\DC2\2895959111\2895959111DAVHDX265-266-267W\gb08pla.fm] masterpage:Left specdef v20061206 Enjoying DivX® Videos (Except for United Kingdom and North American models) About DivX Video Files DivX® is a video file compression technology, developed by DivX, Inc. This product is an official DivX® Certified product. You can play DATA CDs and DATA DVDs that contain DivX® video files.
filename[E:\SS2007\Models\DC2\2895959111\2895959111DAVHDX265-266-267W\gb08pla.fm] masterpage:Right specdef v20061206 3 Press H. The system starts playing the selected album. To select DivX video files, see “Selecting a DivX video file” (page 53). To go to the next or previous page Press C/c. To turn off the display Press DVD MENU repeatedly. You can select the next or previous DivX video file in the same album by pressing ./>.
filename[E:\SS2007\Models\DC2\2895959111\2895959111DAVHDX265-266-267W\gb08pla.fm] masterpage:Left specdef v20061206 Playing VIDEO CDs with PBC Functions (Ver.2.0) (PBC Playback) With PBC (Playback Control) functions, you can enjoy simple interactive operations, search functions, and other such operations. PBC playback allows you to play VIDEO CDs interactively by following the menu on the TV screen. 1 Start playing a VIDEO CD with PBC functions. The menu for your selection appears.
filename[E:\SS2007\Models\DC2\2895959111\2895959111DAVHDX265-266267W\gb09rad.fm] masterpage:Right specdef v20061206 To change the preset number Tuner Functions Presetting Radio Stations You can preset 20 FM stations, and 10 AM stations. Before tuning, make sure to turn down the volume to minimum. 1 2 Press FUNCTION repeatedly until “TUNER FM” or “TUNER AM” appears in the front panel display. Press and hold TUNING + or – until the auto scanning starts.
filename[E:\SS2007\Models\DC2\2895959111\2895959111DAVHDX265-266267W\gb09rad.fm] Listening to the Radio Preset radio stations in the system’s memory first (see “Presetting Radio Stations” (page 55)). 1 Press FUNCTION repeatedly until “TUNER FM” or “TUNER AM” appears in the front panel display. masterpage:Left specdef v20061206 If an FM program is noisy If an FM program is noisy, you can select monaural reception. There will be no stereo effect, but reception will improve. 1 2 Press SYSTEM MENU.
filename[E:\SS2007\Models\DC2\2895959111\2895959111DAVHDX265-266267W\gb09rad.fm] 6 masterpage:Right specdef v20061206 Create a name by using the cursor buttons. Press X/x to select a character, then press c to move the cursor to the next position. Letters, numbers, and other symbols can be input for a radio station. If you make a mistake Press C/c repeatedly until the character to be changed flashes, then press X/x to select the desired character.
filename[E:\SS2007\Models\DC2\2895959111\2895959111DAVHDX265-266-267W\gb10oth.fm] masterpage:Left specdef v20061206 Other Operations Controlling the TV with the Supplied Remote You can control your TV (Sony only) with the supplied remote. Controlling TVs with the remote You can control the TV by using following buttons. By pressing You can TV [/1 Turn the TV on or off. TV INPUT Switch the TV’s input source between the TV and other input sources. TV VOL +/– Adjust the TV volume.
filename[E:\SS2007\Models\DC2\2895959111\2895959111DAVHDX265-266-267W\gb10oth.fm] masterpage:Right specdef v20061206 Operating the THEATRE SYNC function Using the Sound Effect Point the remote to the direction of TV and this unit, then press THEATRE SYNC once. Reinforcing bass frequencies If this function does not work, change the transmit time. The transmit time varies depending on the TV. You can reinforce bass frequencies.
filename[E:\SS2007\Models\DC2\2895959111\2895959111DAVHDX265-266-267W\gb10oth.fm] masterpage:Left specdef v20061206 Using the Sleep Timer You can set the system to turn off at a preset time, so you can fall asleep listening to music. You can preset the time in 1 or 10-minutes increments. 1 2 3 Press SYSTEM MENU. Press X/x repeatedly until “SLEEP” appears in the front panel display, then press or c. Press X/x to select a setting.
filename[E:\SS2007\Models\DC2\2895959111\2895959111DAVHDX265-266-267W\gb10oth.fm] masterpage:Right specdef v20061206 Using the DIGITAL MEDIA PORT Adapter The DIGITAL MEDIA PORT (DMPORT) adapter is for enjoying sound from a portable audio source or computer. By connecting a DIGITAL MEDIA PORT adapter, you can enjoy sound from the connected component on the system. Available DIGITAL MEDIA PORT adapters vary in each area.
filename[E:\SS2007\Models\DC2\2895959111\2895959111DAVHDX265-266-267W\gb10oth.fm] masterpage:Left specdef v20061206 Deactivating the Buttons on the Unit (Child Lock) To insert a disc while the child lock function is on Press Z on the remote to open the disc tray and press DISC SKIP repeatedly until the desired DISC indicator (1-5) lights up, then place a disc on the tray and press Z on the remote.
filename[E:\SS2007\Models\DC2\2895959111\2895959111DAVHDX265-266267W\gb11adv.fm] 4 Advanced Settings and Adjustments masterpage:Right specdef v20061206 Press X/x to select [ON t], then press . x If you have not entered a password The display for registering a new password appears. Locking Discs (CUSTOM PARENTAL CONTROL, PARENTAL CONTROL) PARENTAL CONTROL Enter a new 4-digit password, then press ENTER . You can set two kinds of playback restrictions for the desired disc.
filename[E:\SS2007\Models\DC2\2895959111\2895959111DAVHDX265-266267W\gb11adv.fm] To play a disc for which Custom Parental Control is set 1 2 Insert the disc for which Custom Parental Control is set. masterpage:Left specdef v20061206 Press X/x to select [PARENTAL CONTROL], then press . The options for [PARENTAL CONTROL] appear. The [CUSTOM PARENTAL CONTROL] display appears. 12(27) 18(34) T 1:32:55 DVD VIDEO CUSTOM PARENTAL CONTROL OFF ON PLAYER PASSWORD Custom parental control is already set.
filename[E:\SS2007\Models\DC2\2895959111\2895959111DAVHDX265-266267W\gb11adv.fm] 4 Enter or re-enter your 4-digit password using the number buttons, then press . 8 masterpage:Right specdef v20061206 Press X/x to select the level you want, then press . Parental Control setting is complete. The display for setting the playback limitation level appears. PARENTAL CONTROL LEVEL: STANDARD: PARENTAL CONTROL LEVEL: STANDARD: 4: PG13 USA OFF USA The lower the value, the stricter the limitation.
filename[E:\SS2007\Models\DC2\2895959111\2895959111DAVHDX265-266267W\gb11adv.fm] Changing the password 1 Press DISPLAY while the system is in stop mode. The Control Menu display appears. 2 Press X/x to select [PARENTAL CONTROL], then press . The options for [PARENTAL CONTROL] appear. 3 Press X/x to select [PASSWORD t], then press . The display for entering the password appears. 4 5 6 Enter your 4-digit password using the number buttons, then press .
filename[E:\SS2007\Models\DC2\2895959111\2895959111DAVHDX265-266267W\gb11adv.fm] 5 Press C/c to select a setting. • [STANDARD]: when installing all the speakers normally. Note • When the wireless kit WAHT-SD1 (supplied with DAV-HDX267W only) is installed, [STANDARD (WIRELESS)] appears instead. For details, see the operating instructions of the WAHT-SD1. masterpage:Right specdef v20061206 • [ALL FRONT]: when installing all the speakers in front of the listening position.
filename[E:\SS2007\Models\DC2\2895959111\2895959111DAVHDX265-266267W\gb11adv.fm] Tip • When the wireless kit WAHT-SD1 (supplied with DAV-HDX267W only) is installed, [STANDARD (WIRED)] appears. For details, see the operating instructions of the WAHTSD1. masterpage:Left specdef v20061206 Calibrating the Appropriate Settings Automatically (AUTO CALIBRATION) D. C. A. C. (Digital Cinema Auto Calibration) can set the appropriate surround sound automatically.
filename[E:\SS2007\Models\DC2\2895959111\2895959111DAVHDX265-266267W\gb11adv.fm] Connect the calibration mic to the A.CAL MIC jack on the front panel, and set it up at the ear level using a tripod, etc. (not supplied). The front of each speaker should face the calibration mic, and there should be no obstruction between the speakers and the calibration mic. Be quiet during the measurement.
filename[E:\SS2007\Models\DC2\2895959111\2895959111DAVHDX265-266267W\gb11adv.fm] Note • While the Auto Calibration function works: – do not turn off the power. – do not press any button. – do not change the volume. – do not change the function. – do not change the disc. – do not insert or eject a disc. – do not connect the headphones. – do not disconnect the calibration mic. • The measurement for [SUBWOOFER] is always [YES] since the system does not perform subwoofer calibration.
filename[E:\SS2007\Models\DC2\2895959111\2895959111DAVHDX265-266267W\gb11adv.fm] 4 Press X/x to select the setup item from the displayed list: [LANGUAGE SETUP], [SCREEN SETUP], [CUSTOM SETUP], or [SPEAKER SETUP]. Then press . To reset all of the [SETUP] settings 1 2 The Setup item is selected. Example: [SCREEN SETUP] SCREEN SETUP TV TYPE: SCREEN SAVER: BACKGROUND: 4:3 OUTPUT: 16:9 ON JACKET PICTURE FULL Select [RESET] in Step 3 and press . Select [YES] using X/x.
filename[E:\SS2007\Models\DC2\2895959111\2895959111DAVHDX265-266267W\gb11adv.fm] Setting the Display or Sound Track Language [LANGUAGE SETUP] [LANGUAGE SETUP] allows you to set various languages for the on-screen display or sound track. Select [LANGUAGE SETUP] in the Setup Display. For details, see “Using the Setup Display” (page 70). LANGUAGE SETUP OSD: MENU: AUDIO: SUBTITLE: masterpage:Left specdef v20061206 Settings for the Display [SCREEN SETUP] Choose settings according to the TV to be connected.
filename[E:\SS2007\Models\DC2\2895959111\2895959111DAVHDX265-266267W\gb11adv.fm] masterpage:Right specdef v20061206 Note [16:9] • You cannot change the color system of the disc itself. • You can change the color system of this system according to the connected TV (page 13).
filename[E:\SS2007\Models\DC2\2895959111\2895959111DAVHDX265-266267W\gb11adv.fm] x [BLACK LEVEL (COMPONENT OUT)] (North American and Latin American models only) Selects the black level (setup level) for the video signals output from the COMPONENT VIDEO OUT jacks. You cannot select this and the setting is not effective when the system outputs progressive signal. [OFF] Sets the black level of the output signal to the standard level. [ON] Raise the standard black level.
filename[E:\SS2007\Models\DC2\2895959111\2895959111DAVHDX265-266267W\gb11adv.fm] masterpage:Right specdef v20061206 x [TRACK SELECTION] (DVD VIDEO only) x [AUDIO (HDMI)] Gives the sound track which contains the highest number of channels priority when you play a DVD VIDEO on which multiple audio formats (PCM, DTS, MPEG audio, or Dolby Digital format) are recorded. Selects the audio output status from the HDMI OUT jack. [OFF] No priority given. [AUTO] Priority given.
filename[E:\SS2007\Models\DC2\2895959111\2895959111DAVHDX265-266267W\gb11adv.fm] Settings for the Speakers [SPEAKER SETUP] To obtain the best possible surround sound, set connection of the speakers and their distance from your listening position. Then use the test tone to adjust the level and the balance of the speakers to the same level. masterpage:Left specdef v20061206 Note • When you change the [CONNECTION] setting, the [SPEAKER FORMATION] setting returns to [STANDARD].
filename[E:\SS2007\Models\DC2\2895959111\2895959111DAVHDX265-266267W\gb11adv.fm] masterpage:Right specdef v20061206 [SUBWOOFER] +2.0 dB Set this between –6.0 dB and +6.0 dB. x [LEVEL (SURROUND)] You can vary the level of surround speakers as follows. Be sure to set [TEST TONE] to [ON] for easy adjustment. 0.0 - 7.0 m2)/ 0 - 23 ft [L/R] 0.0 dB (appears when you set [SURROUND] to [YES] in the [CONNECTION] setting.) Set this between –6.0 dB and +6.0 dB.
filename[E:\SS2007\Models\DC2\2895959111\2895959111DAVHDX265-266267W\gb11adv.fm] 5 6 Press X/x repeatedly to select [TEST TONE], then press or c. Press X/x repeatedly to select [ON], then press . You will hear the test tone from each speaker in sequence. 7 masterpage:Left specdef v20061206 Returning to the Default Settings You can return the system parameters, such as preset stations, to the default settings.
filename[E:\SS2007\Models\DC2\2895959111\2895959111DAVHDX265-266267W\gb12add.fm] masterpage:Right specdef v20061206 On adjusting volume Additional Information Precautions • Do not turn up the volume while listening to a section with very low level inputs or no audio signals. If you do, the speakers may be damaged when a peak level section is suddenly played. On power sources On cleaning • Unplug the unit from the wall outlet if you do not intend to use it for an extended period of time.
filename[E:\SS2007\Models\DC2\2895959111\2895959111DAVHDX265-266267W\gb12add.fm] Notes about the Discs On handling discs • To keep the disc clean, handle the disc by its edge. Do not touch the surface. • Do not stick paper or tape on the disc. masterpage:Left specdef v20061206 Troubleshooting If you experience any of the following difficulties while using the system, use this troubleshooting guide to help remedy the problem before requesting repairs.
filename[E:\SS2007\Models\DC2\2895959111\2895959111DAVHDX265-266267W\gb12add.fm] Picture noise appears. • The disc is dirty or flawed. • If the picture output from your system goes through your VCR to get to your TV, the copyprotection signal applied to some DVD programs could affect picture quality. If you still experience problems even when you connect your unit directly to your TV, try connecting your unit to your TV’s S video input (page 20).
filename[E:\SS2007\Models\DC2\2895959111\2895959111DAVHDX265-266267W\gb12add.fm] The sound loses stereo effect when you play a VIDEO CD, a CD, or an MP3. • Set [AUDIO] to [STEREO] by pressing AUDIO (page 39). • Make sure the unit is connected properly. The surround effect is difficult to hear when you are playing a Dolby Digital, DTS, or MPEG audio sound track. • Make sure the sound field function is on (page 30). • Check the speaker connections and settings (page 10, 76).
filename[E:\SS2007\Models\DC2\2895959111\2895959111DAVHDX265-266267W\gb12add.fm] • • • • Progressive JPEG which is mainly used on the Internet WEB site. It does not fit the TV screen (those images are reduced). The [MODE (MP3, JPEG)] setting has been set to [AUDIO (MP3)] (page 50). If you cannot change the [MODE (MP3, JPEG)] setting, re-load the disc or turn the system off, then on. The DATA CD/DATA DVD contains a DivX video file (except for United Kingdom and North American models).
filename[E:\SS2007\Models\DC2\2895959111\2895959111DAVHDX265-266267W\gb12add.fm] The unit does not work and “CHILD LOCK” appears in the front panel display when you press any button on the unit. • Set the child lock function to off (page 62). The HDMI CONTROL function does not work. • When “HDMI” does not light up in the front panel display, check the HDMI connection (page 20). • Set the [HDMI CONTROL] setting in [CUSTOM SETUP] to [ON] (page 74).
filename[E:\SS2007\Models\DC2\2895959111\2895959111DAVHDX265-266267W\gb12add.fm] Specifications DVD system Laser AUDIO POWER SPECIFICATIONS for the US model POWER OUTPUT AND TOTAL HARMONIC DISTORTION: With 3 ohms loads, both channels driven, from 120 - 20,000 Hz; rated 84 watts per channel minimum RMS power, with no more than 0.7 % total harmonic distortion from 250 milli watts to rated output.
filename[E:\SS2007\Models\DC2\2895959111\2895959111DAVHDX265-266267W\gb12add.fm] Speakers Front (SS-TS72) Speaker system Speaker unit Rated impedance Dimensions (approx.) Mass (approx.) General Bass reflex, magnetically shielded 65 mm (2 5/8 inches) dia, cone type 3.0 ohms 93 × 221 × 75 mm (3 3/4 × 8 3/4 × 3 inches) (w/h/d) 0.7 kg (1 lb 9 oz) Center (SS-CT71) Speaker system Speaker unit Rated impedance Dimensions (approx.) Mass (approx.
filename[E:\SS2007\Models\DC2\2895959111\2895959111DAVHDX265-266267W\gb12add.fm] •Standby power consumption 0.3 W (or less). •Halogenated flame retardants are not used in the printed wiring boards. •Over 85 % power efficiency of amplifier block is achieved with the full digital amplifier, S-master. masterpage:Right specdef v20061206 Glossary Album Section of a music piece or an image on a data CD containing MP3 audio tracks or JPEG files. Chapter Subdivision of a title on a DVD.
filename[E:\SS2007\Models\DC2\2895959111\2895959111DAVHDX265-266267W\gb12add.fm] masterpage:Left specdef v20061206 Dolby Pro Logic II DVD Dolby Pro Logic II creates five full-bandwidth output channels from 2 channel sources. This is done using an advanced, high-purity matrix surround decoder that extracts the spatial properties of the original recording without adding any new sounds or tonal colorations. A disc that contains up to 8 hours of moving pictures even though its diameter is the same as a CD.
filename[E:\SS2007\Models\DC2\2895959111\2895959111DAVHDX265-266267W\gb12add.fm] Film based software, Video based software DVDs can be classified as Film based or Video based software. Film based DVDs contain the same images (24 frames per second) that are shown at movie theaters. Video based DVDs, such as television dramas or sit-coms, displays images at 30 frames (or 60 fields) per second.
filename[E:\SS2007\Models\DC2\2895959111\2895959111DAVHDX265-266267W\gb12add.fm] masterpage:Left specdef v20061206 VIDEO CD A compact disc that contains moving pictures. The picture data uses the MPEG 1 format, one of a worldwide standard of digital compression technology. The picture data is compressed to about 1/140 of its original size. Consequently, a 12 cm VIDEO CD can contain up to 74 minutes of moving pictures. VIDEO CDs also contain compact audio data.
filename[E:\SS2007\Models\DC2\2895959111\2895959111DAVHDX265-266267W\gb12add.fm] masterpage:Right specdef v20061206 Language Code List The language spellings conform to the ISO 639: 1988 (E/F) standard.
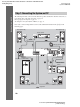
filename[E:\SS2007\Models\DC2\2895959111\2895959111DAVHDX265-266267W\gb12add.fm] masterpage:Left specdef v20061206 Index to Parts and Controls For more information, refer to the pages indicated in parentheses. Front panel A "/1 (on/standby) (26) H VOLUME control (26) B A (open/close) (26) I AUDIO IN/A.
filename[E:\SS2007\Models\DC2\2895959111\2895959111DAVHDX265-266267W\gb12add.
filename[E:\SS2007\Models\DC2\2895959111\2895959111DAVHDX265-266267W\gb12add.fm] masterpage:Left specdef v20061206 Front panel display About the indications in the front panel display A Lights up when the HDMI OUT jack is correctly connected to HDCP (highbandwidth digital content protection) compliant device with HDMI or DVI (digital visual interface) input. (20) B Lights up when the time information of a title or chapter appears in the front panel display.
filename[E:\SS2007\Models\DC2\2895959111\2895959111DAVHDX265-266267W\gb12add.fm] masterpage:Right specdef v20061206 Guide to the Control Menu Display DISPLAY Use the Control Menu display to select a function and to view related information. Press repeatedly to turn on or change the Control Menu display as follows: DISPLAY Control Menu display The Control Menu display 1 and 2 will show different items depending on the disc type. For details about each item, see the pages in parentheses.
filename[E:\SS2007\Models\DC2\2895959111\2895959111DAVHDX265-266267W\gb12add.fm] masterpage:Left specdef v20061206 Currently playing title number1) Currently playing chapter number2) Total number of titles1) Total number of chapters2) Control Menu items 12 (27) 18 (34) T 1:32:55 Selected item Function name of selected Control Menu item DVD VIDEO Playback status (N Playback, X Pause, x Stop, etc.
filename[E:\SS2007\Models\DC2\2895959111\2895959111DAVHDX265-266267W\gb12add.fm] masterpage:Right specdef v20061206 [TIME/TEXT] (page 33) Checks the elapsed time and the remaining playback time. Input the time code for picture and music searching. Displays the DVD/CD text or the MP3 track name. [SPEAKER FORMATION] (pages 66, 68) Sets the speaker formation./Adjust the level of each speaker automatically. [PROGRAM] (page 35) Selects the track to play in the order you want.
filename[E:\SS2007\Models\DC2\2895959111\2895959111DAVHDX265-266267W\gb12add.fm] masterpage:Left specdef v20061206 DVD Setup Display List You can set the following items with the DVD Setup Display. The order of the displayed items may be different from the actual display.
filename[E:\SS2007\Models\DC2\2895959111\2895959111DAVHDX265-266267W\gb12add.fm] masterpage:Right specdef v20061206 System Menu List You can set the following items with SYSTEM MENU on the remote. System menu MEMORY1) FM MODE2) MEMORY 1-20 (FM), MEMORY 1-10 (AM) STEREO MONO NAME IN1) SLEEP DIMMER SLEEP OFF, SLEEP 90M-1M DIMMER OFF DIMMER ON ILLUM ON ILLUM OFF DEMO ON DEMO OFF ILLUM MODE DEMO ATTENUATE3) SL SR REV4) CHILD LOCK ATT ON ATT OFF REV OFF REV ON OFF ON 1) during “TUNER FM” only.
filename[E:\SS2007\Models\DC2\2895959111\2895959111DAVHDX265-266267W\gb02regIX.fm] masterpage:Left specdef v20061206 Index Numerics 16:9 72 4:3 LETTER BOX 72 4:3 OUTPUT 74 4:3 PAN SCAN 72 5.
filename[E:\SS2007\Models\DC2\2895959111\2895959111DAVHDX265-266267W\gb02regIX.
filename[E:\SS2007\Models\DC2\2895959111\2895959111DAVHDX265-266-267W\gbbco.fm] masterpage:Right specdef v20061101 Remote control BUTTON DESCRIPTIONS ALPHABETICAL ORDER A–O P–Z ANGLE 5 (44) AUDIO 4 (39) CLEAR ef (33, 58, 71) D.
filename[E:\SS2007\Models\DC2\2895959111\2895959111DAVHDX265-266-267W\gbbco.