2-583-745-01(1) TFT LCD Color Computer Display Operating Instructions SDM-HS75 SDM-HS95 © 2004 Sony Corporation GB
Owner’s Record The model and serial numbers are located at the rear of the unit. Record these numbers in the spaces provided below. Refer to them whenever you call upon your dealer regarding this product. Serial No. Model No. WARNING To prevent fire or shock hazard, do not expose the unit to rain or moisture. Dangerously high voltages are present inside the unit. Do not open the cabinet. Refer servicing to qualified personnel only.
Table of Contents Precautions. . . . . . . . . . . . . . . . . . . . . . . . . . . . . . . . . . . . . . . . . . . . 4 Identifying parts and controls . . . . . . . . . . . . . . . . . . . . . . . . . . . . . . 5 Setup . . . . . . . . . . . . . . . . . . . . . . . . . . . . . . . . . . . . . . . . . .7 Step 1: Open the stand . . . . . . . . . . . . . . . . . . . . . . . . . . . . . . . . . . 7 Step 2: Connect the display to your computer . . . . . . . . . . . . . . . . . 7 Step 3: Connect the power cord. .
Note on the LCD (Liquid Crystal Display) Precautions Warning on power connections • Use the supplied power cord. If you use a different power cord, be sure that it is compatible with your local power supply. For the customers in the U.S.A. If you do not use the appropriate cord, this monitor will not conform to mandatory FCC standards. For the customers in the UK If you use the monitor in the UK, be sure to use the appropriate UK power cord.
Identifying parts and controls See the pages in parentheses for further details. The 1 (power) switch and the control buttons are on the lower right part of the front of the monitor. 1 1 (Power) switch and indicator (pages 9, 16) To turn the display on or off, press the 1 (power) switch upward. The power indicator lights up in green when the display is turned on, and lights up in orange when the monitor is in power saving mode. Front of the display Press upward to turn the display on or off.
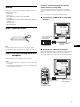
7 Back cover (page 8) Remove this cover when you connect/disconnect cables or cords. Rear of the display 8 AC IN connector (page 8) Connect the power cord (supplied). 9 HD15 input connector (analog RGB) (page 7) This connector inputs analog RGB video signals (0.7 Vp-p, positive) and SYNC signals. 7 Remove the back cover.
Setup Before using your monitor, check that the following items are included in your carton: • LCD display • Power cord • HD15-HD15 video signal cable (analog RGB) • Cord strap • CD-ROM (utility software for Windows/Macintosh, Operating Instructions, etc.) • Warranty card • Quick Setup Guide Connect a computer equipped with an HD15 output connector (analog RGB) Using the supplied HD15-HD15 video signal cable (analog RGB), connect the computer to the monitor’s HD15 input connector (analog RGB).
Step 3: Connect the power cord With the monitor and computer switched off, first connect the power cord to the monitor, then connect it to a power outlet. Step 4: Secure the cords and replace the back cover 1 Bundle the cables and cords. Using the supplied cord strap, bundle the cables and cords. to AC IN Cord strap to a power outlet The illustration of the back of the monitor shown here is that of the SDM-HS75. The same applies for the other models. power cord (supplied) 2 Replace the back cover.
Step 5: Turn on the monitor and computer 1 Press the 1 (power) switch upward. Adjusting the tilt This display can be adjusted within the angles shown below. Approx. 20° The 1 (power) indicator of the monitor lights up in green. 2 Turn on the computer. The installation of your monitor is complete. If necessary, use the monitor’s controls to adjust the picture. Grasp the lower sides of the LCD panel, then adjust screen tilt.
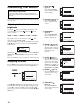
Customizing Your Monitor Before making adjustments Connect the monitor and the computer, and turn them on. Wait for at least 30 minutes before making adjustments for the best result. You can make numerous adjustments to your monitor using the on-screen menu. Adjusting to the desired brightness BACKL I GHT 100 1 2 8 0 x 1 0 2 4 / 6 0Hz EX I T 2 CONTRAST 6 (page 12) Select the CONTRAST menu to adjust the picture contrast.
8 MENU POSITION (page 14) Select the MENU POSITION to change the onscreen menu position. 3 Adjust the menu. MENU POS I T I ON Press the m/M buttons to make the adjustment, then press the OK button. When you press the OK button, the setting is stored, then the display returns to the previous menu. OK 1 2 8 0 x 1 0 2 4 / 6 0Hz EX I T , 9 LANGUAGE (page 15) Select LANGUAGE to change the language used on menus or messages.
You can manually adjust the picture’s sharpness (phase/pitch) and position (horizontal/vertical position). Adjusting the contrast (CONTRAST) These adjustments are stored in memory and automatically recalled when the display receives the same input signal. These settings may have to be repeated if you change the input signal after reconnecting your computer. Adjust the picture contrast. Note The contrast cannot be adjusted when the MIDDLE, or LOW (page 10).
Adjust so that the horizontal stripes are at a minimum. 5 Press the m/M buttons to select (SCREEN) and press the OK button. The SCREEN menu appears on the screen. 6 Press the m/M buttons to select H CENTER or V CENTER and press the OK button. The H CENTER or V CENTER menu appears on the screen. 7 Press the m/M buttons to center the test pattern in the screen. 8 Press the OK button. Return to the SCREEN menu. If vertical stripes are observed over the entire screen, adjust pitch by the following steps.
Fine tuning the color temperature (USER ADJUSTMENT) USER A D J U S T MENT R 128 G 128 B 128 1 2 8 0 x 1 0 2 4 / 6 0Hz EX I T 1 Press the m/M buttons to select ADJUST and press the OK button. The USER ADJUSTMENT menu appears on the screen. 2 Press the m/M buttons to select R (Red) or B (Blue) and press the OK button. Then press the m/M buttons to adjust the color temperature and press the OK button.
Selecting the on-screen menu language (LANGUAGE) You can change the language used on menus or messages displayed on this monitor. 1 Press the MENU button. The main menu appears on the screen. 2 Keep pressing the m button until the icon of the desired option item appears. 3 Press the m/M buttons to select (LANGUAGE) and press the OK button. The LANGUAGE menu appears on the screen. x Locking the menus and controls You can lock the control of buttons to prevent accidental adjustments or resetting.
Technical Features Power saving function This monitor meets the power-saving guidelines set by VESA, ENERGY STAR, and NUTEK. If the monitor is connected to a computer or video graphics board that is DPMS (Display Power Management Standard) compliant, the monitor will automatically reduce power consumption as shown below. SDM-HS75 Power mode Power consumption 1 (power) indicator normal operation 45 W (max.) green active off* (deep sleep)** 1.0 W (max.) orange power off 1.0 W (max.
Troubleshooting Before contacting technical support, refer to this section. On-screen messages If there is something wrong with the input signal, one of the following messages appears on the screen. To solve the problem, see “Trouble symptoms and remedies” on page 18. If OUT OF RANGE appears on the screen This indicates that the input signal is not supported by the monitor’s specifications. Check the following items. I NFORMA T I ON OUT OF RANGE x x x . x kHz / x x xHz If “xxx.
Trouble symptoms and remedies If a problem is caused by the connected computer or other equipment, please refer to the connected equipment’s instruction manual. Symptom Check these items No picture If the 1 (power) indicator is not lit, or if the 1 (power) indicator will not light up when the 1 (power) switch is pressed, • Check that the power cord is properly connected.
Symptom Check these items Picture is fuzzy • Adjust the brightness and contrast (page 12). • Adjust the pitch and phase (page 12). x Problems caused by a computer or other equipment connected, and not caused by the monitor • Set the resolution to 1280 × 1024 on your computer. Picture is ghosting • Eliminate the use of video cable extensions and/or video switch boxes. • Check that all plugs are firmly seated in their sockets.
Specifications SDM-HS75 SDM-HS95 LCD panel LCD panel Panel type: a-Si TFT Active Matrix Picture size: 17.0 inch Input signal format RGB operating frequency* Horizontal: 28–80 kHz Vertical: 48–75 Hz Resolution Horizontal: Max.1280 dots Vertical: Max.1024 lines Input signal levels Analog RGB video signal 0.7 Vp-p, 75 Ω, positive SYNC signal TTL level, 2.2 kΩ, positive or negative (Separate horizontal and vertical) Power requirements 100–240 V, 50–60 Hz, Max. 1.0 A Power consumption Max.