4-532-055-11(1) Interchangeable Lens Digital Camera Instruction Manual E-mount ILCE-6000
English Learning more about the camera (“Help Guide”) “Help Guide” is an on-line manual. Refer to it for in-depth instructions on the many functions of the camera. 1 Access the Sony support page. http://www.sony.net/SonyInfo/Support/ 2 Select your country or region. 3 Search for the model name of your camera on the support page. • Check the model name on the bottom of your camera. Viewing the Guide This camera is equipped with a built-in instruction guide.
Owner’s Record The model and serial numbers are located on the bottom. Record the serial number in the space provided below. Refer to these numbers whenever you call your Sony dealer regarding this product. Model No. ILCE-6000 Serial No. _____________________________ Model No. AC-UB10C/AC-UB10D Serial No. _____________________________ WARNING To reduce fire or shock hazard, do not expose the unit to rain or moisture.
• • • • Keep the battery pack out of the reach of small children. Keep the battery pack dry. Replace only with the same or equivalent type recommended by Sony. Dispose of used battery packs promptly as described in the instructions. [ AC Adaptor Use the nearby wall outlet (wall socket) when using the AC Adaptor. Disconnect the AC Adaptor from the wall outlet (wall socket) immediately if any malfunction occurs while using the apparatus.
For Customers in the U.S.A. If you have any questions about this product, you may call: Sony Customer Information Center 1-800-222-SONY (7669) The number below is for the FCC related matters only. [ Regulatory Information Declaration of Conformity Trade Name: SONY Model No.: ILCE-6000 Responsible Party: Sony Electronics Inc. Address: 16530 Via Esprillo, San Diego, CA 92127 U.S.A. Telephone No.: 858-942-2230 This device complies with Part15 of the FCC Rules.
For Customers in Canada This device complies with Industry Canada licence-exempt RSS standard(s). Operation is subject to the following two conditions: (1) this device may not cause interference, and (2) this device must accept any interference, including interference that may cause undesired operation of the device.
[ Disposal of waste batteries and electrical and electronic equipment (applicable in the European Union and other European countries with separate collection systems) This symbol on the product, the battery or on the packaging indicates that the product and the battery shall not be treated as household waste. On certain batteries this symbol might be used in combination with a chemical symbol. The chemical symbols for mercury (Hg) or lead (Pb) are added if the battery contains more than 0.
Table of contents Preparing the camera – – – – – – – Step 1 P. 9 Step 2 P. 23 Step 3 P. 24 Step 4 P. 25 Checking the supplied items Identifying parts Inserting the battery pack Charging the battery pack Inserting a memory card (sold separately) Attaching/removing the lens Setting the clock Basic operation – Shooting still images/movies Playback function – Viewing images Recording function – Introduction of other functions Importing images to the computer P.
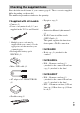
Checking the supplied items First check the model name of your camera (page 8). The accessories supplied differ depending on the model. The number in parentheses indicates the quantity. x Supplied with all models • Camera (1) • Power cord (mains lead) (1)* (not supplied in the U.S.A. and Canada) * Multiple power cords may be supplied with your camera. Use the appropriate one that matches your country/region.
Identifying parts H I J K 1) 2) When the lens is removed A B C D E F G GB 10 Shutter button C1 (Custom 1) button Remote sensor ON/OFF (Power) switch Self-timer lamp/AF illuminator Lens release button Microphone1) Lens Mount Image sensor2) Lens contacts2) Do not cover this part during movie recording. Do not touch this part directly.
G Control dial H Charge lamp I Multi/Micro USB Terminal1) • Supports Micro USB compatible device. J HDMI micro jack 1) A B C D E For details on compatible accessories for the multi interface shoe and the Multi/Micro USB Terminal, visit the Sony web site, or consult your Sony dealer or local authorized Sony service facility. You can also use accessories that are compatible with the accessory shoe. Operations with other manufacturers’ accessories are not guaranteed.
N LCD screen • You can adjust the screen to an easily viewable angle and shoot from any position. K Eye sensor L Viewfinder M Eyepiece cup • Not attached to the camera at the factory. It is recommended that you attach the eyepiece cup when you intend to use the viewfinder. Attaching/removing the eyepiece cup • Remove the eyepiece cup when you attach an accessory (sold separately) to the Multi Interface Shoe.
C Tripod socket hole • Use a tripod with a screw less than 5.5 mm (7/32 inches) long. Otherwise, you cannot firmly secure the camera, and damage to the camera may occur. D Speaker E Access lamp F Battery/memory card cover G Memory card slot H Battery insertion slot I Battery eject lever A (N Mark) • Touch the mark when you connect the camera to a smartphone equipped with the NFC function. • NFC (Near Field Communication) is an international standard of the short-range wireless communication technology.
x Lens See page 43 on the specifications of the lenses. E55 – 210 mm F4.5 – 6.3 OSS (supplied with ILCE-6000Y) E PZ 16 – 50 mm F3.5 – 5.6 OSS (supplied with ILCE-6000L/ILCE-6000Y) A B C D 1) Zooming/Focusing ring Zooming lever Mounting index Lens contacts1) Do not touch this part directly. A B C D E F 1) GB 14 Focusing ring Zooming ring Focal-length scale Focal-length index Lens contacts1) Mounting index Do not touch this part directly.
Inserting the battery pack Battery eject lever 1 Open the cover. the battery pack. 2 Insert • While pressing the battery eject lever, insert the battery pack as illustrated. Make sure that the battery eject lever locks after insertion. • Closing the cover with the battery inserted incorrectly may damage the camera.
Charging the battery pack For customers in the USA and Canada Power cord (Mains lead) For customers in countries/ regions other than the USA and Canada Charge lamp Lit: Charging Off: Charging finished Flashing: Charging error or charging paused temporarily because the camera is not within the proper temperature range the camera to the AC Adaptor (supplied), 1 Connect using the micro USB cable (supplied). the AC Adaptor to the wall outlet (wall socket).
• The battery pack may not be effectively charged if the terminal section of the battery is dirty. In this case, wipe any dust off lightly using a soft cloth or a cotton swab to clean the terminal section of the battery. • Connect the AC Adaptor (supplied) to the nearest wall outlet (wall socket). If malfunctions occur while using the AC Adaptor, disconnect the plug from the wall outlet (wall socket) immediately to disconnect from the power source.
x Battery life and number of images that can be recorded and played back Battery life Number of images Shooting (still images) Screen Approx. 180 min. Approx. 360 images Viewfinder Approx. 155 min. Approx. 310 images Typical movie shooting Screen Approx. 60 min. — Viewfinder Approx. 60 min. — Continuous movie shooting Screen Approx. 90 min. — Viewfinder Approx. 90 min. — Approx. 275 min. Approx.
Inserting a memory card (sold separately) Ensure that the notched corner is faced correctly. 1 Open the cover (page 15). the memory card (sold separately). 2 Insert • With the notched corner facing as illustrated, insert the memory card until it clicks into place. 3 Close the cover.
Attaching/removing the lens Set the power switch of the camera to OFF before you attach or remove the lens. 1 If the cap or the packaging lid is attached, remove it from the camera or the lens. • Quickly change the lens somewhere away from dusty locations to keep dust or debris from getting inside the camera. 2 Mount the lens by aligning the white index marks on the lens and the camera. • Hold the camera facing down to prevent dust from entering into the camera.
x Removing the lens Lens release button 1 Press the lens release button all the way in and turn the lens counterclockwise until it stops. Notes • If dust or debris gets inside the camera while you are changing the lens and adheres to the surface of the image sensor (the part that converts the light source to a digital signal), it may appear as dark spots on the image, depending on the shooting environment.
Setting the clock Control wheel ON/OFF (Power) Select items: v/V/b/B/ / Set: z the ON/OFF (Power) switch to ON. 1 Set The Date & Time setting is displayed when you turn on the camera for the first time. • It may take some time for the power to turn on and allow operation. that [Enter] is selected on the screen, then press 2 Check z on the control wheel. a desired geographic location by following the 3 Select on-screen instructions, then press z.
Shooting still images/movies Shutter button MOVIE Shooting still images the shutter button halfway down to focus. 1 Press When the image is in focus, a beep sounds and the z or indicator lights. 2 Press the shutter button fully down to shoot an image. Shooting movies the MOVIE (Movie) button to start recording. 1 Press • When using a lens with a zoom lever: Move the zoom lever. When using a lens with a zoom ring: Turn the zoom ring. 2 Press the MOVIE button again to stop recording.
Viewing images : Zoom in Adjust: turn the control wheel Control wheel (Playback) (Delete) 1 Press the Select images: B (next)/b (previous) or turn the control wheel Set: z (Playback) button. x Selecting next/previous image Select an image by pressing B (next)/b (previous) on the control wheel or by turning the control wheel. Press z in the center of the control wheel to view movies. x Deleting an image 1 Press the (Delete) button. 2 Select [Delete] with v on the control wheel, then press z.
Introduction of other functions MENU Control wheel x Control wheel DISP (Display Contents): Allows you to change the screen display. ISO (ISO): Allows you to set the sensitivity based on the brightness. (Image Index): Allows you to view multiple images in a single-image screen at the same time. (Photo Creativity): Allows you to operate the camera intuitively and shoot creative images easily. (Exposure Comp.): Allows you to compensate the exposure and brightness for the entire image.
x Menu Items (Camera Settings) GB 26 Image Size Selects the size of still images. Aspect Ratio Selects the aspect ratio for still images. Quality Sets the image quality for still images. Panorama: Size Selects the size of panoramic images. Panorama: Direction Sets the shooting direction for panoramic images. File Format Selects the movie file format. Record Setting Selects the size of the recorded movie frame. Drive Mode Sets the drive mode, such as for continuous shooting.
Zoom Sets the zoom scale for Clear Image Zoom and Digital Zoom. Focus Magnifier Enlarges the image before shooting so that you can check the focus in detail. Long Exposure NR High ISO NR Sets noise reduction processing for shots with a shutter speed of 1 second or longer. Sets noise reduction processing for high-sensitivity shooting. Lock-on AF Sets the function to track a subject and continue focusing. Smile/Face Detect. Selects to detect faces and adjust various settings automatically.
(Custom Settings) Zebra MF Assist Sets the length of time the image will be shown in an enlarged form. Grid Line Sets a grid line display to enable alignment to a structural outline. Auto Review Sets auto review to display the captured image after shooting. DISP Button Sets the screen display modes that can be selected by pressing DISP on the control wheel. Peaking Level Enhances the outline of in-focus ranges with a specific color when focusing manually.
e-Front Curtain Shut. Sets whether to use the electronic front curtain shutter function. S. Auto Img. Extract. When the shooting mode is set to [Superior Auto] and the camera recognizes the scene to be shot with multiple images, this sets whether to extract an image automatically and save it. Exp.comp.set Sets whether to reflect exposure compensation value to flash compensation. Bracket order Sets order of shooting for exposure bracket and white balance bracket.
One-touch(NFC) Assigns an application to One-touch (NFC). You can call up the application when shooting by touching an NFC-enabled smartphone to the camera. Airplane Mode You can set this device to not perform wireless communications. WPS Push You can register the access point to the camera easily by pushing the WPS button. Access Point Set. You can register your access point manually. Edit Device Name You can change the device name under Wi-Fi Direct, etc.
(Setup) Monitor Brightness Sets the screen brightness. Viewfinder Bright. When using an electronic viewfinder, sets the brightness of the electronic viewfinder. Finder Color Temp. Sets the color temperature of the viewfinder. Volume Settings Sets the volume for movie playback. Audio signals Sets the operating sound on/off for when the image is in focus or when the self-timer is started. Upload Settings Sets the upload function of the camera when using an Eye-Fi card.
Format Formats the memory card. File Number Sets the method used to assign file numbers to still images and movies. Select REC Folder Changes the selected folder for storing images. New Folder Creates a new folder for storing still images and movies (MP4). Folder Name Sets the folder name for still images. Recover Image DB Recovers the image database file and enables recording and playback. Display Media Info.
Features of PlayMemories Home™ The software PlayMemories Home allows you to import still images and movies to your computer and use them. PlayMemories Home is required for importing AVCHD movies to your computer.
x System requirements You can find the system requirements for the software at the following URL: www.sony.net/pcenv/ x Installing PlayMemories Home on a computer the Internet browser on your computer, go to the 1 Using following URL, and then install PlayMemories Home. www.sony.net/pm/ • For details on PlayMemories Home, refer to the following PlayMemories Home support page (English only): http://www.sony.co.jp/pmh-se/ • When installation is complete, PlayMemories Home starts.
Adding functions to the camera You can add the desired functions to your camera by connecting to the application download website (PlayMemories Camera Apps™) via the Internet. http://www.sony.net/pmca • After installing an application, you can call up the application by touching an NFC-enabled Android smartphone to the (N mark) on the camera, using the [One-touch(NFC)] function. Notes • The application downloading function may not be available in some countries and regions.
Number of still images and recordable time of movies The number of still images and recordable time may vary depending on the shooting conditions and the memory card. x Still images [ Image Size]: [L: 24M] When [ Aspect Ratio] is set to [3:2]* Capacity Quality 2 GB Standard 330 images Fine 200 images RAW & JPEG 54 images RAW 74 images * When the [ Aspect Ratio] is set to other than [3:2], you can record more pictures than shown above. (Except when [ Quality] is set to [RAW].
• The recordable time of movies varies because the camera is equipped with VBR (Variable Bit-Rate), which automatically adjusts the image quality depending on the shooting scene. When you record a fast-moving subject, the image is clearer but the recordable time is shorter because more memory is required for recording. The recordable time also varies depending on the shooting conditions, the subject or the image quality/size settings.
• Near a location that generates strong radio waves, emits radiation or is strongly magnetic In such locations, the camera may not properly record or play back images. • In sandy or dusty places Be careful not to let sand or dust get into the camera. This may cause the camera to malfunction, and in some cases this malfunction cannot be repaired. On storing Be sure to attach the front lens cap when not using the camera.
On the overheat protection Depending on the camera and battery temperature, you may be unable to record movies or the power may turn off automatically to protect the camera. A message will be displayed on the screen before the power turns off or you can no longer record movies. In this case, leave the power off and wait until the camera and battery temperature goes down.
Specifications Camera [System] Camera type: Interchangeable lens digital camera Lens: E-mount lens [Image sensor] Image sensor: APS-C format (23.5 mm × 15.6 mm) CMOS image sensor Total pixel number of image sensor: Approx. 24 700 000 pixels Effective pixel number of camera: Approx.
Eye point: Approx. 23 mm from the eyepiece, 21.4 mm from the eyepiece frame at –1 m–1 Diopter adjustment: –4.0 m–1 to +3.0 m–1 [Input/output terminals] Multi/Micro USB Terminal*: USB communication HDMI: HDMI type D micro jack * Supports Micro USB compatible device. [Power] Battery type: Rechargeable battery pack NP-FW50 [Power consumption] When using an E PZ 16 – 50 mm F3.5 – 5.6 OSS lens* When using the viewfinder: Approx. 2.8 W When using an LCD screen: Approx. 2.
AC Adaptor AC-UB10C/UB10D Power requirements: AC 100 V to 240 V, 50 Hz/60 Hz, 70 mA Output voltage: DC 5 V, 0.5 A Operating temperature: 0 °C to 40 °C (32 °F to 104 °F) Storage temperature: –20 °C to +60 °C (–4 °F to +140 °F) Dimensions (Approx.): 50 mm × 22 mm × 54 mm (2 inches × 7/8 inches × 2 1/4 inches) (W/H/D) Rechargeable battery pack NP-FW50 Battery type: Lithium-ion battery Maximum voltage: DC 8.4 V Nominal voltage: DC 7.2 V Maximum charge voltage: DC 8.4 V Maximum charge current: 1.
Lens Lens E16 – 50 mm zoom E55 – 210 mm lens1) zoom lens Camera ILCE-6000L/ ILCE-6000Y Equivalent 35 mm-format focal length2) (mm) Lens groups/elements 24 – 75 ILCE-6000Y 82.5 – 315 8–9 9 – 13 Angle of view2) 83° – 32° 28.2° – 7.8° Minimum focus3) (m (ft.)) 0.25 – 0.3 (0.82 – 1) 1.0 (3.28) Maximum magnification (×) Minimum aperture Filter diameter (mm) 0.215 0.225 f/22 – f/36 f/22 – f/32 40.5 49 64.7 × 29.9 (2 5/8 × 1 3/16) 63.8 × 10⁸ (2 5/8 × 4 3/8) Mass (Approx. g (oz.)) 116 (4.
Trademarks GB 44 • Memory Stick and are trademarks or registered trademarks of Sony Corporation. • “AVCHD Progressive” and the “AVCHD Progressive” logotype are trademarks of Panasonic Corporation and Sony Corporation. • Dolby and the double-D symbol are trademarks of Dolby Laboratories. • The terms HDMI and HDMI HighDefinition Multimedia Interface, and the HDMI Logo are trademarks or registered trademarks of HDMI Licensing LLC in the United States and other countries.
Additional information on this product and answers to frequently asked questions can be found at our Customer Support Website.