4-579-410-11(1) Interchangeable Lens Digital Camera E-mount Instruction Manual “Help Guide” (Web manual) Refer to “Help Guide” for in-depth instructions on the many functions of the camera. http://rd1.sony.
English Learning more about the camera (“Help Guide”) “Help Guide” is an on-line manual. You can read the “Help Guide” on your computer or smartphone. Refer to it for in-depth instructions on the many functions of the camera. URL: http://rd1.sony.net/help/ilc/1540/h_zz/ Viewing the Guide This camera is equipped with a built-in instruction guide. In-Camera Guide The In-Camera Guide displays explanations for the currently selected menu function or setting.
Owner’s Record Record the model and serial number (which are located on the product) in the space provided below. Refer to these numbers whenever you call your Sony dealer regarding this product. Model No. ILCESerial No. _____________________ WARNING To reduce fire or shock hazard, do not expose the unit to rain or moisture.
[ Power Cord For the customers in the UK, Ireland, Malta, Cyprus and Saudi Arabia Use the power cord (A). For safety reasons, the power cord (B) is not intended for above countries/regions and shall therefore not be used there. For the customers in other EU countries/ regions Use the power cord (B). (A) (B) For Customers in the U.S.A. and Canada [ RECYCLING LITHIUM-ION BATTERIES Lithium-Ion batteries are recyclable.
[ CAUTION You are cautioned that any changes or modifications not expressly approved in this manual could void your authority to operate this equipment. [ Note: This equipment has been tested and found to comply with the limits for a Class B digital device, pursuant to Part 15 of the FCC Rules. These limits are designed to provide reasonable protection against harmful interference in a residential installation.
The electromagnetic fields at the specific frequencies may influence the picture and sound of this unit. [ Disposal of waste batteries and electrical and electronic equipment (applicable in the European Union and other European countries with separate collection systems) GB 6 This symbol on the product, the battery or on the packaging indicates that the product and the battery shall not be treated as household waste. On certain batteries this symbol might be used in combination with a chemical symbol.
Table of contents Preparing the camera – – – – – – – Step 1 P. 8 Step 2 P. 23 Step 3 P. 24 Step 4 P. 25 Checking the supplied items Identifying parts Inserting the battery pack Charging the battery pack Inserting a memory card (sold separately) Attaching/removing the lens Setting the language and the clock Basic operation – Shooting still images/movies Playback function – Viewing images Recording function – Introduction of other functions Using a computer P.
Checking the supplied items First check the model name of your camera (page 7). The accessories supplied differ depending on the model. The number in parentheses indicates the quantity. x Supplied with all models • Camera (1) • Power cord (mains lead) (1)* (supplied in some countries/ regions) * Multiple power cords may be supplied with your camera. Use the appropriate one that matches your country/region. See page 4.
Identifying parts When the lens is removed A B C D E F G H I J K L Shutter button C1 (Custom 1) button Remote sensor Wi-Fi antenna (built-in) ON/OFF (Power) switch Self-timer lamp/AF illuminator Lens release button Microphone*1 Lens Mount Image sensor*2 Lens contacts*2 *1 Do not cover this part during movie recording. *2 Do not touch this part directly. A Multi interface shoe* B Image sensor position mark C Hook for shoulder strap D Speaker E Flash • Press the (Flash pop-up) button to use the flash.
G Control dial H Multi/Micro USB Terminal* • Supports Micro USB compatible device. I Charge lamp J HDMI micro jack K m (Microphone) jack • When an external microphone is connected, the microphone is turned on automatically. If the external microphone is a plug-inpower type, the power of the microphone is supplied by the camera.
O Monitor • You can adjust the screen to an easily viewable angle and shoot from any position. Y C2 (Custom 2) button/ (Delete) button Z (Playback) button P Diopter-adjustment dial • Adjust the diopter-adjustment dial to your eyesight until the display appears clearly in the viewfinder. If it is difficult to turn the diopter-adjustment dial, remove the eyepiece cup and then adjust the dial.
C Tripod socket hole • Use a tripod with a screw less than 5.5 mm (7/32 inches) long. Otherwise, you cannot firmly secure the camera, and damage to the camera may occur. D E F G H Access lamp Battery/memory card cover Memory card slot Battery insertion slot Battery lock lever x Lens See page 45 on the specifications of the lenses. E PZ 16 – 50 mm F3.5 – 5.6 OSS (supplied with ILCE-6300L) A B C D Zooming ring/Focusing ring Zooming lever Mounting index Lens contacts* * Do not touch this part directly.
Inserting the battery pack Battery lock lever 1 Open the cover. the battery pack. 2 Insert • While pressing the battery lock lever, insert the battery pack as illustrated. Make sure that the battery lock lever locks after insertion. • Closing the cover with the battery inserted incorrectly may damage the camera.
Charging the battery pack Charge lamp Lit: Charging Off: Charging finished Flashing: Charging error or charging paused temporarily because the camera is not within the proper temperature range the camera to the AC Adaptor (supplied), 1 Connect using the micro USB cable (supplied). the AC Adaptor to the wall outlet (wall socket). 2 Connect The charge lamp lights orange, and charging starts. • Turn off the camera while charging the battery.
• The battery pack may not be effectively charged if the terminal section of the battery is dirty. In this case, wipe any dust off lightly using a soft cloth or a cotton swab to clean the terminal section of the battery. • Connect the AC Adaptor (supplied) to the nearest wall outlet (wall socket). If malfunctions occur while using the AC Adaptor, disconnect the plug from the wall outlet (wall socket) immediately to disconnect from the power source.
x Battery life and number of images that can be recorded and played back Battery life Number of images Shooting (still images) Monitor — Approx. 400 images Viewfinder — Approx. 350 images Typical movie shooting Monitor Approx. 75 min. — Viewfinder Approx. 70 min. — Continuous movie shooting Monitor Approx. 115 min. — Viewfinder Approx. 115 min. — Approx. 360 min. Approx.
x Supplying power You can use the camera while power is supplied from a wall outlet (wall socket) by using the AC Adaptor (supplied). Notes • The camera will not activate if there is no remaining battery. Insert a sufficiently charged battery pack into the camera. • If you use the camera while power is being supplied from a wall outlet (wall socket), make sure that the icon ( ) displays on the monitor. • Do not remove the battery pack while power is being supplied from a wall outlet (wall socket).
Inserting a memory card (sold separately) Ensure the notched corner faces correctly. 1 Open the cover. the memory card. 2 Insert • With the notched corner facing as illustrated, insert the memory card until it clicks into place. 3 Close the cover.
• For details on the number of recordable still images and recordable duration of movies, refer to pages 37 to 38. Check the tables to select a memory card with the desired capacity. Notes • When an SDHC memory card is used to record XAVC S movies over extended periods of time, the recorded movies will be divided into files of 4 GB. The divided files can be integrated into a single file using PlayMemories Home. • Not all memory cards are guaranteed to operate correctly.
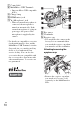
Attaching/removing the lens Set the ON/OFF (Power) switch of the camera to OFF before you attach or remove the lens. the cap or the packaging lid is attached, remove it 1 Iffrom the camera or the lens. • Change the lens quickly somewhere away from dusty locations to keep dust or debris from getting inside the camera. the lens by aligning the white index marks on the 2 Mount lens and the camera. • Hold the camera facing down to prevent dust from entering into the camera.
x Removing the lens Lens release button the lens release button all the way in and turn the 1 Press lens counterclockwise until it stops. Notes • If dust or debris gets inside the camera while you are changing the lens and adheres to the surface of the image sensor (the part that converts the light source to a digital signal), it may appear as dark spots on the image, depending on the shooting environment.
Setting the language and the clock Control wheel ON/OFF (Power) Select items: v/V/b/B Set the numeric value of date and time: v/V/ / Set: z the ON/OFF (Power) switch to ON. 1 Set Language setting screen is displayed when you turn on the camera for the first time. • It may take time for the power to turn on and allow operation. a desired language, then press z on the control 2 Select wheel. Date & Time setting screen is displayed. that [Enter] is selected on the screen, then press 3 Check z.
Shooting still images/movies Shutter button MOVIE Shooting still images the shutter button halfway down to focus. 1 Press When the image is in focus, the z or indicator lights. 2 Press the shutter button fully down to shoot an image. Shooting movies the MOVIE (Movie) button to start recording. 1 Press • When using a lens with a zoom lever: Move the zoom lever. When using a lens with a zoom ring: Turn the zoom ring. 2 Press the MOVIE button again to stop recording.
Viewing images : Zoom in Adjust: turn the control wheel Control wheel (Playback) (Delete) 1 Press the Select images: B (next)/b (previous) or turn the control wheel Set: z (Playback) button. x Selecting next/previous image Select an image by pressing B (next)/b (previous) on the control wheel or by turning the control wheel. Press z in the center of the control wheel to view movies. x Deleting an image 1 Press the (Delete) button. 2 Select [Delete] with v on the control wheel, then press z.
Introduction of other functions MENU Control dial AF/MF/AEL switch lever Control wheel Fn (Function) x Control wheel DISP (Display Contents): Allows you to change the screen display. ISO (ISO): Allows you to set the sensitivity based on the brightness. (Image Index): Allows you to view multiple images in a single-image screen at the same time. (Exposure Comp.): Allows you to compensate the exposure and brightness for the entire image.
x AF/MF/AEL switch lever You can switch the function of the AF/MF/AEL button to AF/MF or AEL by changing the position of the AF/MF/AEL switch lever. When you move the AF/MF/AEL switch lever to the AF/MF position and press the button, the focusing mode temporarily switches between auto and manual (AF/MF control). When you move the AF/MF/AEL switch lever to the AEL position and press the button, the exposure is locked (AE lock). x Menu Items (Camera Settings) Image Size Selects the size of still images.
AF Track Sens Sets the AF tracking sensitivity in movie mode. Exposure Comp. Compensates for the brightness of the entire image. Exposure step Selects the size of the increment step for shutter speed, aperture, and exposure. ISO Sets the ISO sensitivity. ISO AUTO Min. SS Sets the slowest shutter speed at which ISO sensitivity will start to change in [ISO AUTO] mode. Metering Mode Selects the method for measuring brightness. White Balance Adjusts the color tones of an image.
Auto Mode You can shoot selecting either Intelligent Auto or Superior Auto. Scene Selection Selects pre-set settings to match various scene conditions. Movie/HFR Selects the exposure mode to suit your subject or effect. SteadyShot Sets SteadyShot for shooting still images and movies. Reduces blur from camera shake when shooting while holding the camera. Color Space Changes the range of reproducible colors. Auto Slow Shut.
Auto Review Sets auto review to display the captured image after shooting. DISP Button Sets the type of information to be displayed on the monitor or in the viewfinder by pressing DISP on the control wheel. Peaking Level Enhances the outline of in-focus ranges with a specific color when focusing manually. Peaking Color Sets the color used for the peaking function. Exposure Set. Guide Sets the guide displayed when exposure settings are changed in the shooting screen.
Priority Set in AF-C AF w/ shutter Sets whether to perform AF when the shutter button is half pressed. This is useful when you want to adjust the focus and exposure separately. AEL w/ shutter Sets whether to perform AEL when the shutter button is half pressed. This is useful when you want to adjust the focus and exposure separately. Silent Shooting Shoots images without the shutter sound. e-Front Curtain Shut. Sets whether to use the electronic front curtain shutter function. S. Auto Img. Extract.
Dial/Wheel Ev Comp Adjusts the exposure compensation with the control dial or the control wheel. Zoom Ring Rotate Assigns the zoom in/out to the rotational direction of the zoom lens. This function is only available with a power zoom lens that is compatible with this function. MOVIE Button Sets whether to always activate the MOVIE button. Dial/Wheel Lock Sets whether to disable the control dial and the control wheel temporarily by using the Fn button when shooting.
(Application) Application List Displays the application list. You can select the application you want to use. Introduction Displays instructions on using the application. (Playback) Delete Deletes an image. View Mode Sets the way in which images are grouped for playback. Image Index Displays multiple images at the same time. Display Rotation Sets the playback direction of the recorded image. Slide Show Shows a slide show. Rotate Rotates the image. Enlarge Image Enlarges the playback images.
Delete confirm. Sets whether Delete or Cancel is preselected in the Delete confirmation screen. Display Quality Sets the display quality. Pwr Save Start Time Sets the time intervals to automatically switch to power save mode. NTSC/PAL Selector*1 By changing the TV format of the device, shooting in a different movie format is possible. Cleaning Mode Starts the cleaning mode to clean the image sensor. Demo Mode Sets demonstration movie playback to on or off.
New Folder Creates a new folder for storing still images and movies (MP4). Folder Name Sets the folder name for still images. Recover Image DB Recovers the image database file and enables recording and playback. Display Media Info. Displays the remaining recording time of movies and the recordable number of still images on the memory card. Version Displays the camera software version. Certification Logo*2 The certification can be displayed on the camera.
Using software Installing the following software to your computer will make your camera experience more convenient. • PlayMemories Home™: Imports images to your computer and lets you use them in different ways (page 36). • Image Data Converter: Displays RAW images and processes them. • Remote Camera Control: Controls a camera connected to your computer via a USB cable. You can download and install this software to your computer from the following URLs.
Importing images to your computer and using them (PlayMemories Home) The software PlayMemories Home allows you to import still images and movies to your computer and use them. PlayMemories Home is required for importing XAVC S movies and AVCHD movies to your computer. http://www.sony.
Adding functions to the camera You can add the desired functions to your camera by connecting to the application download website (PlayMemories Camera Apps™) via the Internet. http://www.sony.net/pmca/ • After installing an application, you can call up the application by touching an NFC-enabled Android smartphone to the N mark on the camera, using the [One-touch(NFC)] function.
x Movies The table below shows the approximate total recording times using a memory card formatted with this camera. The recording time for XAVC S and AVCHD movies is the recording time when shooting with [Dual Video REC] set to [Off].
• Continuous shooting is possible for approximately 29 minutes (a product specification limit). However, the duration of time available for continuous movie recording varies under the following conditions.
Notes on using the camera Functions built into this camera • This camera is compatible with 1080 60p or 50p-format movies. Unlike standard recording modes up to now, which record in an interlacing method, this camera records using a progressive method. This increases the resolution, and provides a smoother, more realistic image. • This camera is compatible with 4K 30p/4K 25p/4K 24p recording. Movies can be recorded in a higher resolution than HD format.
Notes on the monitor, electronic viewfinder and lens • The monitor and electronic viewfinder are manufactured using extremely highprecision technology, and over 99.99% of the pixels are operational for effective use. However, some tiny black and/or bright dots (white, red, blue or green) may appear on the monitor and electronic viewfinder. These dots are a normal result of the manufacturing process, and do not affect the recording. • Do not hold the camera by the monitor.
On charging the battery If you charge a battery that has not been used for a long time, you may be unable to charge it to the proper capacity. This is due to the battery characteristics. Charge the battery again. Warning on copyright • Television programs, films, videotapes, and other materials may be copyrighted. Unauthorized recording of such materials may be contrary to the provisions of the copyright laws.
Specifications Camera [System] Camera type: Interchangeable lens digital camera Lens: Sony E-mount lens [Image sensor] Image sensor: APS-C format (23.5 mm × 15.6 mm) CMOS image sensor Effective pixel number of camera: Approx. 24 200 000 pixels Total pixel number of image sensor: Approx. 25 000 000 pixels [Anti-Dust] System: Charge protection coating on Optical Filter and ultrasonic vibration mechanism [Auto focus system] Exposure compensation: ±5.
Eye point (CIPA compliant): Approx. 23 mm from the eyepiece, approx. 21.4 mm from the eyepiece frame at –1 m–1 Diopter Adjustment: –4.0 m–1 to +3.0 m–1 [Input/output terminals] Multi/Micro USB Terminal*: Hi-Speed USB (USB 2.0) * Supports Micro USB compatible device. HDMI: HDMI type D micro jack m (Microphone) Terminal: 3.5 mm Stereo mini jack [Power] Battery type: Rechargeable battery pack NP-FW50 [Power consumption (while shooting)] When using an E PZ 16 – 50 mm F3.5 – 5.6 OSS lens* Approx. 2.
[Wireless LAN] Supported format: IEEE 802.11 b/g/n Frequency band: 2.4 GHz Supported security protocols: WEP/ WPA-PSK/WPA2-PSK Configuration method: Wi-Fi Protected Setup (WPS)/Manual Access method: Infrastructure mode NFC: NFC Forum Type 3 Tagcompliant Model No. WW906746 AC Adaptor AC-UUD12/UUE12 Power requirements: AC 100 V to 240 V, 50 Hz/60 Hz, 0.2 A Output voltage: DC 5 V, 1.5 A Rechargeable battery pack NP-FW50 Battery type: Lithium-ion battery Maximum voltage: DC 8.4 V Nominal voltage: DC 7.
Trademarks GB 46 • Memory Stick and are trademarks or registered trademarks of Sony Corporation. • XAVC S and are registered trademarks of Sony Corporation. • “AVCHD Progressive” and “AVCHD Progressive” logotype are trademarks of Panasonic Corporation and Sony Corporation. • Dolby and the double-D symbol are trademarks of Dolby Laboratories.
On GNU GPL/LGPL applied software The software that is eligible for the following GNU General Public License (hereinafter referred to as “GPL”) or GNU Lesser General Public License (hereinafter referred to as “LGPL”) are included in the product. This informs you that you have a right to have access to, modify, and redistribute source code for these software programs under the conditions of the supplied GPL/ LGPL. Source code is provided on the web. Use the following URL to download it. http://oss.sony.
Additional information on this product and answers to frequently asked questions can be found at our Customer Support Website.
SONY. 4-584-092-61(1) Wi-Fi Connection/ One-touch (NFC) Guide Sending images to a smartphone/tablet computer (One-touch sharing (NFC)) Envoi d'images vers un smartphone ou une tablette (partager par simple contact (NFC)) Required equipment/environment: A smart phone or a tabl et computer {a wireless access point is not necessary). Equipement!environnement requis: Un smartphone ou une tablette (un point d'acces sans fil nest pas necessaire).
Detailed operations are described in the"Help Guide"(on-line manual). Refer to the supplied Instruction Manual for more information about the "Help Guide:' Using a smartphone/tablet computer as a remote controller (One-touch remote (NFC)) Utilisation d'un smartphone ou d'une tablette com me U?lecommande (commande a distance par simple contact (NFC)) Required equipment/environment: A smartphone or a tablet computer (a wireless access point is not necessary).
SON~ mm f.J'JIO) [.., ~~1;:?\,\"'( *-~~~. ~~~~~~~~U~~~7-~~M~Lt~ • E18-135mm :;(-L~~~ (~~;(70~1--:\:"\?•Y:i. ~~:A:- 1 JJ7:\:"\7•Y:1a-t) 1,; ~ i.' E 18-135mm F3.5-5.6 OSS &Bt!CT.>~Il!i ~~:A:' 7-f:' f.i:r.:. 6 ~ ~ ;(~~~t,~· 2 7o1"-1l:::Z 1 )~ 1f 3 ~-L'J~Ij' 7 ~~:A:'7 - ~ 8 7o1"-1l:::z:c-r-·:::z-f'Yr 4 1\V;J;!i\lleMElllli s 1\V;Ji!i\lleMf.i:r.:. • ®:~-¥c·P!I!tt1Jc'c· < 9 ';7?~ ~--~#.\ tC: zc'. frtl :\1\Ji':\~~lii: 18-135 mm 9!-ff~-;:t;t<(~:*:l¥x:&zl 35mmll!IW:\I\#.\~Iii' ' : 27-202.
SONY: 4-699-303-01(1) *t\lll;:t*1*')7 f-.SJIYY':J-:f=f-'- f-.I<::J:~), jg~O)~:I&mBJl~~cti~:@I<::Xjl c~mO)t\!l~ :IJI)B!JO~tlLL';!;9, ~J.fiO)t\ll~IC:-::J~\cl;:tl A.)~-:f':i:i'-fi.:'J (Web~:t&mBJl~) 1<=8ctil c \,' ;!:9, A.)~ -:ffj'-j' f-: 1;::-::J \,' c~l< l;:tjgJI:O)~f&8118Jl~>'J:C:'~< tc~ \, ', ')7 f-.SI IYY'Y 7'7'- f--1<=-::J \, 'cl;:t') -0)-lf;f- r- -l7-f r->'J:C:'lil~< tc~\, ,, = *t\llc l;:t tllfof~I C: I Elm!.J'ill:)m\OFF;,'i;ll!tJt\llljgtJ c' :IJIJB!JO~:tl c ~' ;f9, • ~l!l
Lenses & Accessories I Objectifs et accessoires Objetivos y accesorios I 06beKTII1B 111 AOnonHII1TenbHble np1!1HaAne)f(HOCTII1 I ~~~Wgjcf!:f: I ~A ~ Q!!AiiA12.
+; ..t.ii!.ii (JJ) FE XXX .
SEL85F14GM SEL2470GM SEL90M28G Sonnar T * FE 85mm F1.4 GM SELBSF14GM ESOmm F1.8 OSS SELSOF18 FE 55mm Fl.S ZA SELSSFlBZ 70-200mm F2.8 GSSM II SAL70200G2 70-400mm F4-5.6 GSSM II FE 70-200mm F4 GOSS 5AL70400G2 SEL70200G DT 18-135mm F3.5-5.6 SAM SAL18135 FE 24-70mm F2.8 GM SEL2470GM FE 24-240mm F3.5-6.3 OSS SEL24240 SOmm F2.8 Macro SALSOM28 E30mm F3.5 Macro SEL30M35 FE 90mm F2.
E-mount Lenses I Objectifs pour monture E 11mm (16mm*) • - 28mm (42mm*) SOmm (75mm*) 85mm (128mm*) [!I MASTER"' lOOmm (150mm*) • 200mm (300mm*) - ~~~ ZEISS• 300mm (450mm*) ~APS -e format WAil APS-e format 400mm (600mm*) *11 I I * " tH?ib! 1!:1* rmJ SOOmm (750mm*) Wide Converters I Convertisseurs grand angle Vano Tessar P FE 16 35mm F4 ZA OSS (SEL1635Z)~ E PZ 16 SOmm F3 5 56 055 (SELP1650) @E) Varro Tessar T• E 16 70mm F4 ZA 055 (SEL1670Z) ~ E18 55mmF35 560SS(SEL1855)~ E Pl18 110rnm F4 G
a: Lens and Accessory System Chart a: Schema descriptif des objectifs et des accessoires O:ltnsandAccessorySystem(hfrt O:SthfMildtstriplifdtsobjt
Choose your country to go to the local site I Choisissez votre pays pour acceder au site correspondant Elige un pais para ira Ia web local/ 8bl6eplr1Te npaHy, 'IT06bl nepe~Tir'l Ha MeCTHbiM cal1r iUI~fir±~~~~ttH~J.~mt~t*ttn~uot7-l;;s ~7~• ~12.11"6H iiH'5'" A~ol§.£ o1~ http:/ /www.sony.net/electronics/ r:rft All rights reserved. Reproduction in whole or part is prohibited. Not all models are available in all countries/ regions. Some models are only available at Sony Store in some regions. 1.1\:,1 Some pic
GARANTIE LIMITEE E.-U. et Canada uniquement - 1 an Sony Electronics Inc. exdusivement pour les achats effeclues aux Etats-Unis et Sony du Canada Ltee. exclusivement pour les achats effectues au Canada (collectivement " Sony ,. ) garantit ce produit contre les clefauts de materiaux ou de fabrication pour le proprit\taire d'origine et tous les proprietaires utilisateurs finaux suivants (" Vous ,. ou " Vos ,. ) pendant Ia periode definie cidessus et comme indique dans les prt\sentes. Confoi1Tit\ment acette Gar
11111111111111111~11 ~111111 4-698-500-01 SONY® LIMITED WARRANTY Camcorder, Digital Still Camera, Interchangeable Lens Digital Camera Interchangeable Lens, Accessory U.S. and Canada only- 1 year Sony Electronics Inc. solely for purchases made in the United States and Sony of Canada Ltd.