5-010-473-91(1) Interchangeable Lens Digital Camera E-mount Instruction Manual “Help Guide” (Web manual) Refer to “Help Guide” for in-depth instructions on the many functions of the camera. https://rd1.sony.
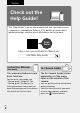
English Check out the Help Guide! The “Help Guide” is an on-line manual that you can read on your computer or smartphone. Refer to it for details on menu items, advanced usage, and the latest information on the camera. Scan here https://rd1.sony.net/help/ilc/1960/h_zz/ ILCE-9M2 Help Guide Instruction Manual In-Camera Guide This manual introduces some basic functions. The [In-Camera Guide] shows explanations of the menu items on the monitor of the camera.
Table of contents Check out the Help Guide!........................................................ 2 Notes on using your camera.................................................... 6 Preparations for shooting Checking the camera and the supplied items........................10 Identifying parts....................................................................... 11 Front side........................................................................ 11 Rear side..............................................
Shooting Focusing.................................................................................. 36 Focus Mode................................................................... 36 Auto focus............................................................................... 38 Focus Area..................................................................... 38 Manual Focus...........................................................................41 Direct manual focus (DMF).....................................
Using a computer Introduction to computer software........................................ 64 Imaging Edge................................................................ 64 PlayMemories Home..................................................... 65 Remote Camera Tool..................................................... 65 MENU items/List of icons Using MENU items.................................................................. 66 List of MENU items...........................................................
Notes on using your camera Along with this section, also see “Precautions” in the Help Guide. Notes on the monitor and electronic viewfinder Notes on handling the product ••The monitor and electronic viewfinder are manufactured using extremely high-precision technology, and over 99.99% of the pixels are operational for effective use. However, there may be some small black dots and/or bright dots (white, red, blue or green in color) that constantly appear on the monitor and electronic viewfinder.
Notes on recording for long periods of time or recording 4K movies ••The camera body and battery may become warm with use – this is normal. ••If the same part of your skin touches the camera for a long period of time while using the camera, even if the camera does not feel hot to you, it may cause symptoms of a low-temperature burn such as redness or blistering. Pay special attention in the following situations and use a tripod, etc.
Notes on discarding or transferring a memory card to others Executing [Format] or [Delete] on the camera or a computer may not completely delete the data on the memory card. When transferring a memory card to others, we recommend that you delete the data completely using data deletion software. When discarding a memory card, we recommend that you physically destroy it.
For Customers in the U.S.A. For question regarding your product or for the Sony Service Center nearest you, call 1-800-222-SONY (7669). Supplier’s Declaration of Conformity Trade Name: SONY Model No.: WW942051 Responsible Party: Sony Electronics Inc. Address: 16535 Via Esprillo, San Diego, CA 92127 U.S.A. Telephone Number: 858-942-2230 This device complies with part 15 of the FCC rules.
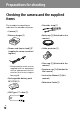
Preparations for shooting Checking the camera and the supplied items The number in parentheses indicates the number of pieces. •• Shoulder strap (1) •• Camera (1) •• Battery charger (1) •• Body cap (1) (Attached to the camera) •• Power cord (mains lead) (1)* (supplied in some countries/ regions) •• Cable protector (1) * Multiple power cords may be supplied with this equipment. Use the appropriate one that matches your country/region. See page 8.
Identifying parts See the pages in parentheses for details. Front side Preparations for shooting ON/OFF (Power) switch When the lens is removed (33)/Shutter button (34) Front dial You can quickly adjust the settings for each shooting mode. Infrared remote sensor Lens release button (32) Microphone Do not cover this part during movie recording. Doing so may cause noise or lower the volume.
Rear side Eyepiece cup To remove the eyepiece cup Push the grips at the bottom of the eyepiece cup to the left and right and lift up the cup. C3 button (Custom button 3) (76)/ (Protect) button MENU button (66) Monitor (For touch operation: Touch panel/Touch pad) (50) You can adjust the monitor to an easily viewable angle and shoot from any position. Remove the eyepiece cup when attaching an angle finder (sold separately).
Diopter-adjustment dial Adjust the diopter-adjustment dial according to your eyesight until the display appears clearly in the viewfinder. If it is hard to operate the diopter-adjustment dial, remove the eyepiece cup before operating the dial.
Top side Mode dial (35) The mode dial is unlocked while you hold down the unlock button at the center. Rear dial You can quickly adjust the settings for each shooting mode. Exposure compensation dial Pressing the lock button at the center switches the exposure compensation dial between the locked and unlocked status. The dial is unlocked when the lock button is popped up and the white line is visible.
•• If the subject is closer than the minimum shooting distance of the lens, the focus cannot be confirmed. Make sure you put enough distance between the subject and the camera. C1 button (Custom button 1) (76) Multi Interface Shoe* Some accessories may not go in all the way and protrude backward from the Multi interface shoe. However, when the accessory reaches the front end of the shoe, the connection is completed.
Sides LAN terminal (Headphones) jack HDMI micro jack (Flash sync) terminal USB Type-C terminal (17) (Microphone) jack Multi/Micro USB Terminal* GB Speaker 16 When an external microphone is connected, the builtin microphone turns off automatically. When the external microphone is a plugin-power type, the power of the microphone is supplied by the camera. (17) This terminal supports Micro USB-compatible devices.
Hooks for shoulder strap Attach both ends of the strap onto the camera. SLOT 2 (Memory card slot 2) (30) Supports SD cards only (compatible with UHS-I and UHS-II) Notes on USB terminals (N-Mark) (61) •• This mark indicates the touch point for connecting the camera and an NFC-enabled Smartphone. •• NFC (Near Field Communication) is an international standard of short-range wireless communication technology.
Notes on the cable protector Use the cable protector to prevent a cable from being disconnected when shooting images with the cable connected. To attach the cable protector Open both of the jack covers on the monitor side. Fit the two hooks on the rear side of the cable protector into the two notches to the left of the USB Type-C terminal and Multi/Micro USB Terminal, and then align the cable protector with the terminal part of Hooks the camera.
Bottom Preparations for shooting Lock lever (27) Battery insertion slot (27) Battery cover (27) When attaching an accessory such as a vertical grip (sold separately), remove the battery cover. To attach the battery cover Insert the shaft on one side of the battery cover into the attachment site, and then push in the battery cover by attaching the shaft on the opposite side.
Basic operations Using the control wheel •• You can select setting items by turning or pressing the top/bottom/left/ right side of the control wheel. Your selection is determined when you press the center of the control wheel. •• The DISP (Display Setting) and ISO (ISO) functions are assigned to the top/right side of the control wheel. In addition, you can assign selected functions to the left/right/bottom side and the center of the control wheel, and to the rotation of the control wheel.
Using the multi-selector Preparations for shooting •• Put your finger right on top of the multi-selector to manipulate it more precisely. •• When [Focus Area] is set to [Zone], [Flexible Spot], [Expand Flexible Spot], [Tracking: Zone], [Tracking: Flexible Spot], or [Tracking: Expand Flexible Spot], you can move the focus area by pressing the multi-selector up/down/left/right. •• The [Focus Standard] function is assigned to the center of the multiselector in the default settings.
1 Press the DISP on the control wheel repeatedly to display a screen mode other than [For viewfinder], and then press the Fn (Function) button. Fn button 2 Select the desired function by pressing the top/bottom/left/ right side of the control wheel. 3 Select the desired setting by turning the front dial, and press the center of the control wheel. •• Some functions can be fine-tuned using the rear dial.
To change the functions in the function menu (Function Menu Set.) The following is the procedure for changing [Drive Mode] in the function menu for still images to [Grid Line]. •• To change the movie function menu, select a movie function menu item in Step . MENU (Camera Settings 2) [Function Menu Set.]. Move to the [Display/Auto Review] screen using the left/ right side of the control wheel. Then, select [Grid Line] and press the center of the control wheel.
4 Press the Fn button to switch to the Quick Navi screen. •• The displayed contents and their positions in the illustrations are just guidelines, and may differ from the actual displays. Auto mode P/A/S/M mode 5 Select a function to set by pressing the top/bottom/left/right side of the control wheel. 6 Select the desired setting by turning the front dial. •• Some functions can be fine-tuned using the rear dial.
To adjust settings from the dedicated setting screens Select the desired function in step 5, then press the center of the control wheel. The dedicated setting screen for the function will appear. Follow the operating guide to adjust settings. Note ••Items that are gray on the Quick Navi screen are not adjustable. ••When using [Creative Style], etc., some of the setup tasks can only be accomplished on a dedicated screen.
Startup guide Step 1: Charging the battery pack 1 Insert the battery pack into the battery charger. •• Place the battery pack on the battery charger in the direction of the . •• Slide the battery pack in the direction of the arrow as far as it will go. 2 Connect the power cord CHARGE lamp (supplied) to the battery charger, and connect the battery charger to the wall outlet (wall socket). The CHARGE lamp on the battery charger will light up in orange and charging will start.
Step 2: Inserting the battery pack into the camera 1 Open the battery cover. pressing the lock lever with the tip of the battery until the battery locks into place. Lock lever Preparations for shooting 2 Insert the battery pack while 3 Close the cover.
To charge the battery pack while it is inserted in the camera Turn the camera off and connect it to a device such as a computer using the USB cable. If you turn on the camera, power will be supplied from the computer or the device that you connected, and you will be able to operate the camera. However, the battery pack will not charge. Use the USB Type-C cable (supplied) or a USB-standard cable. To remove the battery pack Make sure that the access lamp (page 13) is not lit, and turn off the camera.
2 Insert the SD card into the slot 1. 3 Close the cover. Preparations for shooting •• Both the slot 1 (upper) and the slot 2 (lower) only support SD memory cards (compatible with UHS-II). •• This camera does not support Slot 1 Slot 2 Memory Stick media. •• Insert the memory card with the terminal side facing toward you, until it clicks into place. •• You can change which memory card slot to use by selecting MENU (Setup) [Rec. Media Settings] [Prioritize Rec. Media].
To remove the memory card Make sure that the access lamp (page 13) is not lit, and then push in the memory card once to remove it. Access lamp To record to memory cards in two slots The slot 1 is used in the default settings. If you do not intend to change the settings and will only use one memory card, use the slot 1.
2 Mount the lens by aligning the two white index marks (mounting indexes) on the lens and camera. •• Hold the camera with the lens facing down to prevent dust or debris from entering the camera. toward the camera, turn the lens slowly in the direction of the arrow until it clicks into the locked position. Preparations for shooting 3 While pushing the lens lightly Note ••Be sure to hold the lens straight and do not use force when attaching a lens.
To remove the lens Keep pressing the lens release button and turn the lens in the direction of the arrow until it stops.
Step 5: Setting the language and the clock 1 Set the ON/OFF (Power) switch to “ON” to turn on the camera. ON/OFF (Power) switch Preparations for shooting 2 Select the desired language and then press the center of the control wheel. Control wheel 3 Make sure that [Enter] is selected on the screen and then press the center. 4 Select the desired geographic location and then press the center.
7 Repeat steps 5 and 6 to set other items, then select [Enter] and press the center. Hint ••To reset the date and time setting, use MENU (page 81). Note ••This camera does not have a function for inserting the date into images. You can insert the date into images and then save and print them using PlayMemories Home (for Windows only). Step 6: Shooting images in auto mode 1 Press and hold the lock release button in the center of the mode dial, then turn the mode dial to set to .
To shoot movies Press the MOVIE button to start/stop recording. To play back images Press the (Playback) button to play back images. You can select the desired image using the control wheel. To shoot images in various shooting modes Set the mode dial to the desired mode depending on the subject or the functions you want to use. Preparations for shooting To delete displayed image Press the (Delete) button while an image is displayed to delete it.
Shooting Focusing Focus Mode Selects the focus method to suit the movement of the subject. Turn the focus mode dial while pressing the focus mode dial lock release button and select the desired mode. Focus mode dial Focus mode dial lock release button AF-S (Single-shot AF): The product locks the focus once focusing is complete. Use this when the subject is motionless. AF-C (Continuous AF): The product continues to focus while the shutter button is pressed and held halfway down.
Focus indicator (lit): The subject is in focus and the focus is locked. (flashing): The subject is not in focus. (lit): The subject is in focus. The focus will be adjusted continuously according to the movements of the subject. (lit): Focusing is in progress.
Auto focus Focus Area Selects the focusing area. Use this function when it is difficult to focus properly in the auto focus mode. MENU setting. (Camera Settings 1) [Focus Area] desired Wide: Focuses on a subject covering the whole range of the screen automatically. When you press the shutter button halfway down in the still image shooting mode, a green frame is displayed around the area that is in focus.
Examples of the focusing frame display The focusing frame differs as follows. When focusing on a larger area Shooting When focusing on a smaller area •• When [Focus Area] is set to [Wide] or [Zone], the focusing frame may switch between “When focusing on a larger area” and “When focusing on a smaller area” depending on the subject or situation.
To move the focus area •• You can move the focus area in [Flexible Spot], [Expand Flexible Spot], [Zone], [Tracking: Flexible Spot], [Tracking: Expand Flexible Spot], or [Tracking: Zone] by operating the multi-selector. If you assign [Focus Standard] to the center of the multi-selector beforehand, you can move the focusing frame back to the center of the monitor by pressing the center of the multi-selector. •• You can move the focusing frame quickly by touching and dragging it on the monitor.
Manual Focus When it is difficult to focus properly in the autofocus mode, you can adjust the focus manually. 1 Focus mode dial Shooting Turn the focus mode dial while pressing the focus mode dial lock release button and select MF. Focus mode dial lock release button 2 Rotate the focusing ring to achieve sharp focus. •• When you rotate the focusing ring, the focus distance is displayed on the screen. The focus distance is not displayed when the Mount Adaptor (sold separately) is attached.
Direct manual focus (DMF) You can make fine adjustments manually after performing auto focusing, letting you focus on a subject more quickly than when using the manual focus from the beginning. This is convenient in situations such as macro shooting. 1 Turn the focus mode dial while pressing the focus mode dial lock release button and select DMF. Focus mode dial Focus mode dial lock release button 2 Press the shutter button halfway down to focus automatically.
Shutter setting Shutter Type You can set whether to shoot with a mechanical shutter or an electronic shutter. (Camera Settings 2) [ Shutter Type] desired Auto: The shutter type is automatically switched based on the shooting conditions and shutter speed. Shooting MENU setting. Mechanical Shutter: Shoot with the mechanical shutter only. Electronic Shutter: Shoot with the electronic shutter only. Hint ••In the following situations, set the [ Shutter Type] to [Auto] or [Electronic Shutter].
Using the electronic shutter Using the electronic shutter lets you perform various kinds of shooting that are difficult to achieve using the mechanical shutter, such as shooting without sounds or shaking, shooting with a super-fast shutter, and blackout-free shooting*. * During blackout-free shooting, the screen does not black out or drop frames and you can keep looking at the subject through the viewfinder or monitor while shooting images.
*1 The maximum shutter speed is 1/16000 second when the shooting mode is not set to S (Shutter Priority) or M (Manual Exposure), or during bracket shooting with a setting other than [WB bracket] or [DRO Bracket]. *2 The next value after 1/16000 second is 1/32000 second when the shooting mode is set to S (Shutter Priority) or M (Manual Exposure). *3 When [Shoot. Start Disp.] is set to [On], blackout occurs only when the first image is shot (page 47).
Turn the drive mode dial and select (Continuous Shooting: Hi), (Continuous Shooting: Mid), or (Continuous Shooting: Lo). Turn the focus mode dial and select AF-C (Continuous AF), then start shooting images. Hint ••If you want to display the timing of shooting on the screen during blackout(Camera Settings 2) free shooting, adjust the setting using MENU [Shoot. Timing Disp.]. ••To take advantage of the performance of the camera, we recommend that you use a UHS-II memory card.
MENU (Camera Settings 2) [Shoot. Timing Disp.] desired setting. On: Type 1: Displays a frame (dark color) around the focusing frame. On: Type 2: Displays a frame (light color) around the focusing frame. On: Type 3: Displays (dark color) in the four corners of the screen. On: Type 4: Displays (light color) in the four corners of the screen. [On: Type 1]/[On: Type 2] (Example: [Focus Area] is set to [Center]) Shooting Off: Does not display the shutter release timing during blackout-free shooting.
Continuous shooting Shoots images continuously while you press and hold down the shutter button. Turn the drive mode dial and select the desired mode. •• Turn the drive mode dial while pressing the drive mode dial lock release button.
Note ••The shooting speed during continuous shooting becomes slower when [ RAW File Type] is set to [Uncompressed]. ••Continuous shooting is unavailable in the following situations: ––[Picture Effect] is set to [Rich-tone Mono.]. ––[DRO/Auto HDR] is set to [Auto HDR]. ••The speed of continuous shooting decreases when you shoot with a flash. Sets whether to display an indicator of the remaining time for which continuous shooting can be performed at the same shooting speed.
Using touch function Touch Operation Sets whether or not to activate touch operations on the monitor. MENU (Setup) [Touch Operation] desired setting. On: Activates the touch operation. Off: Deactivates the touch operation. Touch Panel/Pad Touch operations when shooting with the monitor are referred to as “touch panel operations,” and touch operations when shooting with the viewfinder are referred to as “touch pad operations.
Touch Focus [Touch Focus] allows you to specify a position where you want to focus using touch operations. This function is available when [Focus Area] is set to a parameter other than [Flexible Spot], [Expand Flexible Spot], [Tracking: Flexible Spot] or [Tracking: Expand Flexible Spot]. Select MENU (Setup) [Touch Operation] [On] beforehand. Specifying the position where you want to focus in the still image mode Shooting MENU (Camera Settings 2) [Func. of Touch Operation] [Touch Focus].
Specifying the position where you want to focus in the movie recording mode (spot focus) The camera will focus on the touched subject. Spot focus is not available when shooting with the viewfinder. Touch the subject on which you want to focus before or during recording. •• When you touch the subject, the focus mode temporarily switches to manual focus and the focus can be adjusted using the focus ring. •• To cancel spot focus, touch or press the center of the control wheel.
2 Touch the subject that you want to track on the monitor. Tracking will start. •• When shooting with the viewfinder, you can use the touch pad to select a subject you want to track. 3 Press the shutter button halfway down to focus. •• Press the shutter button all the way down to shoot images. or press the center of the control wheel.
Selecting a still image size/image quality File Format Sets the file format for still images. MENU setting. (Camera Settings 1) [ File Format] desired RAW: Digital processing is not performed on this file format. Select this format to process images on a computer for professional purposes. RAW & JPEG: A RAW image and a JPEG image are created at the same time. This is suitable when you need two image files, a JPEG for viewing, and a RAW for editing. JPEG: The image is recorded in the JPEG format.
JPEG Image Size The larger the image size, the more detail will be reproduced when the image is printed on large-format paper. The smaller the image size, the more images can be recorded. MENU (Camera Settings 1) [ desired setting. JPEG Image Size] When [ Aspect Ratio] is set to 3:2 When [ Aspect Ratio] is set to 4:3 L: 24M 6000×4000 pixels L: 21M 5328×4000 pixels M: 10M 3936×2624 pixels M: 9.2M 3488×2624 pixels S: 6.0M 3008×2000 pixels S: 5.
Note ••When [ File Format] is set to [RAW] or [RAW & JPEG], the image size for RAW images corresponds to “L.” APS-C/Super 35mm Sets whether to record in APS-C-equivalent size for still images and in Super 35mm-equivalent size for movies. If you select [On] or [Auto], you can use an APS-C size dedicated lens on this product. MENU (Camera Settings 1) [APS-C/Super 35mm] desired setting. On: Records in either APS-C-equivalent size or Super 35mm-equivalent size.
Shooting movies Changing settings for movie recording File Format Selects the movie file format. File Format (Camera Settings 2) [ File Format] desired Characteristics XAVC S 4K Records movies in 4K resolution (3840×2160). XAVC S HD Records movies in crisper quality than AVCHD with larger amounts of data. AVCHD The AVCHD format has a high degree of compatibility with storage devices other than computers. You can save movies on a computer using the PlayMemories Home software.
Record Setting Selects the frame rate and bit-rate for movie recording. MENU (Camera Settings 2) [ desired setting. Record Setting] •• The higher the bit-rate, the higher the image quality. •• For estimates of the maximum recordable movie time with each recording setting, refer to page 93. When [ File Format] is set to [XAVC S 4K] Record Setting Bit-rate Description 30p 100M/25p 100M Approx. 100 Mbps Records movies in 3840×2160 (30p/25p). 30p 60M/25p 60M Approx.
When [ File Format] is set to [XAVC S HD] Record Setting Description Approx. 50 Mbps Records movies in 1920×1080 (60p/50p). 60p 25M/50p 25M Approx. 25 Mbps Records movies in 1920×1080 (60p/50p). 30p 50M/25p 50M Approx. 50 Mbps Records movies in 1920×1080 (30p/25p). 30p 16M/25p 16M Approx. 16 Mbps Records movies in 1920×1080 (30p/25p). 24p 50M* Approx. 50 Mbps Records movies in 1920×1080 (24p). 120p 100M/100p 100M Approx. 100 Mbps Records high-speed movies in 1920×1080 (120p/100p).
Note ••Creating an AVCHD recording disc from movies that were recorded with Record Setting] takes a long time [60i 24M (FX)]/[50i 24M (FX)] as the [ because the image quality of movies is converted. If you want to store movies without converting them, use a Blu-ray Disc. ••[120p]/[100p] cannot be selected for the following settings.
Using network functions Using the Wi-Fi/One-touch (NFC)/ Bluetooth/wired LAN functions For details, refer to the “Help Guide” (page 2). Installing Imaging Edge Mobile Imaging Edge Mobile is required to connect the camera and a smartphone. If Imaging Edge Mobile is already installed on your smartphone, be sure to update it to the latest version. For details on Imaging Edge Mobile, refer to the support page (https://www.sony.net/iem/).
Recording location information to captured images By using Imaging Edge Mobile, you can obtain location information from a connected smartphone (via Bluetooth communication) and record it to captured images. For details on the operating procedure, refer to the “Help Guide” (page 2) or the following support page. https://www.sony.net/iem/btg/ Transferring images to the FTP server You can use the camera’s Wi-Fi function or wired LAN to transfer images to the FTP server.
Connecting the camera to a wireless access point Connect the camera to your wireless access point. Before starting the procedure, make sure you have the SSID (name of the access point) and password of your wireless access point with you. 1 MENU (Network) [Wi-Fi Settings] [Access Point Set.]. want to connect. Press the center of the control wheel and enter the password for the wireless access point, then select [OK].
Using a computer Introduction to computer software We offer the following computer software to enhance your enjoyment of photos/movies. Access one of the following URLs using your Internet browser and then download the software by following the onscreen instructions. If one of these software is already installed on your computer, update it to the latest version before use. For details on the software for computers, refer to the following URL: https://www.sony.
PlayMemories Home PlayMemories Home allows you to import still images and movies to your computer and view or use them. You need to install PlayMemories Home to import XAVC S movies or AVCHD movies to your computer. You can access the download website directly from the following URL: https://www.sony.net/pm/ •• When you connect the camera to your computer, new functions may be added to PlayMemories Home.
MENU items/List of icons Using MENU items You can change settings related to all the camera operations including shooting, playback, and operating method. You can also execute camera functions from the MENU. 1 Press the MENU button to display the menu screen. 2 Select the desired setting you want to adjust using the top/ bottom/left/right sides of the control wheel or by turning the control wheel, and then press the center of the control wheel.
List of MENU items For details on each MENU items, refer to the reference page in the last column or the Help Guide. (Camera Settings 1) Red tab Quality/Image Size File Format Sets the file format for still images. ([RAW] / [JPEG], etc.) RAW File Type Selects the file type for RAW images. JPEG Quality Selects the JPEG image quality for [RAW & JPEG] or [JPEG] under [ File Format]. 54 JPEG Image Size Selects the size of still images.
Shoot Mode/Drive Self-timer Type When shooting with the self-timer, sets how many seconds elapse from when you press the shutter button until when the image is recorded and how many images are recorded. Help Guide Bracket Settings Sets self-timer shooting in the bracket mode, bracket type, and the shooting order for exposure bracketing or white balance bracketing. Help Guide Configures settings for interval shooting. Help Guide Interval Shoot Func.
Sets whether to adjust the [Focus Area] and the position of the focusing frame based on the camera’s position (horizontal or vertical). Help Guide AF Illuminator Sets the AF illuminator, which provides light to aid focusing in dark scenes. Help Guide Configures settings such as whether the camera focuses with priority on human faces or eyes. Help Guide Sets the AF tracking sensitivity for the still image mode.
Disp. cont. AF area Sets whether or not to display the focus area in [Continuous AF] mode. Help Guide Phase Detect. Area Sets phase detection AF area. Help Guide Circ. of Focus Point Sets whether to allow the focusing frame to jump from one end to the other when you move the focusing frame. Help Guide AF Micro Adj. Finely adjusts the autofocused position, when using the LA-EA2 or LA-EA4 Mount Adaptor (sold separately). Help Guide Exposure Comp.
Sets whether to lock the exposure when the shutter button is pressed halfway down. This is useful when you want to adjust the focus and exposure separately. Help Guide Adjusts the standard for the correct exposure value for each metering modes. Help Guide Flash Mode Sets the flash settings. Help Guide Flash Comp. Adjusts the intensity of flash output. Help Guide Exp.comp.set Sets whether to reflect exposure compensation value to flash compensation.
Creative Style Selects the desired image processing. You can also adjust contrast, saturation, and sharpness. ([Vivid] / [Portrait], etc.) Help Guide Picture Effect Shoots images with a texture unique to the selected effect. ([Toy Camera] / [High Contrast Mono.], etc.) Help Guide Sets whether to lock the white balance while the shutter button is pressed in the auto white balance mode. Help Guide Focus Magnifier Enlarges the image before shooting so that you can check the focus.
Regist. Faces Priority Detects the registered face with higher priority using [Face Registration]. (Camera Settings 2) Help Guide Purple tab Movie Sets the exposure mode when shooting movies. Help Guide Exposure Mode Sets the exposure mode when shooting slow-motion/quick-motion movies. Help Guide File Format Selects the movie file format. ([XAVC S 4K] / [AVCHD], etc.) 57 Record Setting Selects a frame-rate and bit-rate for the movie.
Audio Level Display Sets whether to display the audio level. Help Guide Audio Out Timing Sets the timing of audio output during the movie recording. Help Guide Wind Noise Reduct. Reduces wind noise during movie recording. Help Guide Marker Display Sets whether to display markers on the monitor when recording movies. Help Guide Marker Settings Sets which markers to display on the monitor when recording movies.
Zoom Ring Rotate Assigns the zoom in/out to the rotational direction of the zoom lens. This function is only available with a power zoom lens that is compatible with this function. Help Guide DISP Button Sets the type of information to be displayed on the monitor or in the viewfinder when the DISP button is pressed. Help Guide FINDER/MONITOR Sets the method for switching the display between the viewfinder and the monitor. Help Guide Sets the frame rate for the viewfinder when shooting still images.
Auto Review Sets auto review to display the captured image after shooting. Help Guide Custom Key Assigns functions to the various keys so that you can perform operations more quickly by pressing the keys when shooting still images. Help Guide Custom Key Assigns functions to the various keys so that you can perform operations more quickly by pressing the keys when shooting movies.
MOVIE Button Enables or disables the MOVIE button. Help Guide Lock Operation Parts Sets whether to disable the multiselector, control wheel, or front and rear dials temporarily when the Fn button is pressed and held down. Help Guide Audio signals Selects whether the electronic shutter makes a sound or the camera beeps during auto focus and self-timer operations. Help Guide (Network) Green tab Sets movies to be transferred to a smartphone, or transfers images to a smartphone.
Bluetooth Settings Configures settings for connecting the camera to a smartphone or a Bluetooth remote commander via a Bluetooth connection. Help Guide Obtains location information from the paired smartphone and records it to captured images. Help Guide Bluetooth Rmt Ctrl Sets whether or not to use a Bluetooth remote commander. Help Guide Wired LAN Setting Sets the wired LAN. Help Guide Edit Device Name Changes the device name under Wi-Fi Direct, etc.
Specifies in advance on the memory card which still images to print out later. Help Guide Voice Memo Records, plays back, and deletes voice memos. Help Guide Voice Memo PB Volume Sets the playback volume for voice memos. Help Guide Copy Copies images from the memory card in the memory card slot designated in [Select Playback Media] to the memory card in the other slot. Help Guide Photo Capture Captures a chosen scene in a movie to save as a still image.
Image Jump Setting Sets which dial and method to use for jumping between images during playback. (Setup) GB 80 Help Guide Yellow tab Monitor Brightness Adjusts the brightness of the screen. Help Guide Viewfinder Bright. Sets the brightness of the viewfinder. Help Guide Finder Color Temp. Sets the color temperature of the viewfinder. Help Guide Volume Settings Sets the volume for movie playback. Help Guide Delete confirm.
Adjusts settings related to touch pad operation. Help Guide Demo Mode Sets demonstration playback of movies to on or off. Help Guide TC/UB Settings Sets the time code (TC) and user bit (UB). * This function is for skilled movie creators. Help Guide IR Remote Ctrl Sets whether to use the infrared remote control. Help Guide HDMI Settings Sets the HDMI settings.
GB 82 Write Serial Number Writes the camera’s serial number to the Exif data when recording still images. Help Guide Format Formats the memory card. Help Guide Rec. Media Settings Sets the method for recording images to two memory card slots. Help Guide File/Folder Settings Sets file names for still images to be shot, and specifies folders for storing the shot still images. Help Guide File Settings Sets file numbers and file names for movies to be recorded.
(My Menu) Add Item Gray tab Adds desired MENU items to (My Menu). Sort Item Sorts the MENU items added to (My Menu). Delete Item Deletes MENU items added to (My Menu). Delete Page Deletes all the MENU items on a page in Delete All (My Menu). Deletes all the MENU items added to (My Menu). Display From My Menu Help Guide Help Guide Help Guide Help Guide Help Guide *1 If you change this item, you will need to format the memory card for compatibility with the PAL or NTSC system.
List of icons on the monitor The displayed contents and their positions in the illustrations are just guidelines, and may differ from the actual displays.
24M 21M 20M 16M 10M 9.2M 8.7M 6.9M 6.0M 5.3M 5.1M 4.0M 2.6M 2.3M 2.2M 1.7M Setting Effect OFF (75) Image size of still images (55) RAW RAW recording (compressed/ uncompressed) (54) AF Illuminator (69) Flicker Flickering detected (72) X.FINE FINE STD JPEG Quality (54) XAVC S 4K XAVC S HD AVCHD SteadyShot off/on, Camera shake warning (74) File format of movies (57) SteadyS. Focal Len.
Copyright information writing on (81) Database file full/Database file error IPTC IPTC information writing on (81) Battery Focus Cancel (51) Remaining battery (26) Tracking Cancel (52) Remaining battery warning Spot Focus Performing [Spot Focus] (52) NFC active (61) USB power supply (81) Shooting settings Bluetooth connection available / Bluetooth connection unavailable (78) Drive Mode (48) Connected to smartphone / Not connected to smartphone Obtaining location information/ Location inform
JPEG RAW RAW+J +J File Format (54) Focus indicator/exposure settings Metering Mode (70) AWB Focus indicator (37) 1/250 Shutter speed 7500K A5 G5 White Balance (Auto, Preset, Underwater Auto, Custom, Color temperature, Color filter) (71) D-Range Optimizer/Auto HDR (71) F3.
STBY REC Spot metering area (70) Movie recording standby/Movie recording in progress 1:00:12 Exposure Setting Guide (75) Actual movie recording time (hours: minutes: seconds) Shutter speed indicator Audio Level Display (74) Aperture indicator REC Control (81) Histogram 00:00:00:00 Time code (hours: minutes: seconds: frames) (81) Digital level gauge 00 00 00 00 User Bit (81) Icons on the playback screen Single-image playback Histogram display Basic information View Mode (79) Playback media (79)
Shooting settings Rating (78) Picture Effect error Protect (78) DPOF DPOF set (79) 3/7 File number/Number of images in the view mode Auto HDR error (71) 35mm Lens focal length Refer to “Icons on the shooting screen” (page 84) for other icons displayed in this area.
About this product Specifications Battery life and number of recordable images Battery life Number of images Shooting (still images) Screen mode ― Approx. 690 Viewfinder mode ― Approx. 500 Actual shooting (movies) Screen mode Approx. 120 min. ― Viewfinder mode Approx. 110 min. ― Screen mode Approx. 200 min. ― Viewfinder mode Approx. 195 min.
Memory cards that can be used This camera only supports SD memory cards (UHS-II compatible). When using microSD memory cards with this camera, be sure to use the appropriate adaptor.
Number of recordable images When you insert a memory card into the camera and turn the camera on, the number of images that can be recorded (should you continue to shoot using the current settings) is displayed on the screen. Note ••When “0” (the number of recordable images) flashes in orange, the memory card is full. Replace the memory card with another one, or delete images from the current memory card. ••When “NO CARD” flashes in orange, it means no memory card has been inserted. Insert a memory card.
Recordable movie times The table below shows the approximate total recording times using a memory card formatted with this camera. The values may vary depending on the shooting conditions and the type of memory File Format] is set to card used. The recording times for when [ [XAVC S 4K] and [XAVC S HD] are recording times when shooting with [ Proxy Recording] set to [Off].
•• The duration of time available for movie recording varies depending on the file format/recording settings for movies, memory card, ambient temperature, Wi-Fi network environment, condition of the camera before you start recording, and condition of the charging of the battery. The maximum continuous recording time for a single movie shooting session is approximately 13 hours (a product specification limit).
•• The duration of time available for movie recording varies with the temperature, file format/record setting for movies, Wi-Fi network environment, or condition of the camera before you start recording. If you frequently recompose or shoot images after the power is turned on, the temperature inside the camera will rise and the recording time available will be shorter. •• If the icon appears, the temperature of the camera has risen.
Specifications Camera [System] Camera Type: Interchangeable Lens Digital Camera Lens: Sony E-mount lens [Image sensor] Image format: 35 mm full frame (35.6 mm × 23.8 mm), CMOS image sensor Effective pixel number of camera: Approx. 24 200 000 pixels Total pixel number of camera: Approx.
[Recording format] [General] [Recording media] [Wireless LAN] File format: JPEG (DCF Ver. 2.0, Exif Ver. 2.31, MPF Baseline) compliant, RAW (Sony ARW 2.3 format) Movie (XAVC S format): MPEG-4 AVC/H.264 XAVC S ver.1.0 format compliant Video: MPEG-4 AVC/H.264 Audio: LPCM 2ch (48 kHz 16 bit) Movie (AVCHD format): AVCHD format Ver. 2.0 compatible Video: MPEG-4 AVC/H.264 Audio: Dolby Digital 2ch, equipped with Dolby Digital Stereo Creator ••Manufactured under license from Dolby Laboratories.
Battery charger BC-QZ1 Rated input: , 50/60 Hz, 0.38 A 100 - 240 V Rated output: 8.4 V , 1.6 A Rechargeable battery pack NP-FZ100 Rated voltage: 7.2 V Design and specifications are subject to change without notice. On image data compatibility ••This camera conforms with DCF (Design rule for Camera File system) universal standard established by JEITA (Japan Electronics and Information Technology Industries Association).
On GNU GPL/LGPL applied software The software that is eligible for the following GNU General Public License (hereinafter referred to as “GPL”) or GNU Lesser General Public License (hereinafter referred to as “LGPL”) are included in the product. This informs you that you have a right to have access to, modify, and redistribute source code for these software programs under the conditions of the supplied GPL/LGPL. Source code is provided on the web. Use the following URL to download it. http://oss.sony.
Index A F AF ..................................................... 38 Fn ..................................................13, 21 AF-C................................................... 36 Focus................................................. 36 AF-S................................................... 36 Focus indicator.................................. 37 Auto focus......................................... 38 Function button............................13, 21 Auto Mode.............................
N V NFC................................................. 5, 61 Volume..............................................80 Noise reduction................................. 67 O W WB......................................................71 One-touch (NFC)................................61 Wi-Fi............................................... 5, 61 P X Playback............................................ 35 XAVC S 4K.......................................... 57 PlayMemories Home........................
GB 102
Index GB 103
©2019 Sony Corporation Printed in Thailand