4-130-105-12 (1) Intelligent Monitoring Software Installation Guide Software Version 1.
Table of Contents Copyright Notice ....................................... 2 Features of RealShot Manager Advanced ............................................ 3 Example System Layouts ......................... 5 Example System Layout 1 ...........................5 Example System Layout 2 ...........................6 Example System Layout 3 ...........................7 Operating Environment ............................ 8 END-USER LICENSE AGREEMENT ......... 8 MPEG-4 Video Patent Portfolio License ..........
Features of RealShot Manager Advanced RealShot Manager Advanced is a software application used to monitor network cameras (IP cameras) in a multipoint monitoring system. By installing RealShot Manager Advanced on a computer and making a few easy settings, it is possible to manage multiple network cameras over a network, monitor images, search and play back recordings, and control cameras, among other operations. RealShot Manager Advanced has the following features.
Caution • With RealShot Manager Advanced (Server), up to 32 licensed cameras can be connected. However, because connecting the maximum number of cameras may adversely affect system performance, depending on your hardware and operating environment, be sure to test your system before operating RealShot Manager Advanced (Server). • The RealShot Manager Advanced license is a fixed-type license, permanently associated with the computer on which RealShot Manager Advanced (Server) is installed.
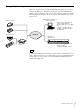
Example System Layouts With RealShot Manager Advanced, you can construct the following system layouts according to the scale and intended use of your system. Caution When a camera is registered with and operated by RealShot Manager Advanced on one computer, do not operate that same camera from another RealShot Manager Advanced or NSR-series device, or from another Web browser. Doing so may result in malfunction. Example System Layout 1 What follows is the most basic system layout.
Example System Layout 2 With this system layout, you can share recording data and camera monitoring between multiple computers by installing the version of RealShot Manager Advanced suited to your needs on each computer. RealShot Manager Advanced (Client: Client Unit) • Monitor images and audio from cameras via the main unit. • Play back data stored on the main unit. • Configure and adjust settings. • Configure and adjust settings for the main unit.
Example System Layout 3 This is an example layout for using RealShot Manager Advanced as a remote client for the NSR series. With this system layout, you can install RealShot Manager Advanced (Client) on the remote client computer, and share recording data and camera monitoring between the client and the NSR unit acting as the master server. RealShot Manager Advanced (Client: Client Unit) • Monitor images and audio from cameras via the NSR unit. • Play back data stored on the NSR unit.
Operating Environment For details on the operating environments and devices supported by RealShot Manager Advanced, refer to the software release notes. END-USER LICENSE AGREEMENT The following End-User License Agreement (“EULA”) is a legal agreement between you and Sony Corporation (“SONY”). Under the EULA, you may use SONY’s Intelligent Monitoring Software named “RealShot Manager Advanced” (the “Software”). END-USER LICENSE AGREEMENT Article 1. LICENSE 1.
Article 5. LIMITATION OF LIABILITY 1. THE SOFTWARE IS PROVIDED ON AN “AS IS” BASIS. SONY MAKES NO REPRESENTATION OR WARRANTY THAT THE SOFTWARE IS FREE FROM ERROR, DEFECT OR INACCURACY AND OPERATES PERFECTLY. SONY MAKES NO WARRANTIES WHATSOEVER, EXPRESS, IMPLIED OR STATUTORY, AND HEREBY DICLAIMS ALL IMPLIED WARRANTIES, INCLUDING, BUT NOT LIMITED TO, THE WARRANTIES OF MERCHANTABILITY, FITNESS FOR A PARTICULAR PURPOSE. 2.
MPEG-4 Video Patent Portfolio License THIS PRODUCT IS LICENSED UNDER THE MPEG-4 VISUAL PATENT PORTFOLIO LICENSE FOR THE PERSONAL AND NON-COMMERCIAL USE OF A CONSUMER FOR (i) ENCODING VIDEO IN COMPLIANCE WITH THE MPEG-4 VISUAL STANDARD (“MPEG-4 VIDEO”) AND/OR (ii) DECODING MPEG-4 VIDEO THAT WAS ENCODED BY A CONSUMER ENGAGED IN A PERSONAL AND NON-COMMERCIAL ACTIVITY AND/OR WAS OBTAINED FROM A VIDEO PROVIDER LICENSED BY MPEG LA TO PROVIDE MPEG-4 VIDEO.
Steps to Proficiency By installing the software and following the steps below, you can become proficient in RealShot Manager Advanced. The configurations required differ depending on whether RealShot Manager Advanced is used as a server or a client. Installing the Software (page 12) After downloading RealShot Manager Advanced, you need to install it on your computer.
1 Installing the Software Double-click the “setup.exe” file in the RealShot Manager Advanced folder. The installation wizard starts. Run the installer to install the software on your computer. The installer performs the following operations in order.
4 Select a destination folder for installation, and click [Next]. 6 Select the type of RealShot Manager Advanced to install, and click [Next]. The folder “C:\Program Files\Sony\RealShot Manager Advanced” is selected by default. To change the destination folder, click [Change] and specify a folder to use for installation. Note 5 To install and use the [Client] type software, a computer running the [Server] type or an NSR series master server must exist on the same network.
8 Click [Install]. 10 When the following screen appears, click [Yes]. The computer will restart. Installation of RealShot Manager Advanced begins. 9 When the following screen appears, click [Finish]. Installation of the software is now complete.
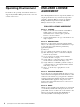
Starting and Stopping RealShot Manager Advanced If a license has not been registered when you start RealShot Manager Advanced (Server), the following screen appears. Click either [Evaluate] or [30 Days Mode] to start RealShot Manager Advanced. Starting RealShot Manager Advanced 1 Click the [Start] menu, select [All Programs], point to [Sony RealShot Manager Advanced], and then click [RealShot Manager Advanced]. The logon screen appears. 2 Log on.
Stopping RealShot Manager Advanced 1 Click Setting Up for Use as a Server at the top right of the Main screen. Log on to RealShot Manager Advanced, and perform basic configuration to automatically register cameras and configure scheduled recording and alarm recording. Logging On Enter the user name and password, and click [Logon]. Default user name: admin Default password: admin The following screen appears. 2 Click [Exit Application]. RealShot Manager Advanced exits.
Registering All Cameras and Configuring Scheduled Recording Automatically 1 4 Click [Next]. Select [Automatic camera registration], and click [OK]. The following screen appears. Devices on the same network segment are automatically detected. 5 Enter the number of days to store recorded images, and click [Next]. Caution The IP address for the camera is automatically changed and registered. 2 Click [Finish]. Scheduled recording is configured automatically.
When configuration is complete, the Configuration Manager screen appears. 7 Click 2 For further details on settings, refer to “Registering Devices” in the User’s Guide (PDF). (close) at the top right of the window. The Main screen appears with a 2 × 2 layout. Continue to the section, “Verifying Operation” (page 20). Select the check boxes for the cameras you want to register, and click [Register]. The selected cameras are registered on RealShot Manager Advanced. 3 Click [Finish].
5 Click [Next]. Basic Configuration Settings After performing basic configuration, the values for each setting will be as follows. 6 Verify configurations, and click [Finish]. Alarm recording starts. When configuration is complete, the Main screen appears with a 2 × 2 layout. Setting Scheduled recording Alarm recording Image size Maximum image size supported by the camera. Depends on the Alarm/Event Record settings configured in the [Video] tab. Codec Codec that supports the maximum image size.
4 Refer to the User’s Guide (PDF) for details on operating each function. Settings that Require Individual Configuration Further configuration is required in the following cases. Storage location settings Under basic configuration settings, data is stored in the default storage location. For details on recording to other storage locations, refer to the User’s Guide (PDF).
1 Setting Up for Use as a Client Specify a server, log on to RealShot Manager Advanced, and assign cameras to monitor frames. Logging On Enter the following information, and click [Logon]. Logon Server: Server IP address. Specify the central server value configured on the server for the port. The default value is “8082.” User Name: User name configured on the server. Password: Password configured on the server.
Monitoring Camera Images Note When the Camera pane is not displayed, click and select [Camera] from the menu that appears to switch to the Camera pane. This section explains in broad terms the steps to monitoring images from cameras. For detailed operating instructions and other functions, refer to the User’s Guide (PDF). 1 Click the monitor frame to display the live images on the main screen. 2 Click [LIVE] on the Monitor Control pane.
Note You can also control a camera with the mouse or remote control. For details, refer to the User’s Guide (PDF). Recording, Searching, and Playing Images You can record live images, and search and play back recorded image data and audio data. Caution As a general rule, do not run other applications on the computer using RealShot Manager Advanced to perform recording. Note You can also set a recording schedule to record images from a camera. For details, refer to the User’s Guide (PDF).
3 Click pane. (Start Recording) on the Playback Control 2 Specify a date and time in [Date] in the Monitor Control pane, and then click [GO]. Recording starts. Note A frame for the specified data and time appears. Recording continues even if you change the layout. 4 Click (Stop recording) to stop recording. Recording stops. Playing Recorded Images Playing from Alarm History 1 Click to select the monitor frame of the recorded images you want to play.
2 Specify the search conditions, and click [Search]. 1 3 Click (Play). The recorded images are played in the monitor frame. You can perform operations such as enlarging, reducing, fast forwarding, and rewinding images on the Image Control pane and Playback Control pane. 2 3 4 1 Click [Normal]. 2 Specify the search conditions. 3 Click [Search]. A list of search results is displayed (4). You can play recorded images from the search results. For details, refer to “Playing Back Search Results” (page 25).
Uninstalling the Software Perform the following procedure to uninstall the software. Troubleshooting Logging Uninstall RealShot Manager Advanced r Uninstall PostgreSQL r Delete data Before Uninstalling • Log on to Windows as a user with administrator privileges when uninstalling. • Close all other programs currently running. With RealShot Manager Advanced, you can view the most recent log messages in the “Log Window”. Log Window This window appears when you click (Open Log Window) on the main window.
If this window appears even when a license file is copied to the RealShot Manager install folder, restart your computer. To confirm that your license is installed properly Select [Information] in the logon screen. In the dialog box that appears, you can confirm the number of cameras that are enabled with your license. Verifying a Network Connection (Using Ping) Using the ping command, you can test whether the camera is connected to the network and whether it can be recognized by the computer.
Cannot Display or Record at the Maximum Frame Rate When there are network-related issues, or when the settings on the camera or in RealShot Manager Advanced are incorrect, one of the following problems could be the cause. • The camera resolution or picture quality is set too high for the network connection or the computer running RealShot Manager Advanced. tConfirm the camera configuration, while referring to the User’s Guide (PDF). • The maximum value is restricted by the local settings on the camera.
Sony Corporation