D:\SONY TV\SY130221_F31 (Rev-1)\4477659112_GB\GB01COV.
D:\SONY TV\SY130221_F31 (Rev-1)\4477659112_GB\GB02REG.fm Introduction Thank you for choosing this Sony product. Before operating the TV, please read this manual thoroughly and retain it for future reference. ~ • Instructions about “Installing Wall-Mount Bracket” are included within this TV’s instructions manual. • The illustrations used in this manual may differ depending on your TV model. • The illustrations of the remote control used in this manual are of the RM-GD026 unless otherwise stated.
D:\SONY TV\SY130221_F31 (Rev-1)\4477659112_GB\GB02REG.fm This television is designed for use in Hong Kong and ensured the usage in Hong Kong only. Location of the identification label Labels for Model No. and Power Supply rating (in accordance with applicable safety regulation) and Manufacturing date are located on the rear of the TV.
D:\SONY TV\SY130221_F31 (Rev-1)\4477659112_GB\GB01TOC.fm About this manual (Operating Instructions) This manual explains how to set up your TV. For more information on how to use BRAVIA TV, refer to the “Electronic manual”. Operating Instructions Explains how to set up your TV such as connections, initial set-up, and basic operations. For more information, press the i-MANUAL button Electronic manual (i-Manual) Explains how to use all the features. See page 19 on how to use the i-Manual.
D:\SONY TV\SY130221_F31 (Rev-1)\4477659112_GB\GB01TOC.fm Table of Contents Getting Started Checking the accessories......................................................................... 6 Inserting batteries into the remote control................................................. 6 1: Attaching the Table-Top Stand ............................................................. 7 2: Connections ..........................................................................................
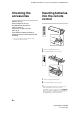
D:\SONY TV\SY130221_F31 (Rev-1)\4477659112_GB\GB03STU.fm Getting Started Checking the accessories Inserting batteries into the remote control Remote Control (1) One-touch Remote Control (1) Size AAA batteries (R03 type) (4) Table-Top Stand (1)* Fixing screws for Table-Top Stand (M5 × 12) (4) Active 3D Glasses (Battery included) (4) Operating Instructions (this manual) and other documents * Refer to the supplied Table-Top Stand leaflet to assemble the Table-Top Stand.
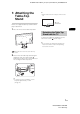
D:\SONY TV\SY130221_F31 (Rev-1)\4477659112_GB\GB03STU.fm 1: Attaching the Table-Top Stand ~ • Ensure that there are no objects in front of the TV. 3D Sync Transmitter Refer to the supplied Table-Top Stand leaflet for proper attachment. 1 IR Sensor GB Place the TV set on the Table-Top Stand. Detaching the Table-Top Stand from the TV To detach the Table-Top Stand from the TV, remove the screws fixed in step 2.
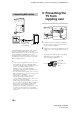
D:\SONY TV\SY130221_F31 (Rev-1)\4477659112_GB\GB03STU.fm 2: Connections x To connect a Set Top Box/recorder (e.g. DVD recorder) with HDMI ~ • Use an antenna (aerial) cable connector no greater than 14 mm in thickness. • Use an HDMI cable connector within 12 mm (thickness) × 21 mm (width). • Use Sony HDMI cable with “High Speed” indication for HDMI connection. • For more information on connections, refer to the i-Manual.
D:\SONY TV\SY130221_F31 (Rev-1)\4477659112_GB\GB03STU.
D:\SONY TV\SY130221_F31 (Rev-1)\4477659112_GB\GB03STU.fm Connecting MHL device 3: Preventing the TV from toppling over 1 2 Use authorized MHL 2 CABLE with MHL logo (not supplied) MHL device 1 2 The MHL (Mobile High-Definition Link) enables the TV to communicate with a connected MHL-compatible device. The TV can charge the connected MHL-compatible device while playing photo/music/video from it. You can use the TV remote control to control the connected MHL-compatible device.
D:\SONY TV\SY130221_F31 (Rev-1)\4477659112_GB\GB03STU.fm 4: Bundling the cables Before bundling the cables, remove the cable holder from the AC cover. Reuse the cable holder to bundle the other cables. 5: Connecting the TV to the Internet ~ When you connect this TV to the Internet, you can enjoy multiple functions. For details on the functions, refer to the i-Manual. • Do not bundle the AC power cord (mains lead) together with other cables.
D:\SONY TV\SY130221_F31 (Rev-1)\4477659112_GB\GB03STU.fm Preparing a wireless LAN The built-in wireless LAN device allows you to access the Internet and your home network. With this feature, you can connect to a wireless LAN and enjoy the benefits of networking in a cable-free environment. Before setting up the wireless LAN function of the TV, be sure to set up a wireless LAN router.
D:\SONY TV\SY130221_F31 (Rev-1)\4477659112_GB\GB03STU.fm 3 Press V/v/B/b to select an item, then press . Follow the instructions on the screen. GB Programme Sorting: Changes the order of analogue channels stored in the TV. 1 Press V/v to select the channel you want to move to a new position, then press . 2 Press V/v to select the new position for the channel, then press . ~ • You can also tune channels manually. Network Set-up: Sets up the Internet settings.
D:\SONY TV\SY130221_F31 (Rev-1)\4477659112_GB\GB04SAF.fm Using Your BRAVIA TV Watching TV 1 1 Turn on the TV. Press =/1 on the TV or remote control to turn on the TV. 1 3 2 Select a mode. 3 Select a TV channel or select an input. or or x To select digital channels Use 0-9. For channel numbers 10 and above, press the next digit quickly. 2 ~ • See below illustration for location of the CH+/-, 2+/-, V/v/B/b, , and HOME buttons on the TV.
D:\SONY TV\SY130221_F31 (Rev-1)\4477659112_GB\GB04SAF.fm Watching 3D contents This feature lets you experience powerful 3D entertainment, such as stereoscopic 3D games and 3D Blu-ray Disc. Refer to the i-Manual as well as the instruction manual supplied with the 3D glasses on how to set the 3D settings or watch the 3D contents. GB Frequently used buttons 1 1 2 Subtitle setting You can turn subtitle on/off while watching digital broadcasting.
D:\SONY TV\SY130221_F31 (Rev-1)\4477659112_GB\GB04SAF.fm Selecting various functions and settings (Home Menu) You can select the features of your TV from the Home menu. Here is an example on how to select an item and modify the TV settings. 1 Press HOME. 2 Press V/v to select “Settings” category. The contents of “Settings” are displayed horizontally. 2, 3 OPTIONS 1 See page 17 (Category list) for all categories. 3 Press B/b to select a desired setting item, then press . 4 Modify the settings.
D:\SONY TV\SY130221_F31 (Rev-1)\4477659112_GB\GB04SAF.fm Category list Category GB The categories are available depending on your TV model, region and country. Featured Provides information on available applications and content. If there is no network connection, or the “Featured Display” setting is set to “Off”, the “Featured” category will not be displayed. History Displays recently viewed items. TV Allows you to select a list of TV channels, or a programme guide.
D:\SONY TV\SY130221_F31 (Rev-1)\4477659112_GB\GB04SAF.fm Watching Internet Video This feature serves as a gateway to Internet content, delivering a variety of on-demand entertainment straight to your TV. You can enjoy video content, including movies and cartoons. You will need to make a broadband Internet connection. For details, see page 11 (5: Connecting the TV to the Internet). 2, 3, 4 1 Press HOME. 2 Press V/v to select “Applications” category. 3 Press B/b “All Applications”, then press .
D:\SONY TV\SY130221_F31 (Rev-1)\4477659112_GB\GB05OVR.fm Looking for Instructions Looking for instructions in the electronic manual (i-Manual) Operating instructions are built into your BRAVIA TV and can be displayed on the screen. To learn more about your TV features, access your i-Manual with the touch of a button. 1 Press i-MANUAL. 2 Select an item. GB 1 Press B/b to select an item. 1 2 RETURN 2 Press V/v/B/b to select an item, then press .
D:\SONY TV\SY130221_F31 (Rev-1)\4477659112_GB\GB05OVR.fm Saving frequently viewed pages (Bookmark) You can save frequently viewed pages for easy access anytime. x To save a page In the page to bookmark, press the yellow button on the remote control. Displaying the page again while operating the TV You can switch between the i-Manual screen and the TV screen. This feature allows you to refer to the instructions in the i-Manual while using your BRAVIA TV.
D:\SONY TV\SY130221_F31 (Rev-1)\4477659112_GB\GB06OPT.fm Additional Information Troubleshooting When the illumination LED is flashing in red, count how many times it flashes (interval time is three seconds). Press "/1 on the TV to turn it off, disconnect the AC power cord (mains lead), and inform your dealer or Sony service centre of how the indicator flashes (number of flashes). When the illumination LED is not flashing, check the items in the table below.
D:\SONY TV\SY130221_F31 (Rev-1)\4477659112_GB\GB06OPT.fm Specifications System Panel system LCD (Liquid Crystal Display) Panel TV system Analogue: B/G, I, D/K, M, L Digital: DTMB Colour/video system Analogue: PAL, SECAM, NTSC3.58, NTSC4.
D:\SONY TV\SY130221_F31 (Rev-1)\4477659112_GB\GB06OPT.fm Others Supplied accessories See “Checking the accessories” (page 6).
D:\SONY TV\SY130221_F31 (Rev-1)\4477659112_GB\GB06OPT.fm Installing the Accessories (Wall-Mount Bracket) x To Customers: For product protection and safety reasons, Sony strongly recommends that installing of your TV be performed by Sony dealers or licensed contractors. Do not attempt to install it yourself. x To Sony Dealers and Contractors: Provide full attention to safety during the installation, periodic maintenance and examination of this product.
D:\SONY TV\SY130221_F31 (Rev-1)\4477659112_GB\GB06OPT.fm SU-WL500 Mounting Hook Screw (+PSW 6 × 16) * After mounting the TV to the wall, tilt the TV to the front to detach the Stand Cover from the TV. GB Stand Cover * ~ • Attach the Mounting Hook using the four screws supplied with the Wall-Mount Bracket. • Before mounting the TV to the wall, detach the Table-Top Stand from the TV. See “Detaching the Table-Top Stand from the TV” (page 7) for details.
D:\SONY TV\SY130221_F31 (Rev-1)\4477659112_GB\GB06OPT.fm Screws and Hook locations diagram/table Screw location Model Name KD- Hook location SU-WL500 SU-WL400 SU-WL500 65X8500A d, g - a SU-WL400 - 55X8500A - - - a x SU-WL500 Screw location Hook location When installing the Mounting Hook on the TV. When installing the TV onto the Base Bracket. a b c x SU-WL400 Hook location When installing the TV onto the Base Bracket.
D:\SONY TV\SY130221_F31 (Rev-1)\4477659112_GB\GB06OPT.
D:\SONY TV\SY130221_F31 (Rev-1)\4477659112_GB\GB06OPT.fm Unit: mm Model Name KD- Display dimensions Screen centre dimension Length for mounting SU-WL500 65X8500A 1,478 863 48 489 116 371 816 509 1,259 740 183 562 119 - - - SU-WL400 55X8500A Figures in the table may differ slightly depending on the installation. When your TV is installed on the wall, the upper side of the TV slightly leans forward.
D:\SONY TV\SY130221_F31 (Rev-1)\4477659112_GB\GB07PRE.fm Additional Information Safety Information WARNING Transporting – • Before transporting the TV set, disconnect all cables. • Two or three people are needed to transport a large TV set. • When transporting the TV set by hand, hold it as shown below. Do not put stress on the LCD panel and the frame around the screen. Do not install the TV set as shown below. Air circulation is blocked.
D:\SONY TV\SY130221_F31 (Rev-1)\4477659112_GB\GB07PRE.fm Prohibited Usage Situation: Do not install/use the TV set in locations, environments or situations such as those listed below, or the TV set may malfunction and cause a fire, electrical shock, damage and/or injuries. • Do not use when your hands are wet, with the cabinet removed, or with attachments not recommended by the manufacturer. Disconnect the TV set from AC power outlet (mains socket) and antenna during lightning storms.
D:\SONY TV\SY130221_F31 (Rev-1)\4477659112_GB\GB07PRE.fm • If this TV set is used in a cold place, a smear may occur in the picture or the picture may become dark. This does not indicate a failure. These phenomena disappear as the temperature rises. • Ghosting may occur when still pictures are displayed continuously. It may disappear after a few moments. • The screen and cabinet get warm when this TV set is in use. This is not a malfunction. • The LCD screen contains a small amount of liquid crystal.
D:\SONY TV\SY130221_F31 (Rev-1)\4477659112_CT\CT02REG.
D:\SONY TV\SY130221_F31 (Rev-1)\4477659112_CT\CT02REG.
D:\SONY TV\SY130221_F31 (Rev-1)\4477659112_CT\CT01TOC.
D:\SONY TV\SY130221_F31 (Rev-1)\4477659112_CT\CT01TOC.fm 目錄 入門 檢查配件........................................................ 6 將電池裝入遙控器中.............................................. 6 1: 安裝桌面底座 ................................................. 7 2: 連接 ......................................................... 8 3: 防止電視機傾倒 .............................................. 10 4: 捆紮纜線 .................................................... 11 5: 連接電視機至網際網絡 ........................................ 11 6: 執行初始設定 ......
D:\SONY TV\SY130221_F31 (Rev-1)\4477659112_CT\CT03STU.
D:\SONY TV\SY130221_F31 (Rev-1)\4477659112_CT\CT03STU.fm 1: 安裝桌面底座 ~ • 確定電視機前沒有障礙物。 請參閱隨附的桌面底座說明頁以正確安裝底座。 3D 同步傳送器 1 將電視機放在桌面底座上。 紅外線感應器 將桌面底座從電視機上拆下 來 CT 要從電視機拆下桌面底座,拆除在步驟 2 安裝的 螺絲。 ~ • 除非在電視機上安裝對應的配件,否則不要將桌 面底座拆掉。 箭頭方向表示桌面底座的前面。 2 使用隨附螺絲將電視機固定到桌面底座上。 箭頭標記 表示用於固定桌面底座的螺絲 孔的位置。 ~ • 如果使用電動螺絲起子,請將扭矩設定為大約 1.
D:\SONY TV\SY130221_F31 (Rev-1)\4477659112_CT\CT03STU.
D:\SONY TV\SY130221_F31 (Rev-1)\4477659112_CT\CT03STU.
D:\SONY TV\SY130221_F31 (Rev-1)\4477659112_CT\CT03STU.
D:\SONY TV\SY130221_F31 (Rev-1)\4477659112_CT\CT03STU.
D:\SONY TV\SY130221_F31 (Rev-1)\4477659112_CT\CT03STU.
D:\SONY TV\SY130221_F31 (Rev-1)\4477659112_CT\CT03STU.
D:\SONY TV\SY130221_F31 (Rev-1)\4477659112_CT\CT04SAF.
D:\SONY TV\SY130221_F31 (Rev-1)\4477659112_CT\CT04SAF.
D:\SONY TV\SY130221_F31 (Rev-1)\4477659112_CT\CT04SAF.
D:\SONY TV\SY130221_F31 (Rev-1)\4477659112_CT\CT04SAF.
D:\SONY TV\SY130221_F31 (Rev-1)\4477659112_CT\CT04SAF.
D:\SONY TV\SY130221_F31 (Rev-1)\4477659112_CT\CT05OVR.
D:\SONY TV\SY130221_F31 (Rev-1)\4477659112_CT\CT05OVR.
D:\SONY TV\SY130221_F31 (Rev-1)\4477659112_CT\CT06OPT.
D:\SONY TV\SY130221_F31 (Rev-1)\4477659112_CT\CT06OPT.fm 規格 系統 面板系統 LCD (液晶顯示)面板 電視系統 類比:B/G、I、D/K、M、L 數位:DTMB 彩色 / 視訊系統 類比:PAL、SECAM、NTSC3.58、NTSC4.
D:\SONY TV\SY130221_F31 (Rev-1)\4477659112_CT\CT06OPT.fm 其他 隨附的配件 請參閱 “ 檢查配件 ” ( 第 6 頁 )。 選用的配件 壁掛式支架 : SU-WL500 (KD-65X8500A) : SU-WL400 (KD-55X8500A) USB 無線網卡 :UWA-BR100 照相機和麥克風附件:CMU-BR200/CMU-BR100 主動式 3D 眼鏡:TDG-BT500A 作業溫度 0 ºC – 40 ºC 操作濕度 10% - 80% 相對濕度 (非冷凝) 型號名稱 KD- 65X8500A CT 55X8500A 電源和其他規格 電源需求 220 V – 240 V AC,50 Hz 螢幕尺寸 (對角測量) 顯示解析度 大約 163.9 厘米 /65 英寸 耗電量 標示於電視機背面上 大約 138.
D:\SONY TV\SY130221_F31 (Rev-1)\4477659112_CT\CT06OPT.
D:\SONY TV\SY130221_F31 (Rev-1)\4477659112_CT\CT06OPT.fm SU-WL500 掛鉤 螺絲 (+PSW 6 x 16) * 安裝電視機至牆壁之後, 將電視機向前 傾以從電視機上拆下底座蓋子。 CT 底座蓋子 * ~ • 使用壁掛式支架隨附的四根螺絲安裝掛鉤。 • 安裝電視機至牆壁之前 , 將桌面底座從電視機上拆下來。詳情請參閱 “ 將桌面底座從電視機上拆下來 ” ( 第 7 頁 )。 • 再次安裝桌面底座時,務必將 (之前取下的)螺絲鎖緊至電視機背面的原始孔。 SU-WL400 × 滑輪 B 4 * 安裝電視機至牆壁之後, 將電視機向前傾以從電 視機上拆下底座蓋子。 螺絲 (+PSW 6 x 20) C 底座 蓋子 * 帶子 F 墊片 E 螺絲 (+PSW 6 x 50) G ~ 將滑輪和螺絲 (+PSW6 x 20)安裝至電視機的上後部。 使用螺絲 (+PSW6 x 50)將帶子和墊片安裝至電視機的下後部。 如果使用電動螺絲起子,請將扭矩設定為大約 1.
D:\SONY TV\SY130221_F31 (Rev-1)\4477659112_CT\CT06OPT.
D:\SONY TV\SY130221_F31 (Rev-1)\4477659112_CT\CT06OPT.
D:\SONY TV\SY130221_F31 (Rev-1)\4477659112_CT\CT06OPT.
D:\SONY TV\SY130221_F31 (Rev-1)\4477659112_CT\CT07PRE.
D:\SONY TV\SY130221_F31 (Rev-1)\4477659112_CT\CT07PRE.
Instructions about “Installing Wall-Mount Bracket” are included within this TV’s instructions manual.