4-180-168-11(1) LCD Digital Colour TV Operating Instructions KDL-40EX43B / KDL-32EX43B Setting Up Watching TV Additional Information
NOTICE FOR CUSTOMERS IN THE UNITED KINGDOM A moulded plug complying with BS1363 is fitted to this equipment for your safety and convenience. Should the fuse in the plug supplied need to be replaced with the same rating of fuse approved by ASTA or BSI to BS 1362 (i.e., marked with or ) must be used. When an alternative type of plug is used it should be fitted with the same rating of fuse, otherwise the circuit should be protected by a 10 AMP FUSE at the distribution board.
Table of Contents Checking the accessories ..............................................................................................................3 Inserting batteries into the remote .................................................................................................3 Setting Up Attaching the Table-Top Stand ......................................................................................................4 Connecting an antenna (aerial)/Set Top Box/recorder (e.g. DVD recorder) ....
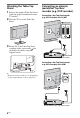
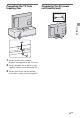
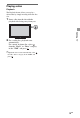
Setting Up Attaching the Table-Top Stand 1 Refer to the supplied Table-Top Stand leaflet for proper attachment for some TV models. 2 Place the TV set on the Table-Top Stand. 3 Fix the TV to the Table-Top Stand according to the arrow marks that guide the screw holes using the supplied screws. Connecting an antenna (aerial)/Set Top Box/ recorder (e.g. DVD recorder) Connecting a Set Top Box/recorder (e.g. DVD recorder) with SCART Set Top Box/recorder (e.g.
Preventing the TV from toppling over Organising the AC power cord (mains lead) Setting Up 1 Install a wood screw (4 mm in diameter, not supplied) in the TV stand. 2 Install a machine screw (M4 × 16, not supplied) into the screw hole of the TV. 3 Tie the wood screw and the machine screw with a strong cord (not supplied).
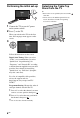
Performing the initial set-up Detaching the Table-Top Stand from the TV ~ • Remove the screws guided by the arrow marks of the TV. • Do not remove the Table-Top Stand for any reason other than to install corresponding accessories on the TV. 1 Connect the TV to your AC power outlet (mains socket). 2 Press 1 on the TV. When you switch on the TV for the first time, the Language menu appears on the screen. 3 Follow the instructions on the screen.
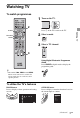
Watching TV To watch programmes 1 Turn on the TV. 2 Press 1 on the TV to turn on the TV. GUIDE Watching TV OPTIONS 2 Select a mode. 3 Select a TV channel. HOME 3 Using Digital Electronic Programme Guide Press GUIDE in digital mode to display the programme guide. z • The number 5, N, PROG + and AUDIO buttons on the remote have a tactile dot. Use the tactile dots as a reference when operating the TV. To utilise the TV’s features HOME button Press to display various operation and setting screens.
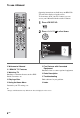
To use i-Manual 1 Operating instructions are built into your BRAVIA TV and can be displayed on the screen. To learn more about your TVs features you can access your i-Manual with the touch of a button. 1 Press i-MANUAL. 2 Press G/g/F/f/ 2 x Welcome to i-Manual x “BRAVIA” TV Features x Watching TV Introduces convenient features such as EPG Guide, Favourites, etc. x Playing a Disc x Using the Home Menu Customise your TV settings, etc.
Playing a disc Playback The Playback feature allows you to play a desired disc by simply inserting it into the disc slot. Insert a disc into the slot with the playback side facing away from you. 2 For a video disc, playback starts automatically. For a music or photo disc, select from the “Music” or “Photo” category in the “XMB” and press . Watching TV 1 ~ • If playback does not start automatically, select from the “Video” category in the “XMB” and press .
Additional Information Troubleshooting Check whether the 1 (standby) indicator is flashing in red. When the 1 (standby) indicator is flashing The self-diagnosis function is activated. 1 Count how many times the 1 (standby) indicator flashes between each three second break. For example, the indicator may flash three times, go off for three seconds, then flash again three times.
Specifications System Panel system LCD (Liquid Crystal Display) Panel TV system Analogue: Depending on your country/area selection: B/G/H, D/K, L, I Digital: DVB-T2/DVB-T/DVB-C Colour/video system Analogue: PAL, PAL60 (only video input), SECAM, NTSC3.58, NTSC4.43 (only video input) Digital: MPEG-2 MP@ML/HL, H.
Model name KDL- 40EX43B 32EX43B Power and others Power requirements 220 V – 240 V AC, 50 Hz Screen size (measured diagonally) Approx. 101.6 cm/40 inches Display resolution 1,920 dots (horizontal) × 1,080 lines (vertical) Power in “Home”/ consumption “Standard” mode 107 W 176 W in “Shop”/ “Vivid” mode Approx. 80.1 cm/32 inches 72 W 128 W Standby power consumption*1 0.2 W (17 W when “Quick Start” is set to “On”) 0.
Installing the Accessories (Wall-Mount Bracket) To Customers: For product protection and safety reasons, Sony strongly recommends that installing of your TV be performed by Sony dealers or licensed contractors. Do not attempt to install it yourself. To Sony Dealers and Contractors: Provide full attention to safety during the installation, periodic maintenance and examination of this product. Your TV can be installed using the SU-WL500 Wall-Mount Bracket (sold separately).
TV installation dimensions table Screen centre point Unit: cm Model Name KDL- Display dimensions Screen centre dimension Length for each mounting angle Angle (0°) A B C D E 40EX43B 99.2 59.8 12.2 42.5 16.0 32EX43B 80.0 49.7 17.2 42.6 15.7 Figures in the above table may differ slightly depending on the installation. WARNING The wall that the TV will be installed on should be capable of supporting a weight of at least four times that of the TV.
Screw and Hook locations diagram/table Screw location Hook location KDL-40EX43B Model Name d, g b KDL-32EX43B e, g c Screw location When installing the Mounting Hook on the TV. Hook location When installing the TV onto the Base Bracket. a* b c Additional Information * Hook location “a” cannot be used for the models.
Ventilation Safety Information Installation/Set-up Installed on the wall Install and use the TV set in accordance with the instructions below in order to avoid any risk of fire, electrical shock or damage and/or injuries. Installation • The TV set should be installed near an easily accessible mains socket. • Place the TV set on a stable, level surface. • Only qualified service personnel should carry out wall installations.
When not in use • If you will not be using the TV set for several days, the TV set should be disconnected from the mains for environmental and safety reasons. • As the TV set is not disconnected from the mains when the TV set is just turned off, pull the plug from the mains to disconnect the TV set completely. • However, some TV sets may have features that require the TV set to be left in standby to work correctly. For children • Do not allow children to climb on the TV set.
Safety information about built-in BD player • The use of optical instruments with this product will increase eye hazard. As the laser beam used in this built-in BD/DVD player is harmful to eyes, do not attempt to disassemble the cabinet. Refer servicing to qualified personnel only. • Do not use solvents such as benzine, thinner, commercially available disc/ lens cleaners, or anti-static spray intended for vinyl LPs. • If you have printed the disc’s label, dry the label before playing.
Additional Information Keep this Instruction manual safe you’ll need it Television in the UK is going digital, bringing us all more. Please see overleaf to find out when your area switches to digital. Digital UK is the independent, non-profit organisation leading the process of digital TV switchover in the UK. Digital UK provides impartial information on what people need to do to prepare for the move to digital, and when they need to do it.
How to re-tune: 1 Press "HOME" on the remote 2 Press G/g to select "Settings" 3 Press F/f to select "Digital Set-up", then press 4 Press 5 Press G to select "Yes" then press 6 Follow the on screen instructions. to select "Digital Auto Tuning" to start "Digital Auto Tuning" If you are missing any channels, it may be that they are not available in your area, or that your aerial needs upgrading.
For useful information about Sony products 4-180-168-11(1) © 2010 Sony Corporation