4-411-984-13(1) LCD TV Operating Instructions KDL-55HX75x / 46HX75x / 46EX65x / 40HX75x / 40EX65x / 32HX75x / 32EX65x / 26EX55x KDL-22EX55x
NOTICE FOR CUSTOMERS IN THE UNITED KINGDOM A moulded plug complying with BS1363 is fitted to this equipment for your safety and convenience. Should the fuse in the plug supplied need to be replaced with the same rating of fuse approved by ASTA or BSI to BS 1362 (i.e., marked with or ) must be used. If the plug supplied with this equipment has a detachable fuse cover, be sure to attach the fuse cover after you change the fuse. Never use the plug without the fuse cover.
Music and video recognition technology and related data are provided by Gracenote®. Gracenote is the industry standard in music recognition technology and related content delivery. For more information, please visit www.gracenote.com. CD, DVD, Blu-ray Disc, and music and video-related data from Gracenote, Inc., copyright © 2000-present Gracenote. Gracenote Software, copyright © 2000-present Gracenote. One or more patents owned by Gracenote apply to this product and service.
About this manual (Operating Instructions) This manual explains how to set up your TV. For more information on how to use BRAVIA TV, refer to the “Electronic manual”. Operating Instructions Explains how to set up your TV such as connections, initial set-up, and basic operations. For more information, press the i-MANUAL button Electronic manual (i-Manual) Explains how to use all the features. See page 23 on how to use the i-Manual.
Table of Contents GB Getting Started Checking the accessories.................................................................... 6 Inserting batteries into the remote........................................................ 6 1: Attaching the Table-Top Stand ........................................................ 7 2: Adjusting the viewing angle of the TV .............................................. 9 3: Connections ...................................................................................
Getting Started Checking the accessories Inserting batteries into the remote Remote (1) Size AAA batteries (R03 type) (2) Table-Top Stand (1)*1 Fixing screws for Table-Top Stand (M5 × 16) (3) (except KDL-26/22EX55x) Fixing screws for Table-Top Stand (M5 × 16) (2) (KDL-26/22EX55x only) Assembling screws for Table-Top Stand (M5 × 16) (4) (KDL-55HX75x only) Assembling screws for Table-Top Stand (M5 × 16) (2) (KDL-46/40/32HX75x, KDL-46/40/32EX65x only) 3D Glasses (battery included) (2) (KDL-55/46/40/32HX751
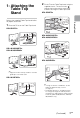
1: Attaching the Table-Top Stand 2 Fix the TV to the Table-Top Stand using the supplied screws. The arrow marks indicate the location of the screw holes used for securing the Table-Top Stand. KDL-55HX75x 1 Getting Started Refer to the supplied Table-Top Stand leaflet for proper attachment. Place the TV set on the Table-Top Stand.
Detaching the Table-Top Stand from the TV KDL-46/40/32HX75x, KDL-46/40/32EX65x To detach the Table-Top Stand from the TV, remove the screws fixed in step 2. ~ • Do not remove the Table-Top Stand for any reason other than to install corresponding accessories on the TV. • When removing the Table-Top Stand from the TV, lay the display face down on a stable work surface that is larger than the TV. • To prevent damaging the surface of the LCD display, make sure to place a soft cloth on the work surface.
2: Adjusting the viewing angle of the TV KDL-26/22EX55x *6° Getting Started This TV can be adjusted within the angles as illustrated. x Angle adjustment (Swivel) (Except KDL-26/22EX55x) ~ • When adjusting the angle, hold the stand with one hand to avoid having the stand slip or TV tip over. * The angle is approximate value. ~ *15° *15° *15° *15° • Ensure that there are no objects in front of the TV.
3: Connections KDL-26/22EX55x ~ • Use an antenna cable connector no greater than 14 mm in thickness. • Use an HDMI cable connector within 12 mm (thickness) × 21 mm (width). AV 1 Connecting an antenna (aerial)/Set Top Box/ recorder (e.g. DVD recorder) x To connect a Set Top Box/recorder (e.g. DVD recorder) with SCART KDL-55/46/40/32HX75x, KDL-46/40/32EX65x Set Top Box/recorder (e.g. DVD recorder) ~ • Right Angle Type Universal SCART Lead is recommended for this connection. Set Top Box/recorder (e.g.
x To connect a Set Top Box/recorder (e.g. DVD recorder) with HDMI KDL-26/22EX55x KDL-55/46/40/32HX75x, KDL-46/40/32EX65x ARC 1 2 Getting Started ARC 1 4 Set Top Box/recorder (e.g. DVD recorder) Set Top Box/recorder (e.g.
KDL-26/22EX55x Connecting audio/video devices KDL-55/46/40/32HX75x, KDL-46/40/32EX65x AV 2 Y PB PR (MONO) L R COMPONENT IN Audio/video device Audio/video device 12 GB
4: Preventing the TV from toppling over KDL-26/22EX55x Soft cloth 1 Getting Started KDL-55HX75x ~ KDL-46/40/32HX75x, KDL-46/40/32EX65x • Before install the machine screw, lay the display face down on a stable work surface that is larger than the TV. • To prevent damaging the surface of the LCD display, make sure to place a soft cloth on the work surface. 1 2 Install a machine screw (M4, not supplied) into the screw hole of the TV and tie with a strong cord (not supplied).
5: Bundling the cables Before bundling the cables, remove the cable holder from the AC cover. Reuse the cable holder to bundle the other cables. ~ • Do not bundle the AC power cord (mains lead) together with other cables. KDL-55HX75x 1 2 3* 4 KDL-46/40/32HX75x, KDL-46/40/32EX65x 1 2 3* 4 * When installing on the wall, attach the cable holder under the terminals.
6: Connecting the TV to the Internet KDL-26/22EX55x TV Internet LAN Modem with router functions or ~ • You will need to contract with an Internet service provider to connect to the Internet. Router Modem Preparing a wired network Internet ~ KDL-55/46/40/32HX75x, KDL-46/40/32EX65x • For LAN connections, use a Category 7 cable (not supplied).
7: Performing the initial set-up Digital Auto Tuning: “Antenna” or “Cable”: Select “Antenna” to receive terrestrial TV broadcasting by an external antenna. Select “Cable” if you are a Cable TV subscriber not using an external Set-Top Box. When you select “Cable”, we recommend that you select “Quick Scan” for quick tuning. Set “Frequency” and “Network ID” according to the information supplied from your cable provider. If no channel is found using “Quick Scan”, try “Full Scan” (though it may take some time).
GB
Using Your BRAVIA TV Watching TV 1 1 Turn on the TV. Press "/1 on the TV or remote to turn on the TV. 1 2 Select a mode. 3 Select a TV channel or select an input. 3 or or x To select digital channels Use 0-9. For channel numbers 10 and above, press the next digit quickly.
Watching 3D contents (KDL-55/46/40/32HX75x only) This feature lets you experience powerful 3D entertainment, such as stereoscopic 3D games and 3D Blu-ray Disc. Refer to the i-Manual as well as the instruction manual supplied with the 3D Glasses on how to set the 3D settings or watch the 3D contents. Frequently used buttons 1 GUIDE Displays the digital programme guide. 2 Colour buttons 2 3 / Info/Text reveal Displays channel number, details of programmes, and the clock.
Selecting various functions and settings (Home Menu) You can select the features of your TV from the Home menu. Here is an example on how to select an item and modify the TV settings. 1 Press HOME. 2 Press G/g to select category. (Settings) The contents of “Settings” are displayed on the right. 2, 3 OPTIONS 1 See page 21 (Category list) for all categories. 3 Press F/f to select “Display”, then press . 4 Modify the settings. x To exit the Home menu Press HOME.
Category list Settings Widgets Applications Sony Entertainment Network Internet Content Recordings TV Media Inputs Favourites/History The categories are available depending on your region and country. Provides settings (e.g. picture settings, sound settings, key tone setting) that allow you to customise your TV. Widgets Enables access to Widgets. Applications Launches applications that require an Internet connection.
Watching Internet Video This feature serves as a gateway to Internet content, delivering a variety of on-demand entertainment straight to your TV. You can enjoy video content, including movies and cartoons. You will need to make a broadband Internet connection. For details, see page 15 (6: Connecting the TV to the Internet). 1 Press HOME. 2 Press G/g to select Content) category. 3 Press F/f to select “Internet Video”, then press . 4 Press F/f/G/g to highlight the desired content, then press .
Looking for Instructions Looking for instructions in the electronic manual (i-Manual) Operating instructions are built into your BRAVIA TV and can be displayed on the screen. To learn more about your TV features, access your i-Manual with the touch of a button. 1 Press i-MANUAL. 2 Select an item. 1 Press G/g to select an item. 1 2 RETURN 2 Press F/f/G/g to select an item, then press . * If a scroll bar appears, press f repeatedly to display more items. The page of the selected item appears.
Saving frequently viewed pages (Bookmark) You can save frequently viewed pages for easy access anytime. x To save a page In the page to bookmark, press the yellow button on the remote. x To access the bookmarked page Displaying the page again while operating the TV You can switch between the i-Manual screen and the TV screen. This feature allows you to refer to the instructions in the i-Manual while using your BRAVIA TV.
Additional Information Troubleshooting When the 1 (standby) indicator is flashing, count how many times it flashes (interval time is three seconds). Press "/1 on the TV to turn it off, disconnect the AC power cord (mains lead), and inform your dealer or Sony service centre of how the indicator flashes (number of flashes). When the 1 (standby) indicator is not flashing, check the items in the tables as follows. Also refer to “Troubleshooting” in the i-Manual.
Specifications System Panel system LCD (Liquid Crystal Display) Panel TV system Analogue: Depending on your country/area selection: B/G/H, D/K, L, I, M Digital: DVB-T2 (KDL-55/46/40/32HX753, KDL-46/40/32EX653, KDL-26/22EX553 only) DVB-T/DVB-C Colour/video system Analogue: PAL, SECAM, NTSC3.58, NTSC4.
Model name KDL- 55HX75x 46HX75x 46EX65x Screen size (measured diagonally) Approx. 138.8 cm/55 inches Approx. 116.8 cm/46 inches Approx. 116.8 cm/46 inches Power in “Home”/ 87.0 W consumption “Standard” mode 84.0 W 63.0 W 152 W 143 W 122 W Average annual energy consumption*1 121 kWh 117 kWh 87 kWh Standby power consumption*2 0.25 W (15 W in software / EPG update mode) 0.25 W (12 W in software / EPG update mode) 0.
Model name KDL- 40HX75x Operating humidity 10% - 80% RH (non-condensing) 40EX65x Model name KDL- 32EX65x 32HX75x 26EX55x 22EX55x Power and others Power requirements 220 V – 240 V AC, 50 Hz Energy Efficiency Class A B B Screen size (measured diagonally) Approx. 80.1 cm/32 inches Approx. 66.1 cm/26 inches Approx. 54.8 cm/22 inches 36.0 W 25.0 W 85 W 61 W 45 W Average annual energy consumption*1 57 kWh 50 kWh 35 kWh Standby power consumption*2 0.
Installing the Accessories (WallMount Bracket) x To Customers: For product protection and safety reasons, Sony strongly recommends that installing of your TV be performed by Sony dealers or licensed contractors. Do not attempt to install it yourself. x To Sony Dealers and Contractors: Provide full attention to safety during the installation, periodic maintenance and examination of this product.
SU-WL500 (except KDL-26/22EX55x) Screw (+PSW 6 × 16) Mounting Hook Soft cloth ~ • Attach the Mounting Hook using the four screws supplied with the Wall-Mount Bracket. • When attaching the Table-Top Stand again, be sure to fasten the screws (previously removed) to the original holes on the rear of the TV. SU-WL100 (KDL-26/22EX55x only) Screw (+PSW 4 × 12) Mounting Hook Soft cloth ~ • Attach the Mounting Hook using the four screws supplied with the Wall-Mount Bracket.
Screw and Hook locations diagram/table Model Name KDL- Screw location Hook location SU-WL500 SU-WL500 e, j b e, g c SU-WL100 SU-WL100 55HX75x 46HX75x/46EX65x 40HX75x/40EX65x 32HX75x/32EX65x 26EX55x - a 22EX55x - b x SU-WL500 Screw location Hook location When installing the Mounting Hook on the TV. When installing the TV onto the Base Bracket. a b c x SU-WL100 Hook location When installing the TV onto the Base Bracket.
TV installation dimensions table SU-WL500 (1) F E A C B D G H Screen centre point SU-WL100 (2) A F 125 E C B G D H Screen centre point Unit: cm Model Name KDL- Display dimensions A B Length for each mounting angle Screen centre dimension C Angle (0°) Angle (20°) D E F G H SU-WL500 (1) 55HX75x 127.1 76.1 7.8 46.8 10.7 33.4 70.5 47.7 46HX75x 107.6 65.2 13.3 46.9 10.7 29.6 60.2 47.7 46EX65x 107.4 65.1 13.3 46.9 10.8 29.4 59.9 47.6 40HX75x 94.3 57.8 17.
Additional Information Safety Information KDL-26/22EX55x Mains lead Handle the mains lead and socket as follows in order to avoid any risk of fire, electrical shock or damage and/or injuries: – KDL-55/46/40/ 32HX75x, KDL-46/40/ 32EX65x WARNING Batteries must not be exposed to excessive heat such as sunshine, fire or the like. Installation/Set-up Install and use the TV set in accordance with the instructions as follows in order to avoid any risk of fire, electrical shock or damage and/or injuries.
Additional Information • Never spray water or detergent directly on the TV set. It may drip to the bottom of the screen or exterior parts and enter the TV set, and may cause damage to the TV set. Environment: • Places that are hot, humid, or excessively dusty; where insects may enter; where it might be exposed to mechanical vibration, near flammable objects (candles, etc). The TV set shall not be exposed to dripping or splashing and no objects filled with liquids, such as vases, shall be placed on the TV.
Precautions Viewing the TV • Some people may experience discomfort (such as eye strain, fatigue, or nausea) while watching 3D video images or playing stereoscopic 3D games. Sony recommends that all viewers take regular breaks while watching 3D video images or playing stereoscopic 3D games. The length and frequency of necessary breaks will vary from person to person. You must decide what works best.
Disposal of waste batteries (applicable in the European Union and other European countries with separate collection systems) This symbol on the battery or on the packaging indicates that the battery provided with this product shall not be treated as household waste. On certain batteries this symbol might be used in combination with a chemical symbol. The chemical symbols for mercury (Hg) or lead (Pb) are added if the battery contains more than 0.0005% mercury or 0.004% lead.
For useful information about Sony products 4-411-984-13(1) © 2012 Sony Corporation