4-458-509-12(1) LCD TV Operating Instructions Introducing Your New BRAVIA® Getting Started Operating the TV Using Features Using the Menus Other Information Sony Customer Support U.S.A.: http://www.sony.com/tvsupport Canada: http://www.sony.ca/support United States 1.800.222.SONY Canada 1.877.899.
Owner’s Record The model and serial numbers are located at the side and rear of the TV. Record these numbers in the spaces provided below. Refer to them whenever you call upon your Sony dealer regarding this TV. Model Name Serial No. CAUTION To prevent electric shock and blade exposure, do not use this polarized AC plug with an extension cord, receptacle or other outlet unless the blades can be fully inserted. ❑ ❑ Operate the TV only on 110-240 V AC (USA/Canada 120 V AC).
Contents Introducing Your New BRAVIA® Welcome to the World of BRAVIA® Using Features . . . . . . . .4 BRAVIA Sync Control . . . . . . . . . . . . . . . . . . 27 Experiencing Stunning HD with Your BRAVIA . . . . . . . . . . . . . . . . . . . . . . . . . . .4 Using PIP Feature. . . . . . . . . . . . . . . . . . . . . 28 The Four Steps to a Stunning HD Experience . . . . . . . . . . . . . . . . . . . . . . . . .5 Wide Mode . . . . . . . . . . . . . . . . . . . . . . . . . . 30 TV Feature Highlights .
® Introducing Your New BRAVIA Welcome to the World of BRAVIA® Thank you for choosing this Sony BRAVIA® high-definition television. Use the documentation listed below to get the most out of your TV. Safety Booklet Contains precautionary measures to keep you and your TV safe. Read this information prior to setting up your TV. Quick Setup Guide Provides TV setup information with sample connection diagrams. Operating Instructions Provides the most detailed information to operate your TV.
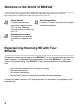
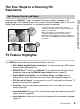
The Four Steps to a Stunning HD Experience Set, Source, Sound, and Setup You can enjoy crisp, clear images, smooth movement, and high-impact visuals from 1080 HD signals as shown here. When you compare a high-definition signal to a standard analog signal, you will notice a big difference in picture quality. If black bars appear as shown here, press WIDE on the remote control to fill the screen.
➢ Scene Select: Allows you to easily adjust your TV to the most suitable picture and sound settings based on the scenes for the best quality result for the contents genre you are watching. ➢ Photo Frame: You can enjoy the large photo frame display with music (page 33). ➢ On Timer: Set timer to wake up TV automatically with preferred setting of input and volume. You can also wake up with your favorite photo and music through photo frame feature (page 49).
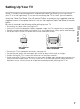
Getting Started Setting Up Your TV Some TV models are packaged with a detached Table-Top Stand so you can mount your TV to a wall right away. If you are not mounting the TV to a wall, you will need to attach the Table-Top Stand. You will need a Phillips screwdriver (not supplied) and the supplied screws to complete the task. Look for the supplied Table-Top Stand instruction leaflet. Be sure to consider the following while setting up your TV: Disconnect all cables when carrying the TV.
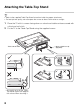
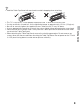
Attaching the Table-Top Stand • Refer to the supplied Table-Top Stand instruction leaflet for proper attachment. • For best picture quality, do not expose the screen to direct illumination or sunlight. 1 Place the TV with its screen facing down on a level and stable surface covered with a thick and soft cloth. 2 Fix the TV to the Table-Top Stand using the supplied screws. Thick and soft cloth * Be careful not to hit the TableTop Stand against the edge of the surface when attaching it.
• Hold the Table-Top Stand with one hand to avoid it dropping when attaching. This TV is very heavy, so two people should place the TV onto thick and soft cloth. If using an electric screwdriver, set the tightening torque at approximately 1.5 N·m (15 kgf·cm). Be sure to securely tighten the supplied screws, otherwise the TV may fall down. Use an appropriate screwdriver to attach the screws tightly without damaging the screw head.
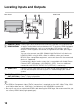
Locating Inputs and Outputs Rear Panel Item Side Panel Description 1 HDMI IN 1 (ARC) HDMI (High-Definition Multimedia Interface) provides an uncompressed, 6 HDMI IN 2/MHL all-digital audio/video interface between this TV and any HDMI-equipped audio/video equipment, such as a set-top box, DVD player, and A/V receiver. HDMI supports enhanced, or high-definition video, plus digital audio. You can also connect your MHL (Mobile High-Definition Link) device to HDMI IN 2/MHL using an MHL cable.
Description RF input that connects to your Cable or VHF/UHF antenna. 7 USB Connects to USB equipment to access photo, music, and video files. This input port can be used as a composite video input (VIDEO) or as a component video input (COMPONENT). For composite use, connect the yellow jack to Y for video and use audio L (mono) and R for audio signal. For component connection, use Y, PB, PR for video signals and also connect the audio L (mono) and R for audio signal.
Connecting the TV Cable System or VHF/UHF Antenna System You can enjoy high-definition and standard-definition digital programming (if available in your area) along with standard-definition analog programming. This TV is capable of receiving unscrambled digital programming for both cable (QAM and 8VSB) and external VHF/UHF antenna (ATSC).
HD Cable Box/HD Satellite Box You can enjoy high-definition programming by subscribing to a high-definition cable service or a high-definition satellite service. For the best possible picture, make sure you connect this equipment to your TV via the HDMI or component video (with audio) input located on the back of your TV.
MHL device The MHL (Mobile High-Definition Link) enables the TV to communicate with connected MHL-compatible device. When connecting MHL-compatible device, TV simultaneously charges the connected device while playing photo/music/video from it. You can use the TV remote control to control the connected MHL-compatible device. MHL device Side of TV Use authorized MHL Cable with MHL Logo (not supplied).
Connecting Other Equipment Blu-ray Disc Player/ “PS3” DVD player Digital satellite receiver Digital cable box Audio system Digital audio equipment (A/V Receiver/Home Theater) Getting Started MHL device USB Analog audio equipment (A/V Receiver/HomeTheater) Digital recorder CABLE/ANTENNA • Refer to the Quick Setup Guide (supplied) when connecting other equipment to your TV.
When Installing the TV Against a Wall or Enclosed Area Make sure that your TV has adequate ventilation. Allow enough space around the TV as shown below. Avoid operating the TV at temperatures below 41 °F (5 °C). Installed on the wall Installed with stand 11 7 /8 inches (30 cm) 4 inches (10 cm) 2 3 /8 inches 4 inches (10 cm) (6 cm) 11 7/ 8 inches (30 cm) 4 inches (10 cm) 4 inches (10 cm) 4 inches (10 cm) Leave at least this much space around the set. Leave at least this much space around the set.
Securing the TV Sony strongly recommends taking measures to prevent the TV from toppling over. Unsecured TVs may topple and result in property damage, serious bodily injury or even death. Preventing the TV from Toppling ❑ ❑ Secure the TV to a wall and/or stand. Do not allow children to play or climb on furniture and TV sets. Avoid placing or hanging items on the TV. Never install the TV on: • slippery, unstable and/or uneven surfaces.
2 Secure the TV to the stand. Use the optional hardware listed below (not supplied): • M4 machine screw (screwed into the screw hole of the TV). • A screw or similar (attach it to the TV stand). • Rope or chain (strong enough to support the weight of the TV). Make sure that there is no excess slack in the rope or chain. An alternative way to secure the TV is with an optional Sony Support Belt Kit. The Sony Support Belt Kit is available as an optional accessory, depending on your TV model.
• Contact Sony Customer Support to obtain the optional Support Belt Kit by providing your TV model name. For United States call: 1-800-488-7669 or visit: http://www.sony.com/accessories For Canada call: 1-877-899-7669 • Securing the TV to the stand without securing the TV and the stand to the wall provides minimum protection against the TV toppling over. For further protection, be sure to follow the three measures recommended.
Running Initial Setup During initial setup, you will perform the following: • • • • Set the language for the On Screen Display (OSD) text Choose your viewing environment Scan for digital and analog channels Set the current date and time after Auto Program. Complete your cable connections before beginning the Initial Setup. Refer to the Quick Setup Guide (supplied) for sample connection diagrams. 1 Turn on the TV. The Initial Setup screen will appear.
• If you cancel the Auto Program, any channels you have selected are not registered. To rescan for available channels, run Auto Program. • Connect either your cable or antenna to the TV (you can connect both using an A-B RF switch (not supplied)); for more details see page 12.
Operating the TV Using the Remote Control To Insert Batteries into the Remote Control Insert two size AAA batteries (supplied) by matching e and E on the batteries to the diagram inside the battery compartment of the remote control. Push to open Guidelines to follow • Point your remote control directly at the IR sensor located on your TV. • Make sure that no objects are blocking the path between the remote control and the IR sensor on your TV.
Remote Control Button Description Button Description 1 SYNC MENU Press to display the BRAVIA Sync Menu and then select connected HDMI/MHL equipment from Device Selection. 2 INPUT Press to display the list of External Inputs and TV mode. Press repeatedly to toggle through the inputs. See page 31. 3 PIC OFF Press to turn picture off, and sound remains on. 4 0-9 Press 0-9 to select a channel. Use with 0-9 to select digital channels. For example, to enter 2.1, press , and .
Button 24 Description qs POWER Press to turn on and off the TV. qd WIDE Press repeatedly to cycle through the available Wide Mode settings. See page 30. qf CC/ Press to cycle through the available settings for SUBTITLE Closed Captions (CC) : On, Off, and On when Muting. qg DISPLAY Press once to display the banner with channel/ program information you are watching. The banner will time out in a few seconds or press again to exit.
Button w; Description Equipment These buttons are used to control the equipment Control connected to the TV by using the BRAVIA Sync Control function (not available on all BRAVIA Sync Control equipment). Some other buttons on the remote control may also operate BRAVIA® SyncTM equipment. 25 Operating the TV m (fast reverse): Press to play a program in fast rewind mode. N (PLAY): Press to play a program at a normal speed. M (fast forward): Press to play a program in fast forward mode. .
TV Controls and Indicators Item Description 1 (IR) Infrared Receiver/ Light sensor 2 "/1 LED 3 4 5 6 Receives IR signal from the remote control. Senses room light level and adjusts the screen brightness accordingly. Do not put anything over the sensor, doing so may affect its function. • Lights up in red when the TV is in standby mode. • Lights up in green when the TV is turned on. • Lights up in orange when the timer is set or the TV is in Photo Frame Mode.
Using Features BRAVIA Sync Control With the BRAVIA Sync Control function, BRAVIA Sync helps to communicate with BRAVIA Sync-compatible equipment using HDMI CEC (Consumer Electronics Control). Use the following settings and tips to help unify control of your connected equipment. 1 Press HOME and select Settings, then select the Setup settings. 2 Select the BRAVIA Sync Settings, then highlight BRAVIA Sync Control, and set to On.
Using PIP Feature x To Swap Audio You can swap audio between the main and sub window. PIP (picture in picture) displays a picture from a connected PC in full screen, and a TV program or other external input (see below “To Enter PIP” table) in an inset window. (Closed Captions (CC) is not available with PIP mode.) 1 Press OPTIONS. 2 Press V/v to highlight Audio Swap Sub Window (Location of the Sub Window can be moved by pressing V/v/B/b.
Favorites Your favorite channels and external inputs can be accessed by pressing the HOME button once they are added to the list. • Favorite channels and external inputs can also be added using the OPTIONS button on the remote control. • Your Favorites list will be cleared each time you run the Auto Program. 1 Press HOME. 2 Press V/v to select Favorites, then press . Using Features The favorites list appears. 3 Press V/v to select a channel or input, then press .
Wide Mode The Wide Mode feature allows you to select the screen display of your preference. Based on the original signal source, you may see black bars around the picture or just on the both sides of the screen. Sometimes you will see the picture filled the full screen. This is due to the signals your TV receives. You can manually select available Wide Mode settings as you watch your TV by pressing the WIDE button on your remote control or you can set your TV to Auto Wide.
Wide Mode with PC Inputs Wide Mode is also available for the PC settings. When a PC is connected to the TV and HDMI input is selected, you can change the PC Screen settings. Press INPUT to display the Input menu and toggle through the external inputs to select your video signal for viewing including the TV mode. The inputs list consists of TV mode and other equipment connected to the TV. You can label your external inputs to identify them easily.
Playing back Photo/ Music/Video via USB You can enjoy photo/music/video files stored in a Sony digital still camera or camcorder through a USB cable or USB storage device on your TV. 1 Connect a supported USB device to the TV. 2 Press HOME. 3 Press V/v to select Photo, Music, or Video, then press . The file or folder list appears. 4 Press V/v/B/b to select a file or folder, then press . When you select a folder, select a file, then press . Playback starts.
• Use a USB storage device that is compliant with USB Mass Storage Class standards. Photo Frame • The file system on the USB device supports FAT16, FAT32 and NTFS. You can enjoy looking at photos, listening to music, or seeing the clock and calendar, at the same time. You can enter photo frame mode using any of the following methods: You can switch the frame, e.g. image and clock, full screen image or full screen clock. For more details, see page 47.
x To select music You can select music from USB memory, using any of the following methods: 1 Press HOME and select Settings, then Setup > Photo Frame Settings > Music Selection. Press to select the file from thumbnail view. 2 In photo frame mode, press OPTIONS > Music Selection. Press to select the file from thumbnail view. 3 Press HOME, and select Music. When playing back music, press OPTIONS > Photo Frame Mode to launch Photo Frame with the selected music.
Using the Menus Navigating through TV Menus The HOME button allows you to access a variety of TV settings and USB media files. 1 2 3 4 Favorites Press on the remote control to display the menu options. Press V/v/B/b to navigate on the menu or adjust the settings. Press to select or confirm. Press to exit. The Favorites feature provides quick access to your frequently used items, such as preferred TV channels or external inputs (e.g. game console, DVD player). For details, see page 29.
Settings The Settings icon contains all of the necessary configurations to customize your TV settings. The options you can select may vary. Unavailable options are grayed out or not displayed. Picture: adjust the picture on your TV to fit your viewing preference. Sound: customize your sound settings to suit your audio preference. You can also change the settings to output the sound to your connected audio equipment. Screen: adjust the size and shape of the images you see on the screen.
Using the Picture Settings Option Description Displays the options selected in the Scene Select settings. When Scene Select is set to General, the first three options below can be selected. Vivid Select for enhanced picture contrast and sharpness. Standard Select for standard picture settings. Recommended for home entertainment. Custom Select to store your preferred settings. Cinema For film-based content. Suitable in a theater-like environment. Graphics Optimizes picture quality for viewing graphics.
Option Description Advanced Settings Reset Resets the advanced settings to the default values. Adv. Contrast Automatically adjusts backlight and contrast to the most Enhancer suitable settings judging from the brightness of the screen. This setting is especially effective for dark scenes, and will increase the contrast distinction of the darker picture scenes. Select from High, Medium, Low and Off. Black Enhances black areas of the picture for stronger contrast.
Using the Sound Settings Description Sets a sound mode. Sound Mode includes options best suited for video and photographs, respectively. Standard Optimizes sound quality for general content. Music Lets you experience dynamic and clear sound, like that of a concert. Cinema Optimizes surround sound for movies. Game Broadens your game-playing experience with superb sound quality. Sports Reproduces realistic sound, like that in a stadium.
• MTS Audio is only available for analog programs. • Alternate Audio is only available if the program is broadcast with alternate audio streams. • You can also access Sound Mode, MTS Audio and Alternate Audio by using the OPTIONS button on the remote control.
Using the Screen Settings Option Description Wide Zoom Fills the screen with minimum distortion. Normal Select to display 4:3 picture in original size when the original source is 4:3. Full Select to enlarge the picture horizontally to fill the screen when the original source is 4:3 (Standard definition source). When the original source is 16:9 (High-definition source), select this mode to display the 16:9 picture in its original size.
Option Description Vertical Center Allows you to move the position of the picture up and down. (Available in Wide Zoom and Zoom.) When a PC is connected to the TV, the PC settings screen appears instead of the Screen settings. You can also select the PIP feature which allows you to view two pictures simultaneously from OPTIONS button (page 28). Wide Mode Normal Select to display in the original image size. Full 1 Select to enlarge the picture to fill the display area, keeping its original aspect ratio.
Using the Channel Settings Option Description Signal Type Cable Auto Program Add Digital Channels Show/Hide Channels Analog Fine Tune • • • • You should run Auto Program after changing the Signal Type setting. Running Auto Program will clear the Favorites list. Channels that you set to be hidden can be accessed by the 0-9 and buttons. You can set channels to be hidden that are automatically set in Auto Program.
Using the Parental Lock Settings Option Description Password The Parental Lock settings allow you to set up the TV to block programs according to their content and rating levels. Use 0-9 on the remote control to enter a four-digit password. The first time you create a password, confirm the password by entering it again. Select to change your password. Change Password Country Rating U.S.A. Canada Off Child Youth Young Adult Custom Downloadable U.S. Rating (Available only in U.S.A.
• You need your password for any future access into the Parental Lock settings. If you lose your password, see “Lost password” on page 61. • Selecting Clear All will delete the current Downloadable U.S. Rating menu and the menu will no longer be available until the TV is tuned to a channel that contains downloadable ratings.
Canadian Models: Selecting Custom Parental Lock Rating Options To select custom rating options for Canada, select Canada in the Country setting (page 44). Option Description English Rating C All children. C8+ Children 8 years and older. G General programming. PG Parental guidance. 14+ Viewers 14 and older. 18+ Adult programming. G General programming. 8 ans+ Not recommended for young children. 13 ans+ Not recommended for ages under 13. 16 ans+ Not recommended for ages under 16.
Using the Setup Settings Option Description Photo Frame Display Mode Settings Clock Display Audio Application Image Selection Music Selection Slideshow Setting USB Auto Start Select music. Slideshow Single View All Tracks Single Track You can play a slideshow of photos. Displays one photo only. Listen to all music tracks. Set to listen to a single music track. Selects the time period (1 h, 2 h, 4 h or 24 h) after which the TV automatically switches to standby mode.
Option Description Closed Captions (CC) Allows you to select from several closed caption modes (for programs that are broadcast with closed captioning). CC Display On Closed Captions (CC) is turned on. Off Closed Captions (CC) is turned off. On when Closed Captions (CC) is turned on when the TV Muting is muted. Analog CC Allows you to select basic analog (EIA-608) closed caption options. CC1, CC2, Displays a printed version of the dialog or sound CC3, CC4 effects of a program.
Option Description Displays the information related to the input signal you are watching. Select Small to display minimal channel and program title or select Large to display detailed channel and program information along with the TV icon if you are viewing the TV. Select Hidden to hide information about the TV channel or program. This information will appear if it is available from the broadcaster.
Option Description BRAVIA Sync Communicates with equipment compatible with the BRAVIA Sync Control Settings function. BRAVIA Sync Links the operations of the TV and the equipment. Control For specific Sony equipment compatible with BRAVIA Sync Control, this setting is applied automatically to the connected equipment when set to On. Device Auto Select On to have your connected equipment with BRAVIA Power Off Sync Control function power off automatically when the TV is turned off.
Option Description Product Support Contact Sony Signal Diagnostics Sony contact information is available on this screen for your convenience. TV specific information such as Model Name, Serial Number, Software Version and downloadable ratings (if available from the TV) are displayed here. Press to display the diagnostics information for the current signal.
Using the Eco Settings Option Description Reset Resets the current Eco settings to the default values. Power Saving Select from Off, Low, High, Picture Off to adjust your TV’s power consumption. By selecting the High option, you will reduce the power consumption more than the other available settings. While Picture Off is set, pressing VOL +/– or MUTING buttons will not disable this function. Press other buttons to disable it.
Other Information PC Input Signal Reference Chart for HDMI IN After connecting the PC to the TV, set the output signal from the PC according to the chart below. x KDL-32R421A/32R400A Resolution Signals Horizontal (Pixel) × Vertical (Line) Horizontal frequency (kHz) Vertical frequency (Hz) Standard VGA 640 × 480 31.5 60 VGA SVGA 800 × 600 37.9 60 VESA Guidelines XGA 1,024 × 768 48.4 60 VESA Guidelines WXGA 1,280 × 768 47.4 60 VESA 1,280 × 768 47.
Using a Wall-Mount Bracket Your TV can be mounted on a wall using a Wall-Mount Bracket (not supplied) out of the box as packaged. If the Table-Top Stand is attached to the TV, the TV may require detaching the Table-Top Stand. Prepare the TV for the Wall-Mount Bracket before making cable connections. Sony does not supply the Wall-Mount Bracket or the installing service.
For KDL-46R453A/46R450A only Secure the Attachment Parts to the rear of the TV using the supplied screws.
Troubleshooting Many of the poor pictures and poor sound conditions are related to improper connection of the cables; refer to the Quick Setup Guide provided for connections. If you have questions, service needs, or require technical assistance related to the use of your Sony TV even after you read this operating instructions manual, contact the following: For US Support: http://www.sony.com/tvsupport or call 1-800-222-SONY (7669) For Canadian Support: http://www.sony.
Condition Explanation/Solution TV is locked to one channel • Perform Auto Program to add receivable channels that are not present in the TV’s memory (see pages 20 and 43). Cannot receive or select channels • Perform Auto Program to add receivable channels that are not present in the TV’s memory (see pages 20 and 43). • To receive or select cable channels, make sure that Signal Type in the Channel settings is set to Cable (see page 43).
Condition Explanation/Solution Blurry picture / Poor color • Transporting the TV from a cold to a warm location or a sudden change in room temperature may cause moisture condensation, resulting in a blurry picture or poor color. Turn off your TV and wait a few hours before powering on again. No sound / Noisy sound No sound but good picture • Check the volume control. • Press MUTING or VOL + so that “Muting” disappears from the screen (see pages 23 and 24).
Condition Explanation/Solution PC connection No picture / No signal • Confirm the PC is correctly connected to the TV with the HDMI IN. • Ensure the output signal from the PC is one of the formats listed on page 53. • Turn the PC off. Confirm the PC connection and restart the PC. Plug-and-play will auto-detect the TV and correctly set up PC timing. • Verify the PC is not in standby or hibernation mode. Poor Picture • Adjust the resolution (see page 53).
Condition Black bands appear at the edges of the screen Explanation/Solution • Some wide screen programs are filmed in aspect ratios that are greater than 16:9 (this is especially common with theatrical releases). Your TV will show these programs with black bands at the top and bottom of the screen. For more details, check the documentation that came with your DVD/Blu-ray (or contact your program provider). • Programs in 4:3 aspect ratio will have bands on left and right sides of the screen.
Condition Explanation/Solution Photo images or folders take time to display • Depending on the image dimension, file size, and number of files in a folder, some photo images or folders take time to display. • The first time a camera is connected to the TV via USB cable, it may take up to a couple of minutes for the photos to display. Lost password • Select the Password settings on the Parental Lock settings, then enter the following master password: 4357.
Important Notices Declaration of Conformity Trade Name: SONY Model: KDL-46R453A/KDL-46R450A/KDL-40R471A/ KDL-40R450A/KDL-32R421A/KDL-32R400A Responsible Party: Sony Electronics Inc. Address: 16530 Via Esprillo, San Diego, CA 92127 U.S.A. Telephone Number: 858-942-2230 This device complies with part 15 of the FCC rules.
Specifications System Television system NTSC: American TV standard ATSC (8VSB terrestrial): ATSC compliant 8VSB QAM on cable: ANSI/SCTE 07 2000 (Does not include CableCARD functionality) Channel coverage Analog terrestrial: 2 - 69 / Digital terrestrial: 2 - 69 Analog Cable: 1 - 135 / Digital Cable: 1 - 135 Panel system LCD (Liquid Crystal Display) Panel, LED Backlight Speaker output 8W+8W Input/Output jacks CABLE/ANTENNA 75-ohm external terminal for RF inputs VIDEO IN VIDEO: 1 Vp-p, 75 ohms unbal
Model name KDL-46R450A KDL-46R453A Supplied accessories KDL-40R471A KDL-40R450A Remote control RM-YD092 (1)/Size AAA batteries (2)/Operating Instructions (1)/Quick Setup Guide (1)/Warranty Card (1)/Safety and Regulatory Booklet (1)/Software License (1)/Stand installation guide (1)/Table-Top Stand (1 set)/Screw (4) (KDL-46R453A/46R450A), Screw (2) (KDL-40R471A/40R450A)/Attachment Parts (2) (KDL-46R453A/46R450A only) common to all models Optional accessories Connecting cables / Support Belt Kit Model
Index "/1 LED 26 0-9 buttons 23 4:3 Default 41 A Add Digital Channels 43 Advanced Settings 38 Alternate Audio 39 Analog Fine Tune 43 Audio Description 48 AUDIO OUT 10 Audio Out 39 Auto Display Area 41 Auto Program 20, 43 Auto Shut Off 52 Auto Wide 41 AV Setup 49 H S HDMI IN 10 HOME button 23 Horizontal Center 41 Hue 37 Scene Select 37 Settings Channel 43 Eco 52 Parental Lock 44 Picture 37 Screen 41 Setup 47 Sound 39 Sharpness 37 Show/Hide Channels 43 Signal Type 43 SLEEP button 23 Sound Booster 39 Soun
For Your Convenience Online Registration: Be sure to register your TV. United States Canada http://productregistration.sony.com http://www.sony.ca/registration 4-458-509-12(1) © 2013 Sony Corporation Printed in U.S.A.