Television Operating Instructions Parts and Controls Watching TV Navigating through Home Menu Viewing Pictures from Connected Equipment Additional Information KDL-40R48xB / 40R45xB / 32R43xB / 32R41xB
Table of Contents IMPORTANT NOTICE . . . . . . . . . . . . . . . . . . . . 3 Safety information . . . . . . . . . . . . . . . . . . . . . 3 Precautions . . . . . . . . . . . . . . . . . . . . . . . . . . . 5 Parts and Controls TV. . . . . . . . . . . . . . . . . . . . . . . . . . . . . . . . . 7 Remote Control . . . . . . . . . . . . . . . . . . . . . 8 Watching TV Changing the Viewing Style . . . . . . . . . . 10 Changing the Wide Mode . . . . . . . . . . . . . . 10 Setting Scene Select . . . . . . . .
Introduction Thank you for choosing this Sony product. Before operating the TV, please read this manual thoroughly and retain it for future reference. Note • The “x” that appears in the model name corresponds to a numeric digit, related to design, colour or TV system. • Before operating the TV, please read “Safety information” (page 3). • Images and illustrations used in Quick Start Guide and this manual are for reference only and may differ from actual product appearance.
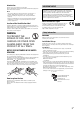
Transporting Mains lead • Before transporting the TV set, disconnect all cables. • Two or three people are needed to transport a large TV set. • When transporting the TV set by hand, hold it as shown below. Do not put stress on the LCD panel and the frame around the screen. Handle the mains lead and socket as follows in order to avoid any risk of fire, electrical shock or damage and/or injuries: Use only mains leads supplied by Sony, not other suppliers. Insert the plug fully into the mains socket.
Environment: • Places that are hot, humid, or excessively dusty; where insects may enter; where it might be exposed to mechanical vibration, near flammable objects (candles, etc.). The TV set shall not be exposed to dripping or splashing and no objects filled with liquids, such as vases, shall be placed on the TV. • Do not place the TV in a humid or dusty space, or in a room with oily smoke or steam (near cooking tables or humidifiers). Fire, electric shock, or warping may result.
Caution about handling the remote control • Observe the correct polarity when inserting batteries. • Do not use different types of batteries together or mix old and new batteries. • Dispose of batteries in an environmentally friendly way. Certain regions may regulate the disposal of batteries. Please consult your local authority. • Handle the remote control with care. Do not drop or step on it, or spill liquid of any kind onto it.
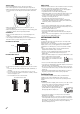
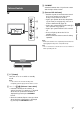
CH/INPUT Switches between the CH Up/Down screen and the input select screen. Parts and Controls (Sensors/LED indicator) TV 1 3 Note • Make sure that the TV is completely turned off before unplugging the AC power cord (mains lead). Hint • The + button has a tactile dot. Use it as a reference when operating the TV. 4 / (Power) Turns the TV on or to switch to standby mode. Note • To disconnect the TV from the AC power completely, pull the plug from the mains socket.
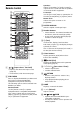
Speakers: Selects [TV Speakers] or [Audio System] to output the TV’s sound from the TV speakers or connected audio equipment. Remote Control TV Control: Use the [TV Control] menu to operate the TV from the [Home (Menu)] or [Options] menu. Return to TV: Selects this option to return to TV programme. DIGITAL/ANALOG Switch to digital or analogue input. Number buttons • Select channels. For channel numbers 10 and above, enter the next digit quickly.
/ (TV standby) Turns the TV on or switches to standby mode. (Wide Mode) Adjusts the screen display. Press repeatedly to select the desired wide mode (page 10). AUDIO • In digital mode, selects the sound for multilingual source. • In analogue mode, selects dual sound (page 15). Parts and Controls GB (Subtitle) Activates or changes the subtitle language (page 17). / (Info / Text reveal) • Displays information. Press once to display information about the programme/input you are viewing.
TV Watching TV 1 Press / on the TV or remote control to turn on the TV. 2 Press DIGITAL/ANALOG to switch between digital and analogue modes. 3 Press the number buttons or PROG +/– to select a TV channel. 4 Press +/– to adjust the volume. Changing the Viewing Style Changing the Wide Mode 1 Press mode. repeatedly to select the wide [Wide Zoom]* [Normal] [Full] [Zoom]* [14:9]* [Captions]* In digital mode An information banner appears briefly.
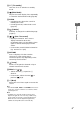
To use the Favourite list Navigating through Home Menu The HOME button allows you to access a variety of TV settings and features. 1 The Favourite feature allows you to specify up to four lists of your favourite programmes. While watching TV, press to create or display a Favourite list. Hint • Press the blue button to edit the Favourite list. Follow the guides at the bottom of the screen. Press HOME. Digital Electronic Programme Guide (EPG) 1 Press GUIDE in digital mode.
To select photo or music from USB memory 1 Press OPTIONS while playing back a photo or music file. 2 Press / then to select [Photo Frame Mode] to launch Photo Frame. To select Display mode You can change the photo frame display by selecting [Display Mode] in the [Photo Frame Settings] (page 19). To select Clock Display mode To exit FM Radio mode 1 Press RETURN.
Photo Share (except KDL-40R45xB, KDL-32R41xB) Connect, copy and view favourite photos on TV using your devices (eg. smart phones or tablets). 1 2 Press HOME. Press / then Share]. to select [Photo Follow the instructions on the screen to connect your device to the TV. 4 Open web browser on device after all connections are established, then follow the instructions on the screen to access URL.
• Sony will not be held liable for any damage to, or loss of, data on the recording media due to a malfunction of any connected devices or the TV. • The file system on the USB device supports FAT16, FAT32 and NTFS. • The file name and folder name may not display correctly in some cases. • When you connect a Sony digital still camera, set the camera’s USB connection mode to Auto or Mass Storage. For more information about USB connection mode, refer to the instructions supplied with your digital camera.
Hue Advanced Settings Increases or decreases the green tones and red tones. Sets [Picture] settings in more detail. Sharpness Sharpens or softens the picture. Colour Temperature Adjusts the whiteness of the picture. Noise Reduction Reduces the picture noise (snowy picture) in a weak broadcast signal. Reset: Resets all the advanced settings to the default settings. Adv.
Balance Screen Emphasises left or right speaker balance. Screen Format Volume Offset For details about wide mode, see page 10. Adjusts the volume level of the current input relative to other inputs. Auto Format Dual Sound Sets the sound from the speaker to [Mono], [Stereo], [A] or [B]. Note • If the signal is very weak, the sound becomes monaural automatically. • If the stereo sound is noisy when receiving a NICAM programme, select [Mono]. The sound becomes monaural, but the noise is reduced.
Note Channel Set-up Analogue Set-up Analogue Auto Tuning: Tunes in all the available analogue channels. Usually you do not need to do this operation because the channels are already tuned when the TV was first installed. However, this option allows you to repeat the process (e.g., to retune the TV after moving house, or to search for new channels that have been launched by broadcasters). Programme: Presets programme channels manually.
Technical Set-up: Auto Service Update Enables the TV to detect and store new digital services as they become available. Service Replacement Select [On] to automatically change the channel when broadcaster changes transmission of the viewing programme to a different channel. Satellite Set-up: Allows you to automatically tune satellite channels. CA Module Set-up: Allows you to access a pay TV service once you obtain a Conditional Access Module (CAM) and a view card.
Set-up Wi-Fi Setup (except KDL-40R45xB, KDL-32R41xB) Built-in Wi-Fi: Turns on/off the Wireless LAN. USB Auto Start When USB device is connected to the USB port, select [On] to automatically view the thumbnail of the last played Photo/ Music/Video. Wi-Fi Direct: Turns on/off to display photos, music and movies or control volume level using Wi-Fi direct device such as PC, mobile phone or digital camera.
Start-up Logo Select [On] to display the logo when the TV is turned on. Select [Off] to disable it. LED Indicator Select [On] to light up the LED indicator. Select [Off] to disable it. AV Set-up AV Preset: Assigns name to external equipment input. Enable: Select [Auto] to display names only when the equipment is connected, or [Always] to display regardless of connection status.
Auto Input Change (MHL): When this is set to [On], an MHL device is switched to MHL input automatically. If the TV is in standby mode, it will not switch automatically. Select [Off] to disable it. The availability of [Auto Input Change(MHL)] depends on whether the MHL-compatible device can support this feature. BRAVIA Sync Device List: Displays a list of connected equipment that is compatible with BRAVIA Sync Control. Selects [Enable] to update the [BRAVIA Sync Device List].
Picture Check View Test Picture: Allows you to check the picture condition on the display. USB System Update Select to perform system update. Automatic Software Download Select [On] to download the software automatically by broadcast signal. Select [Off] to disable it. Factory Settings Resets all settings to factory settings. After completing this process, the initial set-up screen is displayed. Note • Be sure not to turn the TV off during this period (it takes about 30 seconds) or press any buttons.
KDL-40R48xB / 40R45xB / 32R43xB / 32R41xB Viewing Pictures from Connected Equipment Connection Diagram You can connect a wide range of optional equipment to your TV.
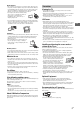
To use DTV Scart Out Using Audio and Video Equipment 1 Turn on the connected equipment. 2 Press to display the input source. 3 Press / then to select the desired Setting Digital TV SCART Out 1 2 3 4 Select Digital RF input. Press OPTION. Press / then to select [SCART Out]. Press / then to select [On]. input source. Note The highlighted item is selected if 2 seconds pass without any operation.
Using Screen mirroring (except KDL-40R45xB, KDL-32R41xB) Screen mirroring displays the screen of a compatible device (e.g. smartphones) on your large TV screen by Miracast technology. No wireless router (or access point) is required to use this feature. 1 Press the / button, then select [Screen mirroring] using / buttons. 2 Operate the Screen mirroring compatible device to connect with the TV. Once connected, the screen will be displayed on the device and also TV.
Distorted picture (dotted lines or stripes) Additional Information Troubleshooting When the LED indicator is flashing red, count how many times it flashes (interval time is three seconds). If the LED indicator flashes red, reset the TV by disconnecting the AC power cord (mains lead) from the TV for two minutes, then turn on the TV. If the problem persists, contact your dealer or Sony service centre with the number of times the LED indicator flashes red (interval time is three seconds).
Sound No sound, but good picture Press +/– or (Mute). Check if [Speakers] in [AV Set-up] is set to [TV Speakers] (page 20). Check if the headphone plug is connected to the TV. No sound or noisy sound Check if the TV system setting is appropriate (page 15). Channels The desired channel cannot be selected Switch between digital and analogue mode and select the desired digital/analogue channel.
HDMI IN 1/MHL, HDMI IN 2 (ARC) Specifications System Panel system LCD (Liquid Crystal Display) Panel, LED Backlight TV system Analogue: Depending on your country/area selection: B/G/H, D/K, L, I Digital: DVB-T/DVB-C DVB-T2*1 Satellite*1: DVB-S/DVB-S2 Colour/video system Analogue: PAL, SECAM, NTSC3.58, NTSC4.43 Digital: MPEG-2 MP@ML/HL, H.264/MPEG-4 AVC HP@L4.0, MP@L4.0 Channel coverage Analogue: UHF/VHF/Cable, Depending on your country/area selection.
Others Dimensions (Approx.) (w × h × d) Optional accessories with Table-Top Stand Wall-Mount Bracket: SU-WL450 MHL Cable: DLC-MB10/DLC-MB20/DLC-MC10/ DLC-MC20 Operating temperature 0 ºC – 40 ºC Operating humidity 10 % – 80 % RH (non-condensing) Power and others Power requirements 19.5 V DC with AC adapter Rating: Input 220 V - 240 V AC, 50 Hz Energy Efficiency Class KDL-40R48xB: A KDL-40R45xB: A KDL-32R43xB: A KDL-32R41xB: A Screen size (measured diagonally) (approx.
Notes on Digital TV function • Any functions related to Digital TV ( ) will only work in countries or areas where DVB-T/DVB-T2* (MPEG-2 and H.264/ MPEG-4 AVC) digital terrestrial signals are broadcast or where you have access to a compatible DVB-C (MPEG-2 and H.264/ MPEG-4 AVC) cable service. Please confirm with your local dealer if you can receive a DVB-T/DVB-T2* signal where you live or ask your cable provider if their DVB-C cable service is suitable for integrated operation with this TV.
For useful information about Sony products Pour obtenir les informations utiles concernant les produits Sony Información de utilidad para productos Sony Voor nuttige informatie over Sony producten Für hilfreiche Informationen zu Sony Produkten Para informação útil sobre os produtos Sony Per informazioni utili sui prodotti Sony For nyttig information om Sony-produkter For mere information om Sony-produkter Hyödyllista tietoa Sony tuotteista For nyttig informasjon om Sony produkter Szczegółowe informacje o pr