
Additional Information for Using Sony Wall-Mount Bracket (SU-WL500)


− 9 −
Additional Information for Using Sony Wall-Mount Bracket (SU-WL500)
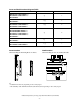
6 Adjust the angle of the Mounting Hook using the hexagon wrench supplied
with the Wall-Mount Bracket.
When installing the TV parallel to the wall (0 degrees), adjustment of the Mounting Hook angle
(procedures
and
below) is not necessary. Make sure that each arm base X is screwed in securely.
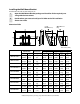
Remove the two screws from the arm base X of the Mounting Hook. Choose the holes
corresponding to the desired angle (5, 10, 15 or 20 degrees).
Adjust the angles of the top Y and bottom Z arm to t the corresponding hole, and rmly
secure each arm using the two screws removed in the previous procedure .
Hexagon
wrench
✍
• Be sure to adjust the right and le arms to the same angle.
• Make sure that the two arm bases are screwed in securely.
CAUTION
Be careful not to pinch your ngers when adjusting the angle of the Mounting Hook.
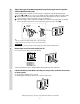
7 Remove the screws from the back of the TV.
Do not remove any other screws from the TV.
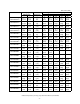
KDL-32EX6*,
KDL-32EX7
*,
KDL-40EX6*,
KDL-40EX7*,
KDL-40HX800 only
* In the actual model names, the “” indicates numbers and/or characters specic to each model.
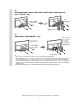
8 Lift the TV o the stand. Make sure that you carry out this task with at least two
or three people.
Do not attempt to li the TV by yourself.
For holding and carrying the TV, refer to your TV’s instructions.