4-174-286-13(1) LCD Digital Colour TV Setting Up Watching TV Additional Information Operating Instructions KDL-55HX700 / 55EX500 / 46HX700 / 46EX500 / 40HX700 / 40EX500 / 40EX400 KDL-32EX500 / 32EX400
Introduction Thank you for choosing this Sony product. Before operating the TV, please read this manual thoroughly and retain it for future reference. ~ • The illustrations used in this manual are of the KDL-40EX500 unless otherwise state. • In this manual, following models are described as HX700 models. KDL-55/46/40HX700 Following models are described as EX500 models. KDL-55/46/40/32EX500 Following models are described as EX400 models.
Table of Contents Checking the accessories.............................................................................................................. 3 Inserting batteries into the remote ................................................................................................. 3 Setting Up Attaching the Table-Top Stand...................................................................................................... 4 Connecting an antenna (aerial)/cable/VCR ..................................
Setting Up Attaching the Table-Top Stand ~ • For best picture quality, do not expose the screen to direct illumination or sunlight. • If the TV is brought directly from a cold to a warm location, or is placed in a very damp room, or is placed in a room in which heating has just been turned on, moisture may condense on the surface or inside the TV. Should this occur, turn off the TV and leave the TV off until the moisture evaporates, and then the TV can be used.
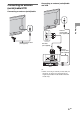
Connecting an antenna (aerial)/cable/VCR Connecting an antenna (aerial)/cable and VCR Connecting an antenna (aerial)/cable Setting Up Antenna (aerial) cable (not supplied) Antenna (aerial) cable (not supplied) AV cable (not supplied) Antenna (aerial) cable (not supplied) VCR ~ • When connecting an antenna (aerial) cable (not supplied), an adaptor (not supplied) may be required (Australian model and New Zealand model only).
Preventing the TV from toppling over Bundling the cables ~ • A cable holder is available for HX700 models. To bundle the cables, follow steps 2 to 4. * For KDL-55/46EX500 and KDL-55/46HX700 * 1 Install a wood screw (4 mm in diameter, not supplied) in the TV stand. 2 Install a machine screw (M4 × 16, not supplied) into the screw hole of the TV. 3 Tie the wood screw and the machine screw with a strong cord (not supplied). z • An optional Sony support belt kit is used to secure the TV.
Performing the initial set-up Detaching the Table-Top Stand from the TV ~ • Remove the screws guided by the arrow marks of the TV. • Do not remove the Table-Top Stand for any reason other than to install corresponding accessories on the TV. 1 Connect the TV to your AC power outlet (mains socket). 2 For HX700 models, check the ENERGY SAVING SWITCH setting is on (z). 3 Press 1 on the TV.
Watching TV To watch programmes 1 Turn on the TV. 2 1 For HX700 models, switch ENERGY SAVING SWITCH on. 2 Press 1 on the TV to turn on the TV. GUIDE OPTIONS HOME 2 Select a mode. 3 Select a TV channel. 3 Using Digital Electronic Programme Guide (only available for EPG supported countries/regions) Press GUIDE in digital mode to display the programme guide. z • The number 5, N, PROG + and AUDIO buttons on the remote have a tactile dot. Use the tactile dots as a reference when operating the TV.
To use i-Manual 1 2 x “BRAVIA” TV Features x Watching TV Introduces convenient features such as EPG Guide, Favourites, etc. x Using the HOME Menu Customise your TV settings, etc. ~ • This feature is unavailable when you select Arabic or Persian. 1 Press i-MANUAL. 2 Press G/g/F/f/ Watching TV x Welcome to i-Manual Operating instructions are built into your BRAVIA TV and can be displayed on the screen. You can browse your i-Manual anytime you need to find the varieties of convenient functions.
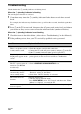
Additional Information Troubleshooting Check whether the 1 (standby) indicator is flashing in red. When the 1 (standby) indicator is flashing The self-diagnosis function is activated. 1 Count how many times the 1 (standby) indicator flashes between each three second break. For example, the indicator may flash three times, go off for three seconds, then flash again three times.
Specifications System LCD (Liquid Crystal Display) Panel TV system Analogue: B/G, I, D/K, M Digital: DVB-T Colour/video system Analogue: PAL, PAL60 (only video input), SECAM, NTSC3.58, NTSC4.43 (only video input) Digital: MPEG-2 MP@ML/HL (Australian model), MPEG-2 MP@ML/HL, H.
Model name KDL- 55EX500 55HX700 46EX500 46HX700 Power requirements 110 V – 240 V AC, 50/60 Hz 110 V – 240 V AC, 50 Hz 110 V – 240 V AC, 50/60 Hz 110 V – 240 V AC, 50 Hz Screen size (measured diagonally) 55 inches (Approx. 138.8 cm) Display resolution 1,920 dots (horizontal) × 1,080 lines (vertical) Dimensions (Approx.) (w × h × d) 1,324 mm × 832 mm × 350 mm Power and others 46 inches (Approx. 116.
Installing the Accessories (Wall-Mount Bracket) To Customers: For product protection and safety reasons, Sony strongly recommends that installing of your TV be performed by Sony dealers or licensed contractors. Do not attempt to install it yourself. To Sony Dealers and Contractors: Provide full attention to safety during the installation, periodic maintenance and examination of this product. Your TV can be installed using the SU-WL500 or SU-WL50B Wall-Mount Bracket (sold separately).
TV installation dimensions table SU-WL500 Screen centre point SU-WL50B Screen centre point Unit: mm Model Name KDL- Display dimensions Screen centre dimension Length for each mounting angle Angle (0°) D C A B Angle (20°) F E SUWL500 SUWL50B SUWL500 SUWL50B SUWL500 SUWL50B G H SU-WL500 only 55EX500 1,324 795 25 78 428 481 165 166 413 752 55HX700 1,363 825 25 78 439 492 165 166 421 776 481 46EX500 1,127 676 84 137 426 478 161 162 369 640 463 46HX700 1,1
Screw and Hook locations diagram/table Model Name Screw location SU-WL500 Hook location SU-WL50B SU-WL500 KDL-55HX700 / 55EX500 SU-WL50B a KDL-46HX700 / 46EX500 KDL-40HX700 / 40EX500 / 40EX400 d, g d, i KDL-32EX500 / 32EX400 e, g e, h b c SU-WL500 Screw location When installing the Mounting Hook on the TV. Hook location When installing the TV onto the Base Bracket. a b c Additional Information SU-WL50B Screw location When installing the Mounting Hook on the TV.
AC power cord Safety Information Handle the AC power cord and outlet as follows in order to avoid any risk of fire, electrical shock or damage and/or injuries: Installation/Set-up – – Install and use the TV set in accordance with the instructions below in order to avoid any risk of fire, electrical shock or damage and/or injuries. – – Installation Ventilation • The TV set should be installed near an easily accessible AC power outlet.
Batteries Broken pieces: • Do not throw anything at the TV set. The screen glass may break by the impact and cause serious injury. • If the surface of the TV set cracks, do not touch it until you have unplugged the AC power cord. Otherwise electric shock may result. When not in use • If you will not be using the TV set for several days, the TV set should be disconnected from the AC power for environmental and safety reasons.
Instructions about “Installing Wall Mount Bracket” are included within this TV’s instructions manual.