D:\SONY TV\SY120215_F14\4463328111_GB\GB01COV.
D:\SONY TV\SY120215_F14\4463328111_GB\GB02REG.fm Introduction Thank you for choosing this Sony product. Before operating the TV, please read this manual thoroughly and retain it for future reference. ~ • Instructions about “Installing Wall Mount Bracket” are included within this TV’s instructions manual. • The illustrations used in this manual may differ depending on your TV model. • The illustrations of the remote control used in this manual are of the RM-GD027 unless otherwise stated.
D:\SONY TV\SY120215_F14\4463328111_GB\GB02REG.fm Australia model KDL-50/46W700A only: Notice for customers in the South Africa The N Mark is a trademark or registered trademark of NFC Forum, Inc. in the United States and in other countries. The Euro/South Africa converter plug should be fitted as follows. 1 Insert the power supply or CEE7 plug in to the converter plug. 2 Use an appropriate screwdriver to attach the screw tightly without damaging the screw head.
D:\SONY TV\SY120215_F14\4463328111_GB\GB01TOC.fm About this manual (Operating Instructions) This manual explains how to set up your TV. For more information on how to use BRAVIA TV, refer to the “Electronic manual”. Operating Instructions Explains how to set up your TV such as connections, initial set-up, and basic operations. For more information, press the i-MANUAL button Electronic manual (i-Manual) Explains how to use all the features. See page 19 on how to use the i-Manual.
D:\SONY TV\SY120215_F14\4463328111_GB\GB01TOC.fm Table of Contents Getting Started Checking the accessories......................................................................... 6 Inserting batteries into the remote control................................................. 6 1: Attaching the Table-Top Stand ............................................................. 7 2: Adjusting the viewing angle of the TV ................................................... 8 3: Connections ..........................
D:\SONY TV\SY120215_F14\4463328111_GB\GB03STU.
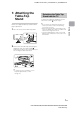
D:\SONY TV\SY120215_F14\4463328111_GB\GB03STU.fm 1: Attaching the Table-Top Stand Detaching the Table-Top Stand from the TV To detach the Table-Top Stand from the TV, remove the screws fixed in step 2. ~ 1 Place the TV set on the Table-Top Stand. • Do not remove the Table-Top Stand for any reason other than to install corresponding accessories on the TV. • When removing the Table-Top Stand from the TV, lay the display face down on a stable work surface that is larger than the TV.
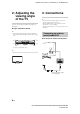
D:\SONY TV\SY120215_F14\4463328111_GB\GB03STU.fm 2: Adjusting the viewing angle of the TV 3: Connections ~ This TV can be adjusted within the angles as illustrated. • Use an antenna (aerial) cable connector no greater than 14 mm in thickness. • Use an HDMI cable connector within 12 mm (thickness) × 21 mm (width). • For more information on connections, refer to the i-Manual.
D:\SONY TV\SY120215_F14\4463328111_GB\GB03STU.fm x To connect a Set Top Box/recorder (e.g. DVD recorder) with HDMI x Connecting an antenna (aerial)/cable and VCR Getting Started HDMI cable (not supplied) Antenna (aerial) cable (not supplied) Antenna (aerial) cable (not supplied) AV cable (not supplied) Antenna (aerial) cable (not supplied) Set Top Box/recorder (e.g.
D:\SONY TV\SY120215_F14\4463328111_GB\GB03STU.fm Connecting audio/video devices Connecting MHL device Use authorized MHL2 cable with MHL device MHL logo (not supplied) The MHL (Mobile High-Definition Link) enables the TV to communicate with a connected MHL-compatible device. The TV can charge the connected MHL-compatible device while playing photo/music/video from it. You can use the TV remote control to control the connected MHL-compatible device.
D:\SONY TV\SY120215_F14\4463328111_GB\GB03STU.fm 4: Preventing the TV from toppling over 5: Bundling the cables Before bundling the cables, remove the cable holder from the AC cover. Reuse the cable holder to bundle the other cables. • Do not bundle the AC power cord (mains lead) together with other cables. 1 1 2 3* 4 * When installing on the wall, attach the cable holder under the terminals.
D:\SONY TV\SY120215_F14\4463328111_GB\GB03STU.fm 6: Connecting the TV to the Internet When you connect this TV to the Internet, you can enjoy multiple functions. For details on the functions, refer to the i-Manual. Preparing a wireless LAN The built-in wireless LAN device allows you to access the Internet and your home network. With this feature, you can connect to a wireless LAN and enjoy the benefits of networking in a cable-free environment.
D:\SONY TV\SY120215_F14\4463328111_GB\GB03STU.fm 7: Performing the initial set-up 2 Connect the TV to your AC power outlet (mains socket). Press =/1 on the TV. The illumination LED will light up in white. When you switch on the TV for the first time, the Language menu appears on the screen. ~ • When you turn on the TV for the first time, the TV requires some internal processing for optimisation before you can perform the initial setup.
D:\SONY TV\SY120215_F14\4463328111_GB\GB04SAF.fm Using Your BRAVIA TV Watching TV 1 1 Turn on the TV. Press =/1 on the TV or remote control to turn on the TV. 1 3 2 Select a mode. 3 Select a TV channel or select an input. or or x To select digital channels Use 0-9. For channel numbers 10 and above, press the next digit quickly. 2 ~ • See below illustration for location of the CH+/-, 2+/-, V/v/B/b, , and HOME buttons on the TV.
D:\SONY TV\SY120215_F14\4463328111_GB\GB04SAF.fm Frequently used buttons 1 1 2 Subtitle setting You can turn subtitle on/off while watching digital broadcasting. 2 AUDIO You can select the sub sound or secondary language while watching multiplex broadcasts. 3 3 Colour buttons When the colour buttons are available, an operation guide appears on the screen. 4 4 GUIDE Displays the digital programme guide. 5 5 / Info/Text reveal Displays channel number, details of programmes, and the clock.
D:\SONY TV\SY120215_F14\4463328111_GB\GB04SAF.fm Selecting various functions and settings (Home Menu) You can select the features of your TV from the Home menu. Here is an example on how to select an item and modify the TV settings. 1 Press HOME. 2 Press V/v to select “Settings” category. The contents of “Settings” are displayed horizontally. 2, 3 OPTIONS 1 See page 17 (Category list) for all categories. 3 Press B/b to select a desired setting item, then press . 4 Modify the settings.
D:\SONY TV\SY120215_F14\4463328111_GB\GB04SAF.fm Category list Category The categories are available depending on your TV model, region and country. Provides information on available applications and content. If there is no network connection, or the “Featured Display” setting is set to “Off”, the “Featured” category will not be displayed. History Displays recently viewed items. TV Allows you to select a list of TV channels, or a programme guide.
D:\SONY TV\SY120215_F14\4463328111_GB\GB04SAF.fm Watching Internet Video This feature serves as a gateway to Internet content, delivering a variety of on-demand entertainment straight to your TV. You can enjoy video content, including movies and cartoons. You will need to make a broadband Internet connection. For details, see page 12 (6: Connecting the TV to the Internet). 2, 3, 4 1 Press HOME. 2 Press V/v to select “Applications” category. 3 Press B/b to select “All Applications”, then press 4 .
D:\SONY TV\SY120215_F14\4463328111_GB\GB05OVR.fm Looking for Instructions Looking for instructions in the electronic manual (i-Manual) Operating instructions are built into your BRAVIA TV and can be displayed on the screen. To learn more about your TV features, access your i-Manual with the touch of a button. 1 Press i-MANUAL. 2 Select an item. 1 Press B/b to select an item. 1 2 RETURN 2 Press V/v/B/b to select an item, then press . The page of the selected item appears.
D:\SONY TV\SY120215_F14\4463328111_GB\GB05OVR.fm Saving frequently viewed pages (Bookmark) You can save frequently viewed pages for easy access anytime. x To save a page In the page to bookmark, press the yellow button on the remote control. Displaying the page again while operating the TV You can switch between the i-Manual screen and the TV screen. This feature allows you to refer to the instructions in the i-Manual while using your BRAVIA TV.
D:\SONY TV\SY120215_F14\4463328111_GB\GB06OPT.fm Additional Information Troubleshooting When the illumination LED is flashing in red, count how many times it flashes (interval time is three seconds). Press "/1 on the TV to turn it off, disconnect the AC power cord (mains lead), and inform your dealer or Sony service centre of how the indicator flashes (number of flashes). When the illumination LED is not flashing, check the items in the tables as follows. Also refer to “Troubleshooting” in the i-Manual.
D:\SONY TV\SY120215_F14\4463328111_GB\GB06OPT.fm Specifications System Panel system LCD (Liquid Crystal Display) Panel TV system Analogue: B/G, I, D/K, M, L Digital: DVB-T2 (Depending on your TV model) DVB-T Colour/video system Analogue: PAL, SECAM, NTSC3.58, NTSC4.43 Digital: Refer to the i-Manual Channel coverage Analogue: UHF/VHF/Cable, Depending on your country/area selection. Digital: UHF/VHF, Depending on your country/area selection.
D:\SONY TV\SY120215_F14\4463328111_GB\GB06OPT.fm Model name KDL- 50W704A 50W700A 46W704A 46W700A Power and others Power requirements 110 V – 240 V AC, 50/60 Hz Screen size (measured diagonally) Approx. 125.7cm/50 inches Display resolution 1,920 dots (horizontal) × 1,080 lines (vertical) Power consumption Indicated on the rear of the TV Approx. 116.8cm/46 inches Dimensions (Approx.
D:\SONY TV\SY120215_F14\4463328111_GB\GB06OPT.fm Installing the Accessories (Wall-Mount Bracket) x To Customers: For product protection and safety reasons, Sony strongly recommends that installation of your TV be performed by Sony dealers or licensed contractors. Do not attempt to install it yourself. x To Sony Dealers and Contractors: Provide full attention to safety during the installation, periodic maintenance and examination of this product.
D:\SONY TV\SY120215_F14\4463328111_GB\GB06OPT.fm SU-WL400 Screw (+PSW 6 x 50) G Screw (+PSW 6 x 20) C Spacer E Pulley B × 4 Band F Soft cloth ~ • With the screen of the TV facing down, attach the SU-WL400 accessories. For more details of B, C, E, F and G, refer to Instruction Guide provided with Wall-Mount Bracket. • Attach the Pulleys and Screws (+PSW 6 x 20) to the upper rear of the TV. • Attach the Band and Spacers with Screws (+PSW 6 x 50) to the lower rear of the TV.
D:\SONY TV\SY120215_F14\4463328111_GB\GB06OPT.fm TV installation dimensions table SU-WL400 e a 80 c d b Screen centre point Unit: mm Model Name KDL- Display dimensions Screen centre dimension Length for mounting SU-WL400 50W704A/ 50W700A 1137 669 182 526 116 46W704A/ 46W700A 1059 626 204 526 116 Figures in the table may differ slightly depending on the installation. When your TV is installed on the wall, the upper side of the TV slightly leans forward.
D:\SONY TV\SY120215_F14\4463328111_GB\GB07PRE.fm Additional Information Safety Information WARNING Transporting – • Before transporting the TV set, disconnect all cables. • Two or three people are needed to transport a large TV set. • When transporting the TV set by hand, hold it as shown below. Do not put stress on the LCD panel and the frame around the screen. Do not install the TV set as shown below. Air circulation is blocked.
D:\SONY TV\SY120215_F14\4463328111_GB\GB07PRE.fm Prohibited Usage Situation: Do not install/use the TV set in locations, environments or situations such as those listed below, or the TV set may malfunction and cause a fire, electrical shock, damage and/or injuries. • Do not use when your hands are wet, with the cabinet removed, or with attachments not recommended by the manufacturer. Disconnect the TV set from AC power outlet (mains socket) and antenna during lightning storms.
D:\SONY TV\SY120215_F14\4463328111_GB\GB07PRE.fm • Never use any type of abrasive pad, alkaline/acid cleaner, scouring powder, or volatile solvent, such as alcohol, benzene, thinner or insecticide. Using such materials or maintaining prolonged contact with rubber or vinyl materials may result in damage to the screen surface and cabinet material. • Periodic vacuuming of the ventilation openings is recommended to ensure to proper ventilation.
Instructions about “Installing Wall Mount Bracket” are included within this TV’s instructions manual.