D:\SONY TV\SY130273_Clover 6\4489955111_US\US01COV.fm 4-489-955-11(1) Television Téléviseur Operating Instructions (Setup Guide) US Mode d’emploi (Guide d’installation) FR Sony Customer Support U.S.A.: http://www.sony.com/tvsupport Canada: http://www.sony.ca/support United States 1.800.222.SONY Canada 1.877.899.SONY Please Do Not Return the Product to the Store Service à la clientèle Sony Canada : http://support.sony.ca/fr États-Unis : http://www.sony.com/tvsupport Canada 1.877.899.
D:\SONY TV\SY130273_Clover 6\4489955111_US\US02REG.fm Owner’s Record The model and serial numbers are located at the side and rear of the TV. Record these numbers in the spaces provided below. Refer to them whenever you call upon your Sony dealer regarding this TV. Model Name Serial No. CAUTION To prevent electric shock and blade exposure, do not use this AC plug with an extension cord, receptacle or other outlet unless the blades can be fully inserted. • Operate the TV only on DC 19.
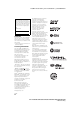
D:\SONY TV\SY130273_Clover 6\4489955111_US\US02REG.fm Your BRAVIA TV is ENERGY STAR® qualified in the default mode. It meets strict energy efficiency guidelines set by the U.S. Environmental Protection Agency and Department of Energy. ENERGY STAR is a joint program of these government agencies, designed to promote energy efficient products and practices. US Changes to certain features, settings, and functionalities (when available) of this TV (i.e.
D:\SONY TV\SY130273_Clover 6\4489955111_US\US02REG.fm The BRAVIA® Full HDTV Experience Thank you for choosing Sony! Your new BRAVIA® TV opens the door to the “Full HDTV Experience.” This document will help you get the most out of your TV. Please take a moment to register your TV at: U.S.A.: http://productregistration.sony.com Canada: http://www.sony.ca/registration Four Steps to a Full HD Experience Set, Source, Sound, and Setup.
D:\SONY TV\SY130273_Clover 6\4489955111_US\US02REG.
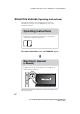
D:\SONY TV\SY130273_Clover 6\4489955111_US\US01TOC.fm About this manual (Operating Instructions) This manual explains how to setup your TV. For more information on how to use your BRAVIA TV, refer to the “Electronic manual”. Operating Instructions Explains how to setup your TV such as connections, initial setup, and basic operations. For more information, press the i-MANUAL button Electronic manual (i-Manual) Explains how to use all the features. See page 26 on how to use the i-Manual.
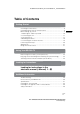
D:\SONY TV\SY130273_Clover 6\4489955111_US\US01TOC.fm Table of Contents Getting Started Checking the accessories........................................................................8 Inserting batteries into the remote control................................................8 Before setting up your TV.........................................................................9 1: Attaching the Table-Top Stand ..........................................................10 2: Connecting the TV..................
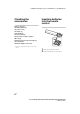
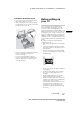
D:\SONY TV\SY130273_Clover 6\4489955111_US\US03STU.fm Getting Started Checking the accessories Inserting batteries into the remote control Remote control (1)* Size AAA batteries (2) AC power cord (1) AC adapter (1) Cable holder (3) Table-Top Stand (1)* Fixing screws for Table-Top Stand (M5 × 20) (2) Operating Instructions (this manual) and other documents Wall-Mount Adapter accessories * Refer to the model name printed on the remote control. 1 2 Remove the protection sheet.
D:\SONY TV\SY130273_Clover 6\4489955111_US\US03STU.fm x Guidelines for Remote Control • Point your remote control directly at the IR sensor located on your TV. • Make sure that no objects are blocking the path between the remote control and the IR sensor on your TV. • Fluorescent lamps can interfere with your remote control; try turning off the fluorescent lamps. • If you are having problems with the remote control, reinsert or replace your batteries and make sure that they are correctly inserted.
D:\SONY TV\SY130273_Clover 6\4489955111_US\US03STU.fm • Ensure that there are no objects in front of the TV. 1: Attaching the Table-Top Stand Refer to the supplied Table-Top Stand leaflet for proper attachment. ~ IR Sensor • Do not put stress on the LCD panel or the frame around the screen. • Be careful to not pinch your hands or the AC power cord when you install the TV set to the Table-Top Stand. 1 2 Attach the Table-Top Stand to the TV. Fix the TV to the Table-Top Stand using the supplied screws.
D:\SONY TV\SY130273_Clover 6\4489955111_US\US03STU.fm ~ • If using an electric screwdriver, set the torque at approximately 1.5 N·m {15 kgf·cm}. 2: Connecting the TV ~ Detaching the Table-Top Stand from the TV To detach the Table-Top Stand from the TV, remove the screws fixed in step 2. ~ • Do not remove the Table-Top Stand for any reason other than to install corresponding accessories on the TV.
D:\SONY TV\SY130273_Clover 6\4489955111_US\US03STU.fm Recommendation for an F type plug Projection of the inner wire from the connection part must be less than 1.5 mm. x Cable System or VHF/UHF Antenna System 7 mm max. 1.5 mm max.
D:\SONY TV\SY130273_Clover 6\4489955111_US\US03STU.fm x Shown with MHL device with MHL connection US Use authorized MHL 2 CABLE with MHL logo MHL device The TV simultaneously charges the MHLcompatible connected device while playing photo/music/video files. You can use the TV remote control to control the connected MHL-compatible device.
D:\SONY TV\SY130273_Clover 6\4489955111_US\US03STU.fm x Shown with HD BRAVIA® Sync™ Basic Connection *2Optical Connection *1Under Panel *1A/V Receiver *1Rear of TV *1Side Panel *1Blu-ray Disc HD Cable Box or HD Satellite Receiver SAT (Dish) Cable/Antenna *1 Signifies a BRAVIA Sync capable device. *2 The optical connection is only needed for A/V receivers that do not support ARC (Audio Return Channel).
D:\SONY TV\SY130273_Clover 6\4489955111_US\US03STU.fm x Shown with HD Basic Connection with Home Theater System *Optical Connection Under Panel US Cable/Antenna or Rear of TV Home Theater System Side Panel Blu-ray Disc/DVD VIDEO L Cable/SAT (Dish) R SD Cable Box or SD Satellite Receiver * The optical connection is only needed for home theater system that do not support ARC (Audio Return Channel) when connecting with HDMI.
D:\SONY TV\SY130273_Clover 6\4489955111_US\US03STU.fm x Shown with PC Connection with SD VCR/DVD Notebook PC * DVI Side Panel PC or Under Panel Rear of TV VCR Splitter DVD VCR/DVD Combo Cable/Antenna * DVI does not support audio signals. Connect the audio output of the PC to the PC speakers or an A/V receiver to listen to sound from the PC.
D:\SONY TV\SY130273_Clover 6\4489955111_US\US03STU.fm 3: Securing the TV Sony strongly recommends taking measures to prevent the TV from toppling over. Unsecured TVs may topple and result in property damage, serious bodily injury or even death. Preventing the TV from Toppling • Secure the TV to a wall and/or stand. • Do not allow children to play or climb on furniture and TV sets. • Avoid placing or hanging items on the TV. • Never install the TV on: – slippery, unstable and/or uneven surfaces.
D:\SONY TV\SY130273_Clover 6\4489955111_US\US03STU.fm The length of the M6 machine screw differs depending on the rope or chain diameter. Please see below illustration. 4: Bundling the cables 8-12 mm ~ Screw M6 • Do not bundle the AC power cord together with other cables. Rope or chain TV’s rear cover 3 Anchor the TV to the wall by using bolts, wall anchor and chain (or rope).
D:\SONY TV\SY130273_Clover 6\4489955111_US\US03STU.fm 5: Connecting the TV to the Internet When you connect this TV to the Internet, you can enjoy multiple functions. For details on the functions, refer to the i-Manual. ~ • You will need to contract with an Internet service provider to connect to the Internet. Preparing a Wi-Fi connection The built-in Wi-Fi device allows you to access the Internet and your home network.
D:\SONY TV\SY130273_Clover 6\4489955111_US\US03STU.fm 6: Running initial setup 4 Set up the Internet connection by selecting Wi-Fi or Wired LAN. If you will not be using the network features of the TV, or to set up later, select Skip. ~ 1 2 3 • The TV will automatically detect and setup the network when a wired connection is made before the initial setup. • For customers who need to setup their network connection with a Static IP address and/or a Proxy server, select Skip.
D:\SONY TV\SY130273_Clover 6\4489955111_US\US03STU.fm Watching TV 1 Using the remote control Turn on the TV. Press "/1 on the TV or POWER on the remote control to turn on the TV. The illumination LED will light up in white. US 1 or 2 Select a TV channel or select an input. or 2 3 or 4 x To select digital channels Use 0-9 and channel 2.1: Press , . .
D:\SONY TV\SY130273_Clover 6\4489955111_US\US03STU.fm x Frequently used buttons 1 Color buttons When the color buttons are available, an operation guide appears on the screen. 2 DISPLAY Displays channel number, program details, and the clock. 3 GUIDE Displays the digital program guide. (For an Antenna signal only and availability depends on your TV model/ region/country) 4 SUBTITLE/CC You can turn closed captions/subtitles on/off.
D:\SONY TV\SY130273_Clover 6\4489955111_US\US04SAF.fm Using Your BRAVIA TV Discovering the contents you like (Discover) Enjoying social networking while watching TV (Social Viewing) You can use Discover to search for content (such as TV programs, Internet contents, etc.). Contents that appear in Discover vary depending on your TV model/region/ country. 1 Press DISCOVER. 2 Press V/v to select the desired category. Social Viewing brings the benefits of social networking to your TV viewing experience.
D:\SONY TV\SY130273_Clover 6\4489955111_US\US04SAF.fm Selecting various contents and tools (Home Menu) Select the desired category at the top of the Home Menu. You can play back content by selecting its thumbnail in a subcategory. You can also use functions (such as setting change) by selecting its icon. 4 Select the thumbnail of the desired content. The content is played back. Selecting various contents The categories are available depending on your TV model/region/country.
D:\SONY TV\SY130273_Clover 6\4489955111_US\US04SAF.fm Selecting a Tool The tools are available depending on your TV model/region/country. Search Inputs Media Server You can input a keyword to search for content. You can also select keywords searched in the past. US You can select an input device connected to the TV. You can select a media server (e.g. USB flash drive, home network) to browse its content using the Media Browser. You can change TV settings Settings (e.g.
D:\SONY TV\SY130273_Clover 6\4489955111_US\US05OVR.fm Looking for Instructions Looking for instructions in the electronic manual (i-Manual) 1 Press i-MANUAL. 2 Select an item. 1 Press B/b to select an item. Operating instructions are built into your BRAVIA TV and can be displayed on the screen. To learn more about your TV features, access your i-Manual with the touch of a button. 2 Press V/v/B/b to select an item, then press 2 .
D:\SONY TV\SY130273_Clover 6\4489955111_US\US05OVR.fm Saving frequently viewed pages (Bookmark) You can save frequently viewed pages for easy access anytime. x To save a page When displaying the page to bookmark, press the red button on the remote control. US x To access the bookmarked page When displaying the i-Manual, press the blue button on the remote control to display the bookmark list. Press V/v to select the desired item, then press . ~ • To return to the previous screen, press RETURN.
D:\SONY TV\SY130273_Clover 6\4489955111_US\US06OPT.fm Additional Information Troubleshooting When the LED indicator is flashing red, count how many times it flashes (interval time is three seconds). If the LED indicator flashes red, reset the TV by disconnecting the AC power cord from the TV for two minutes, then turn on the TV.
D:\SONY TV\SY130273_Clover 6\4489955111_US\US06OPT.fm Condition Explanation/Solution Frozen audio or video, a blank screen, or the TV does not respond to TV or remote control buttons. • Perform a simple reset of the TV by unplugging the AC power cord for two minutes, then plug it in again. The "/1, CH+/–, 2 +/–, • See below illustration for location of the buttons on the V/v/B/b, t, and HOME TV. buttons cannot be located Rear of TV on the TV.
D:\SONY TV\SY130273_Clover 6\4489955111_US\US06OPT.fm How to care for your BRAVIA TV Safety is very important. Please read and follow the safety documentation (Safety Booklet) separately provided. Unplug the TV and other connected equipment from the wall outlet before you begin cleaning your TV. • Wipe the LCD screen gently with a soft cloth. • Stubborn stains may be removed with a cloth slightly moistened with a solution of mild soap and warm water.
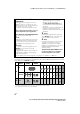
D:\SONY TV\SY130273_Clover 6\4489955111_US\US06OPT.fm Specifications System Television system Channel coverage Panel system Speaker output Wireless technology NTSC: American TV standard ATSC (8VSB terrestrial): ATSC compliant 8VSB QAM on cable: ANSI/SCTE 07 2000 (Does not include CableCARD functionality) Analog terrestrial: 2 - 69 / Digital terrestrial: 2 - 69 Analog Cable: 1 - 135 / Digital Cable: 1 - 135 LCD (Liquid Crystal Display) Panel, LED Backlight 8W+8W Protocol IEEE802.
D:\SONY TV\SY130273_Clover 6\4489955111_US\US06OPT.fm Model name KDL- 48W600B 48W590B 48W580B 40W600B 40W590B 40W580B Power and others Power requirement 19.5 V DC with AC adapter Rating: Input 110-240 V AC, 50/60 Hz (U.S.A./Canada 120 V AC, 60 Hz) 75 W Less than 0.4 W with 120 V AC and less than 0.5 W with 240 V AC 47.
D:\SONY TV\SY130273_Clover 6\4489955111_US\US06OPT.fm Installing the TV to the Wall To Customers Sufficient expertise is required for installing this product. Be sure to subcontract the installation to Sony dealers or licensed contractors and pay special attention to safety during the installation. Sony is not liable for any damages or injury caused by mishandling or improper installation, or installing any other than the specified product. Your Statutory Rights (if any) are not affected.
D:\SONY TV\SY130273_Clover 6\4489955111_US\US06OPT.fm ~ • Read the supplied Safety Booklet for additional safety information. • See page 40 (Safety Information) and page 41 (Precaution) on WALL-MOUNT ADAPTER before carrying out Wall-Mount Adapter installation.
D:\SONY TV\SY130273_Clover 6\4489955111_US\US06OPT.fm 2 Make sure that the wall has enough space for the TV and is capable of supporting a weight of at least four times that of the TV. Refer to the following table on installing the TV to the wall. See page 31-32 (Specifications) for the TV’s weight.
D:\SONY TV\SY130273_Clover 6\4489955111_US\US06OPT.fm 4 Tape the Paper Template A to the wall and drill holes according to the numbering on the Paper Template A using an electric drill. 1, 2, 3, 4 150 150 100 100 50 1 0 2 5, 6, 7, 8 50 3 5 4 6 0 7 8 50 50 100 100 150 150 A 5 6 7 Remove the Paper Template A from the wall. Attach the Wall-Mount Base B to the wall correctly using screws (8 mm in diameter, not supplied). Attach the Pulleys C to the TV using the supplied screws D.
D:\SONY TV\SY130273_Clover 6\4489955111_US\US06OPT.fm 8 9 Make sure to connect and bundle the cables before installing the TV on the wall. Bundle the AC Adapter using the cable holders (supplied with the TV). Make sure that the label is facing outwards when bundling AC adapter. 1 2 3 US 10 Install the TV on the wall. Confirm the Pulleys C are firmly latched into the Wall-Mount Base B. Then, attach the Band F to the wall using a screw (5 mm in diameter, not supplied).
D:\SONY TV\SY130273_Clover 6\4489955111_US\US06OPT.fm Dimensions of the hole positions on the wall Pass the following information to the licensed contractors if necessary. Use screws (8 mm in diameter, not supplied) to install the Wall-Mount Base B on the wall. Be sure to use the supplied Paper Template A that shows the actual position of Wall-Mount Base B for easy installation.
D:\SONY TV\SY130273_Clover 6\4489955111_US\US06OPT.fm Installing the TV against a wall or enclosed area Make sure that your TV has adequate ventilation. Allow enough space around the TV as shown in the illustration. US Installed with stand 11 7/8 inches (30 cm) 4 inches 4 inches (10 cm) (10 cm) 2 3/8 inches (6 cm) Leave at least this much space around the set. Installed on the wall 11 7/8 inches (30 cm) 4 inches 4 inches (10 cm) (10 cm) Leave at least this much space around the set.
D:\SONY TV\SY130273_Clover 6\4489955111_US\US07PRE.fm Additional Information Safety Information Declaration of Conformity Trade Name: SONY Model: KDL-48W600B/KDL-48W590B/ KDL-48W580B/KDL-40W600B/KDL-40W590B/ KDL-40W580B Responsible Party: Sony Electronics Inc. Address: 16530 Via Esprillo, San Diego, CA 92127 U.S.A. Telephone Number: 858-942-2230 This device complies with part 15 of the FCC rules.
D:\SONY TV\SY130273_Clover 6\4489955111_US\US07PRE.fm • The set is not disconnected from the AC source as long as it is connected to the AC power outlet, even if the set itself has been turned off. • As the AC adapter will become warm when it is used for a long time, you may feel hot when touching it by hand. Wall-Mount Adapter Below information shows the correct handling of the WallMount Adapter. Be sure to read this information thoroughly and use the Wall-Mount Adapter correctly.
D:\SONY TV\SY130273_Clover 6\4489955111_CF\CF02REG.fm La technologie de reconnaissance des données audio/vidéo et les données associées sont fournies par Gracenote®. Gracenote constitue la norme de l’industrie en matière de technologie de reconnaissance musicale et de fourniture de contenus connexes. Pour plus de détails, visitez www.gracenote.com. Fiche d’identification Les numéros de modèle et de série sont indiqués à l’arrière et sur le côté du téléviseur.
D:\SONY TV\SY130273_Clover 6\4489955111_CF\CF02REG.fm Votre téléviseur BRAVIA est conforme à la norme ENERGY STARMD en mode par défaut. Il répond à des directives strictes en matière d’efficacité énergétique établies par l’Agence pour la protection de l’environnement et le département de l’Énergie des États-Unis. ENERGY STAR est un programme conjoint de ces agences gouvernementales qui vise à promouvoir l’efficacité énergétique, tant dans les produits que dans les habitudes des consommateurs.
D:\SONY TV\SY130273_Clover 6\4489955111_CF\CF02REG.fm Fonctionnalités de l’expérience haute définition complète de BRAVIAMD Nous vous remercions d’avoir choisi Sony! Votre nouveau téléviseur BRAVIAMD est la clé d’une « expérience haute définition complète ». Le présent document vous aidera à préparer votre nouveau téléviseur pour l’utilisation. Prenez quelques instants pour compléter l’enregistrement de votre téléviseur à l’adresse suivante : Canada : http://www.sony.
D:\SONY TV\SY130273_Clover 6\4489955111_CF\CF02REG.fm Le tableau ci-dessous indique les formats de haute définition (HD) et de définition standard (SD) pris en charge par les entrées de votre téléviseur BRAVIA.
D:\SONY TV\SY130273_Clover 6\4489955111_CF\CF01TOC.fm À propos de ce manuel (Mode d’emploi) Ce manuel explique comment configurer votre téléviseur. Pour plus de détails sur l’utilisation de votre téléviseur BRAVIA, reportez-vous au « Manuel électronique ». Mode d’emploi Explique comment installer votre téléviseur tels que les branchements, la configuration initiale et le fonctionnement de base.
D:\SONY TV\SY130273_Clover 6\4489955111_CF\CF01TOC.fm Table des matières Pour commencer Vérifier les accessoires ............................................................................8 Insérer les piles dans la télécommande ..................................................8 Avant d’installer votre téléviseur...............................................................9 1 : Fixer le support de table ...................................................................10 2 : Raccorder le téléviseur ..
D:\SONY TV\SY130273_Clover 6\4489955111_CF\CF03STU.fm Pour commencer Vérifier les accessoires Insérer les piles dans la télécommande Télécommande (1)* Piles AAA (2) Cordon d’alimentation CA (1) Adaptateur CA (1) Support de câble (3) Support de table (1)* Vis de fixation pour le support de table (M5 × 20) (2) Mode d’emploi (ce manuel) et autres documents Accessoires de l’adaptateur de fixation murale * Reportez-vous au nom de modèle imprimé sur la télécommande. 1 2 Retirez le feuillet protecteur.
D:\SONY TV\SY130273_Clover 6\4489955111_CF\CF03STU.fm x Directives pour la télécommande • Pointez la télécommande en direction du capteur infrarouge du téléviseur. • Assurez-vous qu’aucun objet ne se trouve entre la télécommande et le capteur infrarouge. • Les lampes fluorescentes peuvent perturber le fonctionnement de votre télécommande; le cas échéant, éteignez les lampes fluorescentes dans la pièce.
D:\SONY TV\SY130273_Clover 6\4489955111_CF\CF03STU.fm • Évitez de déplacer le téléviseur d’un endroit froid à un endroit chaud. Un changement soudain de température peut provoquer de la condensation. Ce phénomène peut affecter la qualité de l’image et/ou des couleurs affichées par le téléviseur. Si cela se produit, laissez la condensation s’évaporer complètement avant de mettre le téléviseur sous tension. • Assurez-vous qu’aucun objet ne se trouve devant le téléviseur.
D:\SONY TV\SY130273_Clover 6\4489955111_CF\CF03STU.fm ~ Regroupement de l’adaptateur CA • Si vous utilisez un tournevis électrique, réglez le couple de serrage à environ 1,5 N·m (15 kgf·cm). ~ Démonter le support de table du téléviseur Démonter le support de table du téléviseur, retirer les vis fixées à l'étape 2. • Vous pouvez regrouper l’adaptateur CA de manière facultative. Ne le regroupez pour aucune autre raison que pour la fixation murale du téléviseur.
D:\SONY TV\SY130273_Clover 6\4489955111_CF\CF03STU.fm 2 : Raccorder le téléviseur x Illustré avec un décodeur avec la connexion à HDMI ~ • Utiliser un raccord de câble d’antenne d’une épaisseur de moins de 14 mm. • Lorsque vous branchez le câble au Câble / Antenne, serrez-le à la main uniquement, car serrer excessivement la connexion peut endommager le téléviseur.
D:\SONY TV\SY130273_Clover 6\4489955111_CF\CF03STU.
D:\SONY TV\SY130273_Clover 6\4489955111_CF\CF03STU.fm x Illustré avec un appareil MHL équipé de connexion MHL Utilisez un CÂBLE MHL 2 autorisé portant le logo MHL Appareil MHL Le téléviseur charge simultanément l’appareil connecté compatible MHL tout en lisant les photos / la musique / les fichiers vidéo. La télécommande du téléviseur peut être utilisée pour contrôler l’appareil connecté compatible avec la fonction MHL. ~ • Si Modif.
D:\SONY TV\SY130273_Clover 6\4489955111_CF\CF03STU.fm x Illustré avec une connexion HD BRAVIA® Sync™ de base *2Connexion optique *1Panneau inférieur *1Récepteur audio-vidéo *1Arrière du téléviseur *1Panneau latéral FR *1Blu-ray Disc Décodeur de câblodistribution HD ou récepteur satellite HD SAT (antenne satellite) Câblodistribution /antenne *1 Indique un appareil doté de la fonctionnalité BRAVIA Sync.
D:\SONY TV\SY130273_Clover 6\4489955111_CF\CF03STU.
D:\SONY TV\SY130273_Clover 6\4489955111_CF\CF03STU.fm x Illustré avec la connexion à un ordinateur avec un magnétoscope ou lecteur DVD à définition standard Ordinateur portable * DVI Panneau latéral Ordinateur ou FR Panneau inférieur Arrière du téléviseur Magnétoscope Répar- Combiné magnétoscope/ DVD titeur DVD Câblodistribution/ antenne * La prise DVI ne prend pas en charge les signaux audio.
D:\SONY TV\SY130273_Clover 6\4489955111_CF\CF03STU.fm 3 : Fixer le téléviseur Sony recommande fortement de prendre les mesures nécessaires pour prévenir le basculement du téléviseur. Des téléviseurs qui ne sont pas fixés solidement peuvent basculer et entraîner des dommages matériels, des blessures corporelles graves ou même mortelles. Mesures recommandées pour fixer solidement le téléviseur Tenez compte des mesures suivantes lorsque vous fixez votre téléviseur à une base (non fournie).
D:\SONY TV\SY130273_Clover 6\4489955111_CF\CF03STU.fm Trou de vis sur le couvercle arrière 1 3 Fixez le téléviseur au mur avec des boulons, un dispositif d’ancrage au mur et une chaîne (ou une corde). Boulons d’ancrage (M6) (non fourni) Vis à métal M4 (non fournie) Corde ou chaîne (non fournie) Trous de montage au mur Corde ou chaîne (non fournie) FR Dispositif d’ancrage au mur (non fourni) 2 Vis (non fournie) La longueur des vis à métal M6 diffère selon le diamètre de la corde ou de la chaîne.
D:\SONY TV\SY130273_Clover 6\4489955111_CF\CF03STU.fm 4 : Regrouper les câbles 5 : Brancher le téléviseur à Internet ~ • Ne groupez pas le câble d’alimentation avec les autres câbles. Lorsque ce téléviseur est connecté à Internet vous profitez de plusieurs fonctions. Pour plus de détails sur les fonctions, reportez-vous au i-Manual. ~ • Vous aurez besoin d’un abonnement à un fournisseur Internet afin de vous connecter.
D:\SONY TV\SY130273_Clover 6\4489955111_CF\CF03STU.fm Préparer une connexion Wi-Fi Le dispositif Wi-Fi intégré vous permet d’accéder à Internet et à votre réseau domestique. Cette fonction vous permet de vous connecter à un réseau sans fil et de profiter des avantages de la mise en réseau dans un environnement sans câbles. Avant de configurer la fonction Wi-Fi du téléviseur, assurez-vous d’avoir configuré le routeur sans fil (point d’accès).
D:\SONY TV\SY130273_Clover 6\4489955111_CF\CF03STU.fm 4 Définissez la connexion Internet en sélectionnant Wi-Fi ou LAN filaire. Si vous n’allez pas utiliser les fonctionnalités réseau du téléviseur, ou pour configurer la connexion ultérieurement, sélectionnez Sauter. Regarder la télévision 1 Appuyez sur la touche "/1 du téléviseur ou la touche POWER de la télécommande pour allumer le téléviseur. Le LED d’éclairage sera allumé en blanc.
D:\SONY TV\SY130273_Clover 6\4489955111_CF\CF03STU.fm Utiliser la télécommande x Touches utilisées fréquemment 1 Touches de couleur Lorsque les touches de couleur sont disponibles, un guide d’opération apparait à l’écran. 2 DISPLAY Affiche le numéro du canal, les détails des émissions et l’heure. FR 3 GUIDE 1 Affiche le guide de programmation numérique.
D:\SONY TV\SY130273_Clover 6\4489955111_CF\CF04SAF.fm Utiliser votre téléviseur BRAVIA Retrouver les contenus que vous aimez (Discover) Profitez des réseaux sociaux en regardant la télévision (Social Viewing) Vous pouvez utiliser Discover pour rechercher du contenu (émissions de télévision, contenu Internet, etc.). Le contenu affiché sous Discover varie selon le modèle de votre téléviseur, votre région et votre pays.
D:\SONY TV\SY130273_Clover 6\4489955111_CF\CF04SAF.fm Sélectionner différents contenus et outils (menu d’accueil) 3 Lorsque le curseur est déplacé au-delà de la limite gauche/droite de la souscatégorie, la sous-catégorie suivante est affichée (s’il existe plus d’une souscatégorie). Sélectionnez la catégorie souhaitée en haut du Menu Accueil. Vous pouvez reproduire du contenu en sélectionnant sa vignette dans une sous-catégorie.
D:\SONY TV\SY130273_Clover 6\4489955111_CF\CF04SAF.fm Sélectionner plusieurs contenus La disponibilité des catégories peut varier selon votre modèle de téléviseur, votre région ou votre pays. Canal Films Album Sélectionner un outil La disponibilité des outils peut varier selon votre modèle de téléviseur, votre région ou votre pays. Vous pouvez visualiser la liste des contenus numériques diffusés et les vignettes des contenus actuellement diffusés ou à venir.
D:\SONY TV\SY130273_Clover 6\4489955111_CF\CF05OVR.fm Rechercher des instructions Rechercher des instructions dans le manuel électronique (i-Manual) 1 Appuyez sur i-MANUAL. 2 Sélectionnez un élément. 1 Appuyez sur B/b pour sélectionner Le mode d’emploi est intégré à votre téléviseur BRAVIA et s’affiche à l’écran. Pour en apprendre davantage au sujet des fonctions de votre téléviseur, vous pouvez accéder au i-Manual du simple toucher d’un bouton. un élément.
D:\SONY TV\SY130273_Clover 6\4489955111_CF\CF05OVR.fm Enregistrer les pages visionnées fréquemment (Signets) Vous pouvez enregistrer les pages visionnées fréquemment pour un accès plus facile en tout temps. x Pour enregistrer une page Lorsque la page à ajouter aux signets s’affiche, appuyez sur la touche rouge de la télécommande. x Pour accéder à la page mise en signet Lors de l’affichage du i-Manual, appuyez sur la touche bleue de la télécommande afin d’afficher la liste des signets.
D:\SONY TV\SY130273_Clover 6\4489955111_CF\CF06OPT.fm Information complémentaire Dépannage Lorsque l’indicateur LED clignote en rouge, comptez combien de fois il clignote (un intervalle de 3 secondes entre les clignotements). Si l’indicateur LED clignote en rouge, réinitialisez le téléviseur en débranchant le cordon d’alimentation CA pendant deux minutes, puis allumez le téléviseur.
D:\SONY TV\SY130273_Clover 6\4489955111_CF\CF06OPT.fm Symptôme Explication/solution Comment réinitialiser le téléviseur à ses réglages d’usine. • Allumez le téléviseur. Tout en maintenant enfoncée la touche V de la télécommande, appuyez sur la touche "/1 du téléviseur. (Le téléviseur s'éteindra lui-même, puis se rallumera.) Relâcher V. AVERTISSEMENT : La réinitialisation effacera tous vos réglages personnalisés, y compris le réglage Contrôle parental.
D:\SONY TV\SY130273_Clover 6\4489955111_CF\CF06OPT.fm Entretien de votre téléviseur BRAVIA La sécurité est très importante. La sécurité étant de première importance, veuillez lire la documentation de sécurité (Feuillet de consignes de sécurité) fournie séparément et vous y conformer. Débranchez le téléviseur et les appareils raccordés de la prise de courant avant de nettoyer le téléviseur. • Essuyez l’écran ACL délicatement à l’aide d’un chiffon doux.
D:\SONY TV\SY130273_Clover 6\4489955111_CF\CF06OPT.
D:\SONY TV\SY130273_Clover 6\4489955111_CF\CF06OPT.fm Nom du modèle KDL- 48W600B 48W590B 48W580B 40W600B 40W590B 40W580B Alimentation et autres Alimentation Consommation d’énergie en cours d’utilisation en veille Taille de l’écran* (mesurée en diagonale) (pouces) Résolution de l’écran Dimensions* avec support (mm) (pouces) sans support (mm) (pouces) schéma des trous pour la fixation murale (mm) taille des vis de fixation murale (mm) Poids* avec support (kg)/(lb.) sans support (kg)/(lb.
D:\SONY TV\SY130273_Clover 6\4489955111_CF\CF06OPT.fm Fixer le téléviseur au mur Note au consommateur L’installation de ce produit nécessite une certaine compétence. Veillez à confier l’installation à un détaillant Sony ou à un entrepreneur autorisé et portez une attention particulière à la sécurité pendant l’installation. Sony n’est pas responsable des dommages ou blessures provoquées par une mauvaise manipulation ou une mauvaise installation, ou par l’installation d’autres produits que ceux précisés.
D:\SONY TV\SY130273_Clover 6\4489955111_CF\CF06OPT.fm ~ • Lisez le Feuillet de consignes d’utilisation et de sécurité fourni pour plus de renseignements sur l’utilisation en toute sécurité. • Voir la page 41 (Consignes de sécurité) et la page 43 (Précautions) sur l’ADAPTATEUR DE FIXATION MURALE avant d’installer l’adaptateur de fixation murale.
D:\SONY TV\SY130273_Clover 6\4489955111_CF\CF06OPT.fm 2 Assurez-vous que le mur est assez grand pour le téléviseur et qu’il est capable de supporter un poids au moins quatre fois supérieur à celui du téléviseur. Reportez-vous au tableau ci-après pour la fixation du téléviseur au mur. Pour connaître son poids, reportez-vous aux pages 32-33 (Spécifications).
D:\SONY TV\SY130273_Clover 6\4489955111_CF\CF06OPT.fm 4 Scotchez le gabarit en papier A sur le mur et faites des trous correspondant à la numérotation sur le gabarit en papier A à l’aide d’une perceuse électrique. 1, 2, 3, 4 150 150 100 100 1 0 2 5, 6, 7, 8 50 50 3 5 4 6 0 7 8 50 50 100 100 150 150 A 5 6 7 FR Retirez le gabarit en papier A du mur. Fixez correctement la base de fixation murale B au mur à l'aide des vis (diamètre de 8 mm, non fournies).
D:\SONY TV\SY130273_Clover 6\4489955111_CF\CF06OPT.fm 8 9 Veillez à raccorder et ranger les câbles avant d’installer le téléviseur au mur. Regroupez l'adaptateur CA à l'aide des supports de câbles (fournis avec le téléviseur). Veillez à ce que l’étiquette soit orientée vers l’extérieur lorsque vous regroupez l'adaptateur CA. 1 10 2 3 Installez le téléviseur au mur. Assurez-vous que les poulies C sont fermement verrouillées dans la base de fixation murale B.
D:\SONY TV\SY130273_Clover 6\4489955111_CF\CF06OPT.fm Dimensions pour la position des orifices sur le mur Veuillez communiquer les données suivantes à des entrepreneurs autorisés si besoin. Utilisez les vis (diamètre de 8 mm, non fournies) pour fixer la base de fixation murale B au mur. Afin de faciliter l’installation, veillez à utiliser le gabarit en papier A fourni qui vous indiquera la position exacte de la base de fixation murale B.
D:\SONY TV\SY130273_Clover 6\4489955111_CF\CF06OPT.fm Installation du téléviseur contre un mur ou dans un endroit fermé Assurez-vous que l’air circule adéquatement autour du téléviseur. Tel qu’illustré, laissez suffisamment d’espace autour du téléviseur. Installation sur support 30 cm (11 7/8 pouces) 6 cm 10 cm 10 cm (4 pouces) (4 pouces) (2 3/8 pouces) Laissez au moins cet espace autour du téléviseur.
D:\SONY TV\SY130273_Clover 6\4489955111_CF\CF07PRE.fm Information complémentaire Consignes de sécurité Déclaration de conformité Appellation commerciale: SONY Modèle: KDL-48W600B/KDL-48W590B/ KDL-48W580B/KDL-40W600B/KDL-40W590B/ KDL-40W580B Partie responsable: Sony Electronics Inc. Adresse : 16530 Via Esprillo, San Diego, CA 92127 U.S.A. Numéro de téléphone : 858-942-2230 Cet appareil est conforme à la section 15 des règlements de la FCC.
D:\SONY TV\SY130273_Clover 6\4489955111_CF\CF07PRE.fm • N’enroulez pas le câble d’alimentation autour de l’adaptateur CA. Le fil central pourrait se couper et / ou cela pourrait entrainer un problème de fonctionnement du téléviseur. • Ne touchez pas l’adaptateur CA avec des mains humides. • Si vous remarquez une anomalie sur l’adaptateur CA, déconnectez-le immédiatement de la prise d’alimentation CA.
D:\SONY TV\SY130273_Clover 6\4489955111_CF\CF07PRE.fm Précautions ADAPTATEUR DE FIXATION MURALE • Si vous laissez le téléviseur longtemps installé sur l’adaptateur de fixation murale, le mur se trouvant derrière ou au-dessus du téléviseur peut se décolorer, ou le papier peint peut se décoller, selon le matériau du mur. • Si vous enlevez l’adaptateur de fixation murale après l’avoir installé au mur, les trous de vis seront toujours présents.
For Your Convenience Online Registration: Be sure to register your TV. United States Canada http://productregistration.sony.com http://www.sony.ca/registration Your TV is capable of receiving software updates. For the latest information about software updates for your TV, visit: Software Updates: United States Canada http://www.sony.com/tvsupport http://www.sony.