9-884-613-02 (1) KV-13VM42/43/KV-20VM42/KV-20VS42 KV-13VM42/43 KV-20VM42 KV-20VS42 Operating Instructions US Mode d’emploi FR Manuel de instrucciones ES Trinitron Color Video/TV ® G Owner's Record The model and serial numbers are located at the rear of the video TV. Record these numbers in the spaces provided below. Refer to them whenever you call upon your Sony dealer regarding this product. Model No. © 1999 Sony Corporation Serial No. Printed in U.S.A.
WARNING To prevent fire or shock hazard, do not expose the unit to rain or moisture. Precautions Safety • Operate the Video/TV only on 120 V AC. • One blade of the plug is wider than the other for safety purposes and will fit into the power outlet only one way. If you are unable to insert the plug fully into the outlet, contact your dealer. • Should any liquid or solid object fall into the cabinet, unplug the Video/TV and have it checked by qualified personnel before operating it any further.
Contents Getting Started Step 1 — Preparation ................................................. 4 Checking the supplied accessories ....................... 4 Inserting batteries into the remote control .......... 4 Step 2 — Connecting the Antenna ........................... 5 Connecting an antenna ........................................... 5 Connecting an antenna/cable TV system ........... 5 Step 3 — Setting Up the Video/TV Automatically – AUTO SET UP ......................................................
Getting Started Step 1 — Preparation Checking the supplied accessories When you have taken everything out of the carton, check that you have these items: • Remote control • Two size AA (R6) batteries Inserting the batteries Insert two size AA (R6) batteries by matching the + and – on the batteries to the diagram inside the battery compartment. Insert the negative (–) end first, then push in and down until the positive (+) end clicks into position.
Step 2 — Connecting the Antenna Although you can use either an indoor or outdoor antenna with your Video/TV, we recommend connecting an outdoor antenna or a cable TV system for better picture quality. Connecting an antenna Connect your antenna cable to the VHF/UHF antenna terminal. If you cannot connect your antenna cable directly to the terminal, follow the instructions that match your cable type.
Step 3 — Setting Up the Video/TV Automatically – AUTO SET UP You can set up your Video/TV easily by using the AUTO SET UP feature. To set up each item individually, see “Changing the menu language” (page 11), “Setting cable TV on or off” (page 9), and “Presetting channels – AUTO PROGRAM” (page 10). Before you begin • Connect the antenna or cable to the Video/TV. POWER STANDBY REC EJECT TIMER REC INPUT SELEECT POWER – VOL + – CHANNEL + VOL +/– CHANNEL +/– 1 Press POWER to turn the Video/TV on.
EJECT MUTING DISPLAY POWER TV INPUT SELECT SLEEP MENU TIMER ON SCREEN RESET SELECT VCR Plus 1 2 3 4 5 6 7 8 Erasing and adding channels After AUTO SET UP, you can erase unnecessary channels or add more channels. 1 Press MENU to display the main menu. The main menu appears. V I DEO AUDIO TIMER TAPE SET UP COUNTER/ REMAIN COUNTER RESET JUMP 9 S e l e c t SELECT E x i t MENU 2 Move the cursor (z) to “SET UP” with + ◊ or – √ and press SELECT.
5 Erase and/or add channels: EJECT MUTING DISPLAY POWER TV INPUT SELECT SLEEP MENU TIMER ON SCREEN To erase an unwanted channel (1) Make sure the cursor (z) is beside SKIP. (2) Press CH +/– or the 0 - 9 buttons to select the channel you want to erase and press SELECT. CHANNEL SKIP/ADD 3 RESET SELECT SKIP ADD MENU VCR Plus 1 2 3 4 5 6 7 8 COUNTER/ REMAIN COUNTER RESET JUMP 9 ENTER The message “Channel will be skipped” appears for several seconds and the cursor (z) moves to ADD.
EJECT MUTING DISPLAY POWER TV INPUT SELECT SLEEP RESET SELECT VCR Plus 1 2 3 4 5 6 7 8 COUNTER/ REMAIN JUMP 9 ENTER 0 VOL 2 Move the cursor (z) to “SET UP” with + ◊ or – √ and press SELECT. The SET UP menu appears.
EJECT MUTING DISPLAY POWER TV INPUT SELECT SLEEP RESET SELECT VCR Plus 1 2 3 4 5 6 7 8 COUNTER/ REMAIN JUMP 9 ENTER 0 VOL 1 Press MENU to display the main menu. 2 Move the cursor (z) to “SET UP” with + ◊ or – √ and press SELECT. The SET UP menu appears.
EJECT MUTING DISPLAY POWER TV INPUT SELECT SLEEP MENU TIMER ON SCREEN RESET SELECT VCR Plus 1 2 3 4 5 6 7 8 COUNTER/ REMAIN COUNTER RESET JUMP 9 ENTER Changing the menu language If you prefer Spanish or French to English, change the menu language with the following steps. 1 Press MENU to display the main menu. 2 Move the cursor (z) to “SET UP” with + ◊ or – √ and press SELECT. The SET UP menu appears.
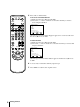
Step 4 — Setting the Clock Setting the clock automatically EJECT MUTING DISPLAY POWER TV INPUT SELECT SLEEP MENU TIMER ON SCREEN RESET SELECT Some TV and cable channels transmit time signals with their broadcasts. Your Video/TV can pick up these time signals to automatically set the clock (AUTO CLOCK). The AUTO CLOCK feature works only if a channel in your area is broadcasting a time signal. If your Video/TV cannot pick up the signals, set the clock manually (page 15).
If the clock does not activate EJECT MUTING DISPLAY POWER TV INPUT SELECT SLEEP MENU TIMER ON SCREEN RESET SELECT 1 Follow steps 1-5 in “Setting the clock automatically” and select VCR Plus 1 2 3 4 5 6 7 8 9 COUNTER/ REMAIN COUNTER RESET If the clock is set, but your time zone or daylight saving time is not set correctly, you can adjust these settings manually. If you live close to a time zone border, the Video/TV’s clock may not match the actual broadcast times of the programs.
5 Using + ◊ or – √, select “AUTO,” “STANDARD TIME,” or “DAYLIGHT EJECT MUTING DISPLAY POWER TV INPUT SELECT SLEEP MENU TIMER ON SCREEN RESET SELECT SAVING TIME.” (See the table below). Then move the cursor (z) to “OK,” and press SELECT. Choose AUTO STANDARD TIME DAYLIGHT SAVING TIME To Select to set the daylight saving time automatically. Select if your area does not use daylight saving time. Select if your area uses daylight saving time.
EJECT MUTING DISPLAY POWER TV INPUT SELECT SLEEP MENU TIMER ON SCREEN RESET SELECT VCR Plus 1 2 3 4 5 6 7 8 9 COUNTER/ REMAIN COUNTER RESET JUMP ENTER 0 VOL CH INDEX Setting the date and clock enables you to use the timer feature for recording or automatically turning the Video/TV on or off. 1 Press MENU to display the main menu. 2 Move the cursor (z) to “TIMER” with + ◊ or – √ and press SELECT. The TIMER menu appears.
Step 5 — Setting Up VCR Plus+ system EJECT MUTING DISPLAY POWER TV INPUT SELECT SLEEP MENU TIMER ON SCREEN RESET SELECT The VCR Plus+ system feature allows you to simplify the task of programming your Video/TV to make recordings with the timer. Setting up your Video/TV involves coordinating the TV channel number (the number you turn to on your Video/TV or VCR to watch a program) with the guide channel (the number that’s assigned to that channel in your program guide).
6 Press the 0-9 buttons to enter the channel number assigned in the guide EJECT MUTING DISPLAY POWER TV INPUT SELECT SLEEP MENU TIMER ON SCREEN RESET SELECT channel and press ENTER. The TV CH position turns red. VCR Plus+ SET UP GUIDE CH – TV CH 16 – CHANNEL LIST MENU Use [0-9] to set a TV channel Then press [ENTER] VCR Plus 1 2 3 4 5 6 7 8 9 COUNTER/ REMAIN COUNTER RESET JUMP 7 Press the 0-9 buttons to enter the actual channel number on your Video/ TV and press ENTER.
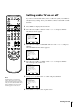
Basic Operations Watching the TV This section explains the basic functions to use while watching the TV. Most of the operations can be done using the remote control. Switching the Video/TV on and off POWER STANDBY REC EJECT TIMER REC INPUT SELEECT – VOL + – CHANNEL Switching on + Press POWER. The STANDBY lamp flashes until the picture appears.
EJECT MUTING DISPLAY POWER TV INPUT SELECT SLEEP Adjusting the picture When watching TV programs, you can adjust the picture to suit your taste. You can adjust the picture received through the input jacks as well. These adjustments are retained in memory even when you turn off the TV. MENU TIMER ON SCREEN 1 Press MENU to display the main menu. RESET SELECT The main menu appears.
Adjusting the sound EJECT MUTING DISPLAY TV INPUT SELECT MENU RESET SELECT 1 Press MENU to display the main menu. 2 Move the cursor (z) to “AUDIO” with + ◊ or – √ and press SELECT. The AUDIO menu appears. VCR Plus 1 2 3 4 5 6 7 8 9 COUNTER/ REMAIN JUMP AUDIO BASS TREBLE BALANCE MTS : SURROUND : MENU STEREO ON ENTER 0 VOL Move S e l e c t SELECT E x i t MENU CH INDEX 3 Select the item you want to adjust.
EJECT MUTING DISPLAY POWER TV INPUT SELECT SLEEP The Multichannel TV Sound (MTS) feature allows you to switch between stereo, mono, and Second Audio Program (SAP). MENU TIMER ON SCREEN RESET SELECT VCR Plus 1 2 3 4 5 6 7 8 9 COUNTER/ REMAIN COUNTER RESET Selecting stereo or bilingual programs (KV-20VS42 only) JUMP ENTER 0 VOL CH 1 Press MENU to display the main menu. 2 Move the cursor (z) to “AUDIO” with + ◊ or – √ and press SELECT. The AUDIO menu appears.
This table describes the relation between the sound output from the speaker, the recorded sound, and the MTS mode. For instance, if you set MTS to “SAP” and a SAP signal is not being broadcast, the sound from the speakers is muted. However, if you record the same program, the sound will be recorded in the program’s primary audio channel (stereo or mono).
EJECT MUTING DISPLAY POWER TV INPUT SELECT SLEEP Listening to surround sound effects (KV-20VS42 only) The surround feature simulates the sound reproduction of a movie theater or a concert hall. Surround is only effective for stereo programs. MENU TIMER ON SCREEN RESET SELECT VCR Plus 1 2 3 4 5 6 7 8 9 1 Press MENU to display the main menu. 2 Move the cursor (z) to “AUDIO” with + ◊ or – √ and press SELECT. The AUDIO menu appears.
Displaying on-screen information Press DISPLAY to turn the display on or off. The channel number, date and time, audio mode are displayed. Press DISPLAY repeatedly to scroll between XDS ON, CAPTION, and DISPLAY OFF. For more information on XDS and CAPTION, see page 39.
Playing a Tape This section shows you how to insert a video cassette and to play it. For more information on using the advanced features, see “Additional Operations” on pages 36 through 57. Inserting a video cassette Gently insert a cassette with the arrow indication facing upwards. The cassette is automatically loaded into the cassette compartment and the Video/TV turns on. If you insert a cassette without a safety tab, playback automatically starts.
Playing a tape 1 Insert the tape. The Video/TV automatically turns on. If you insert a cassette without a safety tab, playback automatically begins. 2 Press PLAY ·. Playback begins. On screen-information automatically disappears after several seconds. POWER STANDBY REC EJECT TIMER REC INPUT SELEECT EJECT – MUTING VOL + – CHANNEL + DISPLAY POWER To stop playback Press STOP p. The Video/TV returns to the normal TV picture.
EJECT MUTING DISPLAY POWER TV INPUT SELECT SLEEP MENU TIMER ON SCREEN RESET SELECT VCR Plus 1 2 3 4 5 6 7 8 Playing a tape repeatedly – AUTO REPEAT You can play the recorded portion of a tape repeatedly. 1 Press MENU. The main menu appears. V I DEO AUDIO TIMER TAPE SET UP COUNTER/ REMAIN COUNTER RESET JUMP 9 ENTER VOL CH INDEX S e l e c t SELECT E x i t MENU 2 Move the cursor (z) to “TAPE” with + ◊ or – √ and press SELECT. The TAPE menu appears.
EJECT MUTING DISPLAY POWER TV INPUT SELECT SLEEP MENU TIMER ON SCREEN RESET Displaying on-screen information Press DISPLAY to turn the display on or off. The date and time, tape operation mode is displayed. Press DISPLAY repeatedly to scroll between XDS ON, CAPTION, and DISPLAY OFF. For more information on XDS and CAPTION, see page 39.
Recording TV Programs Recording TV programs Caution Television programs, films, video tapes and other materials may be copyrighted. Unauthorized recording of such material may be contrary to the provisions of the copyright laws. Also, use of this recorder with cable television transmission and/or program owner. 1 Insert a cassette with a safety tab. POWER STANDBY REC The Video/TV turns on automatically.
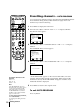
Recording TV Programs Using the Timer EJECT MUTING DISPLAY POWER The Timer Recording function allows you to preset your Video/TV to record up to six programs within a one-month period.
4 Press SELECT, then set the hour of the recording start time to “8” with + ◊ EJECT MUTING DISPLAY POWER or – √.
10 Press SELECT. EJECT MUTING DISPLAY POWER TV INPUT SELECT SLEEP MENU TIMER ON SCREEN RESET 11 When you want to set other programs, press – √ to move the cursor (z) to the next line, then repeat steps 2 through 10. SELECT 12 Press MENU to exit the TIMER SET/CHECK menu. VCR Plus 1 2 3 4 5 6 7 8 COUNTER/ REMAIN COUNTER RESET The message “Please turn TV off to set timer” is displayed for three seconds.
EJECT MUTING DISPLAY POWER TV INPUT SELECT SLEEP MENU TIMER ON SCREEN RESET SELECT VCR Plus 1 2 3 4 5 6 7 8 9 COUNTER/ REMAIN COUNTER RESET Checking the timer settings You can display the list of the timer settings which you preset. Press TIMER ON SCREEN. The TIMER SET/CHECK menu appears.
Recording using QUICK TIMER You can preset your Video/TV to start recording immediately and to automatically stop recording after a specific time period. Even if you have not set the clock, QUICK TIMER recording can be used. POWER STANDBY REC EJECT TIMER REC INPUT SELEECT QUICK TIMER REC – VOL + – CHANNEL + To record QUICK TIMER REC 1 Insert a cassette with its safety tab intact.
Recording TV Programs Using VCR Plus+ system How the VCR Plus+ system works EJECT MUTING DISPLAY POWER TV INPUT SELECT SLEEP MENU TIMER ON SCREEN RESET SELECT VCR Plus 1 2 3 4 5 6 7 8 9 COUNTER/ REMAIN COUNTER RESET JUMP ENTER 0 VOL CH INDEX Before you begin • Make sure that the time and date are set correctly. If not, refer to “Setting the Clock” on page 12. • Make sure that the loaded cassette has its safety tab intact. 1 Press the VCR Plus button.
Additional Operations Automatically Switching the Video/TV On or Off – ON/OFF TIMER EJECT MUTING DISPLAY POWER You can set the Video/TV to turn on and off at any time. Make sure the clock is set correctly. If it is not, set the clock first (page 12). TV 1 Press MENU to display the main menu. INPUT SELECT SLEEP MENU TIMER ON SCREEN 2 Move the cursor (z) to “TIMER” with + ◊ or – √ and press SELECT. The TIMER menu appears.
8 Press + ◊ or – √ to set the channel and press SELECT. ON/OFF TIMER EVERY MON–FRI 12:02 AM 1H MENU CH 1 Select a channel SUN 12:00 AM S e l e c t SELECT E x i t MENU Move 9 Press MENU to return to the original screen. If you are not using the Video/TV, press POWER to set the Video/TV in standby mode. One minute before the Video/TV turns off, the message “TV will turn off soon” appears on the screen.
Selecting the Video/TV’s Cable Box Input Channel – CHANNEL FIX EJECT MUTING DISPLAY POWER TV INPUT SELECT SLEEP MENU TIMER ON SCREEN RESET SELECT VCR Plus 1 2 3 4 5 6 7 8 9 COUNTER/ REMAIN COUNTER RESET JUMP ENTER 0 VOL CH INDEX TAPE SPEED REC &SLOW X2 7 PAUSE SEARCH Use the CHANNEL FIX feature to prevent the Video/TV’s input channel from being accidentally changed. It is recommended that you set up your Video/TV as follows when you connect a cable box.
Displaying Caption Vision/XDS EJECT MUTING DISPLAY POWER TV INPUT SELECT SLEEP MENU TIMER ON SCREEN RESET SELECT VCR Plus 1 2 3 4 5 6 7 8 COUNTER/ REMAIN COUNTER RESET JUMP 9 1 Press MENU to display the main menu. 0 CH INDEX 2 Move the cursor (z) to “SET UP” with + ◊ or – √ and press SELECT. The SET UP menu appears.
Blocking Out Programs – Parental Control EJECT MUTING DISPLAY POWER TV INPUT SELECT SLEEP MENU TIMER ON SCREEN RESET SELECT VCR Plus 1 2 3 4 5 6 7 8 COUNTER/ REMAIN COUNTER RESET JUMP 9 ENTER 0 VOL The TV programs and movies shown on TV are given a rating signal based on the following rating systems. In U.S.A.: U.S. Television Parental Guidelines to rate television programs (U.S.
5 Enter a four digit password* using the 0–9 buttons. EJECT MUTING DISPLAY POWER PARENTAL CONTROL TV PASSWORD: MENU INPUT SELECT SLEEP Confirm password MENU TIMER ON SCREEN Move RESET SELECT VCR Plus 1 2 3 4 5 6 7 8 9 COUNTER/ REMAIN COUNTER RESET JUMP ENTER 0 VOL CH INDEX S e l e c t SELECT E x i t MENU * Do not enter “4357” corresponding to “HELP” on a phone number pad. (See page 48.) If you enter “4357,” “Invalid password, please try again” appears.
10 Using + ◊ or – √, select a desired rating (“CHILD,” “YOUTH,” or EJECT MUTING DISPLAY POWER TV “YOUNG ADULT”) and press SELECT. PARENTAL CONTROL INPUT SELECT SLEEP MENU TIMER ON SCREEN RESET SELECT VCR Plus 1 2 3 4 5 6 7 8 COUNTER/ REMAIN COUNTER RESET JUMP 9 ENTER Move S e l e c t SELECT E x i t MENU If you want to select the ratings from “CUSTOM,” go to step 4 of “Selecting custom ratings in U.S.A.
EJECT MUTING DISPLAY Selecting custom ratings in U.S.A. POWER TV INPUT SELECT SLEEP MENU TIMER ON SCREEN RESET SELECT VCR Plus 1 2 3 1 Perform steps 1–4 of “Activating the Parental Control feature” on page 40. 4 5 6 2 Enter your four digit password using the 0–9 buttons. 7 8 9 COUNTER/ REMAIN COUNTER RESET If you want to select the ratings to be blocked from “CUSTOM” once you have activated the Parental Control feature (page 40), follow the procedure below.
7 Using + ◊ or – √, select “ ” and press SELECT. EJECT MUTING DISPLAY POWER The indicator automatically appears beside the selected rating and all “higher” ratings, indicating that the programs that match the ratings will be blocked.
EJECT MUTING DISPLAY POWER TV INPUT SELECT SLEEP MENU TIMER ON SCREEN RESET SELECT VCR Plus 1 2 3 4 5 6 7 8 COUNTER/ REMAIN COUNTER RESET JUMP 9 ENTER 0 VOL TAPE SPEED &SLOW X2 7 E x i t MENU 13 Move the cursor (z) to the movie rating to be blocked with + ◊ or – √ and press SELECT. The selected position turns red. MOVIE RATINGS G: _ PG: _ PG–1 3 : R: _ NC– 1 7 : _ X: _ MENU Allow rating Move S e l e c t SELECT E x i t MENU PAUSE 14 Using + ◊ or – √, select “ ” and press SELECT.
3 Using + ◊ or – √, select the type of programs to be blocked and press EJECT MUTING DISPLAY POWER SELECT.
EJECT MUTING DISPLAY POWER TV 5 Using + ◊ or – √, select the rating you want to block and press SELECT. The selected rating menu appears.
3 Move the cursor (z) to “CHANGE PASSWORD” with + ◊ or – √ and press EJECT MUTING DISPLAY POWER TV INPUT SELECT SLEEP MENU TIMER ON SCREEN RESET CHANGE PASSWORD PASSWORD: ____ MENU SELECT Move VCR Plus 1 2 3 4 5 6 7 8 9 COUNTER/ REMAIN COUNTER RESET SELECT. The CHANGE PASSWORD menu appears. JUMP ENTER 0 VOL S e l e c t SELECT E x i t MENU 4 Move the cursor (z) to “PASSWORD” with + ◊ or – √ and press SELECT. The password position turns red.
What the Ratings Mean Ratings in U.S.A. Sony’s predetermined ratings These are original ratings that Sony predetermined according to the viewer’s age. Each rating allows you to view the certain programs, as follows: See below for a description of each rating. Ratings CHILD: Suitable for children under the age of 6 YOUTH: Suitable for children aged 7 and older YOUNG ADULT: Suitable for children aged 13 and older Viewable U.S. movie ratings G, NR, and N/A Viewable U.S.
U.S. TV ratings U.S. TV ratings are for TV programs rated according to the U.S. Television Parental Guidelines. Ratings TV-Y (All Children) TV-Y7 (Directed to Older Children) TV-G (General Audience) TV-PG (Parental Guidance Suggested) TV-14 (Parents Strongly Cautioned) TV-MA (Mature Audience Only) TV-NR (Not Rated/Unrated) Explanations This program is designed for young children aged 2–6 and is appropriate for all children. This program is designed for children aged 7 and above.
Canadian English Language ratings The Canadian English Language ratings are for TV programs in English broadcast in Canada. Ratings C (Programming intended for children under age 8) G (General Audience) C8+ (Programming generally considered acceptable for children 8 years and over to watch on their own) PG (Parental Guidance) 14+ (Programming contains themes or content which may not be suitable for viewers under the age of 14.
Setting Your Favorite Channels – FAVORITE CHANNEL EJECT MUTING DISPLAY POWER TV INPUT SELECT SLEEP MENU TIMER ON SCREEN 1 Press MENU to display the main menu. SELECT RESET 2 Move the cursor (z) to “SET UP” with + ◊ or – √ and press SELECT. VCR Plus 1 2 3 4 5 6 7 8 9 COUNTER/ REMAIN COUNTER RESET The FAVORITE CHANNEL feature allows your Video/TV to memorize the channels that you watch the most.
7 Using + ◊ or – √, select the channel that you want to set as your favorite EJECT MUTING DISPLAY POWER channel and press SELECT. TV INPUT SELECT SLEEP MENU TIMER ON SCREEN RESET SELECT VCR Plus 1 2 3 8 Repeat steps 6 and 7 to set the other favorite channels. 4 5 6 9 Press MENU to return to the original screen. 7 8 COUNTER/ REMAIN COUNTER RESET JUMP 9 ENTER 0 VOL CH INDEX The favorite channels menu appears.
Searching Using the Index Function EJECT MUTING DISPLAY POWER TV INPUT SELECT SLEEP MENU TIMER ON SCREEN RESET 1 Insert a tape with index signals. 1 2 3 2 Press INDEX once during playback. 4 5 6 3 Press ) FF or 0 REW to search for individual programs ahead or 7 8 COUNTER/ REMAIN JUMP 9 ENTER 0 VOL CH INDEX TAPE SPEED REC &SLOW X2 behind the current position. The tape rewinds or rapidly advances to the next index signal.
Enhancing Video Picture Quality EJECT MUTING DISPLAY POWER TV INPUT SELECT SLEEP MENU TIMER ON SCREEN RESET The tracking condition is automatically adjusted on this Video/TV. The AUTO TRACKING indicator will appear for three seconds while the Video/TV is searching for the best tracking condition.
Reducing the Picture Noise EJECT MUTING DISPLAY POWER TV INPUT SELECT SLEEP RESET SELECT VCR Plus 1 2 3 4 5 6 7 8 COUNTER/ REMAIN JUMP 2 Move the cursor (z) to “TAPE” with + ◊ or – √ and press SELECT. The TAPE menu appears. TAPE TAPE REMAIN: T-120 AUTO REPEAT: OFF NOISE REDUCTION: OFF TRACKING MENU 9 ENTER Move VOL CH E x i t MENU 3 Move the cursor (z) to “NOISE REDUCTION” with + ◊ or – √ and press SELECT. The selected position turns red.
Connecting Optional Equipment Watching the picture input from optional equipment To connect a video camera Front Front (KV-20VS42 only) POWER POWER STANDBY STANDBY REC EJECT REC TIMER REC EJECT TIMER REC INPUT SELEECT – VOL + INPUT SELEECT – CHANNEL + VIDEO VIDEO AUDIO to VIDEO/AUDIO jacks – VOL + – CHANNEL + L AUDIO R to LINE IN (VIDEO/AUDIO L (MONO)/R) jacks to video/audio outputs To connect a VCR without a cable box Rear to VIDEO/AUDIO jacks Rear (KV-20VS42 only) to LINE IN (VI
Additional Information Troubleshooting If, after reading the following instructions, you have additional questions related to the use of your Sony Video/TV, please call one of the following members (English only). Customers in the continental United States contact the Direct Response Center at: 1-800-222-SONY (7669) Customers in Canada contact the Customer Relations Center at: (416) 499-SONY (7669) Function Problems TV reception No picture (screen is dark), no sound • The AC power cord is disconnected.
Symptoms caused by contaminated video heads • Normal picture • Rough picture • Unclear picture • No picture (or black& white screen appears) initial contamination terminal Function Problems Playback The sound drops out. • The tape is defective. / Use a new tape. Recording The cassette is ejected when you press REC r. • The safety tab of the cassette has been removed. / Cover the tab hole with adhesive tape, or use another cassette with a safety tab. (page 25) Recording does not function.
Specifications TV Section Television system American TV Standard Channel coverage VHF: 2-13/UHF:14-69/ CATV: 1-125 Picture tube KV-13VM42/43: MicroblackTM Trinitron® tube KV-20VM42: Trinitron® Tube 20-inch picture measured diagonally KV-20VS42: Trinitron® Tube 20-inch picture measured diagonally Screen size KV-13VM42/43: 13-inch picture measured diagonally KV-20VM42/KV-20VS42: 20-inch picture measured diagonally Antenna 75-ohm external antenna terminal for VHF/UHF Video Section Format VCR system VHS NTSC s
Index to Parts and Controls Video/TV set—front This section briefly describes the buttons and controls on the Video/TV set and on the remote control. For more information, refer to the pages next to each description.
Remote control 1 MUTING (muting) (page 18) 1 EJECT 2 3 4 MUTING DISPLAY TV INPUT SELECT SLEEP TIMER ON SCREEN MENU RESET 5 6 7 8 9 !º !¡ SELECT 1 2 3 4 5 6 7 8 COUNTER/ REMAIN COUNTER RESET !• !ª @º JUMP VOL REC X2 !£ X2 (page 26) @¢ @∞ PAUSE SEARCH @§ @¶ REW PLAY STOP 8 JUMP (page 18) @™ CH 7 7 COUNTER RESET (pages 25, 28) !¡ SLOW & +/– (page 26) !™ REC (recording) r (page 29) @£ &SLOW 5 VCR Plus (page 35) 6 COUNTER/REMAIN (page 28) @¡ 9 TAPE SPEED 3 INPUT SELECT
Additional Information 63
AVERTISSEMENT Afin d’éviter tout risque d’incendie ou d’électrocution, ne pas exposer l’appareil à la pluie ni à l’humidité. Précautions Sécurité • Faites uniquement fonctionner le téléviseur/vidéo sur une tension de 120 V CA. • L’une des lames de la fiche est plus large que les autres pour des raisons de sécurité et ne s’adapte dans la prise que dans un seul sens. Si vous ne parvenez pas à introduire complètement la fiche dans la prise, prenez contact avec votre revendeur Sony.
Contenu Préparation 1re étape — Préparation ............................................ 4 Vérification des accessoires fournis ....................... 4 Installation des piles dans la télécommande ........ 4 2e étape — Raccordement de l’antenne .................. 5 Raccordement d’une antenne ................................. 5 Raccordement d’une antenne/réseau de télédistribution ..................................................... 5 3e étape — Installation automatique du téléviseur/vidéo – AUTO SET UP ..
Préparation 1re étape — Préparation Vérification des accessoires fournis Lorsque vous avez tout retiré du carton, vérifiez si vous avez bien reçu les accessoires suivants : • Télécommande • Deux piles AA (R6) Installation des piles Installation des piles dans la télécommande Introduisez deux piles AA (R6) en faisant correspondre les pôles + et – des piles au diagramme à l’intérieur du compartiment à piles.
2e étape — Raccordement de l’antenne Bien que vous puissiez utiliser une antenne intérieure ou externe avec votre téléviseur/vidéo, nous recommandons une antenne externe ou un réseau de télédistribution par câble de façon à obtenir la meilleure qualité d’image possible. Raccordement d’une antenne Branchez votre câble d’antenne sur la borne d’antenne VHF/UHF.
3e étape — Installation automatique du téléviseur/vidéo – AUTO SET UP Vous pouvez installer votre téléviseur/vidéo de manière simplifiée grâce à la fonction AUTO SET UP. Pour configurer chaque paramètre individuellement, reportez-vous aux sections “Changement de la langue d’affichage des menus” (page 11), “Activation/désactivation de la télédistribution” (page 9) et “Présélection de chaînes de télévision – AUTO PROGRAMMATION” (page 10).
EJECT MUTING DISPLAY POWER TV INPUT SELECT SLEEP MENU TIMER ON SCREEN RESET SELECT VCR Plus 1 2 3 4 5 6 7 8 Suppression et ajout de chaînes Au terme de la procédure AUTO SET UP, vous pouvez supprimer des chaînes jugées inutiles ou en ajouter d’autres. 1 Appuyez sur MENU pour afficher le menu principal. Le menu principal s’affiche.
5 Suppression et/ou ajout de chaînes: EJECT MUTING DISPLAY POWER TV INPUT SELECT SLEEP MENU TIMER ON SCREEN Pour supprimer une chaîne jugée inutile (1) Amenez le curseur (z) en regard de SAUTE. (2) Appuyez sur les touches CH +/– ou 0 à 9 pour sélectionner la chaîne que vous voulez supprimer et appuyez ensuite sur SELECT.
EJECT MUTING DISPLAY POWER TV INPUT SELECT SLEEP MENU TIMER ON SCREEN RESET Si vous avez raccordé votre téléviseur/vidéo à un réseau de télédistribution, réglez CABLE sur OUI (réglage par défaut). Sinon, réglez CABLE sur NON pour visualiser des chaînes VHF ou UHF. SELECT 1 Appuyez sur MENU pour afficher le menu principal.
EJECT MUTING DISPLAY POWER TV INPUT SELECT SLEEP MENU TIMER ON SCREEN RESET SELECT VCR Plus Vous pouvez présélectionner des chaînes télévisées de manière simplifiée à l’aide de la fonction PROGRAMMATION AUTO. Présélectionnez les chaînes pendant la journée plutôt que le soir lorsque certaines stations ne diffusent plus leurs émissions. 2 3 1 Appuyez sur MENU pour afficher le menu principal.
EJECT MUTING DISPLAY POWER TV INPUT SELECT SLEEP MENU TIMER ON SCREEN RESET SELECT Changement de la langue d’affichage des menus Si vous préférez le français ou l’espagnol à l’anglais, changez la langue d’affichage des menus selon la procédure suivante. 1 Appuyez sur MENU pour afficher le menu principal. VCR Plus 1 2 3 4 5 6 7 8 COUNTER/ REMAIN COUNTER RESET JUMP appuyez ensuite sur SELECT. Le menu REGLAGE apparaît.
4e étape — Réglage de l’horloge EJECT MUTING DISPLAY POWER TV INPUT SELECT SLEEP MENU TIMER ON SCREEN RESET SELECT VCR Plus 1 2 3 4 5 6 7 8 COUNTER/ REMAIN COUNTER RESET JUMP 9 ENTER 0 VOL CH INDEX Certaines chaînes de télévision et chaînes câblées transmettent des signaux horaires en même temps que leurs émissions. Votre téléviseur/vidéo peut capter ces signaux horaires pour régler l’horloge automatiquement (AUTO CLOCK).
Si l’horloge ne démarre pas EJECT MUTING DISPLAY POWER TV INPUT SELECT SLEEP MENU TIMER ON SCREEN RESET SELECT VCR Plus 1 2 3 4 5 6 7 8 COUNTER/ REMAIN COUNTER RESET JUMP 9 ENTER 0 VOL Si l’horloge est activée mais que votre fuseau horaire ou l’heure d’été n’ont pas été réglés correctement, vous pouvez régler ces paramètres manuellement.
5 A l’aide de la touche + ◊ ou – √, sélectionnez “AUTO”, “HEURE EJECT MUTING DISPLAY POWER TV INPUT SELECT TIMER ON SCREEN RESET SLEEP Choisissez Pour MENU AUTO Sélectionner le réglage automatique de l’heure d’été. HEURE STANDARD Indiquer que votre zone géographique n’applique pas l’heure d’été. HEURE D’ETE Indiquer que votre zone géographique applique l’heure d’été.
EJECT MUTING DISPLAY Réglage manuel de la date et de l’heure POWER TV INPUT SELECT MENU TIMER ON SCREEN RESET SELECT VCR Plus 1 2 3 4 5 6 7 8 COUNTER/ REMAIN COUNTER RESET JUMP 1 Appuyez sur MENU pour afficher le menu principal.
5e étape — Réglage du système VCR Plus+ EJECT MUTING DISPLAY POWER TV INPUT SELECT SLEEP MENU TIMER ON SCREEN RESET SELECT VCR Plus 1 2 3 4 5 6 7 8 COUNTER/ REMAIN COUNTER RESET JUMP 9 ENTER 0 VOL 1 Appuyez sur MENU pour afficher le menu principal. 2 Déplacez le curseur (z) sur “REGLAGE” à l’aide de la touche + ◊ ou – √ et appuyez ensuite sur SELECT. Le menu REGLAGE apparaît.
6 Appuyez sur les touches 0 à 9 pour introduire le numéro de chaîne attribué EJECT MUTING DISPLAY POWER TV INPUT SELECT SLEEP MENU TIMER ON SCREEN RESET SELECT VCR Plus 1 2 3 4 5 6 7 8 COUNTER/ REMAIN COUNTER RESET JUMP 9 ENTER 0 VOL LISTE DES CANAUX MENU Utilisez [0-9] pour régler un canal TV Pressez [ENTER] 7 Appuyez sur les touches 0 à 9 pour introduire le numéro assigné à cette chaîne sur votre téléviseur/vidéo et appuyez ensuite sur ENTER.
Opérations de base Regarder la télévision Cette section présente les fonctions de base à utiliser lorsque vous regardez la télévision. La plupart de ces opérations peuvent être exécutées sans l’aide de la télécommande. Mise sous et hors tension du téléviseur/vidéo POWER STANDBY REC EJECT TIMER REC INPUT SELEECT – VOL + – CHANNEL + Mise sous tension POWER ‰/ STANDBY EJECT Appuyez sur POWER. Le témoin STANDBY clignote jusqu’à ce que l’image apparaisse.
EJECT MUTING DISPLAY POWER TV INPUT SELECT SLEEP MENU TIMER ON SCREEN RESET SELECT Réglage de l’image Lorsque vous regardez des émissions télévisées, vous pouvez régler l’image en fonction de vos préférences. Vous pouvez également régler l’image reçue via les prises d’entrée. Ces réglages restent en mémoire même lorsque vous mettez le téléviseur/ vidéo hors tension. 1 Appuyez sur MENU pour afficher le menu principal. Le menu principal s’affiche.
EJECT MUTING DISPLAY POWER TV INPUT SELECT SLEEP (KV-20VS42 uniquement) Vous pouvez ajuster les graves, les aigus et la balance en fonction de vos préférences. Vous pouvez également régler le son de signal reçu via les prises d’entrée. MENU TIMER ON SCREEN RESET SELECT VCR Plus 1 2 3 4 5 6 7 8 9 COUNTER/ REMAIN COUNTER RESET Réglage du son JUMP ENTER 0 VOL CH 1 Appuyez sur MENU pour afficher le menu principal.
EJECT MUTING DISPLAY POWER TV INPUT SELECT SLEEP MENU TIMER ON SCREEN RESET La fonction de son télévisé multicanal MTS (Multichannel TV Sound) vous permet de commuter le son stéréo, le son monaural et l’émission audio secondaire SAP (Second Audio Program). SELECT 1 Appuyez sur MENU pour afficher le menu principal.
Ce tableau décrit la relation entre les sons diffusés par les haut-parleurs, le son enregistré et le mode MTS. Par exemple, si vous réglez MTS sur “SAP” mais qu’un signal SAP n’est pas retransmis, le son diffusé par les hautparleurs est coupé. Si toutefois vous enregistrez cette émission, le son du canal audio primaire de l’émission (stéréo ou mono) sera enregistré.
EJECT MUTING DISPLAY POWER TV INPUT SELECT SLEEP MENU TIMER ON SCREEN RESET uniquement) La fonction de son spatial simule la restitution sonore d’une salle de cinéma ou d’une salle de concert. La fonction de son spatial n’est opérante qu’avec les émissions stéréo. SELECT 1 Appuyez sur MENU pour afficher le menu principal.
Affichage d’informations à l’écran Appuyez sur DISPLAY pour activer ou désactiver l’affichage. Le numéro de la chaîne, la date et l’heure et le mode audio s’affichent. Appuyez plusieurs fois de suite sur DISPLAY pour faire défiler XDS ON, CAPTION et DISPLAY OFF. Pour des informations plus détaillées sur XDS and CAPTION, reportez-vous à la page 39.
Lecture d’une cassette Cette section présente comment introduire une cassette vidéo et la reproduire. Pour des informations plus détaillées sur l’utilisation des fonctions avancées, reportez-vous aux “Opérations complémentaires” des pages 36 à 57. Introduction d’une cassette vidéo Introduisez précautionneusement une cassette avec le repère fléché orienté vers le haut. La cassette est automatiquement chargée dans le compartiment à cassette et le téléviseur/vidéo se met sous tension.
Lecture d’une cassette 1 Introduisez la cassette Le téléviseur/vidéo se met automatiquement sous tension. Si vous introduisez une cassette sans onglet de protection, la lecture démarre automatiquement. 2 Appuyez sur PLAY ·. La lecture commence. Les informations qui s’affichent à l’écran disparaissent au bout de quelques secondes.
EJECT MUTING DISPLAY POWER TV INPUT SELECT SLEEP MENU TIMER ON SCREEN RESET SELECT Lecture répétée d’une cassette – REPETITION AUTO Vous pouvez reproduire un passage enregistré de manière répétée. 1 Appuyez sur MENU. Le menu principal s’affiche. VCR Plus 1 2 3 4 5 6 7 8 COUNTER/ REMAIN COUNTER RESET JUMP 9 ENTER Aller VOL CH SELECT Sortie MENU 2 Déplacez le curseur (z) sur “CASSETTE” à l’aide de la touche + ◊ ou – √ et appuyez sur SELECT. Le menu CASSETTE apparaît.
EJECT MUTING DISPLAY POWER TV INPUT SELECT SLEEP MENU TIMER ON SCREEN RESET SELECT Affichage d’informations à l’écran Appuyez sur DISPLAY pour activer ou désactiver l’affichage. La date et l’heure ainsi que le mode d’exploitation de la bande s’affichent. Appuyez plusieurs fois de suite sur DISPLAY pour faire défiler XDS ON, CAPTION et DISPLAY OFF. Pour des informations plus détaillées sur XDS et CAPTION, voir page 39.
Enregistrement d’émissions télévisées Enregistrement d’émissions télévisées Attention Les émissions télévisées, les films, les cassettes vidéo et autres matériaux peuvent être protégés par des droits d’auteur. L’enregistrement non autorisé de tels matériaux peut être en infraction avec la législation sur les droits d’auteur.
Enregistrement d’émissions télévisées à l’aide du programmateur EJECT MUTING DISPLAY POWER TV INPUT SELECT SLEEP MENU TIMER ON SCREEN RESET SELECT VCR Plus 1 2 3 4 5 6 7 8 La fonction d’enregistrement par programmateur vous permet de programmer votre téléviseur/vidéo pour l’enregistrement de six émissions dans un délai d’un mois. Avant de commencer • Assurez-vous que la date et l’heure de l’horloge sont correctement réglées. Sinon, le message “Réglez d’abord l’horloge” s’affiche à l’écran.
4 Appuyez sur SELECT et réglez ensuite l’heure de début d’enregistrement EJECT MUTING DISPLAY POWER TV INPUT SELECT SLEEP MENU TIMER ON SCREEN RESET SELECT VCR Plus 1 2 3 4 5 6 7 8 COUNTER/ REMAIN COUNTER RESET JUMP 9 ENTER 0 VOL CH INDEX Aller Choisir SELECT Sortie MENU 5 Appuyez sur SELECT et réglez ensuite la minute de début d’enregistrement sur “15” à l’aide de la touche + ◊ ou – √.
10 Appuyez sur SELECT. EJECT MUTING DISPLAY POWER TV INPUT SELECT SLEEP MENU TIMER ON SCREEN RESET 11 Pour régler d’autres programmations, appuyez sur – √ pour amener le curseur (z) sur la ligne suivante et répétez ensuite les étapes 2 à 10. SELECT 12 Appuyez sur MENU pour quitter le menu REG/VERIF PROG. VCR Plus 1 2 3 4 5 6 7 8 COUNTER/ REMAIN COUNTER RESET Le message “Mettre le TV hors tension pour régler le programmateur” s’affiche pendant trois secondes.
EJECT MUTING DISPLAY POWER TV INPUT SELECT SLEEP MENU TIMER ON SCREEN RESET SELECT VCR Plus 1 2 3 4 5 6 7 8 COUNTER/ REMAIN COUNTER RESET JUMP 9 ENTER 0 VOL Appuyez sur TIMER ON SCREEN. Le menu REG/VERIF PROG apparaît.
Enregistrement à l’aide du programmateur rapide – QUICK PROGRAMMATEUR POWER STANDBY REC EJECT Vous pouvez programmer votre téléviseur/vidéo pour démarrer immédiatement l’enregistrement et l’arrêter automatiquement au terme d’une durée déterminée. Vous pouvez utiliser la fonction d’enregistrement QUICK PROGRAMMATEUR même si vous n’avez pas réglé l’horloge.
Enregistrement d’émissions télévisées à l’aide du système VCR Plus+ Comment fonctionne le système VCR Plus+ EJECT MUTING DISPLAY POWER Lorsque vous souhaitez enregistrer un programme télévisé, il vous suffit simplement de rechercher son code “PlusCode”, un numéro attribué à toutes les émissions mentionnées dans les rubriques TV de la plupart des quotidiens, des programmes de TV par câble et dans les programmes TV classiques.
Opérations complémentaires Mise sous ou hors tension automatique du téléviseur/vidéo — MINUTERIE EJECT MUTING DISPLAY Vous pouvez programmer le téléviseur/vidéo pour qu’il se mette sous ou hors tension à l’heure de votre choix. Assurez-vous que l’horloge est réglée correctement. Si ce n’est pas le cas, réglez d’abord l’horloge (page 12). POWER TV INPUT SELECT TIMER ON SCREEN SLEEP 1 Appuyez sur MENU pour afficher le menu principal.
8 Appuyez sur + ◊ ou – √ pour sélectionner la chaîne et appuyez ensuite sur SELECT. MINUTERIE CHAQUE LUN–VEN 12:02 AM 1H CH MENU 1 Choisir le canal DIM 12:00 AM Aller C h o i s i r SELECT S o r t i e MENU 9 Appuyez sur MENU pour revenir à l’écran de départ. Si vous n’envisagez pas d’utiliser le téléviseur/vidéo, appuyez sur POWER pour l’activer en mode de veille. Une minute avant que le téléviseur/vidéo se mette hors tension, le message “TV se met hors tension” apparaît à l’écran.
Sélection de la chaîne d’entrée du décodeur du téléviseur/vidéo — CANAL FIXE EJECT MUTING DISPLAY Utilisez la fonction CANAL FIXE pour éviter que la chaîne d’entrée du téléviseur/vidéo soit changée accidentellement. Si vous raccordez un décodeur, nous recommandons de configurer votre téléviseur/vidéo de la façon suivante. POWER TV INPUT SELECT SLEEP MENU TIMER ON SCREEN RESET SELECT 1 Appuyez sur MENU pour afficher le menu principal.
Affichage de sous-titres/XDS EJECT MUTING DISPLAY POWER TV INPUT SELECT SLEEP MENU TIMER ON SCREEN RESET SELECT VCR Plus 1 2 3 4 5 6 7 8 COUNTER/ REMAIN COUNTER RESET JUMP 9 ENTER 0 VOL Certaines émissions sont diffusées avec des sous-titres. Pour afficher les sous-titres, sélectionnez CC1, CC2, TEXT1 ou TEXT2 dans le menu. CC1 ou CC2 affiche à l’écran une version sous-titrée des dialogues ou des effets sonores d’une émission.
Blocage de programmes télévisés — Contrôle parental EJECT MUTING DISPLAY Les programmes et les films diffusés à la télévision sont identifiés par un signal de classement basé sur les systèmes de classement suivants. Aux Etats-Unis : Les U.S. Television Parental Guidelines des programmes de télévision (classements de télévision aux Etats-Unis), et les Motion Picture Association of America (MPAA) Guidelines des films y compris des films diffusés à la télévision (classements des films).
5 Introduisez un mot de passe à quatre chiffres* à l’aide des touches 0–9. EJECT MUTING DISPLAY POWER CONTROLE PARENTAL TV MOT DE PAS S E : MENU INPUT SELECT SLEEP Confirmez le mot de passe MENU TIMER ON SCREEN Aller RESET SELECT VCR Plus 1 2 3 4 5 6 7 8 9 COUNTER/ REMAIN COUNTER RESET JUMP ENTER 0 VOL CH INDEX Choisir SELECT Sortie MENU * N’introduisez pas le code “4357” qui correspond à “HELP” sur le clavier d’un téléphone. (Voir page 48.
10 A l’aide des touches + ◊ ou – √, sélectionnez un classement (“ENFANT”, EJECT MUTING DISPLAY “JEUNE” ou “ADOLESCENT”) et appuyez ensuite sur SELECT.
EJECT MUTING DISPLAY POWER TV INPUT SELECT SLEEP MENU TIMER ON SCREEN RESET SELECT VCR Plus 1 2 3 4 5 6 7 8 COUNTER/ REMAIN COUNTER RESET JUMP Pour sélectionner un classement de verrouillage “SPECIFIQUE” après avoir activé la fonction de contrôle parental (page 40), appliquez la procédure suivante. Pour une description détaillée de chaque classement, voir “Ce que les classements signifient” à la page 49.
7 A l’aide des touches + ◊ ou – √, select “ ” et appuyez ensuite sur SELECT. EJECT MUTING DISPLAY L’indicateur apparaît automatiquement en regard du classement sélectionné et tous les classements “supérieurs”, indiquant que les programmes correspondant à ces classements seront bloqués.
EJECT MUTING DISPLAY POWER TV INPUT SELECT SLEEP MENU TIMER ON SCREEN RESET SELECT VCR Plus 1 2 3 4 5 6 7 8 9 COUNTER/ REMAIN COUNTER RESET JUMP ENTER VOL CH TAPE SPEED &SLOW X2 7 PAUSE SEARCH REW CLASSEMENT DES F I LMS G: _ PG: _ PG–1 3 : _ R: _ NC– 1 7 : _ X: _ MENU Choisir un classement Aller Choisir SELECT Sortie MENU 13 Déplacez le curseur (z) sur le classement des films à bloquer à l’aide des touches + ◊ ou – √ et appuyez ensuite sur SELECT.
3 A l’aide des touches + ◊ ou – √, sélectionnez le type de programmes à EJECT MUTING DISPLAY bloquer et appuyez ensuite sur SELECT.
5 A l’aide des touches + ◊ ou – √, sélectionnez le classement que vous EJECT MUTING DISPLAY POWER TV INPUT SELECT SLEEP MENU TIMER ON SCREEN RESET SELECT VCR Plus 1 2 3 4 5 6 7 8 9 COUNTER/ REMAIN COUNTER RESET JUMP ENTER 0 VOL CH INDEX TAPE SPEED REC &SLOW X2 7 PAUSE SEARCH REW PLAY STOP voulez bloquer et appuyez ensuite sur SELECT. Le menu de classement sélectionné apparaît.
3 Déplacez le curseur (z) sur “CHANGE LE MOT DE PASSE” à l’aide des EJECT MUTING DISPLAY touches + ◊ ou – √ et appuyez ensuite sur SELECT. Le menu CHANGE LE MOT DE PASSE apparaît. POWER TV CHANGE LE MOT DE PASSE INPUT SELECT SLEEP MOT DE PAS S E : MENU RESET SELECT Aller VCR Plus 1 2 3 4 5 6 7 8 9 JUMP VOL CH MENU 0–9.
Ce que les classements signifient Classements aux Etats-Unis Classements présélectionnés Sony Ce sont des classements présélectionnés par Sony en fonction de l’âge des utilisateurs. Chaque classement vous permet de visualiser certains programmes comme défini ci-après. Voir ci-dessous pour une description de chaque classement. Classements Classement américain des films ENFANT: Convient aux enfants de moins de 6 ans. JEUNE: Convient aux enfants de 7 ans et plus.
Classement américain des programmes télévisés Le classement américain des programmes télévisés classe les programmes de télévision suivant les directives U.S. Television Parental Guidelines. Classement TV-Y (Tous enfants) Explications Ces programmes sont destinés aux jeunes enfants âgés de 2 à 6 ans et conviennent d’une manière générale à tous les enfants. Ces programmes sont destinés aux enfants à partir de 7 ans.
Classement anglais du Canada Le classement anglais du Canada concerne les programmes de télévision diffusés en langue anglaise au Canada.
Sélection de vos chaînes favorites — CANAL PREFERE EJECT MUTING DISPLAY La fonction CANAL PREFERE vous permet de programmer sur votre téléviseur/vidéo les chaînes que vous regardez le plus fréquemment. Si la fonction est réglée sur AUTO, les cinq dernières chaînes que vous avez sélectionnées à l’aide de la touche 0 à 9 sont automatiquement programmées comme vos chaînes favorites. Si vous voulez introduire votre propre sélection de chaînes, réglez la fonction sur MANUEL.
7 A l’aide de la touche + ◊ ou – √, sélectionnez la chaîne que vous voulez EJECT MUTING DISPLAY POWER programmer comme une chaîne favorite et appuyez ensuite sur SELECT. TV INPUT SELECT SLEEP MENU TIMER ON SCREEN RESET SELECT VCR Plus 2 3 8 Répétez les étapes 6 et 7 pour programmer vos autres chaînes favorites. 4 5 6 9 Appuyez sur MENU pour revenir à l’écran de départ. 7 8 9 JUMP ENTER 0 VOL CH INDEX Vos chaînes favorites apparaissent.
Recherche à l’aide de la fonction d’index EJECT MUTING DISPLAY Le téléviseur/vidéo insère automatiquement des signaux d’index sur la bande magnétique à l’endroit où commence chaque enregistrement. Ces signaux permettent de retrouver rapidement un enregistrement spécifique.
Optimisation de la qualité de l’image EJECT MUTING DISPLAY POWER TV INPUT SELECT SLEEP MENU TIMER ON SCREEN RESET L’alignement se règle automatiquement sur ce téléviseur/vidéo. L’indicateur ALIGNEMENT AUTO s’affiche pendant trois secondes pendant que le téléviseur/vidéo recherche le meilleur réglage de l’alignement.
Réduction des parasites dans l’image EJECT MUTING DISPLAY Vous pouvez activer la fonction de réduction automatique des parasites dans l’image en réglant REDUCTION BRUIT sur OUI. Utilisez cette fonction lorsque vous reproduisez une cassette vidéo usée ou ancienne, par exemple une cassette de location. POWER TV INPUT SELECT SLEEP MENU TIMER ON SCREEN RESET SELECT 1 Appuyez sur MENU pour afficher le menu principal.
Raccordement d’un appareil en option Visualisation de l’image d’un appareil en option Pour raccorder une caméra vidéo Avant (KV-20VS42 uniquement) Avant POWER POWER STANDBY STANDBY REC EJECT REC TIMER REC EJECT TIMER REC INPUT SELEECT – VOL + – CHANNEL INPUT SELEECT + VIDEO VIDEO AUDIO vers les prises VIDEO/AUDIO – VOL + – CHANNEL + L AUDIO R vers les prises LINE IN (VIDEO/AUDIO L (MONO)/R) vers les sorties audio/vidéo Pour raccorder un magnétoscope sans décodeur Arrière Arrière
Informations complémentaires Dépannage Si, après avoir lu les instructions suivantes, vous avez encore des questions concernant l’utilisation de votre téléviseur de projection Sony, veuillez prendre contact à l’un des numéros suivants (en anglais uniquement) : Clients aux Etats-Unis (zone continentale) : consultez le Direct Response Center au 1-800-222-SONY (7669). Clients au Canada : consultez le Customer Relations Center au (416) 499-SONY (7669).
Symptômes causés par des têtes vidéo contaminées • Image normale • Image grossière Stade initial Contamination Fonction Problèmes Lecture Pertes de son • Image à peine visible • Pas d’image (ou un écran noir et blanc apparaît) Stade terminal Causes possibles et remèdes • La bande est usée. / Utilisez une nouvelle cassette. • L’onglet de protection de la cassette a été brisé.
Spécifications Téléviseur Système de télévision Normes télévisées américaines Couverture de chaînes VHF: 2-13/UHF:14-69/ CATV: 1-125 Tube image KV-13VM42/43: Tube Trinitron® MicroblackTM KV-20VM42: Tube Trinitron® à image de 20 pouces mesurés en diagonale KV-20VS42: Tube Trinitron® à image de 20 pouces mesurés en diagonale Format de l’écran KV-13VM42/43: Image de 13 pouces mesurés en diagonale KV-20VM42/KV-20VS42: Image de 20 pouces mesurés en diagonale Antenne Borne d’antenne extérieure 75 ohms pour VHF/UH
Index des composants et des commandes Téléviseur/vidéo — Avant Cette section décrit brièvement les touches et les commandes du téléviseur/vidéo et de la télécommande. Pour des informations plus détaillées, reportez-vous aux pages indiquées en regard de chaque description.
Télécommande 1 EJECT 2 3 4 MUTING DISPLAY TV INPUT SELECT SLEEP TIMER ON SCREEN MENU RESET 5 6 7 8 9 !º !¡ SELECT !• !ª 6 COUNTER/REMAIN (page 28) @º 8 JUMP (page 18) 9 INDEX (page 54) 4 5 6 !º TAPE SPEED (pages 29, 35) 7 8 9 JUMP @¡ @™ !£ X2 (page 26) @£ !¢ SEARCH 0/) (page 26) !∞ REW (rembobinage) 0 (page 26) CH TAPE SPEED !§ STOP p (page 26) &SLOW 7 @¢ @∞ !¶ DISPLAY (pages 24, 28) @§ !ª SLEEP (page 37) @º Touches d’exploitation de menu (pages 7, 19, 36, 40) PAUSE SEARC
Informations complémentaires 63
ADVERTENCIA Para evitar el riesgo de incendios y descargas eléctricas, no exponga la unidad a la lluvia ni a la humedad. Precauciones Seguridad • Emplee el video/TV sólo con 120 V CA. • Por razones de seguridad, una cuchilla del enchufe es más ancha que la otra y encajará en la toma de corriente en una sola posición. Si no puede insertar el enchufe por completo en la toma, póngase en contacto con su proveedor.
Indice Procedimientos iniciales Paso 1 — Preparativo ................................................. 4 Comprobación de los accesorios suministrados .. 4 Inserción de las pilas en el mando a distancia ..... 4 Paso 2 — Conexión de la antena .............................. 5 Conexión de una antena .......................................... 5 Conexión de una antena/sistema de TV por cable .......................................................................
Procedimientos iniciales Paso 1 — Preparativo Comprobación de los accesorios suministrados Cuando haya sacado todo de la caja, compruebe que ha recibido los siguientes accesorios: • Mando a distancia • Dos pilas tamaño AA (R6) Inserción de las pilas Inserte dos pilas tamaño AA (R6) de forma que coincidan las polaridades + y – de dichas pilas con las del diagrama del interior del compartimiento de las mismas.
Paso 2 — Conexión de la antena Aunque es posible utilizar una antena interior o exterior con el video/TV, se recomienda conectar una exterior o un sistema de TV por cable para obtener mayor calidad de imagen. Conexión de una antena Conecte el cable de antena al terminal de antena de VHF/UHF. Si no es posible conectar dicho cable directamente al terminal, siga las instrucciones correspondientes al tipo de su cable.
Paso 3 — Ajuste automático del video/TV – AUTO SET UP Es posible ajustar fácilmente el video/TV mediante la función AUTO SET UP. Para ajustar cada elemento por separado, consulte “Cambio del idioma del menú” (página 11), “Activación o desactivación del sistema de TV por cable” (página 9) y “Memorización de canales – AUTO PROGRAMACION” (página 10). Pasos previos • Conecte la antena o el cable al video/TV.
EJECT MUTING DISPLAY POWER TV INPUT SELECT Eliminación y adición de canales Una vez realizada la función AUTO SET UP, es posible eliminar los canales innecesarios o añadir más canales. SLEEP MENU TIMER ON SCREEN 1 Pulse MENU para que aparezca el menú principal. Aparece el menú principal.
5 Borre y/o añada canales: EJECT MUTING DISPLAY POWER TV INPUT SELECT SLEEP MENU TIMER ON SCREEN Para borrar canales que no desee (1) Asegúrese de que el cursor (z) se encuentra junto a OMITIR. (2) Pulse CH +/– o los botones 0 - 9 para seleccionar el canal que desee borrar y pulse SELECT.
EJECT MUTING DISPLAY POWER TV INPUT SELECT SLEEP MENU TIMER ON SCREEN RESET Si ha conectado el video/TV a un sistema de TV por cable, ajuste CABLE en SI (ajuste de fábrica). Si no, ajuste CABLE en NO para ver canales de VHF o UHF. SELECT 1 Pulse MENU para que aparezca el menú principal. VCR Plus 1 2 3 4 5 6 7 8 9 COUNTER/ REMAIN COUNTER RESET Activación o desactivación del sistema de TV por cable JUMP 2 Desplace el cursor (z) hasta “PREFERENCIAS” con + ◊ o – √ y pulse SELECT.
EJECT MUTING DISPLAY POWER TV INPUT SELECT SLEEP MENU TIMER ON SCREEN RESET PROGRAMACION Es posible memorizar fácilmente canales de TV mediante la función AUTO PROGRAMACION. Realice esta operación durante el día y no durante la noche, ya que es posible que algunos canales no estén emitiéndose. 1 Pulse MENU para que aparezca el menú principal. 1 2 3 4 5 6 7 8 9 COUNTER/ REMAIN JUMP 2 Desplace el cursor (z) hasta “PREFERENCIAS” con + ◊ o – √ y pulse SELECT. Aparece el menú PREFERENCIAS.
EJECT MUTING DISPLAY POWER TV INPUT SELECT SLEEP MENU TIMER ON SCREEN RESET SELECT VCR Plus 1 2 3 4 5 6 7 8 COUNTER/ REMAIN COUNTER RESET JUMP 9 ENTER 0 VOL Cambio del idioma del menú Si prefiere el español o el francés en lugar del inglés, realice los siguientes pasos para cambiar el idioma del menú. 1 Pulse MENU para que aparezca el menú principal. 2 Desplace el cursor (z) hasta “PREFERENCIAS” con + ◊ o – √ y pulse SELECT. Aparece el menú PREFERENCIAS.
Paso 4 — Ajuste del reloj EJECT MUTING DISPLAY POWER TV INPUT SELECT SLEEP MENU TIMER ON SCREEN RESET SELECT VCR Plus Algunos canales de TV y de TV por cable transmiten señales horarias con sus emisiones. El video/TV puede recoger dichas señales para ajustar el reloj automáticamente (AUTO CLOCK). La función AUTO CLOCK se activará solamente si algún canal de su zona transmite señales horarias. Si el video/TV no puede recoger las señales, ajuste el reloj manualmente (página 15).
Si el reloj no se activa EJECT MUTING DISPLAY POWER TV INPUT SELECT SLEEP MENU TIMER ON SCREEN RESET SELECT VCR Plus 1 2 3 4 5 6 7 8 COUNTER/ REMAIN COUNTER RESET JUMP 9 ENTER 0 VOL Si el reloj está ajustado, pero la zona horaria o la hora de verano no está correctamente definida, puede ajustar dichos elementos manualmente. Si vive cerca de los límites de la zona horaria, es posible que el reloj del video/TV no coincida con las horas reales de emisión de los programas.
5 Mediante + ◊ o – √, seleccione “AUTO”, “HORA ESTANDAR” o “HORA EJECT MUTING DISPLAY POWER TV INPUT SELECT SLEEP MENU TIMER ON SCREEN RESET SELECT VCR Plus 1 2 3 4 5 6 7 8 COUNTER/ REMAIN COUNTER RESET JUMP 9 ENTER 0 VOL CH INDEX TAPE SPEED REC &SLOW X2 7 PAUSE SEARCH REW PLAY FF STOP 14 Procedimientos iniciales DE VERANO”. (Consulte la siguiente tabla.) A continuación, desplace el cursor (z) hasta “OK”, y pulse SELECT.
EJECT MUTING DISPLAY POWER TV INPUT SELECT SLEEP MENU TIMER ON SCREEN RESET SELECT VCR Plus 1 2 3 4 5 6 7 8 COUNTER/ REMAIN COUNTER RESET JUMP 9 ENTER 0 VOL CH El ajuste de la fecha y el reloj permite emplear el temporizador para grabar o para encender o apagar automáticamente el video/TV. 1 Pulse MENU para que aparezca el menú principal. 2 Desplace el cursor (z) hasta “RELOJ” con + ◊ o – √ y pulse SELECT. Aparece el menú RELOJ.
Paso 5 — Ajuste del sistema VCR Plus+ EJECT MUTING DISPLAY POWER TV INPUT SELECT SLEEP MENU TIMER ON SCREEN RESET SELECT El sistema VCR Plus+ permite simplificar la tarea de programación del video/TV para realizar grabaciones con el temporizador. El ajuste del video/TV conlleva la coordinación del número de canal de TV (el número que elige en su TV o videograbadora para ver un programa) con el canal guía (el número que se asigna a ese canal en la guía de programación).
6 Pulse los botones 0-9 para introducir el número de canal asignado en el EJECT MUTING DISPLAY POWER TV INPUT SELECT SLEEP MENU TIMER ON SCREEN RESET SELECT VCR Plus 1 2 3 4 5 6 7 8 9 COUNTER/ REMAIN COUNTER RESET JUMP ENTER 0 VOL canal guía y pulse ENTER. La posición TV CH aparece en color rojo.
Operaciones básicas Visualización de la TV En esta sección se describen las funciones básicas que pueden utilizarse mientras se ve la TV. La mayor parte de las operaciones pueden realizarse mediante el mando a distancia. Encendido y apagado del video/TV POWER STANDBY REC EJECT TIMER REC INPUT SELEECT – VOL + – CHANNEL + Encendido POWER Pulse POWER. El indicador STANDBY parpadea hasta que aparezca la imagen.
EJECT MUTING DISPLAY POWER TV INPUT SELECT SLEEP MENU TIMER ON SCREEN RESET SELECT 1 2 3 4 5 6 7 8 COUNTER/ REMAIN JUMP 1 Pulse MENU para mostrar el menú principal. V I DEO AUDIO RELOJ CINTA PREFERENCIAS 9 ENTER 0 VOL Mover CH INDEX Seleccionar SELECT Salir MENU 2 Desplace el cursor (z) hasta “VIDEO” con + ◊ o – √ y pulse SELECT. Aparece el menú VIDEO. TAPE SPEED REC Al visualizar programas de TV, es posible ajustar la imagen según sus preferencias.
EJECT MUTING DISPLAY POWER TV INPUT SELECT SLEEP (sólo KV-20VS42) Es posible ajustar los graves, los agudos y el balance según sus preferencias. También puede ajustar el sonido de la señal recibida mediante las tomas de entrada. MENU TIMER ON SCREEN RESET SELECT VCR Plus 1 2 3 4 5 6 7 8 COUNTER/ REMAIN COUNTER RESET Ajuste del sonido JUMP 9 ENTER 0 VOL 1 Pulse MENU para mostrar el menú principal. 2 Desplace el cursor (z) hasta “AUDIO” con + ◊ o – √ y pulse SELECT.
EJECT MUTING DISPLAY POWER TV INPUT SELECT SLEEP La función de sonido de TV multicanal (MTS) permite cambiar entre sonido estéreo, monofónico y SAP (Second Audio Program). MENU TIMER ON SCREEN RESET SELECT VCR Plus 1 2 3 4 5 6 7 8 9 COUNTER/ REMAIN COUNTER RESET Selección de programas estéreo o bilingües (sólo KV-20VS42) JUMP ENTER 0 VOL 1 Pulse MENU para mostrar el menú principal. 2 Desplace el cursor (z) hasta “AUDIO” con + ◊ o – √ y pulse SELECT. Aparece el menú AUDIO.
En esta tabla se describe la relación entre la salida de sonido del altavoz, el sonido grabado y el modo MTS. Por ejemplo, si ajusta MTS en “SAP” y no se transmiten señales SAP, el sonido de los altavoces se cancelará. No obstante, si graba el mismo programa, el sonido se grabará en el canal de audio principal del programa (estéreo o mono).
EJECT MUTING DISPLAY POWER TV INPUT SELECT SLEEP MENU TIMER ON SCREEN RESET 1 Pulse MENU para mostrar el menú principal. 1 2 3 4 5 6 7 8 9 COUNTER/ REMAIN JUMP ENTER 0 VOL CH INDEX TAPE SPEED REC 2 Desplace el cursor (z) hasta “AUDIO” con + ◊ o – √ y pulse SELECT. Aparece el menú AUDIO. AUDIO GRAVES AGUDOS BALANCE MTS : AMBIENTAL : MENU Mover &SLOW X2 7 PAUSE SEARCH REW La función de sonido envolvente simula la reproducción de sonido de una sala de cine o de conciertos.
Visualización de información en pantalla Pulse DISPLAY para activar o desactivar la indicación. Aparecerá el número de canal, fecha y hora y modo de audio. Pulse DISPLAY varias veces para desplazarse entre XDS ON, CAPTION y DISPLAY OFF. Para más información sobre XDS y CAPTION, consulte la página 39.
Reproducción de cintas En esta sección se describe cómo insertar videocassettes y cómo reproducirlos. Para más información sobre el empleo de las funciones avanzadas, consulte “Operaciones adicionales” en las páginas 36 a 57. Inserción de videocassettes Inserte con suavidad un cassette con la indicación de flecha hacia arriba. El cassette se introduce automáticamente en el compartimiento y el video/ TV se enciende.
Reproducción de cintas 1 Inserte la cinta. El video/TV se enciende automáticamente. Si inserta un cassette sin lengüeta de seguridad, la reproducción se iniciará automáticamente. 2 Pulse PLAY ·. La reproducción se inicia. La información en pantalla desaparece automáticamente transcurridos varios segundos. POWER STANDBY REC EJECT TIMER REC INPUT SELEECT EJECT MUTING – VOL + – CHANNEL + DISPLAY Para detener la reproducción Pulse STOP p. El video/TV vuelve a mostrar la imagen normal de TV.
EJECT MUTING DISPLAY POWER TV INPUT SELECT SLEEP MENU TIMER ON SCREEN RESET SELECT Reproducción repetida de cintas – AUTO REPETIR Es posible reproducir la parte grabada de una cinta de forma repetida. 1 Pulse MENU. Aparece el menú principal. VCR Plus 1 2 3 4 5 6 7 8 COUNTER/ REMAIN COUNTER RESET JUMP V I DEO AUDIO RELOJ CINTA PREFERENCIAS 9 ENTER Mover Seleccionar SELECT Salir MENU 0 VOL CH INDEX 2 Desplace el cursor (z) hasta “CINTA” con + ◊ o – √ y pulse SELECT.
EJECT MUTING DISPLAY POWER TV INPUT SELECT SLEEP MENU TIMER ON SCREEN RESET SELECT VCR Plus 1 2 3 4 5 6 7 8 Visualización de información en pantalla Pulse DISPLAY para activar o desactivar la indicación. Aparece la fecha y la hora y el modo de funcionamiento de la cinta. Pulse DISPLAY varias veces para desplazarse entre XDS ON, CAPTION y DISPLAY OFF. Para más información sobre XDS y CAPTION, consulte la página 39.
Grabación de programas de TV Grabación de programas de TV Precaución Los programas de televisión, las películas, las videocintas, y demás materiales pueden tener reservado el derecho de reproducción. La grabación no autorizada de tales materiales puede ir en contra de lo dispuesto por las leyes sobre derechos de autor. Además, el empleo de esta videograbadora con una transmisión de cable puede requerir la autorización del transmisor de cable y/o propietario de los programs.
Grabación de programas de TV con el temporizador EJECT MUTING DISPLAY POWER La función de grabación con temporizador permite programar el video/ TV para grabar un máximo de seis programas en un periodo de un mes. TV INPUT SELECT SLEEP MENU TIMER ON SCREEN RESET SELECT VCR Plus 1 2 3 4 5 6 7 8 COUNTER/ REMAIN COUNTER RESET JUMP 9 ENTER 0 VOL CH INDEX TAPE SPEED REC &SLOW 7 Pasos previos • Compruebe que ha ajustado la hora y la fecha.
4 Pulse SELECT y, a continuación, ajuste la hora de inicio de la grabación en EJECT MUTING DISPLAY POWER TV INPUT SELECT SLEEP MENU TIMER ON SCREEN RESET SELECT VCR Plus 1 2 3 4 5 6 7 8 COUNTER/ REMAIN COUNTER RESET JUMP 9 ENTER 0 VOL CH INDEX Mover Seleccionar SELECT Salir MENU 5 Pulse SELECT y, a continuación, ajuste los minutos de la hora de inicio de la grabación en “15” con + ◊ o – √.
10 Pulse SELECT. EJECT MUTING DISPLAY POWER TV INPUT SELECT SLEEP MENU TIMER ON SCREEN RESET 11 Si desea ajustar otros programas, pulse – √ para que el cursor (z) se desplace a la línea siguiente y, a continuación, repita los pasos 2 a 10. SELECT 12 Pulse MENU para salir del menú AJUSTE/VERIF PROG. VCR Plus 1 2 3 4 5 6 7 8 COUNTER/ REMAIN COUNTER RESET Aparecerá el mensaje “Por favor apague el TV para empezar el reloj” durante tres segundos.
EJECT MUTING DISPLAY POWER TV INPUT SELECT SLEEP MENU TIMER ON SCREEN RESET SELECT VCR Plus 1 2 3 4 5 6 7 8 COUNTER/ REMAIN COUNTER RESET JUMP 9 ENTER Comprobación de los ajustes del temporizador Es posible mostrar la lista de los ajustes del temporizador programados. Pulse TIMER ON SCREEN. Aparece el menú AJUSTE/VERIF PROG.
Grabación con el temporizador rápido QUICK RELOJ Es posible programar el video/TV para que inicie la grabación inmediatamente y la detenga automáticamente transcurrido un espacio de tiempo específico. La grabación QUICK RELOJ puede utilizarse aunque no haya ajustado el reloj.
Grabación de programas de TV con el sistema VCR Plus+ Cómo funciona el sistema VCR Plus+ EJECT MUTING DISPLAY POWER 1 2 3 Cuando desee grabar un programa de TV todo, lo único que deberá hacer es buscar el código “PlusCode” del programa. Dicho código es un número asignado a cada programa, que se publica en la sección de TV de la mayoría de los periódicos, listados de TV por cable e incluso en las revistas de programación de TV.
Operaciones adicionales Encendido o apagado automático del video/TV — ENCENDIDO/APAGADO EJECT MUTING DISPLAY POWER TV INPUT SELECT SLEEP Es posible ajustar el video/TV para que se encienda y se apague cuando desee. Compruebe que ha ajustado el reloj correctamente. Si no lo está, ajústelo primero (página 12). 1 Pulse MENU para que aparezca el menú principal. MENU TIMER ON SCREEN SELECT RESET 2 Desplace el cursor (z) hasta “RELOJ” con + ◊ o – √ y pulse SELECT. Aparece el menú RELOJ.
8 Pulse + ◊ o – √ para ajustar el canal y pulse SELECT. ENCENDIDO/APAGADO CADA LUN–VIE 12:02 AM 1H CH MENU 1 Seleccione el canal DOM 12:00 AM Mover Seleccionar SELECT Salir MENU 9 Pulse MENU para recuperar la pantalla original. Si no está utilizando el video/TV, pulse POWER para ajustarlo en el modo de espera. Un minuto antes de apagarse el video/TV, el mensaje “El TV se apagará” aparecerá en pantalla.
Selección del canal de entrada de decodificador del video/TV — FIJAR CANAL EJECT MUTING DISPLAY POWER TV INPUT SELECT SLEEP MENU TIMER ON SCREEN RESET SELECT VCR Plus 1 2 3 4 5 6 7 8 9 COUNTER/ REMAIN COUNTER RESET JUMP ENTER 0 VOL 1 Pulse MENU para que aparezca el menú principal. 2 Desplace el cursor (z) hasta “PREFERENCIAS” con + ◊ o – √ y pulse SELECT. Aparece el menú PREFERENCIAS. 3 Desplace el cursor (z) hasta “AJUSTE DE CANAL” con + ◊ o – √ y pulse SELECT.
Visualización de subtítulos/XDS EJECT MUTING DISPLAY POWER TV INPUT SELECT SLEEP MENU TIMER ON SCREEN RESET SELECT VCR Plus 1 2 3 4 5 6 7 8 COUNTER/ REMAIN COUNTER RESET JUMP 9 ENTER CH INDEX 1 Pulse MENU para que aparezca el menú principal.
Bloqueo de programas – Control paterno EJECT MUTING DISPLAY POWER TV INPUT SELECT SLEEP MENU TIMER ON SCREEN RESET SELECT VCR Plus 1 2 3 4 5 6 7 8 COUNTER/ REMAIN COUNTER RESET JUMP 9 ENTER 0 VOL CH INDEX TAPE SPEED REC &SLOW X2 7 PAUSE Activación de la función de Control paterno FF En primer lugar, defina una contraseña y, a continuación, seleccione la clasificación que desee de las predeterminadas de Sony.
5 Introduzca una contraseña* de cuatro dígitos mediante los botones 0–9. EJECT MUTING DISPLAY POWER CONTROL PATERNO TV CONTRASEÑA: MENU INPUT SELECT SLEEP Confirme la contraseña MENU TIMER ON SCREEN Mover RESET SELECT VCR Plus 1 2 3 4 5 6 7 8 9 COUNTER/ REMAIN COUNTER RESET JUMP ENTER 0 VOL CH INDEX Seleccionar SELECT Salir MENU * No introduzca “4357” correspondiente a “HELP” (ayuda) en un teclado de teléfono. (Consulte la página 48.
10 Mediante + ◊ o – √, seleccione la clasificación que desee (“INFANTE”, EJECT MUTING DISPLAY POWER TV INPUT SELECT SLEEP CONTROL PATERNO BLOQUEO PATERNO: S I CLAS I F I CAC I ON: N I ÑO CAMB I E LA CONTRASEÑA MENU MENU TIMER ON SCREEN RESET SELECT VCR Plus 1 2 3 4 5 6 7 8 COUNTER/ REMAIN COUNTER RESET “NIÑO” o “JOVEN”) y presione SELECT.
EJECT MUTING DISPLAY Selección de clasificaciones personalizadas en EE.UU. POWER TV INPUT SELECT Si quiere seleccionar las clasificaciones que desee bloquear en “ESPECIAL” una vez activada la función de Control paterno (página 40), realice el siguiente procedimiento. Para obtener una descripción detallada de cada clasificación, consulte “Significado de las clasificaciones” en la página 49.
7 Seleccione “ ” mediante + ◊ o – √ y presione SELECT. EJECT MUTING DISPLAY El indicador aparece automáticamente junto a la clasificación seleccionada y a todas las “superiores”, indicando que los programas que coincidan con ellas se bloquearán.
En segundo lugar, seleccione las clasificaciones de películas. EJECT MUTING DISPLAY POWER TV INPUT SELECT MENU RESET SELECT VCR Plus 1 2 3 4 5 6 7 8 9 COUNTER/ REMAIN JUMP ENTER 0 VOL CH INDEX TAPE SPEED REC &SLOW X2 7 PAUSE SEARCH REW presione SELECT. Aparecerá el menú CLASIFICACION DE CINE.
3 Mediante + ◊ o – √, seleccione el tipo de programas que desee bloquear y EJECT MUTING DISPLAY POWER presione SELECT.
5 Mediante + ◊ o – √, seleccione la clasificación que desee bloquear y EJECT MUTING DISPLAY POWER TV INPUT SELECT SLEEP MENU TIMER ON SCREEN RESET SELECT VCR Plus 1 2 4 5 7 8 3 6 COUNTER/ REMAIN COUNTER RESET JUMP 9 ENTER 0 VOL CH presione SELECT. Aparecerá el menú de clasificación seleccionado.
3 Desplace el cursor (z) hasta “CAMBIAR LA CONTRASEÑA” con + ◊ o EJECT MUTING DISPLAY POWER TV INPUT SELECT SLEEP MENU TIMER ON SCREEN RESET CAMB I AR LA CONTRASEÑA CONTRASEÑA: ____ MENU SELECT Mover VCR Plus 1 2 3 4 5 6 7 8 9 COUNTER/ REMAIN COUNTER RESET – √ y presione SELECT. Aparecerá el menú CAMBIAR LA CONTRASEÑA. JUMP ENTER Seleccionar SELECT Salir MENU 4 Desplace el cursor (z) hasta “CONTRASEÑA” con + ◊ o – √ y presione SELECT. La posición de la contraseña aparece en rojo.
Significado de las clasificaciones Clasificaciones en EE.UU. Clasificaciones predeterminadas de Sony Se trata de clasificaciones originales predeterminadas por Sony en función de la edad del televidente. Cada clasificación permite ver ciertos programas, de la siguiente forma: Consulte a continuación para obtener una descripción de cada clasificación.
Clasificaciones de TV de EE.UU. Estas clasificaciones son para programas de TV clasificados de acuerdo con las Directrices de Limitación para Programas de Televisión de EE.UU.
Clasificaciones de inglés canadiense Estas clasificaciones son para programas de TV en inglés transmitidos en Canadá. Clasificaciones C (Programación destinada a niños menores de 8 años) G (Audiencia general) C8+ (Programación generalmente considerada aceptable para niños de 8 años en adelante sin necesidad de estar acompañados por adultos) PG (Supervisión paterna) 14+ (Programación que contiene temas o asuntos que pueden no ser adecuados para televidentes menores de 14 años.
Ajuste de los canales preferidos — CANAL FAVORITO EJECT MUTING DISPLAY POWER TV INPUT SELECT SLEEP MENU TIMER ON SCREEN SELECT RESET VCR Plus 1 2 3 4 5 6 7 8 9 COUNTER/ REMAIN COUNTER RESET JUMP ENTER 0 VOL TAPE SPEED &SLOW 1 Pulse MENU para que aparezca el menú principal. 2 Desplace el cursor (z) hasta “PREFERENCIAS” con + ◊ o – √ y pulse SELECT. 3 Desplace el cursor (z) hasta “CANAL FAVORITO” con + ◊ o – √ y pulse SELECT. Aparece el menú CANAL FAVORITO.
7 Con + ◊ o – √, seleccione el canal que desee ajustar como preferido y pulse EJECT MUTING DISPLAY POWER SELECT. TV INPUT SELECT SLEEP MENU TIMER ON SCREEN RESET SELECT VCR Plus 2 3 8 Repita los pasos 6 y 7 para ajustar otros canales preferidos. 4 5 6 9 Pulse MENU para recuperar la pantalla original. 7 8 JUMP 9 ENTER 0 VOL CH INDEX Aparece el menú de canales preferidos. &SLOW X2 7 PAUSE SEARCH REW Selección de los canales preferidos 1 Pulse SELECT.
Búsqueda mediante la función de índices EJECT MUTING DISPLAY POWER TV INPUT SELECT SLEEP MENU TIMER ON SCREEN RESET SELECT VCR Plus 1 2 3 4 5 6 7 8 COUNTER/ REMAIN COUNTER RESET JUMP 9 ENTER 0 VOL CH INDEX TAPE SPEED REC &SLOW X2 7 El video/TV marca automáticamente la cinta con una señal de índice en el punto de comienzo de cada grabación. Estas señales pueden utilizarse para encontrar una grabación específica.
Mejora de la calidad de la imagen de vídeo EJECT MUTING DISPLAY POWER TV INPUT SELECT SLEEP Ajuste automático del seguimiento La condición de seguimiento se ajusta automáticamente en este vídeo. El indicador SEGUIMIENTO AUTO aparecerá durante tres segundos mientras el video/TV busca la mejor condición de seguimiento.
Reducción del ruido de imagen EJECT MUTING DISPLAY POWER TV INPUT SELECT SLEEP RESET SELECT VCR Plus 1 2 3 4 5 6 7 8 COUNTER/ REMAIN JUMP Aparece el menú CINTA. CINTA CINTA RESTANTE: T-120 AUTO REPETIR: NO MENOS RUIDO: NO SEGUIMIENTO MENU 9 Mover 0 VOL CH Seleccionar SELECT Salir MENU 3 Desplace el cursor (z) hasta “MENOS RUIDO” con + ◊ o – √ y pulse SELECT. La posición seleccionada aparece en color rojo.
Conexión de equipos opcionales Visualización de la entrada de imagen del equipo opcional Para conectar una videocámara Parte frontal Parte frontal (sólo KV-20VS42) POWER POWER STANDBY STANDBY REC EJECT REC TIMER REC EJECT TIMER REC INPUT SELEECT – VOL + – CHANNEL INPUT SELEECT + VIDEO VIDEO AUDIO a tomas VIDEO/ AUDIO – VOL + – CHANNEL + L AUDIO R a tomas LINE IN (VIDEO/ AUDIO L (MONO)/R) a salidas de vídeo/audio Para conectar una videograbadora sin decodificador Parte posterior P
Información complementaria Solución de problemas Si después de leer las siguientes instrucciones desea realizar consultas adicionales en relación con el empleo del video/ TV Sony, llame a uno de los siguientes números (sólo inglés).
Problemas causados por cabezales de vídeo sucios • Imagen normal • Imagen borrosa suciedad inicial • Imagen sin nitidez • Ausencia de imagen (o la pantalla aparece en blanco y negro) final Función Problemas Grabación El cassette se expulsa al • Ha retirado la lengüeta de seguridad del cassette. / Cubra el orificio de la lengüeta con cinta adhesiva, o utilice otro cassette pulsar REC r. con lengüeta de seguridad.
Especificaciones Sección del TV Sistema de televisión Estándar americano Cobertura de canales VHF: 2-13/UHF:14-69/ CATV: 1-125 Tubo de imagen KV-13VM42/43: MicroblackTM Tubo Trinitron® KV-20VM42: Tubo Trinitron® imagen de 20 pulgadas, medida diagonal KV-20VS42: Tubo Trinitron® imagen de 20 pulgadas, medida diagonal Tamaño de la pantalla KV-13VM42/43: imagen de 13 pulgadas, medida diagonal KV-20VM42/KV-20VS42: imagen de 20 pulgadas, medida diagonal Antena Terminal de antena externa de 75 ohmios para VHF/UHF
Índice de componentes y controles Video/TV—parte frontal En esta sección se describen brevemente los botones y los controles del video/TV y del mando a distancia. Para más información, consulte los números de página que aparecen junto a cada descripción.
Mando a distancia 1 EJECT 2 3 4 MUTING DISPLAY TV INPUT SELECT SLEEP TIMER ON SCREEN MENU RESET 5 6 7 8 9 !º !¡ SELECT @º 7 COUNTER RESET (páginas 25, 28) COUNTER RESET 1 2 3 9 INDEX (página 54) 4 5 6 !º TAPE SPEED (páginas 29, 35) !¡ SLOW & +/– (página 26) 7 8 9 JUMP @¡ !™ REC (grabación) r (página 29) ENTER @™ 0 VOL CH INDEX @£ TAPE SPEED REC &SLOW X2 7 @¢ @∞ PAUSE SEARCH @§ @¶ REW MUTING (desactivación) (página 18) EJECT 6 (página 25) INPUT SELECT (páginas 24,
Información complementaria 63
Sony Corporation Información complementaria 64