
Operating Instructions


LBN-H1.US.5-048-993-12(1)
Battery Station
5-048-993-12(1)
Operating Instructions
LBN-H1
Before using this product
When using a portable power supply,
inverter or generator, ensure that is capable
of supplying more than 1 000 Watts.
Included items
Power cord (1)
Accessory socket cap (3)
Operating Instructions (1)
Warranty (1)
Using the accessory socket cap
The accessory socket cap can be also
used as a stopper to prevent the lid from
accidentally shutting due to wind or other
factors while using this product.
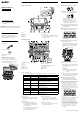
Parts and Controls
Outside of the product
Charging battery packs
1
Slide the MODE switch to CHARGE.
2
Slide the OPTION switch to FULL or
QUICK to select the charging level.
• FULL (Full charge): Charges until the
battery level reaches 100%.
• QUICK (Practical charging): Charges
until the battery level reaches 90%. The
charging time is shorter than FULL.
3
Connect the power cord to the power
port and wall outlet, and then turn on
the power switch.
4
Insert the battery packs to charge into
the battery slots 1 to 4 in order.
Insert firmly until the battery packs click
and lock into place.
5
Confirm that the battery status LED
lights up in orange.
The battery status LED lights up in orange
during charging. The battery level LEDs
on the battery pack indicate the battery
level.
Battery level LEDs
Battery status LEDs
6
Check the charging status of the battery
pack.
While charging, you can check the charge
level with the battery level LEDs on the
battery pack.
Battery level
0%–25%: The LED on the far left blinks.
26%–50%: The 2nd LED from the left
blinks.
51%–75%: The 3rd LED from the left blinks.
76%–99%: The LED on the far right blinks.
Charging complete: All LEDs are off.
7
When charging has completed,
remove the battery pack while
pressing the battery release button.
About the battery charging mechanism
• Battery packs in the battery slots facing up/
down cannot be charged at the same time.
Charging starts from the battery slot into which
the battery pack was inserted first. The other
will be in a standby state, and will start charging
when the battery pack that started charging first
has completed charging.
• Up to 4 battery packs can be charged at the
same time.
• If you turn on the battery station with the battery
packs already inserted into the battery slots,
charging starts from battery slots 1 and 2.
• If the temperature of the battery pack is too
high, such as immediately after flight, charging
will not start due to the protection function. The
battery status LED will repeat blinking fast twice
in orange and the cooling fan will automatically
start. When the battery pack cools down to a
chargeable temperature, charging will start
automatically.
Lid
Lid lock
Wheels
Handle
Retractable handle
Pressure valve
The air pressure inside the Battery Station
is adjusted automatically. Do not touch
the pressure valve.
Inside of the product
Dedicated remote controller charging
cables
Air vent
Power switch
Power port
Storage pocket
Battery storage slot
Accessory sockets
Battery slot (Battery charging/
discharging slot)
Air outlet
Power LED
Battery status LEDs
You can check the charge/discharge status of the battery packs inserted in the battery slots.
LED color LED indication Status of the battery pack
― Off Battery pack is not inserted.
Green Lit up Charging has completed.
Orange Lit up Charging.
Orange Blinking slowly Waiting for charging to start. Charging will start when
charging of the battery pack inserted in the battery
slot facing up/down has completed.
Orange Blinking fast twice Due to the high temperature of the battery pack, it
cannot be charged.
Orange Blinking fast three
times
Due to the low temperature of the battery pack, it
cannot be charged.
Blue Lit up Discharging has completed.
Purple Lit up Discharging.
Purple Blinking fast twice
repeatedly
Due to the high temperature of the battery pack, it
cannot be discharged.
Red Blinking slowly Due to some problem with the battery pack, it cannot
be charged/discharged.
MODE switch
Switches between charging (CHARGE)/
discharging (DISCHARGE) of the battery
packs.
OPTION switch
Sets the charging/discharging level.
• For charging (when the MODE switch is
set to CHARGE): Selects the charging
level (FULL or QUICK).
• For discharging (when the MODE switch
is set to DISCHARGE): Selects the
discharging level (50% or 25%).
ACCESSORY switch
Switches the power supply from the
dedicated remote controller charging
cables and the accessory sockets on and
off.
Battery release button
Remove the battery pack while pressing
the battery release button.
Continued on the reverse side