
Operating Instructions MiniDisc Deck MDS-JA555ES

Recording on MDs
14
GB
Useful Tips for Recording
Checking the remaining recordable time on
the MD
Press TIME.
• When you press the TIME button repeatedly while
the deck is stopped, the display alternates between
total disc playing time and remaining recordable
time on the MD (see page 23).
• When you press the TIME button repeatedly while
recording, the display alternates between the
recording time of the current track and the
remaining recordable time on the MD.
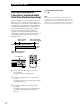
Changing the display while recording
Each time you press DISPLAY/CHAR (or DISPLAY)
while the deck is recording, you can change the display
as follows:
Monitoring the input signal (Input Monitor)
Before starting recording, you can monitor the selected
input signal through the deck’s output connectors.
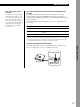
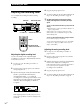
1 Press § OPEN/CLOSE to remove the MD.
2 Set INPUT according to the input signal you want
to monitor.
When the INPUT is set at ANALOG
The analog signal input through the
LINE(ANALOG) IN jacks is output to the
respective DIGITAL OUT connector after A/D
conversion, and then to the LINE(ANALOG) OUT
jacks and the PHONES jack after D/A conversion.
When the INPUT is set at OPT1, OPT2 or COAX
After passing through the sampling rate converter,
the digital signal input through the respective
DIGITAL IN connector is output to the respective
DIGITAL OUT connector, and after D/A
conversion to the LINE(ANALOG) OUT jacks and
PHONES jack.
3 Press r REC.
If the INPUT is set at ANALOG, “AD-DA”
appears in the display.
If the INPUT is set at OPT1, OPT2 or COAX,
“-DA” appears in the display.
If “Auto Cut” appears in the display
(Auto Cut)
There has been no sound input for about 30 seconds
during recording. The 30 seconds of silence are
replaced by a blank of about 3 seconds and the deck
changes to recording pause.
If the deck continues pausing for about 10 minutes
after the Auto Cut Function activated, recording stops
automatically.
Note that this function does not activate even if there
has been no sound input for about 30 seconds when
the deck started recording from the blank portion.
z You can turn off the Auto Cut Function
For details, see “To turn off the Smart Space Function
and Auto Cut Function” on page 15. Note that when
you turn off the Auto Cut Function, the Smart Space
Function is turned off automatically.
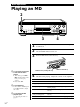
Press
Press
Press
Normal display
Recording level display
FS (sampling frequency) display
§ OPEN/CLOSE
≠ AMS ±
r REC
(
p
INPUT DISPLAY/CHAR MENU/NO
TIME
r
p
P
(
§
0)
DF (digital filter) display
Press