
Operating Instructions MiniDisc Deck MDS-JA555ES


Getting Started
4
GB
çç
çç
ç: Signal flow
What cords will I need?
• Audio connecting cords (supplied) (2)
• Optical cables (not supplied) (3)
• Coaxial digital connecting cables (not supplied) (2)
Getting Started
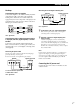
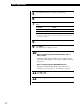
Hooking Up the System
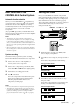
Overview
This section describes how to hook up the MD deck to
an amplifier or other components such as a CD player
or DAT deck. Be sure to turn off the power of each
component before connection.
White
(L)
Red
(R)
White
(L)
Red
(R)
Unpacking
Check that you received the following items:
• Audio connecting cords (2)
• Remote commander (remote) RM-D39M (1)
• R6 (size-AA) batteries (2)
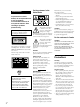
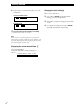
Inserting batteries into the remote
You can control the deck using the supplied remote.
Insert two R6 (size-AA) batteries by matching the +
and – on the batteries. When using the remote, point it
at the remote sensor g on the deck.
z When to replace batteries
With normal use, the batteries should last for about six
months. When the remote no longer operates the deck,
replace all the batteries with new ones.
Notes
• Do not leave the remote near an extremely hot or humid
place.
• Do not drop any foreign object into the remote casing,
particularly when replacing the batteries.
• Do not expose the remote sensor to direct sunlight or
lighting apparatuses. Doing so may cause a malfunction.
• If you don’t use the remote for an extended period of time,
remove the batteries to avoid possible damage from
battery leakage and corrosion.
to a wall outlet
(or to a timer
during timer
recording or
playback)
Amplifier
CD player or
DAT deck, etc.
CD player, DAT deck,
or MD deck, etc.
DIGITAL
OPTICAL OUT
DIGITAL
OPTICAL IN
/
ç
ç
REC
OUT
TAPE/MD
IN
ç
ç
ç
ç
DIGITAL
COAXIAL IN
DIGITAL
COAXIAL OUT
OPTICAL
COAXIAL
COAXIAL
OUT
IN
L
R
L
R
DIGITAL OUT
CONTROL
OPT2OPT1
DIGITAL IN
LINE(ANALOG)
A1