
MiniDisc Deck Operating Instructions


10
GB
If the MD has been partially recorded,
recording starts after the recorded tracks.
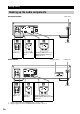
1 Turn on the amplifier and programme
source, and select the source on the
amplifier.
2 Press ?/1 to turn on the deck.
The STANDBY indicator turns off.
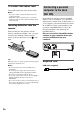
3 Load a recordable MD into the slot
(page 20).
4 Press INPUT repeatedly to select the
input jacks (connector) connected to
the programme source.
1) European model only
2) Other model only
5 Press REC z.
The deck changes to recording pause.
6 If necessary, adjust the recording level.
For details, see “Adjusting the recording
level” on page 16.
7 Press H or X, then start playing the
desired source to record.
Operations you may want to do
during recording
3) The track number increases by one.
To change the display while
recording
Press LEVEL/DISPLAY/CHAR (or DISPLAY)
repeatedly to change the display.
Each press of the button changes the display
cyclically as follows:
Note
Note that, depending on the status of the deck, the
display may not conform with the cycle shown below.
Track number and recorded time of the current
track t Track number and remaining
recordable time
4)
on the MD t Level of the
input signal (setting value of the recording
level) t Sampling frequency indication
5)
4) Time shown in the display differs depending on
the setting of REC MODE.
5) “FS -- kHz” appears while the analogue signal is
input.
Recording to MDs
Recording to an MD
When the source is
connected to the
Set INPUT to
DIGITAL OPTICAL IN
connector
1)
OPT
DIGITAL OPTICAL IN1 or
IN2 connector
2)
OPT1 or OPT2
DIGITAL COAXIAL IN jack
1)
COAX
ANALOG IN jacks ANALOG
To Press
Stop recording x
Pause recording X
Resume recording after
pausing
3)
H or X
Eject the MD EJECT A after stopping
recording