4-239-187-13(1) MiniDisc Deck Operating Instructions MDS-JE780 ©2002 Sony Corporation
About this manual WARNING To reduce the risk of fire or electric shock, do not expose this apparatus to rain or moisture. To prevent fire, do not Cover the ventilation of the apparatus with news papers, table-cloths, curtains, etc. And don’t place lighted candles on the apparatus. To prevent fire or shock hazard, do not place objects filled with liquids, such as vases, on the apparatus. This appliance is classified as a CLASS 1 LASER product. This marking is located on the rear exterior.
Table of Contents List of Button Locations and Reference Pages Main unit................................................. 4 Remote control........................................ 5 Getting Started Hooking up the audio components ......... 6 Connecting a personal computer to the deck (Net MD).................................. 8 Recording to MDs Recording to an MD..............................10 Recording tracks in groups — Group Function.......................... 11 Notes on recording .....................
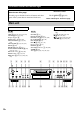
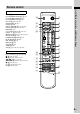
List of Button Locations and Reference Pages Illustration number r How to use this page Use this page to find the location of buttons and other parts of the system that are mentioned in the text.
Remote control AyB qs (20) CD SYNCHRO STANDBY 7 (18) CD SYNCHRO START 7 (18) CD SYNCHRO STOP 7 (19) CLEAR 6 (24) (33) (43) DISPLAY ws (10) (21) FADER 3 (40) GROUP ON/OFF ql (11) (23) (34) GROUP SKIP ql (12) (23) (34) INPUT wd (10) Letter/number buttons 5 (21) (33) LEVEL +/– qa (16) (21) MENU/NO w; (14) (21) (26) (39) (43) MUSIC SYNC 8 (18) NAME EDIT/SELECT wa (32) PLAY MODE 2 (20) (42) REC MODE wd (13) REPEAT qd (20) SCROLL ws (22) T.
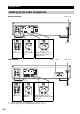
Getting Started Hooking up the audio components European Model mains lead A C B to mains Amplifier, etc. CD player, DBS tuner CD player, DBS tuner, etc.1), Digital amplifier, DAT deck, MD deck, etc.2) Other Model Voltage selector 1 A mains lead 2 B B to mains Amplifier, etc. 1) 2) 6GB CD player, DBS tuner CD player, DBS tuner, etc.1), Digital amplifier, DAT deck, MD deck, etc.
Required cords A Audio connecting cords (2) (supplied) White (L) Red (R) White (L) Red (R) B Optical cables (2 for European model/3 for other model) (only one supplied) • When connecting an optical cable, insert the cable plugs straight in until they click into place. • Do not bend or tie the optical cables.
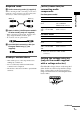
To connect the mains lead Connect the mains lead of the deck to mains. Notes • If you use a timer, connect the mains lead to the socket of the timer. • Install this system so that the power cord can be unplugged from the wall socket immediately in the event of trouble. Inserting batteries into the remote Insert two R6 (size-AA) batteries into the battery compartment with the + and – properly oriented to the markings. When using the remote, point it at the remote sensor on the deck.
Notes Using the Net MD function 1 Turn on the computer. 2 Press ?/1 to turn on the deck. The STANDBY indicator turns off. 3 Load an MD into the slot. 4 Press NET MD. The Net MD function is activated and “Net MD” appears. Getting Started • Do not use a USB hub or USB extension cable between the MD deck and the computer. Be sure to connect the MD deck directly to the computer with the supplied USB cable. • Make sure the USB connector is straight when you insert it.
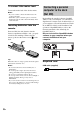
Operations you may want to do during recording Recording to MDs Recording to an MD If the MD has been partially recorded, recording starts after the recorded tracks. 1 Turn on the amplifier and programme source, and select the source on the amplifier. 2 Press ?/1 to turn on the deck. The STANDBY indicator turns off. 3 Load a recordable MD into the slot (page 20). 4 Press INPUT repeatedly to select the input jacks (connector) connected to the programme source.
Recording tracks in groups — Group Function What is the Group function? Group Function: Off Track 1 2 3 4 5 6 7 8 9 Group Function: On Disc Track 1 2 3 4 5 Disc name recording area 0 ; Favorites // 1 – 5 ; Rock // 6 – 9 ; Pops // ... 1 2 3 1 The disc name is “Favorites.” 2 Tracks 1 to 5 are registered in the “Rock” group. 3 Tracks 6 to 9 are registered in the “Pops” group.
Recording into a new group You can create new groups by CD album or artist, etc. 1 Do steps 1 to 4 of “Recording to an MD” on page 10. 2 Press GROUP ON/OFF. The GROUP ON/OFF button lights up. 3 Press REC z. “New Group” flashes and the deck changes to recording pause. 4 Do steps 6 to 7 of “Recording to an MD” on page 10. To continue and record into another new group, press x repeatedly after the recording to display the disc name and the total number of groups, then do steps 3 and 4.
Notes on recording After recording Before disconnecting the mains lead MD recording is completed when the MD Table of Contents (TOC) is updated. The TOC is updated when you eject the MD or press ?/1 to turn off the deck. Do not disconnect the mains lead before updating the TOC (while “TOC” is lit) or while updating the TOC (while “TOC Writing” is flashing) to ensure a complete recording.
Tips • The MDLP indicator lights up when you select LP2 or LP4 in step 2 above. • The deck is set at the factory to add “LP:” at the beginning of a track name automatically. This indication is displayed when the track is played on a deck that does not support long-time recording. To turn off this function, do the following procedure. 1 While the deck is stopped, playing, or paused, press MENU/NO. 2 Turn AMS (or press ./> repeatedly) until “Setup?” appears, then press AMS or YES. 3 Turn AMS (or press .
To change the trigger level for Automatic Track Marking Do the procedure below to change the signal level that triggers Automatic Track Marking. 1 While the deck is stopped, press MENU/ NO. 2 Turn AMS (or press ./> 3 Turn AMS (or press ./> repeatedly) until “LS(T)” appears, then press AMS or YES. The Smart Space function lets you make the blank spaces between tracks 3 seconds long automatically.
4 Turn AMS (or press ./> repeatedly) to select the setting, then press AMS or YES. To Select Turn on Smart Space and Auto Cut S.Space On (factory setting) Turn off Smart Space and Auto Cut S.Space Off 5 Press MENU/NO. Notes • Smart Space does not affect the order of the track numbers being recorded, even if the blank space occurs in the middle of a track. • Auto Cut is automatically turned on or off in tandem with Smart Space.
Monitoring the input signal (Input Monitor) You can monitor the selected input signal even when you are not recording it. jacks (connector) where the signal you want to monitor is being input. 3 Press REC z. When an analogue input is selected The analogue signal input from the ANALOG IN jacks is output to the DIGITAL OUT connector after A/D conversion, and then to the ANALOG OUT jacks and PHONES jack after D/A conversion. “AD – DA” appears in the display during this time.
Synchro-recording with the audio component of your choice — Music Synchro-recording The Music Synchro-recording allows you to automatically synchronize recording to the MD deck with the playing of the selected programme source. The Track Marking Function, however, will differ according to the programme source. For details, see “Marking track numbers while recording” on page 14. 1 Do steps 1 to 4 of “Recording to an MD” on page 10. 2 Press MUSIC SYNC on the remote. The deck changes to recording pause.
If the CD player does not start playing Some CD players may not respond when you press CD SYNCHRO START on the remote. Press X on the CD player’s remote instead to start play on the CD player. To Press Stop recording CD SYNCHRO STOP on the remote Pause recording CD SYNCHRO STANDBY on the remote Resume recording after CD SYNCHRO START on pausing the remote Tips • You can use the remote of the CD player during CD Synchro-recording.
Playing an MD Playing MDs Loading an MD Load an MD as illustrated below. — Normal Play/Shuffle Play/Repeat Play 1 Turn on the amplifier and select MD on the amplifier. With the labelled side up 2 Press ?/1 to turn on the deck. The STANDBY indicator turns off. 3 Load an MD. 4 Press PLAY MODE repeatedly until the mode you want appears in the display.
Other Operations To Do the following: Stop play Press x. Pause play Press X. Resume play after pausing Press H or X. Go to the next or Turn AMS1) clockwise (or press > repeatedly). a succeeding track during play Turn AMS counterclockwise (or press . repeatedly). Go to the beginning of the current track during play Turn AMS counterclockwise (or press . once). Go to a specific track while the deck is stopped Turn AMS (or press .
Using the MD display The display changes cyclically as follows: To check the track name during playing (only when the track name is recorded), press SCROLL on the remote. The track name appears and scrolls. While the track name is scrolling, press the button again to pause scrolling, and again to continue scrolling. Note In stop mode Note that, depending on the status of the deck, the display may not conform with the cycle shown below.
Playing only the tracks in the desired group This function allows you to listen only to your favorite tracks which you have registered into a group. 1 Do steps 1 to 3 of “Playing an MD” on page 20. The GROUP ON/OFF button lights up. The disc name and the total number of groups appears. 3 Press PLAY MODE repeatedly until the mode you want appears. Select To play Blank (no PLAY MODE indication) The tracks in the group in the original order. SHUF The tracks in the group in random order.
Creating your own programme — Programme Play You can pick out the tracks that you like and specify the playing order in a programme containing up to 25 tracks. Programming the tracks 1 While the deck is stopped, press PLAY MODE repeatedly until “PGM” lights up in the display. 2 Turn AMS (or press ./> repeatedly) until the track number you want to add to the programme appears, then press AMS or YES.
Tips for recording from MDs to tape Inserting blanks between tracks during play (Auto Space) 1 While the deck is stopped, press MENU/ NO. You can set the MD deck so that it pauses after each track to give you time to locate the next track to be recorded. 1 While the deck is stopped, press MENU/ NO. 2 Turn AMS (or press ./> repeatedly) until “Setup?” appears, then press AMS or YES. 3 Turn AMS (or press ./> repeatedly) until “Auto Off” appears, then press AMS or YES. 4 Turn AMS (or press .
Editing Recorded MDs Before you start editing Before editing You can edit an MD only when: • The MD is recordable. • The MD play mode is normal play. Note When the Group function is on, editing can be performed only for the tracks registered into the selected group. To cancel the last edit Use Undo Function to cancel the last edit and restore the contents of the MD to the condition before the edit. To quit while editing Press MENU/NO or x.
3 Turn AMS (or press ./> Erasing recordings repeatedly) until the track number you want to erase appears. — Erase Function 4 Press AMS or YES. The MD deck lets you erase unwanted tracks quickly and easily. The three options for erasing recordings are: • Erasing a single track (Track Erase Function) • Erasing all tracks (All Erase Function) • Erasing a portion of a track (A-B Erase Function) — Track Erase Function You can erase a track simply by selecting its track number.
5 Press AMS or YES again if point A is Erasing a portion of a track correct. “Point B set” appears in the display and playback for setting the ending point of the portion to be erased (point B) starts. — A-B Erase Function You can specify a portion within a track and erase the portion with ease. You can shift the desired portion by frame1), minute or second intervals. 1) If point A is not correct Adjust point A by turning AMS (or by pressing .
Dividing recorded tracks — Divide Function Dividing a track after selecting the track 1 While the deck is stopped, playing, or You can use this function to mark track numbers after recording. The total number of tracks increases by one and all the tracks following the divided ones are renumbered. paused, press MENU/NO. “Edit Menu” appears in the display. 2 Turn AMS (or press ./> repeatedly) until “Divide?” appears, then press AMS or YES. Example: Dividing track 2 into two tracks.
1 While the deck is stopped, playing, or Combining recorded tracks paused, press MENU/NO. “Edit Menu” appears in the display. 2 Turn AMS (or press ./> — Combine Function repeatedly) until “Combine?” appears, then press AMS or YES. You can use this function to combine 2 tracks into a single track. The total number of tracks decreases by one and all tracks following the combined ones are renumbered. You can also use this function to erase unnecessary track numbers.
Moving recorded tracks Naming a track or an MD — Move Function — Name Function You can use this function to change the order of any track on the disc. When you move tracks, the tracks are automatically renumbered. You can enter a name for a recorded MD as well as for individual tracks. Names can consist of uppercase and lowercase letters, numbers, and symbols. A total number of about 1,700 characters can be stored for all the names on the MD.
Naming a track or an MD using the controls on the deck 1 While the deck is stopped, playing, recording, or paused, press MENU/NO. “Edit Menu” appears in the display. 2 Turn AMS until “Nm In?” appears, then press AMS or YES. While the deck is recording, a flashing cursor appears in the display and you can enter a name for the track being recorded. In this case, go to step 4. 3 Turn AMS until the track number (when naming a track) or “Disc” (when naming the MD) flashes, then press AMS or YES.
3 Enter a character using letter/number buttons. Renaming a track or an MD If you have selected upper cases or lower cases 1 Press NAME EDIT/SELECT on the 1 Press the corresponding letter/number button repeatedly until the character to be entered flashes. Or, press the button once and press ./> repeatedly. To select symbols, press . repeatedly while “A” is flashing. If you have selected numbers Press the corresponding number button. The number is entered and the cursor shifts to the right.
Naming a group — Name Function You can enter a name for a group. Names can consist of uppercase and lowercase letters, numbers, and symbols. A total number of about 1,700 characters can be stored for all the names on the MD. Note If you enter the symbol “//” between the characters in group names such as “abc//def”, you may be unable to use the Group function. Naming a group using the remote 1 While the deck is stopped, press GROUP ON/OFF. The GROUP ON/OFF button lights up.
Erasing a group name Use this function to erase the name of a group. 1 While the deck is stopped, press GROUP ON/OFF. The GROUP ON/OFF button lights up. 2 Press GROUP SKIP repeatedly until the group you want appears. 3 Press MENU/NO. “Edit Menu” appears in the display. 4 Turn AMS (or press ./> 5 Turn AMS (or press ./> repeatedly) until “Gp ** (selected group number)” flashes, then press AMS or YES. “Complete!” appears.
Tips • To create a group without registering any tracks, turn AMS (or press ./> repeatedly) until “None” appears, then press AMS or YES. “Complete!” appears for a few seconds and new group is created. • You can also register tracks that were recorded on a system that does not support the Group function. Notes • You cannot register the same track to multiple groups. • If all the tracks on an MD are registered into groups, “Assign None” appears after step 4 and you cannot register tracks.
Releasing the registrations of all tracks on an MD — All Release Function You can release the group registrations of all tracks on an MD at once. 1 While the deck is stopped, press GROUP ON/OFF. The GROUP ON/OFF button lights up. 2 Press MENU/NO. “Edit Menu” appears in the display. repeatedly) until “Gp All REL?” appears, then press AMS or YES. “All REL??” appears. 4 Press AMS or YES again. “Complete!” appears. — S.F EDIT You can change the volume of recorded tracks using S.F (Scale Factor) Edit.
6 Press AMS or YES. “(S.F) Edit OK?” appears in the display. 7 Press AMS or YES again. The deck starts recording over the existing track. “S.F Edit(:) ** %” appears while the track is being recorded. An amount of time that is roughly equal to or longer than the playback time of the track is required when recording over the track. When the recording finishes, “Complete!” appears. Fade-in and Fade-out Recording 1 While the deck is stopped, playing, or paused, press MENU/NO.
Undoing the last edit — UNDO You can undo the last edit operation and restore the contents of the MD to the condition that existed before the operation. Note, however, that you cannot undo an edit operation if you perform any of the following operations after the edit: 1 While the deck is stopped, playing, or paused, press MENU/NO. “Edit Menu” appears in the display. 2 Turn AMS (or press ./> repeatedly) until “Undo?” appears. “Undo?” does not appear if no editing has been done. 3 Press AMS or YES.
Finely controlling the pitch (Fine Control Function) You can fine control the playback speed in 0.1% increments from the factory setting (“Off”) to –87.5%. 1 While the deck is stopped, playing, or paused, press MENU/NO. 2 Turn AMS (or press ./> repeatedly) until “Setup?” appears, then press AMS or YES. 3 Turn AMS (or press ./> repeatedly) until “Pfine” appears, then press AMS or YES. 4 Turn AMS (or press ./> repeatedly) to adjust the pitch, then press AMS or YES. 5 Press MENU/NO.
Tip Do the following procedure to specify the fade-in or fade-out duration for playback or recording. 1 While the deck is stopped or playing, or paused, press MENU/NO. 2 Turn AMS (or press ./> repeatedly) until “Setup?” appears, then press AMS or YES. 3 Turn AMS (or press ./> repeatedly) to select the setting, then press AMS or YES. To change the duration of Select Fade-in Play/Recording F.in Fade-out Play/Recording F.out 5 Press MENU/NO.
Using a timer By connecting a timer (not supplied) to the deck, you can start and stop playing/recording operations at specified times. For further information on connecting the timer or setting the starting and ending times, refer to the instructions that came with the timer. Make sure to change the deck to standby mode within a week after timer recording is completed. The TOC on the MD is updated and recorded contents are written to the MD when you turn on the deck.
Operating the MD Deck Using a Keyboard Selecting keyboard type Setting the keyboard The first time you connect a keyboard, you need to select the keyboard type. You can use any IBM1)-compatible keyboard2) with a PS/2 interface. You can select a keyboard with either an English or Japanese keyboard layout. When you use a keyboard with a different layout, you need to assign characters to the keys. For details, see “Assigning characters to keyboard keys” on page 45.
Naming a track or MD using the keyboard If you use a keyboard, you can quickly enter or edit names. While editing a name, you can move the cursor in jumps or scroll the name.
Assigning characters to keyboard keys Assigning a character If your keyboard layout does not match the system settings, the display may show the wrong characters or no characters at all when you press the keys. In this case, you need to assign characters to the keys. 1 While the deck is stopped, press [Esc]. 2 Press [F10]/[F11] repeatedly until “Setup?” appears, then press [F12]. 3 Press [F10]/[F11] repeatedly until “Keyboard?” appears, then press [F12]. “Assign?” appears, then press [F12].
On safety Additional Information Precautions On safety Should any solid object or liquid fall into the cabinet, unplug the deck and have it checked by qualified personnel before operating it any further. On power sources • Before operating the deck, check that the operating voltage of the deck is identical with your local power supply. The operating voltage is indicated on the nameplate at the rear of the deck.
“Disc Full!” appears before the maximum number of tracks is reached Fluctuations in emphasis within tracks are sometimes interpreted as track intervals, incrementing the track count and causing “Disc Full!” to appear. “Group Full!” appears in the display • When the Group function is on, “Group Full!” may be displayed if editing is performed. This means there are insufficient characters for group management. Delete any unnecessary disc names, group names or other characters.
Guide to the Serial Copy Management System Digital audio components, such as CDs, MDs, and DATs, make it easy to produce high-quality copies of music by processing music as a digital signal. To protect copyrighted music sources, this deck uses the Serial Copy Management System, which allows you to make only a single copy of a digitally recorded source through digital-todigital connections. You can make only a first-generation copy1) through a digital-to-digital connection.
The deck does not record. • The MD is record-protected. Slide the recordprotect tab and close the slot. • The deck is not connected properly to the programme source. Check the connection (page 6). • Select the correct programme source using INPUT. • The recording level is not adjusted properly. Adjust the recording level (page 16). • A premastered MD is inserted. Replace it with a recordable MD. • There is not enough time left on the MD.
C14/TOC Error • The deck could not read the TOC on the MD properly. , Insert another disc. , If possible, erase all the tracks on the MD (page 27). C41/Cannot Copy • The sound source is a copy of commercially available music software, or you tried to record a CD-R (Recordable CD). , The Serial Copy Management System prevents making a digital copy (page 48). You cannot record a CD-R. C71/Din Unlock • The sporadic appearance of this message is caused by the digital signal being recorded.
Incomplete! The S.F Edit (changing the recording level after recording, Fade-in, Fade-out) operation was not performed properly because the deck was moved while recording was in progress or the MD is damaged or dirty. Initialize (flashing) The Setup Menu settings have been lost. Or the contents recorded by the timer have disappeared over time and are not be available for saving to disc, or Programme Play could not be activated since the programme has disappeared over time.
Setup menu table Menu item Reference page T.Mark 14 LS(T) 15 Auto 25 S.Space 15 P.Hold 16 F.in 40 F.out 40 Pitch 39 Pfine 39 Ain 16 Opt12) or Opt1) 16 Opt22) or Coax1) 16 Aout 21 Sleep 41 Display 22 Keyboard? 43 LPstamp 13 1) 2) 52GB For European model For other model Specifications System MiniDisc digital audio system Disc MiniDisc Laser Semiconductor laser (λ = 780 nm) Emission duration: continuous Laser output MAX 44.
Outputs PHONES ANALOG OUT Jack type: stereo phone Rated output: 28 mW Load impedance: 32 ohms Jack type: phono Rated output: 2 Vrms (at 50 kilohms) Load impedance: over 10 kilohms DIGITAL OPTICAL OUT Connector type: square optical Rated output: –18 dBm Load impedance: 660 nm (optical wave length) General Power requirements European model: Other model: Power consumption Dimensions (approx.
Sony Corporation Printed in Malaysia