
User Guide


Recording to MDs
15
GB
To change the trigger level for
Automatic Track Marking
Do the procedure below to change the signal
level that triggers Automatic Track Marking.
1 While the deck is stopped, press MENU/
NO.
2 Turn AMS (or press ./>
repeatedly) until “Setup?” appears,
then press AMS or YES.
3 Turn AMS (or press ./>
repeatedly) until “LS(T)” appears, then
press AMS or YES.
4 Turn AMS (or press ./>
repeatedly) to select the level, then
press AMS or YES.
You can set the level at any value between
–72 dB and 0 dB, in 2 dB increments
(–50 dB is the factory setting).
5 Press MENU/NO.
Tips for automatic track marking
• When recording from a CD player or an MD deck
connected to the DIGITAL IN connector, the entire
material might be recorded as a single track in the
following cases:
— When you consecutively record the same track
two or more times using single-track repeat play.
— When you consecutively record two or more
tracks with the same track number but from
different CDs or MDs.
— When you record tracks from certain CD or
multi-disc players.
• A track number might not be marked for tracks less
than 4 seconds long (in Stereo mode, Monaural
mode, and LP2 Stereo mode) or 8 seconds long (in
LP4 Stereo mode) during recording.
• When recording from a component connected to the
ANALOG IN jacks with “T.Mark Off” selected or
when recording from a DAT deck or DBS tuner
connected to the DIGITAL IN connector, the entire
material may be recorded as a single track.
• When recording from a DAT deck or DBS tuner
connected to the DIGITAL IN connector, the deck
will mark a track number whenever the sampling
frequency of the input signal changes, regardless of
the track marking parameter setting (“T.Mark
LSyn(c)” or “T.Mark Off”).
Tip
You can mark track numbers even after recording has
finished. See “Dividing recorded tracks” on page 29.
Erasing blank portions
automatically (Smart Space/
Auto Cut)
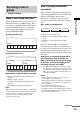
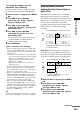
The Smart Space function lets you make the
blank spaces between tracks 3 seconds long
automatically. If the Smart Space function is on
and there is no sound input for about 3 seconds
or more (but less than 30 seconds) while
recording, the deck replaces this silence with a
blank of about 3 seconds and continues
recording.
Auto Cut: When the Smart Space function is
on, if there is no sound input for 30 seconds or
more, the deck replaces this silence with a blank
of about 3 seconds and enters recording pause.
1 While the deck is stopped, press MENU/
NO.
2 Turn AMS (or press ./>
repeatedly) until “Setup?” appears,
then press AMS or YES.
3 Turn AMS (or press ./>
repeatedly) until “S.Space On” appears,
then press AMS or YES.
No sound input for less than 30 seconds
Replaced with a blank of 3 seconds and
recording continues
Off
On
No sound input for 30 seconds or more
Replaced with a blank of 3 seconds
and recording pauses
Off
On
continued