M:\081\XPML A7.0\ML\New Folder\4296017111_MEX-BT4000P_CaFR\01USMEXBT4000PU\01US+00COV-U.fm masterpage:Right 00ML+00COV-U.book Page 1 Friday, August 26, 2011 1:30 PM 4-296-017-11(1) Bluetooth® Audio System Operating Instructions US Mode d’emploi FR Owner’s Record The model and serial numbers are located on the bottom of the unit. Record the serial number in the space provided below. Refer to these numbers whenever you call upon your Sony dealer regarding this product. Model No. MEX-BT4000P Serial No.
M:\081\XPML A7.0\ML\New Folder\4296017111_MEX-BT4000P_CaFR\01USMEXBT4000PU\01US01INT-U.fm masterpage:Left 00ML+00COV-U.book Page 2 Friday, August 26, 2011 1:30 PM Be sure to install this unit in the dashboard of the car for safety. For installation and connections, see the supplied installation/connections manual. Warning FOR UNITED STATES CUSTOMERS. NOT APPLICABLE IN CANADA, INCLUDING IN THE PROVINCE OF QUEBEC. POUR LES CONSOMMATEURS AUX ÉTATS-UNIS.
M:\081\XPML A7.0\ML\New Folder\4296017111_MEX-BT4000P_CaFR\01USMEXBT4000PU\01US01INT-U.fm masterpage:Right_SideIndex 00ML+00COV-U.book Page 3 Friday, August 26, 2011 1:30 PM For the State of California, USA only Perchlorate Material – special handling may apply, See www.dtsc.ca.gov/hazardouswaste/perchlorate Perchlorate Material: Lithium battery contains perchlorate SiriusXM subscriptions and Connect Tuner are sold separately. www.siriusxm.com.
M:\081\XPML A7.0\ML\New Folder\4296017111_MEX-BT4000P_CaFR\01USMEXBT4000PU\01US+00COV-UTOC.fm masterpage:Left 00ML+00COV-U.book Page 4 Friday, August 26, 2011 1:30 PM Table of contents Getting Started . . . . . . . . . . . . . . . . . . . . . . . . . . . . . . . . . . . . . . . . . . . . . . . . . . . . . 6 Notes on Bluetooth . . . . . . . . . . . . . . . . . . . . . . . . . . . . . . . . . . . . . . . . . . . . . . . . . . . . . . . 6 Canceling the DEMO mode . . . . . . . . . . . . . . . . . . . . . . .
M:\081\XPML A7.0\ML\New Folder\4296017111_MEX-BT4000P_CaFR\01USMEXBT4000PU\01US+00COV-UTOC.fm masterpage:Right 00ML+00COV-U.book Page 5 Friday, August 26, 2011 1:30 PM Pandora® internet radio via Bluetooth (Android™ & BlackBerry® phones) . . . . . . . . . . . . . . . . . . . . . . . . . . . . . . . . . . . . 29 Playing back Pandora® . . . . . . . . . . . . . . . . . . . . . . . . . . . . . . . . . . . . . . . . . . . . . . . . . . . . 29 Sound Settings and Setup Menu. . . . . . . . . . . . . . . . . . .
M:\081\XPML A7.0\ML\New Folder\4296017111_MEX-BT4000P_CaFR\01USMEXBT4000PU\01US02CD-U.fm masterpage:Left 00ML+00COV-U.
M:\081\XPML A7.0\ML\New Folder\4296017111_MEX-BT4000P_CaFR\01USMEXBT4000PU\01US02CD-U.fm masterpage:Right 00ML+00COV-U.book Page 7 Friday, August 26, 2011 1:30 PM 2 Rotate the control dial until “DEMO” appears, then press it. 3 Rotate the control dial to select “DEMO-OFF,” then press it. The setting is complete. 4 Press (BACK). The display returns to normal reception/ play mode. Setting the clock The clock uses a 12-hour digital indication. 1 Press and hold the select button.
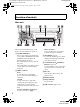
M:\081\XPML A7.0\ML\New Folder\4296017111_MEX-BT4000P_CaFR\01USMEXBT4000PU\01US02CD-U.fm masterpage:Left 00ML+00COV-U.book Page 8 Friday, August 26, 2011 1:30 PM Location of controls Main unit This section contains instructions on the location of controls and basic operations. SOURCE/OFF button*1 Press to turn on the power/change the source (Radio/CD/USB/Pandora® USB/ AUX/Bluetooth audio/Bluetooth Pandora®/Bluetooth phone). Press and hold for 1 second to turn off the power.
M:\081\XPML A7.0\ML\New Folder\4296017111_MEX-BT4000P_CaFR\01USMEXBT4000PU\01US02CD-U.fm masterpage:Right 00ML+00COV-U.book Page 9 Friday, August 26, 2011 1:30 PM (BACK)/MODE button*1 page 11, 15, 16 To return to the previous display. Radio: To select the radio band (FM/AM). USB (iPod): To enter/cancel the passenger control (press and hold). Pandora® USB/Bluetooth Pandora®: To enter the bookmark mode (press and hold).
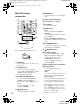
M:\081\XPML A7.0\ML\New Folder\4296017111_MEX-BT4000P_CaFR\01USMEXBT4000PU\01US02CD-U.fm masterpage:Left 00ML+00COV-U.book Page 10 Friday, August 26, 2011 1:30 PM ENTER button To apply a setting; receive a call; end a call. RM-X231 Remote commander 1 2 3 4 OFF CALL MENU SOURCE SOUND MODE + ENTER 5 6 – DSPL/ SCRL PTY 1 2 4 5 qd 3 PAUSE 7 8 9 q; qa qs 6 qf + VOL – Remove the insulation film before use. OFF button To turn off the power; stop the source; reject a call.
M:\081\XPML A7.0\ML\New Folder\4296017111_MEX-BT4000P_CaFR\01USMEXBT4000PU\01US02CD-U.fm masterpage:Right 00ML+00COV-U.book Page 11 Friday, August 26, 2011 1:30 PM Tuning automatically Radio 1 Storing and receiving stations Caution When tuning in stations while driving, use Best Tuning Memory (BTM) to prevent an accident. Select the band, then press +/– to search for the station. Scanning stops when the unit receives a station. Repeat this procedure until the desired station is received.
M:\081\XPML A7.0\ML\New Folder\4296017111_MEX-BT4000P_CaFR\01USMEXBT4000PU\01US02CD-U.fm masterpage:Left 00ML+00COV-U.
M:\081\XPML A7.0\ML\New Folder\4296017111_MEX-BT4000P_CaFR\01USMEXBT4000PU\01US02CD-U.fm masterpage:Right 00ML+00COV-U.book Page 13 Friday, August 26, 2011 1:30 PM Notes USB devices • MSC (Mass Storage Class)-type USB devices compliant with the USB standard can be used. • Corresponding codec is MP3 (.mp3), WMA (.wma), AAC (.m4a) and AAC (.mp4). • Backup of data to a USB device is recommended. For details on the compatibility of your USB device, visit the support site on the back cover.
M:\081\XPML A7.0\ML\New Folder\4296017111_MEX-BT4000P_CaFR\01USMEXBT4000PU\01US02CD-U.fm masterpage:Left 00ML+00COV-U.book Page 14 Friday, August 26, 2011 1:30 PM iPod In these Operating Instructions, “iPod” is used as a general reference for the iPod functions on the iPod and iPhone, unless otherwise specified by the text or illustrations. For details on the compatibility of your iPod, see “About iPod” (page 38) or visit the support site on the back cover.
M:\081\XPML A7.0\ML\New Folder\4296017111_MEX-BT4000P_CaFR\01USMEXBT4000PU\01US02CD-U.fm masterpage:Right 00ML+00COV-U.book Page 15 Friday, August 26, 2011 1:30 PM Operating an iPod directly — Passenger control You can operate an iPod directly even when it is connected to the dock connector. 1 During playback, press and hold . “MODE IPOD” appears and you will be able to operate the iPod directly. To exit the passenger control, press and hold .
M:\081\XPML A7.0\ML\New Folder\4296017111_MEX-BT4000P_CaFR\01USMEXBT4000PU\01US02CD-U.fm masterpage:Left 00ML+00COV-U.book Page 16 Friday, August 26, 2011 1:30 PM 4 Adjust the volume on this unit. Edit your QuickMix station selections on the device before connection. To pause playback, press (PAUSE). To resume playback, press again. To skip a song, press +. Notes • You cannot skip back to the previous song. • Pandora® limits the number of skips allowed. Changing display items Press .
M:\081\XPML A7.0\ML\New Folder\4296017111_MEX-BT4000P_CaFR\01USMEXBT4000PU\01US02CD-U.fm masterpage:Right 00ML+00COV-U.book Page 17 Friday, August 26, 2011 1:30 PM Searching and playing tracks Playing tracks in various modes SHUF GENRE*1 genre in random order. SHUF DEVICE* device in random order. SHUF OFF track in normal order (Normal play). 3 *1 iPod only *2 CD only You can listen to tracks repeatedly (repeat play) or in random order (shuffle play).
M:\081\XPML A7.0\ML\New Folder\4296017111_MEX-BT4000P_CaFR\01USMEXBT4000PU\01US02CD-U.fm masterpage:Left 00ML+00COV-U.book Page 18 Friday, August 26, 2011 1:30 PM Searching by skip items — Jump mode When many items are in a category, you can search for a desired item quickly. 1 Press + in Quick-BrowZer mode. The item name will appear. 2 Rotate the control dial to select the item near the one desired. The list is skipped in steps of 10% of the total number of items in the list.
M:\081\XPML A7.0\ML\New Folder\4296017111_MEX-BT4000P_CaFR\01USMEXBT4000PU\01US02CD-U.fm masterpage:Right 00ML+00COV-U.book Page 19 Friday, August 26, 2011 1:30 PM Changing the illumination Changing the color of display and buttons — Dynamic Color Illuminator Customizing the display and button color — Custom Color You can register a customized color for the display and buttons. 1 Press and hold the select button. The setup display appears.
M:\081\XPML A7.0\ML\New Folder\4296017111_MEX-BT4000P_CaFR\01USMEXBT4000PU\01US02CD-U.fm masterpage:Left 00ML+00COV-U.book Page 20 Friday, August 26, 2011 1:30 PM Advanced color setting Changing the color with sound synchronization — Sound Synchronization When you select a preset pattern, sound synchronization becomes effective. 1 Press and hold the select button. The setup display appears. 2 Rotate the control dial until “SND SYNC” appears, then press it.
M:\081\XPML A7.0\ML\New Folder\4296017111_MEX-BT4000P_CaFR\01USMEXBT4000PU\01US02CD-U.fm masterpage:Right 00ML+00COV-U.book Page 21 Friday, August 26, 2011 1:30 PM Connecting Bluetooth devices Bluetooth operations The Bluetooth function allows for handsfree calling and music streaming via this unit. To use the Bluetooth function, the following procedure is necessary. Operating the Bluetooth functions 1 Press . The call menu appears.
M:\081\XPML A7.0\ML\New Folder\4296017111_MEX-BT4000P_CaFR\01USMEXBT4000PU\01US02CD-U.fm masterpage:Left 00ML+00COV-U.book Page 22 Friday, August 26, 2011 1:30 PM If the device supports Bluetooth version 2.1, passkey input is not required. Pairing * Passkey may be called “passcode,” “PIN code,” “PIN number” or “Password,” etc., depending on the device. The Bluetooth device (cellular phone, audio device, etc.) and this unit need to be “paired” before use between each other via the Bluetooth function.
M:\081\XPML A7.0\ML\New Folder\4296017111_MEX-BT4000P_CaFR\01USMEXBT4000PU\01US02CD-U.fm masterpage:Right 00ML+00COV-U.book Page 23 Friday, August 26, 2011 1:30 PM Tip Connection between this unit and the Bluetooth device may be automatic, depending on the device. 2 Turn on the cellular phone and activate the Bluetooth signal. 3 Connect to this unit using the cellular phone. “ ” appears when the connection is made.
M:\081\XPML A7.0\ML\New Folder\4296017111_MEX-BT4000P_CaFR\01USMEXBT4000PU\01US02CD-U.fm masterpage:Left 00ML+00COV-U.book Page 24 Friday, August 26, 2011 1:30 PM Tip With Bluetooth signal on: when the ignition is turned to on, this unit reconnects automatically to the last-connected cellular phone. But automatic connection also depends on the cellular phone’s specification. If automatic connection is not made, connect manually.
M:\081\XPML A7.0\ML\New Folder\4296017111_MEX-BT4000P_CaFR\01USMEXBT4000PU\01US02CD-U.fm masterpage:Right 00ML+00COV-U.book Page 25 Friday, August 26, 2011 1:30 PM Calling from the phonebook You can make a call from the phonebook in this unit (internal phonebook) or the cellular phone*. For details on how to transfer the phonebook data of a cellular phone into this unit, see “Internal phonebook” (page 26).
M:\081\XPML A7.0\ML\New Folder\4296017111_MEX-BT4000P_CaFR\01USMEXBT4000PU\01US02CD-U.fm masterpage:Left 00ML+00COV-U.book Page 26 Friday, August 26, 2011 1:30 PM Calling by preset number You can store up to 6 contacts in the preset dial. For details on how to store, see “Preset dial” (page 27). 1 2 Press . 3 Press (handsfree). The phone call starts. Press a number button ( to ) to select the contact you want to call.
M:\081\XPML A7.0\ML\New Folder\4296017111_MEX-BT4000P_CaFR\01USMEXBT4000PU\01US02CD-U.fm masterpage:Right 00ML+00COV-U.book Page 27 Friday, August 26, 2011 1:30 PM “RECEIVING” appears during transfer, then “COMPLETE” appears in the display of this unit when transfer is finished. * For the call history, you can also select from the caller name. In this case, the caller name appears in the display of this unit. 2 Updating an internal phonebook Follow step 1 to 3 above.
M:\081\XPML A7.0\ML\New Folder\4296017111_MEX-BT4000P_CaFR\01USMEXBT4000PU\01US02CD-U.fm masterpage:Left 00ML+00COV-U.book Page 28 Friday, August 26, 2011 1:30 PM SMS indicator While connecting a cellular phone to this unit, the SMS indicator informs you of any incoming or unread SMS messages. If you receive a new SMS message, the SMS indicator flashes. If there are any unread SMS messages, the SMS indicator stays lit. 4 Adjust the volume on this unit.
M:\081\XPML A7.0\ML\New Folder\4296017111_MEX-BT4000P_CaFR\01USMEXBT4000PU\01US02CD-U.fm masterpage:Right 00ML+00COV-U.book Page 29 Friday, August 26, 2011 1:30 PM Operations other than the above should be performed on the audio device. Notes • Depending on the audio device, information, such as title, track number/time, playback status, etc., may not be displayed on this unit. The information is displayed during Bluetooth audio playback only.
M:\081\XPML A7.0\ML\New Folder\4296017111_MEX-BT4000P_CaFR\01USMEXBT4000PU\01US02CD-U.fm masterpage:Left 00ML+00COV-U.book Page 30 Friday, August 26, 2011 1:30 PM * When the mobile device is connected, the device number may appear. Make sure that the same numbers are displayed (e.g., 123456) in this unit and the mobile device, then press the select button on this unit and select “Yes” on the mobile device. To pause playback, press (PAUSE). To resume playback, press again.
M:\081\XPML A7.0\ML\New Folder\4296017111_MEX-BT4000P_CaFR\01USMEXBT4000PU\01US02CD-U.fm masterpage:Right 00ML+00COV-U.book Page 31 Friday, August 26, 2011 1:30 PM Sound Settings and Setup Menu Changing the sound settings Adjusting the sound characteristics 1 During reception/playback, press the select button. 2 Rotate the control dial until the desired menu item appears, then press it. 3 Rotate the control dial to select the setting, then press it.
M:\081\XPML A7.0\ML\New Folder\4296017111_MEX-BT4000P_CaFR\01USMEXBT4000PU\01US02CD-U.fm masterpage:Left 00ML+00COV-U.book Page 32 Friday, August 26, 2011 1:30 PM 4 Press Repeat steps and to adjust other frequency ranges. (BACK). To cancel the equalizer curve, select “OFF” in step 3. 6 Tip Press (BACK) twice. The equalizer curve is stored in “CUSTOM.” The equalizer curve setting can be memorized for each source.
M:\081\XPML A7.0\ML\New Folder\4296017111_MEX-BT4000P_CaFR\01USMEXBT4000PU\01US02CD-U.fm masterpage:Right 00ML+00COV-U.book Page 33 Friday, August 26, 2011 1:30 PM 5 Rotate the control dial to select the subwoofer position from “NEAR,” “NORMAL” or “FAR,” then press it. 6 Press (BACK). To cancel the listening position, select “OFF” in step 3. Adjusting the listening position You can fine-tune the listening position setting.
M:\081\XPML A7.0\ML\New Folder\4296017111_MEX-BT4000P_CaFR\01USMEXBT4000PU\01US02CD-U.fm masterpage:Left 00ML+00COV-U.book Page 34 Friday, August 26, 2011 1:30 PM Adjusting setup items DIMMER Changes the display brightness. – “AT”: to dim the display automatically when you turn lights on. (Available only when the illumination control lead is connected.) – “ON”: to dim the display. – “OFF”: deactivate the dimmer. 1 Press and hold the select button. The setup display appears.
M:\081\XPML A7.0\ML\New Folder\4296017111_MEX-BT4000P_CaFR\01USMEXBT4000PU\01US02CD-U.fm masterpage:Right 00ML+00COV-U.book Page 35 Friday, August 26, 2011 1:30 PM SW PHASE (Subwoofer Phase) Selects the subwoofer phase: “NORM,” “REV.” HPF FREQ (High Pass Filter Frequency) Selects the front/rear speaker cut-off frequency: “OFF,” “50Hz,” “60Hz,” “80Hz,” “100Hz,” “120Hz.” HPF SLOP (High Pass Filter Slope) Selects the HPF slope (effective only when HPF FREQ is set to other than “OFF”): “1,” “2,” “3.
M:\081\XPML A7.0\ML\New Folder\4296017111_MEX-BT4000P_CaFR\01USMEXBT4000PU\01US02CD-U.fm masterpage:Left 00ML+00COV-U.book Page 36 Friday, August 26, 2011 1:30 PM SiriusXM Connect Tuner By connecting an optional SiriusXM Connect Tuner, you can use the features and functions of the SiriusXM satellite radio (SiriusXM subscriptions sold separately). For more details on services, visit the following web site: http://www.siriusxm.com/ Note 2 Rotate the control dial to select “LOCK SEL,” then press it.
M:\081\XPML A7.0\ML\New Folder\4296017111_MEX-BT4000P_CaFR\01USMEXBT4000PU\01US02CD-U.fm masterpage:Right 00ML+00COV-U.book Page 37 Friday, August 26, 2011 1:30 PM • Discs that this unit CANNOT play Additional Information Precautions • Cool off the unit beforehand if your car has been parked in direct sunlight. • Do not leave the front panel or audio devices brought in inside the car, or it may cause malfunction due to high temperature in direct sunlight. • Power antenna (aerial) extends automatically.
M:\081\XPML A7.0\ML\New Folder\4296017111_MEX-BT4000P_CaFR\01USMEXBT4000PU\01US02CD-U.fm masterpage:Left 00ML+00COV-U.book Page 38 Friday, August 26, 2011 1:30 PM About iPod • You can connect to the following iPod models. Update your iPod devices to the latest software before use.
M:\081\XPML A7.0\ML\New Folder\4296017111_MEX-BT4000P_CaFR\01USMEXBT4000PU\01US02CD-U.fm masterpage:Right 00ML+00COV-U.book Page 39 Friday, August 26, 2011 1:30 PM • This unit supports security capabilities that comply with the Bluetooth standard to provide a secure connection when the Bluetooth wireless technology is used, but security may not be enough depending on the setting. Be careful when communicating using Bluetooth wireless technology.
M:\081\XPML A7.0\ML\New Folder\4296017111_MEX-BT4000P_CaFR\01USMEXBT4000PU\01US02CD-U.fm masterpage:Left 00ML+00COV-U.book Page 40 Friday, August 26, 2011 1:30 PM CD Player section Notes • For safety, turn off the ignition before cleaning the connectors, and remove the key from the ignition switch. • Never touch the connectors directly with your fingers or with any metal device. Specifications FOR UNITED STATES CUSTOMERS. NOT APPLICABLE IN CANADA, INCLUDING IN THE PROVINCE OF QUEBEC.
M:\081\XPML A7.0\ML\New Folder\4296017111_MEX-BT4000P_CaFR\01USMEXBT4000PU\01US02CD-U.fm masterpage:Right 00ML+00COV-U.book Page 41 Friday, August 26, 2011 1:30 PM USB signal input connector Power requirements: 12 V DC car battery (negative ground (earth)) Dimensions: Approx. 178 × 50 × 179 mm (7 1/8 × 2 × 7 1/8 in) (w/h/d) Mounting dimensions: Approx. 182 × 53 × 162 mm (7 1/4 × 2 1/8 × 6 1/2 in) (w/h/d) Mass: Approx. 1.
M:\081\XPML A7.0\ML\New Folder\4296017111_MEX-BT4000P_CaFR\01USMEXBT4000PU\01US02CD-U.fm masterpage:Left 00ML+00COV-U.book Page 42 Friday, August 26, 2011 1:30 PM During playback or reception, demonstration mode starts. If no operation is performed for 5 minutes with “DEMO-ON” set, demonstration mode starts. – Set “DEMO-OFF” (page 34). The display disappears from/does not appear in the display window. The dimmer is set to “DIM-ON” (page 34).
M:\081\XPML A7.0\ML\New Folder\4296017111_MEX-BT4000P_CaFR\01USMEXBT4000PU\01US02CD-U.fm masterpage:Right 00ML+00COV-U.book Page 43 Friday, August 26, 2011 1:30 PM A USB device takes longer to play back. The USB device contains files with a complicated tree structure. The sound is intermittent. The sound may be intermittent at a high-bitrate of more than 320 kbps. Pandora® connection is not possible. Shut down the Pandora® application on the mobile device, and then launch again.
M:\081\XPML A7.0\ML\New Folder\4296017111_MEX-BT4000P_CaFR\01USMEXBT4000PU\01US02CD-U.fm masterpage:Left 00ML+00COV-U.book Page 44 Friday, August 26, 2011 1:30 PM The playback sound stops momentarily when the connection between this unit and the cellular phone is being made. This is not a malfunction. The connected Bluetooth audio device cannot be controlled. Check that the connected Bluetooth audio device supports AVRCP. Some functions do not work.
M:\081\XPML A7.0\ML\New Folder\4296017111_MEX-BT4000P_CaFR\01USMEXBT4000PU\01US02CD-U.fm masterpage:Right 00ML+00COV-U.book Page 45 Friday, August 26, 2011 1:30 PM MEM FAILURE This unit failed to store the contact in the preset dial. – Make sure that the number you intend to store is correct (page 27). OFFSET There may be an internal malfunction. – Check the connection. If the error indication remains in the display, consult your nearest Sony dealer. MEMORY BUSY This unit is storing data.
M:\081\XPML A7.0\ML\New Folder\4296017111_MEX-BT4000P_CaFR\01USMEXBT4000PU\01US02CD-U.fm masterpage:Left 00ML+00COV-U.book Page 46 Friday, August 26, 2011 1:30 PM OPEN APP (Open Application), PRESS PAUSE When connection via the Bluetooth function. Pandora® does not start up. – Start up the Pandora® application on the mobile device, then press (PAUSE). CHK DEV (Check Device) Pandora® does not start up. – Start up the Pandora® application and log into your account.
M:\081\XPML A7.0\ML\New Folder\4296017111_MEX-BT4000P_CaFR\01USMEXBT4000PU\01US02CD-U.fm masterpage:Right 00ML+00COV-U.
M:\081\XPML A7.0\ML\New Folder\4296017111_MEX-BT4000P_CaFR\02FRMEXBT4000PU\02FR01INT-U.fm masterpage:Left 00ML+00COV-U.book Page 2 Friday, August 26, 2011 1:30 PM Le présent appareil est conforme aux CNR d’Industrie Canada applicables aux appareils radio exempts de licence.
M:\081\XPML A7.0\ML\New Folder\4296017111_MEX-BT4000P_CaFR\02FRMEXBT4000PU\02FR01INT-U.fm masterpage:Right_SideIndex 00ML+00COV-U.book Page 3 Friday, August 26, 2011 1:30 PM Ce produit incorpore une technologie sujette à certains droits de propriété intellectuelle de Microsoft. L’utilisation ou la distribution de cette technologie hors de ce produit est interdite sans licence(s) appropriée(s) de Microsoft. iPhone, iPod, iPod classic, iPod nano et iPod touch sont des marques de Apple Inc.
M:\081\XPML A7.0\ML\New Folder\4296017111_MEX-BT4000P_CaFR\02FRMEXBT4000PU\02FR+00COV-UTOC.fm masterpage:Left 00ML+00COV-U.book Page 4 Friday, August 26, 2011 1:30 PM Table des matières Préparation . . . . . . . . . . . . . . . . . . . . . . . . . . . . . . . . . . . . . . . . . . . . . . . . . . . . . . . . 6 Remarques sur la fonction Bluetooth . . . . . . . . . . . . . . . . . . . . . . . . . . . . . . . . . . . . . . . . 6 Annulation du mode DEMO . . . . . . . . . . . . . . . . . . . . . . . . . . . .
M:\081\XPML A7.0\ML\New Folder\4296017111_MEX-BT4000P_CaFR\02FRMEXBT4000PU\02FR+00COV-UTOC.fm masterpage:Right 00ML+00COV-U.book Page 5 Friday, August 26, 2011 1:30 PM Réglages du son et menu de configuration . . . . . . . . . . . . . . . . . . . . . . . . . . . . . 35 Changement des réglages du son . . . . . . . . . . . . . . . . . . . . . . . . . . . . . . . . . . . . . . . . . . . 35 Pour apprécier les fonctions sonores sophistiquées — Moteur sonore avancé. . . . .
M:\081\XPML A7.0\ML\New Folder\4296017111_MEX-BT4000P_CaFR\02FRMEXBT4000PU\02FR02CD-U.fm masterpage:Left 00ML+00COV-U.
M:\081\XPML A7.0\ML\New Folder\4296017111_MEX-BT4000P_CaFR\02FRMEXBT4000PU\02FR02CD-U.fm masterpage:Right 00ML+00COV-U.book Page 7 Friday, August 26, 2011 1:30 PM Annulation du mode DEMO Vous pouvez désactiver l’affichage de démonstration qui apparaît lorsque cet appareil est éteint. 1 Appuyez sur la touche de sélection et maintenez-la enfoncée. L’écran de configuration apparaît. 2 Tournez la molette de réglage jusqu’à ce que « DEMO » s’affiche, puis appuyez dessus.
M:\081\XPML A7.0\ML\New Folder\4296017111_MEX-BT4000P_CaFR\02FRMEXBT4000PU\02FR02CD-U.fm masterpage:Left 00ML+00COV-U.book Page 8 Friday, August 26, 2011 1:30 PM Emplacement des commandes Appareil principal Cette section contient les instructions relatives à l’emplacement des commandes et aux opérations de base. Touche SOURCE/OFF*1 Appuyez pour mettre l’appareil en marche/changer la source (Radio/CD/ USB/Pandora® USB/AUX/périphérique audio Bluetooth/Bluetooth Pandora®/ téléphone Bluetooth).
M:\081\XPML A7.0\ML\New Folder\4296017111_MEX-BT4000P_CaFR\02FRMEXBT4000PU\02FR02CD-U.fm masterpage:Right 00ML+00COV-U.book Page 9 Friday, August 26, 2011 1:30 PM Molette de réglage/touche de sélection/touche (mains libres) page 35, 38 Permet de régler le niveau de volume (tournez); de sélectionner des paramètres (appuyez et tournez); de recevoir/mettre fin à un appel (appuyez). Fente d’insertion des disques Insérez le disque (côté imprimé vers le haut) pour que la lecture démarre.
M:\081\XPML A7.0\ML\New Folder\4296017111_MEX-BT4000P_CaFR\02FRMEXBT4000PU\02FR02CD-U.fm masterpage:Left 00ML+00COV-U.book Page 10 Friday, August 26, 2011 1:30 PM : MIC (pendant un appel) page 30 Permet de régler le gain MIC (appuyez); de sélectionner le mode Correcteur d’écho/Correcteur de bruits (appuyez sur la touche et maintenez-la enfoncée).
M:\081\XPML A7.0\ML\New Folder\4296017111_MEX-BT4000P_CaFR\02FRMEXBT4000PU\02FR02CD-U.fm masterpage:Right 00ML+00COV-U.book Page 11 Friday, August 26, 2011 1:30 PM Télécommande RM-X231 1 2 3 4 OFF CALL MENU SOURCE SOUND MODE + ENTER 5 6 – DSPL/ SCRL PTY 1 2 4 5 qd 3 PAUSE 7 8 9 q; qa qs 6 qf + VOL – Retirez la feuille de protection avant l’utilisation. Touche (BACK) Permet de retourner à l’écran précédent.
M:\081\XPML A7.0\ML\New Folder\4296017111_MEX-BT4000P_CaFR\02FRMEXBT4000PU\02FR02CD-U.fm masterpage:Left 00ML+00COV-U.book Page 12 Friday, August 26, 2011 1:30 PM Radio : Permettent de capter les stations enregistrées (appuyez); de mémoriser des stations (appuyez sur la touche et maintenez-la enfoncée) (FM/AM).
M:\081\XPML A7.0\ML\New Folder\4296017111_MEX-BT4000P_CaFR\02FRMEXBT4000PU\02FR02CD-U.fm masterpage:Right 00ML+00COV-U.book Page 13 Friday, August 26, 2011 1:30 PM Réception des stations mémorisées Sélection de PTY (Type d’émission) 1 Utilisez la fonction PTY pour afficher ou chercher un type d’émission souhaité. Sélectionnez la bande, puis appuyez sur une touche numérique ( à ). 1 Appuyez sur pendant la réception FM.
M:\081\XPML A7.0\ML\New Folder\4296017111_MEX-BT4000P_CaFR\02FRMEXBT4000PU\02FR02CD-U.fm masterpage:Left 00ML+00COV-U.book Page 14 Friday, August 26, 2011 1:30 PM Réglage de CT (Heure) Les données CT de la transmission RDS règlent l’horloge. CD 1 Lecture d’un disque Réglez l’appareil à « CT-ON » dans le menu de configuration (page 38). Remarque La fonction CT peut ne pas fonctionner correctement même si une station RDS est captée.
M:\081\XPML A7.0\ML\New Folder\4296017111_MEX-BT4000P_CaFR\02FRMEXBT4000PU\02FR02CD-U.fm masterpage:Right 00ML+00COV-U.book Page 15 Friday, August 26, 2011 1:30 PM Périphériques USB • Vous pouvez utiliser des périphériques USB de type MSC (stockage de masse) conformes à la norme USB. • Le codec correspondant est MP3 (.mp3), WMA (.wma), AAC (.m4a) et AAC (.mp4). • Il est recommandé d’effectuer des copies de sauvegarde des données sur un périphérique USB.
M:\081\XPML A7.0\ML\New Folder\4296017111_MEX-BT4000P_CaFR\02FRMEXBT4000PU\02FR02CD-U.fm masterpage:Left 00ML+00COV-U.book Page 16 Friday, August 26, 2011 1:30 PM iPod Dans ce mode d’emploi, « iPod » est utilisé comme référence générale pour des fonctions iPod sur les iPod et iPhone, sauf mention contraire dans le texte ou les illustrations.
M:\081\XPML A7.0\ML\New Folder\4296017111_MEX-BT4000P_CaFR\02FRMEXBT4000PU\02FR02CD-U.fm masterpage:Right 00ML+00COV-U.
M:\081\XPML A7.0\ML\New Folder\4296017111_MEX-BT4000P_CaFR\02FRMEXBT4000PU\02FR02CD-U.fm masterpage:Left 00ML+00COV-U.book Page 18 Friday, August 26, 2011 1:30 PM * Le câble de raccordement USB RC-100IP pour iPhone est recommandé. Appréciation négative En cours de lecture, appuyez sur () et maintenez la touche enfoncée pendant 1 seconde. Liste des stations La liste des stations vous permet de sélectionner facilement la station souhaitée.
M:\081\XPML A7.0\ML\New Folder\4296017111_MEX-BT4000P_CaFR\02FRMEXBT4000PU\02FR02CD-U.fm masterpage:Right 00ML+00COV-U.book Page 19 Friday, August 26, 2011 1:30 PM SHUF DISC*2 Recherche et lecture des plages Lecture des plages dans divers modes Vous pouvez écouter les plages en boucle (lecture répétée) ou dans un ordre aléatoire (lecture aléatoire). Les modes de lecture disponibles diffèrent selon la source sonore sélectionnée.
M:\081\XPML A7.0\ML\New Folder\4296017111_MEX-BT4000P_CaFR\02FRMEXBT4000PU\02FR02CD-U.fm masterpage:Left 00ML+00COV-U.book Page 20 Friday, August 26, 2011 1:30 PM 2 Tournez la molette de réglage pour sélectionner la catégorie de recherche de votre choix, puis appuyez pour valider. Recherche par ordre alphabétique — Recherche alphabétique 3 Répétez l’étape 2 jusqu’à ce que la plage de votre choix soit sélectionnée. La lecture commence.
M:\081\XPML A7.0\ML\New Folder\4296017111_MEX-BT4000P_CaFR\02FRMEXBT4000PU\02FR02CD-U.fm masterpage:Right 00ML+00COV-U.book Page 21 Friday, August 26, 2011 1:30 PM Recherche d’une plage en écoutant des passages — ZAPPIN™ Vous pouvez rechercher la plage de votre choix en écoutant successivement de courts passages des plages d’un CD ou périphérique USB. Le mode ZAPPIN est approprié pour rechercher une plage en mode de lecture aléatoire ou répétée aléatoire. 1 Appuyez sur (ZAP) en cours de lecture.
M:\081\XPML A7.0\ML\New Folder\4296017111_MEX-BT4000P_CaFR\02FRMEXBT4000PU\02FR02CD-U.fm masterpage:Left 00ML+00COV-U.book Page 22 Friday, August 26, 2011 1:30 PM Personnalisation de la couleur de la fenêtre d’affichage et des touches — Couleur personnalisée Vous pouvez enregistrer une couleur personnalisée pour la fenêtre d’affichage et les touches. 1 2 3 Appuyez sur la touche de sélection et maintenez-la enfoncée. L’écran de configuration apparaît.
M:\081\XPML A7.0\ML\New Folder\4296017111_MEX-BT4000P_CaFR\02FRMEXBT4000PU\02FR02CD-U.fm masterpage:Right 00ML+00COV-U.book Page 23 Friday, August 26, 2011 1:30 PM Affichage de couleur claire — Clarté du menu Vous pouvez afficher le menu avec plus de clarté (blanc) sans affecter le réglage de couleur. 1 Appuyez sur la touche de sélection et maintenez-la enfoncée. L’écran de configuration apparaît. 2 Tournez la molette de réglage jusqu’à ce que « WHT MENU » s’affiche, puis appuyez dessus.
M:\081\XPML A7.0\ML\New Folder\4296017111_MEX-BT4000P_CaFR\02FRMEXBT4000PU\02FR02CD-U.fm masterpage:Left 00ML+00COV-U.book Page 24 Friday, August 26, 2011 1:30 PM Installation du microphone Pour capter votre voix pendant les appels en mains libres, vous devez installer le microphone (fourni). Pour plus de détails sur la façon de raccorder le microphone, reportez-vous au guide « Installation/Raccordement » fourni. Utilisation des fonctions Bluetooth 1 Appuyez sur . Le menu d’appel apparaît.
M:\081\XPML A7.0\ML\New Folder\4296017111_MEX-BT4000P_CaFR\02FRMEXBT4000PU\02FR02CD-U.fm masterpage:Right 00ML+00COV-U.book Page 25 Friday, August 26, 2011 1:30 PM L’appareil passe en mode de veille de pairage. Remarque Si « » continue de clignoter, il est possible que le périphérique Bluetooth ne soit pas compatible avec cet appareil. Pour plus de détails sur les périphériques compatibles, visitez le site d’assistance à l’adresse indiquée sur la couverture arrière.
M:\081\XPML A7.0\ML\New Folder\4296017111_MEX-BT4000P_CaFR\02FRMEXBT4000PU\02FR02CD-U.fm masterpage:Left 00ML+00COV-U.book Page 26 Friday, August 26, 2011 1:30 PM du téléphone cellulaire connecté s’afficheront. Connexion Pour utiliser le périphérique après avoir effectué le pairage, démarrez la connexion. Le pairage permet parfois d’établir la connexion automatiquement. Si le pairage a déjà été effectué, commencez l’opération à partir de cette section.
M:\081\XPML A7.0\ML\New Folder\4296017111_MEX-BT4000P_CaFR\02FRMEXBT4000PU\02FR02CD-U.fm masterpage:Right 00ML+00COV-U.book Page 27 Friday, August 26, 2011 1:30 PM Conseil Avec le signal Bluetooth activé : lorsque la clé de contact est tournée sur la position ON, cet appareil se reconnecte automatiquement au dernier téléphone cellulaire connecté. Cependant, la connexion automatique dépend également des caractéristiques techniques du téléphone cellulaire.
M:\081\XPML A7.0\ML\New Folder\4296017111_MEX-BT4000P_CaFR\02FRMEXBT4000PU\02FR02CD-U.fm masterpage:Left 00ML+00COV-U.book Page 28 Friday, August 26, 2011 1:30 PM Appel à partir du répertoire Remarque sur les données du répertoire Vous pouvez effectuer un appel à partir du répertoire de cet appareil (répertoire interne) ou du téléphone cellulaire*.
M:\081\XPML A7.0\ML\New Folder\4296017111_MEX-BT4000P_CaFR\02FRMEXBT4000PU\02FR02CD-U.fm masterpage:Right 00ML+00COV-U.book Page 29 Friday, August 26, 2011 1:30 PM Appel par saisie du numéro de téléphone 1 Appuyez sur et tournez la molette de réglage jusqu’à ce que « DIAL NUMBER » s’affiche, puis appuyez dessus. 2 Tournez la molette de réglage pour entrer le numéro de téléphone, sélectionnez « » (espace), puis appuyez sur la touche (mains libres)*. L’appel téléphonique commence.
M:\081\XPML A7.0\ML\New Folder\4296017111_MEX-BT4000P_CaFR\02FRMEXBT4000PU\02FR02CD-U.fm masterpage:Left 00ML+00COV-U.book Page 30 Friday, August 26, 2011 1:30 PM Remarques • Pour plus de détails sur le fonctionnement du téléphone cellulaire, reportez-vous au mode d’emploi de ce dernier. • Selon le téléphone cellulaire utilisé, la connexion mains libres peut être interrompue lorsque vous tentez d’effectuer un transfert d’appel. Mise à jour d’un répertoire interne Suivez les étapes 1 à 3 ci-dessus.
M:\081\XPML A7.0\ML\New Folder\4296017111_MEX-BT4000P_CaFR\02FRMEXBT4000PU\02FR02CD-U.fm masterpage:Right 00ML+00COV-U.book Page 31 Friday, August 26, 2011 1:30 PM Fonction de présélection La fonction de présélection vous permet de mémoriser des contacts (6 maximum) du répertoire. 1 Sélectionnez un numéro de téléphone que vous souhaitez mémoriser dans la fonction de présélection à partir du répertoire ou de l’historique des appels*, ou en entrant le numéro de téléphone directement.
M:\081\XPML A7.0\ML\New Folder\4296017111_MEX-BT4000P_CaFR\02FRMEXBT4000PU\02FR02CD-U.fm masterpage:Left 00ML+00COV-U.book Page 32 Friday, August 26, 2011 1:30 PM Transmission de musique en continu Écoute de musique à partir d’un périphérique audio Vous pouvez écouter la musique d’un périphérique audio sur cet appareil si le périphérique audio est compatible avec le profil A2DP (Advanced Audio Distribution Profile) de la technologie Bluetooth. 1 2 Réduisez le volume de cet appareil.
M:\081\XPML A7.0\ML\New Folder\4296017111_MEX-BT4000P_CaFR\02FRMEXBT4000PU\02FR02CD-U.fm masterpage:Right 00ML+00COV-U.book Page 33 Friday, August 26, 2011 1:30 PM s’affichent uniquement pendant la lecture Bluetooth audio. • Même si vous changez la source sur cet appareil, la lecture ne s’interrompt pas sur le périphérique audio.
M:\081\XPML A7.0\ML\New Folder\4296017111_MEX-BT4000P_CaFR\02FRMEXBT4000PU\02FR02CD-U.fm masterpage:Left 00ML+00COV-U.book Page 34 Friday, August 26, 2011 1:30 PM 3 Démarrez l’application Pandora® sur le périphérique mobile. Liste des stations 4 Appuyez sur * (PAUSE) pour démarrer la lecture. La liste des stations vous permet de sélectionner facilement la station souhaitée. * Lorsque le périphérique mobile est connecté, le numéro du périphérique peut s’afficher.
M:\081\XPML A7.0\ML\New Folder\4296017111_MEX-BT4000P_CaFR\02FRMEXBT4000PU\02FR02CD-U.fm masterpage:Right 00ML+00COV-U.book Page 35 Friday, August 26, 2011 1:30 PM DM+ (page 37) Réglages du son et menu de configuration Changement des réglages du son Réglage des caractéristiques du son 1 Pendant la réception/lecture, appuyez sur la touche de sélection. 2 Tournez la molette de réglage jusqu’à ce que le paramètre souhaité s’affiche, puis appuyez dessus.
M:\081\XPML A7.0\ML\New Folder\4296017111_MEX-BT4000P_CaFR\02FRMEXBT4000PU\02FR02CD-U.fm masterpage:Left 00ML+00COV-U.book Page 36 Friday, August 26, 2011 1:30 PM 1 Pendant la réception/lecture, appuyez sur la touche de sélection. 2 Tournez la molette de réglage jusqu’à ce que « EQ7 PRESET » s’affiche, puis appuyez dessus. 3 Tournez la molette de réglage jusqu’à ce que la courbe d’égaliseur souhaitée s’affiche, puis appuyez dessus. 4 Appuyez sur 5 Réglez la courbe de l’égaliseur.
M:\081\XPML A7.0\ML\New Folder\4296017111_MEX-BT4000P_CaFR\02FRMEXBT4000PU\02FR02CD-U.fm masterpage:Right 00ML+00COV-U.book Page 37 Friday, August 26, 2011 1:30 PM Les options pour « POSITION » sont indiquées ci-dessous. FRONT L () : Avant gauche FRONT R () : Avant droite FRONT () : Centre avant ALL () : Au centre de votre véhicule OFF : Aucune position réglée Réglage de la position d’écoute Vous pouvez régler la position d’écoute avec précision.
M:\081\XPML A7.0\ML\New Folder\4296017111_MEX-BT4000P_CaFR\02FRMEXBT4000PU\02FR02CD-U.fm masterpage:Left 00ML+00COV-U.book Page 38 Friday, August 26, 2011 1:30 PM Utilisation des haut-parleurs arrière comme caisson de graves — Amplificateur de graves à l’arrière La fonction Amplificateur de graves à l’arrière accentue les graves en appliquant un réglage de filtre passe-bas (page 39) aux haut-parleurs arrière.
M:\081\XPML A7.0\ML\New Folder\4296017111_MEX-BT4000P_CaFR\02FRMEXBT4000PU\02FR02CD-U.fm masterpage:Right 00ML+00COV-U.book Page 39 Friday, August 26, 2011 1:30 PM CUSTOM-C (Couleur personnalisée) Permet de sélectionner une couleur préréglée comme point de départ pour apporter des modifications (page 22). SND SYNC (Synchronisation sonore) Permet de sélectionner la couleur avec la synchronisation sonore : « ON », « OFF ».
M:\081\XPML A7.0\ML\New Folder\4296017111_MEX-BT4000P_CaFR\02FRMEXBT4000PU\02FR02CD-U.fm masterpage:Left 00ML+00COV-U.book Page 40 Friday, August 26, 2011 1:30 PM Utilisation d’un équipement en option Appareil audio auxiliaire En raccordant un appareil audio portatif en option à la prise d’entrée AUX (mini-prise stéréo) de l’appareil, puis en sélectionnant simplement la source, vous pouvez écouter le son par l’intermédiaire des haut-parleurs de votre voiture.
M:\081\XPML A7.0\ML\New Folder\4296017111_MEX-BT4000P_CaFR\02FRMEXBT4000PU\02FR02CD-U.fm masterpage:Right 00ML+00COV-U.book Page 41 Friday, August 26, 2011 1:30 PM Mémorisation des canaux 1 Lorsque vous captez le canal que vous souhaitez mémoriser, appuyez sur une touche numérique ( à ) et maintenez-la enfoncée jusqu’à ce que « MEM » apparaisse. Pour capter le canal mémorisé, sélectionnez SX1, SX2 ou SX3 en appuyant sur , puis appuyez sur une touche numérique ( à ).
M:\081\XPML A7.0\ML\New Folder\4296017111_MEX-BT4000P_CaFR\02FRMEXBT4000PU\02FR02CD-U.fm masterpage:Left 00ML+00COV-U.book Page 42 Friday, August 26, 2011 1:30 PM Informations complémentaires Précautions • Si votre véhicule est resté stationné en plein soleil, laissez l’appareil refroidir avant de l’utiliser. • Ne laissez pas la façade ou les appareils audio à l’intérieur du véhicule car la température élevée résultant du rayonnement direct du soleil pourrait causer un problème de fonctionnement.
M:\081\XPML A7.0\ML\New Folder\4296017111_MEX-BT4000P_CaFR\02FRMEXBT4000PU\02FR02CD-U.fm masterpage:Right 00ML+00COV-U.book Page 43 Friday, August 26, 2011 1:30 PM Ordre de lecture des fichiers MP3/WMA/AAC MP3/WMA/AAC Dossier (album) Fichier MP3/ WMA/AAC (plage) À propos de l’iPod • Vous pouvez raccorder cet appareil aux modèles d’iPod suivants. Mettez vos périphériques iPod à jour avec le logiciel le plus récent avant toute utilisation.
M:\081\XPML A7.0\ML\New Folder\4296017111_MEX-BT4000P_CaFR\02FRMEXBT4000PU\02FR02CD-U.fm masterpage:Left 00ML+00COV-U.book Page 44 Friday, August 26, 2011 1:30 PM À propos de la fonction Bluetooth Qu’est-ce que la technologie Bluetooth? • La technologie Bluetooth sans fil est une technologie sans fil à courte portée permettant la communication sans fil de données entre des appareils numériques tels qu’un téléphone cellulaire et un microcasque.
M:\081\XPML A7.0\ML\New Folder\4296017111_MEX-BT4000P_CaFR\02FRMEXBT4000PU\02FR02CD-U.fm masterpage:Right 00ML+00COV-U.book Page 45 Friday, August 26, 2011 1:30 PM – Selon le périphérique utilisé ou l’environnement de communication, des parasites peuvent se produire lors des communications téléphoniques en mains libres. • Selon le périphérique à connecter, le démarrage de la communication peut prendre un certain temps.
M:\081\XPML A7.0\ML\New Folder\4296017111_MEX-BT4000P_CaFR\02FRMEXBT4000PU\02FR02CD-U.fm masterpage:Left 00ML+00COV-U.
M:\081\XPML A7.0\ML\New Folder\4296017111_MEX-BT4000P_CaFR\02FRMEXBT4000PU\02FR02CD-U.fm masterpage:Right 00ML+00COV-U.book Page 47 Friday, August 26, 2011 1:30 PM Dépannage La liste de vérification suivante vous aidera à remédier aux problèmes que vous pourriez rencontrer avec cet appareil. Avant de passer en revue la liste ci-dessous, vérifiez les procédures de raccordement et d’utilisation.
M:\081\XPML A7.0\ML\New Folder\4296017111_MEX-BT4000P_CaFR\02FRMEXBT4000PU\02FR02CD-U.fm masterpage:Left 00ML+00COV-U.book Page 48 Friday, August 26, 2011 1:30 PM Impossible de capter une station présélectionnée. Enregistrez la fréquence correcte dans la mémoire. Le signal capté est trop faible. La syntonisation automatique est impossible. Le signal capté est trop faible. – Réglez manuellement la fréquence. La fonction « AUTO SCR » est réglée à « OFF ». – Réglez l’appareil à « A.
M:\081\XPML A7.0\ML\New Folder\4296017111_MEX-BT4000P_CaFR\02FRMEXBT4000PU\02FR02CD-U.fm masterpage:Right 00ML+00COV-U.book Page 49 Friday, August 26, 2011 1:30 PM Impossible d’établir la connexion. La connexion est contrôlée à partir d’un côté (cet appareil ou le périphérique Bluetooth), mais pas des deux. – Établissez la connexion à cet appareil à partir d’un périphérique Bluetooth ou vice versa. Vérifiez les procédures de pairage et de connexion dans le manuel de l’autre périphérique, etc.
M:\081\XPML A7.0\ML\New Folder\4296017111_MEX-BT4000P_CaFR\02FRMEXBT4000PU\02FR02CD-U.fm masterpage:Left 00ML+00COV-U.book Page 50 Friday, August 26, 2011 1:30 PM Le nom de l’appelant ne s’affiche pas lors de la réception d’un appel. Le téléphone appelant n’est pas réglé pour envoyer le numéro de téléphone. Un appel commence involontairement. Le téléphone à connecter est réglé pour répondre à un appel automatiquement. « AUTO ANSWER » de cet appareil est réglé sur « ANS-1 » ou « ANS-2 » (page 24).
M:\081\XPML A7.0\ML\New Folder\4296017111_MEX-BT4000P_CaFR\02FRMEXBT4000PU\02FR02CD-U.fm masterpage:Right 00ML+00COV-U.book Page 51 Friday, August 26, 2011 1:30 PM MEM FAILURE Cet appareil n’a pas réussi à mémoriser le contact dans la fonction de présélection. – Assurez-vous de sélectionner un numéro approprié (page 31). MEMORY BUSY Cet appareil mémorise des données. – Attendez que l’opération se termine. MEMORY FULL 1 000 contacts ont été mémorisés.
M:\081\XPML A7.0\ML\New Folder\4296017111_MEX-BT4000P_CaFR\02FRMEXBT4000PU\02FR02CD-U.fm masterpage:Left 00ML+00COV-U.book Page 52 Friday, August 26, 2011 1:30 PM « » ou « » En mode de retour ou d’avance rapide, vous avez atteint le début ou la fin du disque et vous ne pouvez pas aller plus loin. « » Le caractère ne peut pas être affiché sur l’appareil. – Certaines fonctions, telles que la station partagée, ne permettent pas de laisser une appréciation.
M:\081\XPML A7.0\ML\New Folder\4296017111_MEX-BT4000P_CaFR\02FRMEXBT4000PU\02FR02CD-U.fm masterpage:Right 00ML+00COV-U.book Page 53 Friday, August 26, 2011 1:30 PM CODE ERROR Le mot de passe entré est invalide. MEM FAILURE Cet appareil n’a pas réussi à mémoriser le canal dans la fonction de présélection. – Assurez-vous de sélectionner un canal approprié. NOSIGNAL Le service est interrompu en raison d’une interruption du signal.
M:\081\XPML A7.0\ML\New Folder\4296017111_MEX-BT4000P_CaFR\01USMEXBT4000PU\04US+03BCO-U.fm masaterpage:Left 00ML+00COV-U.book Page 48 Friday, August 26, 2011 1:30 PM Support site Site d’assistance If you have any questions or for the latest support information on this product, please visit the web site below: Si vous avez des questions ou si vous souhaitez consulter les toutes dernières informations techniques sur ce produit, rendez-vous sur le site Web suivant : http://esupport.sony.com http://www.