4-235-983-13(2) Mini Hi-Fi Component System Operating Instructions Owner’s Record The model and serial numbers are located on the rear panel. Record the serial number in the space provided below. Refer to them whenever you call upon your Sony dealer regarding this product. Model No. Serial No.
NOTICE FOR THE CUSTOMERS IN THE U.S.A. WARNING To prevent fire or shock hazard, do not expose the unit to rain or moisture. To avoid electrical shock, do not open the cabinet. Refer servicing to qualified personnel only. Do not install the appliance in a confined space, such as a bookcase or built-in cabinet. This appliance is classified as a CLASS 1 LASER product. The CLASS 1 LASER PRODUCT MARKING is located on the rear exterior.
NOTICE FOR THE CUSTOMERS IN CANADA CAUTION: TO PREVENT ELECTRIC SHOCK, DO NOT USE THIS POLARIZED AC PLUG WITH AN EXTENSION CORD, RECEPTACLE OR OTHER OUTLET UNLESS THE BLADES CAN BE FULLY INSERTED TO PREVENT BLADE EXPOSURE.
Table of Contents This system can play the following discs .. 6 Parts Identification Main unit ............................................... 7 Remote control ...................................... 9 Getting Started Hooking up the system ........................ 10 Inserting two size AA (R6) batteries into the remote .............................. 13 Multi channel surround setup .............. 14 Setting the time .................................... 17 Saving the power in standby mode ......
Tuner Presetting radio stations ....................... 42 Listening to the radio — Preset Tuning ........................... 42 Using the Radio Data System (RDS)* .......................................... 43 Tape Loading a tape ..................................... 44 Playing a tape ...................................... 44 Recording to a tape — CD Synchro Recording/ High-Speed Dubbing/Recording Manually/Program Edit ................. 45 Timer-recording radio programs .........
This system can play the following discs DVD VIDEOs Audio CDs VIDEO CDs Disc logo Contents Audio + Video Audio Audio + Video The “DVD VIDEO” logo is a trademark.
Parts Identification The items are arranged in alphabetical order.
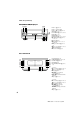
Main unit (continued) DVD/VIDEO CD/CD player es ed wl e;ea 1 rd 2 3 rs m M . > H S ef eg x r; ek eh ra el ej DISC 1–3 rd (25, 26) DISC 1–3 indicators rs DISC 1–3 Z (eject) ea (25, 26) NEXT el (26, 27) PLAY MODE wl (25, 28, 29, 46) PREV ra (26, 27) REPEAT e; (12, 30) RETURN O ej (12, 27, 39, 40) N SELECT (play) r; (25–27, 41, 55, 60) X (pause) ek (26) x (stop) eh (12, 26, 27, 30, 38, 45, 55, 61) .
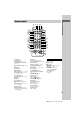
Remote control rl rk rj rh rg rf rd rs ra r; el ek ej eh eg ef ed es ea e; wl 6 7 O nN x . > m M X c C t T 8 9 q; qa qs qd qf qg qh qj qk ql w; wa ws wd wf Parts Identification 1 2 345 V wk B b wg v wh wj ANGLE es (37) AUDIO ws (34) CLEAR qs (22, 29, 30, 36) CLOCK/TIMER SELECT 3 (47, 56) CLOCK/TIMER SET 2 (17, 47, 56) DBFB ra (48) D.
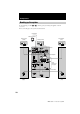
Getting Started Hooking up the system Do the following procedure 1 to qa to hook up your system using the supplied cords and accessories. Before connecting, place the system as described below.
1 Connect the DVD/VIDEO CD/CD player and the tuner with the optical cable. FROM DVP-S9 Getting Started Connect from the OPTICAL OUT jack on the DVD/VIDEO CD/CD player to the OPTICAL IN jack on the tuner. 1 Remove the cover of the jack. To disconnect SYSTEM CONTROL 3 OPTICAL IN FROM DVP-S9 3 Connect the front speakers. Connect the speaker cords to the FRONT SPEAKER jacks. Insert only the stripped portion. R 2 Connect the optical cable.
Hooking up the system (continued) 8 For models with a voltage selector, set VOLTAGE SELECTOR to the position of your local power line voltage. 6 Connect the FM/AM antennas. Set up the AM loop antenna, then connect it. 220V 120V 9 Connect the power cord of the DVD/ VIDEO CD/CD player to the A/V amplifier. Jack type A AM loop antenna VOLTAGE SELECTOR 230-240V AM 0 Connect the power cord to a wall outlet. FM 75 Extend the FM lead antenna horizontally.
Tip You can place the components as described below. In this case, place the components first, then connect the components. DVD/VIDEO CD/CD player Getting Started Tuner Inserting two size AA (R6) batteries into the remote ] } ] A/V Amplifier Cassette deck } Operating a Sony TV To attach the center and rear speaker pads You can use the following buttons on the remote to operate a Sony TV.
Multi channel surround setup For the best possible surround sound, all speakers should be the same distance from the listening position (A). However, this unit lets you to place the center speaker up to 1.5 meters closer (B) and the rear speakers up to 4.5 meters closer (C) to the listening position. The front speakers can be placed from 1.0 to 12.0 meters from the listening position (A). You can place the rear speakers either behind you or to the side, depending on the shape of your room (etc.).
x Rear speaker position (R.PL.)* • Select “SIDE” if the location of your rear speakers corresponds to section A. • Select “MIDDLE” if the location of your rear speakers corresponds to section B. • Select “BEHIND” if the location of your rear speakers corresponds to section C. This setting only effects the surround modes in the “VIRTUAL” sound fields (“VIRTUAL” indicator in the display lights up). The bass frequencies are effectively reproduced from the speakers.
Multi channel surround setup (continued) x Front speaker distance (F.DIST.) Set the distance from your listening position to the front (left or right) speaker (A on page 14). x Center speaker distance (C.DIST.) Set the distance from your listening position to the center speaker (B on page 14). x Rear speaker distance (R.DIST.) Set the distance from your listening position to the rear (left or right) speaker (C on page 14). Tip This unit allows you to input the speaker position in terms of distance.
Setting the time Getting Started 1 Turn on the system. 2 Press CLOCK/TIMER (or CLOCK/TIMER SET on the remote). When you set the time for the first time, proceed to step 5. 3 Press O or o repeatedly to select “CLOCK SET”. 4 Press ENTER (A/V amplifier or remote). 5 Press O or o repeatedly to set the hour. 6 Press ENTER (A/V amplifier or remote). 7 Press O or o repeatedly to set the minutes. 8 Press ENTER (A/V amplifier or remote).
Setting Up for DVD/VIDEO CD/CD Using the Setup Display By using the Setup Display, you can make various adjustments to items such as picture and sound. You can also set a language for the subtitles and the Setup Display, among other things. For details on each Setup Display item, see pages 18–24. For an overall list of Setup Display items, see page 71. The North American model is the model used for OSD (on-screen display) illustration purposes in this section. Use the remote for the operation.
To turn off the Setup Display x SUBTITLE (DVD only) Press DVD SET UP or DVD DISPLAY repeatedly until the Setup Display is turned off. Switches the language of the subtitle. Select the language from the displayed list.* When you select “AUDIO FOLLOW”, the language for the subtitles changes according to the language you selected for the sound track.
Settings for the display — SCREEN SETUP Select settings according to the connected TV. Select “SCREEN SETUP” in the Setup Display. SCREEN SETUP TV TYPE: SCREEN SAVER: BACKGROUND: 16:9 ON JACKET PICTURE x SCREEN SAVER Turn on and off the screen saver. If you turn on the screen saver, the screen saver image appears when you leave the player in pause or stop mode for 15 minutes or when you play a CD for more than 15 minutes.
x PARENTAL CONTROL t (DVD only) Custom settings — CUSTOM SETUP Select “CUSTOM SETUP” in the Setup Display. Set a password and playback limitation level for DVDs with playback limitation for children. For details, see “Limiting playback by children (Parental Control)” on page 39.
Notes Speaker settings • When you select an item, the sound cuts off for a moment. • Depending on the settings of other speakers, the subwoofer may output excessive sound. — SPEAKER SETUP Set up your speaker system for playback of 5.1CH DVDs. Select “SPEAKER SETUP” in the Setup Display.
x DISTANCE x BALANCE The default distance settings for the speakers in relation to the listening position is shown below. You can vary the balance of the left and right speakers as follows. Be sure to set “TEST TONE” to “ON” for easy adjustment. The default settings are in parentheses. 2.4m 2.4m • REAR (0): Adjust the balance between the rear left and right speakers. (You can adjust from center in 6 steps to left or right.) x LEVEL 1.5m 1.5m You can vary the level of each speakers as follows.
Speaker settings (continued) Adjusting the speaker volume and level 1 When the playback is stopped, press DVD SET UP, then select “SPEAKER SETUP”. 2 Select “TEST TONE” and set “TEST TONE” to “ON”. You will hear the test tone from each speaker in sequence. 3 From your listening position, select “BALANCE” or “LEVEL”, then press p or P repeatedly to adjust the value of “BALANCE”, or press o or O repeatedly to adjust the value of “LEVEL”.
DVD/VIDEO CD/CD When playing a VIDEO CD or CD: Playing discs Disc tray number Loading a disc Track number Playing time MIN SEC 1 Press one of the DISC 1–3 Z buttons. The disc tray slides out. 1 Turn on your TV and select the video 2 Place a DVD/VIDEO CD/CD with the input. When you play a DVD/VIDEO CD/ CD single, place it on the inner circle of the tray. 1 2 3 m M . > H S x MODE repeatedly until the mode you want appears in the display.
Playing a disc (continued) *1 *2 There may be some disturbance in the video image. DVD and VIDEO CD only. SLOW t and STEP c are not available during playback of VIDEO CDs. Other operations *3 To Do this Notes Stop playback Press x (DVD/VIDEO CD/ CD). The playback stops at the point x is pressed (Resume Play). Press x again to cancel the Resume Play (see page 30). Pause playback Press X*1. Press again to resume playback.
Playing DVDs using the menu Some discs have a “title menu” or a “DVD menu”. On some DVDs, this may simply be called a “menu” or “title”. Using the title menu — PBC Play You can use menus on your TV screen to enjoy the disc’s interactive software. The menu format and structure may differ depending on each disc. 1 Turn FUNCTION to select “DVD”. 2 Press N SELECT (or SELECT DVD N on the remote) to start playing a VIDEO CD with PBC functions (Ver. 2.0).
Playing VIDEO CDs with PBC functions (Ver. 2.0) (continued) To Do this Cancel playback with PBC functions (Ver. 2.0) When the playback is stopped, press . or > (DVD/VIDEO CD/CD) repeatedly to select the track you want, then press ENTER (A/V amplifier or remote) (or press the numeric buttons on the remote). The PBC indicator turns off and playback starts from the selected track. Still images, such as the menu screens, will not be shown.
5 Select the title, chapter, or track you want to program. x When programming a DVD For example, select chapter “03” of title “02”. Press O/o or the numeric buttons to select “02” under “T”, then press ENTER. PROGRAM 3 : DVD T C ALL 01 02 03 04 05 ALL 01 02 03 04 05 06 Do this Return to normal playback Press CLEAR during playback. Turn off the Program Press PLAY MODE when the Display playback is stopped.
Resuming playback from the point you stopped the disc — Resume Play This system memorizes the point where you stopped the disc so you can resume from that point. 1 While playing a disc, press x (DVD/ VIDEO CD/CD) to stop playback. “RESUME” appears in the display. If “RESUME” does not appear, Resume Play is not available. 2 Press N SELECT (or SELECT DVD N on the remote). The player starts playback from the point you stopped the disc in step 1.
Viewing information about the disc Tip You can quickly change the “REPEAT” setting by pressing REPEAT. Notes • You cannot perform Repeat Play during PBC playback of VIDEO CDs (page 27). • You may not be able to perform Repeat Play depending on the DVD. • If you select DISC repeat (with or without Program Play), the program is repeated up to 5 times. Checking the playing time and remaining time You can check the remaining time of the current track or that of the disc.
Checking the playing time and remaining time (continued) x When playing a VIDEO CD (with PBC functions) When the playback is stopped • **:** Playing time of the current scene DVDs: Total number of titles*3 t Title name of the disc*1 t Clock display (for 8 seconds) t Effect status VIDEO CDs or CDs: Total number of tracks and the total playing time*3 t Title name of the disc*1 t Clock display (for 8 seconds) t Effect status x When playing a VIDEO CD (without PBC functions) or CD • T **:** Playing time of
Checking the playback information Displays of each item By pressing DVD DISPLAY repeatedly, you can display either “BIT RATE” or “LAYER”, whichever was selected in “ADVANCED”. — ADVANCED BIT RATE (DVD only) BIT RATE 1 Press DVD DISPLAY during playback. The Control Menu appears. “ADVANCED”, then press ENTER. The options for “ADVANCED” appear.
Sound adjustment Changing the sound If a DVD is recorded with multilingual tracks, you can select the language you want while playing the DVD. If the DVD is recorded in multiple audio formats (PCM, Dolby Digital, MPEG audio, or DTS), you can select the audio format you want while playing the DVD. With stereo CDs or VIDEO CDs, you can select the sound from the right or left channel and listen to the sound of the selected channel through both the right and left speakers.
** The letters in the program format display mean the following sound component: L: Front (left) R: Front (right) C: Center LS: Rear (left) RS: Rear (right) S: Rear (monaural): The rear component of the Dolby Surround processed signal or the Dolby Digital signal. LFE: LFE (Low Frequency Effect) • DTS “LFE” is always enclosed in a solid line regardless of the LFE signal component being output. PROGRAM FORMAT DTS 3/2.
Enjoying movies Searching for a title/ chapter/track/index/scene You can search a DVD disc by title or chapter, and you can search a VIDEO CD or CD by track, index, or scene. As titles and tracks are assigned unique numbers on the disc, you can select the desired one by entering its number. Or, you can search for a scene using the time code (TIME SEARCH). 1 Turn FUNCTION to select “DVD”. 2 Press DVD DISPLAY. The Control Menu appears. 3 Press O or o repeatedly to select the search method.
Changing the angles Displaying the subtitles (DVD only) When playing a DVD on which various angles (multi-angles) for a scene are recorded, the “ANGLE” indicator lights in green. This means that you can change the viewing angle. For example, while playing a scene of a train in motion, you can display the view from either the front of the train, the left window of the train or from the right window without having the train’s movement interrupted.
Using various additional functions Locking discs — CUSTOM PARENTAL CONTROL/ PARENTAL CONTROL You can set two kinds of playback restrictions for the disc. • Custom Parental Control You can set the playback restrictions so that the system will not play inappropriate discs. You can set the same Custom Parental Control password for up to 50 discs. When you set the fifty-first disc, the playback restriction for the first disc is canceled.
If you make a mistake Press RETURN O, then start from step 3 again. Limiting playback by children (Parental Control) (DVD only) To turn off the Control Menu Press RETURN O, then press DVD DISPLAY repeatedly until the Control Menu is turned off. 1 In step 4, select “OFF t”, then press ENTER. 2 Enter your 4-digit password using the numeric buttons, then press ENTER. To change the password 1 In step 4, Press O or o repeatedly to select DVD SET UP. The Control Menu appears.
8 Press O or o repeatedly to select the Locking discs (continued) level you want, then press ENTER. 4 Enter or re-enter your 4-digit password using the numeric buttons, then press ENTER. The display for setting the playback limitation level and changing the password appears. The Parental Control setting is completed.
Playing the disc for which Parental Control is set Area code Code Standard number Argentina 2044 Korea 2304 Australia 2047 Malaysia 2363 Austria 2046 Mexico 2362 Belgium 2057 Netherlands 2376 Brazil 2070 New Zealand 2390 Canada 2079 Norway 2379 Chile 2090 Pakistan 2427 China 2092 Philippines 2424 Denmark 2115 Portugal 2436 Finland 2165 Russia 2489 France 2174 Singapore 2501 Germany 2109 Spain 2149 Hong Kong 2219 Sweden 2499 India 2248 Switzerland 2086
Tuner Presetting radio stations You can preset 20 stations for FM and 10 stations for AM. 1 Press TUNER/BAND repeatedly to select FM or AM. 2 Press and hold TUNING + or – until “AUTO” appears in the display. Scanning stops when the system tunes in a station. “TUNED” and “STEREO” (for a stereo program) appear. MHz 3 Press TUNER MEMORY. A preset number appears in the display. The stations are stored from preset number 1.
Tips • When an FM program is noisy, press STEREO/ MONO so that “MONO” appears in the display. There will be no stereo effect, but the reception will improve. • To improve broadcast reception, reorient the antennas. Using the Radio Data System (RDS) (European model only) Radio Data System (RDS) is a broadcasting service that allows radio stations to send additional information along with the regular program signal.
Tape Tip When you want to reduce the hiss noise in low-level high-frequency signals, press DOLBY NR so that “DOLBY NR” appears in the display. Loading a tape 1 Press Z (Deck A or B). 2 Insert a tape in deck A or B. Insert with the side you want to play/record facing forward. h AUTO REVERSE H Searching for the beginning of a track (AMS*) During playback, press . or > (Deck A or B) repeatedly for the number of songs you want to skip forward (or backward). M > m .
Recording to a tape — CD Synchro Recording/High-Speed Dubbing/Recording Manually/Program Edit You can record from a DVD, VIDEO CD, CD, tape, radio or other connected component. You can use TYPE I (normal) or TYPE II (CrO2) tapes. The recording level is adjusted automatically. Steps Recording from a VIDEO CD/CD (CD Synchro Recording) Recording from a tape (High-Speed Dubbing) Recording manually Insert a recordable tape into deck B. 2 Turn FUNCTION to select “DVD”. Turn FUNCTION to select “TAPE A”.
Recording to a tape (continued) Recording a VIDEO CD/CD by specifying the track order — Program Edit 5 Select the track you want to program. For example, select track “02”. Press O/o or the numeric buttons to select “02” under “T”, then press ENTER. Selected track PROGRAM –: –––– When programming, make sure the playing times for each side do not exceed the length of one side of the tape. 1 Insert a recordable tape into deck B, ALL CLEAR 1. CD – 02 2. – – – – 3. – – – – 4. – – – – 5. – – – – 6.
Timer-recording radio programs To timer-record, you must set the clock (see “Setting the time” on page 17) and preset the radio stations (see “Presetting radio stations” on page 42) beforehand. 1 Tune in the preset radio station (see To Do this Check the setting Press TIMER SELECT (or CLOCK/TIMER SELECT on the remote) and press O or o repeatedly to select “REC SELECT”, then press ENTER (A/V amplifier or remote). Change the setting Start over from step 1.
Sound Adjustment Tips Adjusting the sound To reinforce bass (DBFB*) Press DBFB on the remote. Each time you press the button, the display changes as follows: DBFB ON y DBFB OFF * Dynamic Bass Feedback For a powerful sound Press GROOVE on the remote. Each time you press the button, the display changes cyclically as follows: GROOVE t V-GROOVE t OFF GROOVE: The volume switches to power mode and the equalizer curve changes. DBFB is automatically set to full strength.
x Virtual Multi Dimension (V.M.DIMENS.)2) x ARENA3) Uses 3D sound imaging to create an array of virtual rear speakers positioned higher than the listener from a single pair of actual rear speakers. This mode creates 5 sets of virtual speakers surrounding the listener at approximately a 30° angle of elevation. Reproduces the acoustics of a 1000-seat concert hall. x Virtual Semi Multi Dimension (V.SEMI M.D.
Understanding the multi channel surround displays L C R SL S SR 3 By adjusting the surround parameters and the equalization of the front speakers, you can customize the sound fields to suit your particular listening situation. Once you customize a sound field, the changes are stored in the memory indefinitely (unless the unit is unplugged for half a day). You can change a customized sound field any time by making new adjustments to the parameters.
2 When the SUR button lights up, press SUR. The button starts blinking and the first parameter is displayed. 3 Press P or p repeatedly to select the parameter you want to adjust. 4 Press O or o repeatedly to select the setting you want. The setting is stored. 5 Press ENTER (A/V amplifier or remote). The SUR button lights up. See the table on page 73 for the surround parameters. Adjusting the level parameters The SP.
Customizing sound fields (continued) Adjusting the equalizer x LFE (Low Frequency Effect) mix level (LFE) The EQ menu lets you adjust the equalization (low, mid, and high frequencies) of the front speakers. The equalizer settings are stored individually for each sound field.
To turn on/off the equalizer Press EQ ON/OFF. The EQ indicator in the display lights up when the equalizer is turned on. When you adjust the equalizer using the EQ parameters, the settings are stored separately for each sound field and can be reproduced whenever you turn on the equalizer. x Front speaker bass (BASS) (Gain/Frequency) Lets you adjust the gain and frequency of bass. x Front speaker midrange (MID) (Gain/Frequency) Lets you adjust the gain and frequency of midrange.
Other Features 3 Press KARAOKE PON on the remote. Each time you press the button, the display changes cyclically as follows: Changing the spectrum analyzer display KARAOKE PON t MPX R t MPX L t Effect status* Press SPECTRUM ANALYZER on the remote (or press and hold DISPLAY on the unit for more than 2 seconds). * KARAOKE PON is cancelled. To sing karaoke by decreasing the vocal level of a VIDEO CD/CD or a tape, select “KARAOKE PON”. To sing karaoke of multiplex CD, select “MPX R” or “MPX L”.
Notes Tips • With some songs, vocals may not be canceled when you select “KARAOKE PON”. • If you recall a sound effect, the karaoke mode is canceled. • The sound effect is canceled when “KARAOKE PON”, “MPX R”, or “MPX L” is selected. When the karaoke effect is canceled, the sound effect before entering the karaoke effect is applied again. • The instrumental sound may be reduced as well as the singer’s voice when the sound is recorded in monaural.
Waking up to music 7 Press O or o repeatedly until the music source you want appears. The indications change as follows: t TUNER y DVD PLAY T — Daily Timer You can wake up to music at a preset time every day. Make sure you have set the clock (see “Setting the time” on page 17). t TAPE PLAY T 8 Press ENTER (A/V amplifier or remote). The type of timer (“DAILY 1” or “DAILY 2”), followed by the start time, stop time and the music source, appears, then the original display appears.
Hooking Up the Optional Components Notes Connecting audio components To connect audio components, connect to the jacks on the rear panel of the tuner. To the digital input jack of an MD deck To subwoofer • Make sure to match the color of the plugs and the connectors. • Digital signals are output from DIGITAL OUT jack during CD or DIGITAL function only. Besides, the sound output from the DIGITAL OUT jack is not affected by the sound adjustment.
Additional Information Notes on discs Precautions On operating voltage Before operating the unit, check that the operating voltage of your unit is identical with the voltage of your local power supply. On safety • The unit is not disconnected from the AC power source (mains) as long as it is connected to the wall outlet, even if the unit itself has been turned off. • Unplug the unit from the wall outlet (mains) if it is not to be used for an extended period of time.
To save a tape permanently Demagnetizing the tape heads To prevent a tape from being accidentally recorded over, break off the cassette tab from side A or B as illustrated. If you later want to reuse the tape for recording, cover the broken tab with adhesive tape. However, be careful not to cover the detector slots which allow the tape player to automatically detect the type of tape.
Troubleshooting (continued) “--:--” lights up in the display. • A power interruption occurred. Set the clock and timer settings again. The radio presetting is canceled. • The power cord is disconnected or a power failure occurs for longer than half a day. Redo “Presetting radio stations” (page 42). The timer does not function. • Set the clock correctly. • You cannot activate the Daily timer and the Timer-recording simultaneously. There is no sound. • Turn VOLUME clockwise.
Speakers DVD/VIDEO CD/CD Player Sound comes from only one channel or unbalanced left and right volume. The disc tray does not close. • Check the speaker connection and speaker placement. • The source being played back is monaural. • Adjust the balance parameters (pages 23, 51). The sound comes from the center speaker only. • Depending on the disc, the sound may come from the center speaker only. There is no sound from the center speaker. • Set the center speaker level to the appropriate level.
Troubleshooting (continued) Picture There is no picture. • Turn FUNCTION to select “DVD”. • Check that the system is connected securely. • The video cable is damaged. Replace it with a new one. • Make sure you connect the system to the video input jack of your TV (page 12). • Make sure you turn on the TV. • Make sure you select the video input on the TV so that you can view the pictures from the system. The picture noise appears. • Clean the disc.
Cassette Deck If other troubles not described above occur, reset the system as follows: The tape does not record. 1 While holding down DIGITAL, press • The tab has been removed from the cassette (see “To save a tape permanently” on page 59). • The tape has reeled to the end. The tape does not record nor play, or there is a decrease in sound level. • The heads are dirty (see “Cleaning the tape heads” on page 59). • The record/playback heads are magnetized (see “Demagnetizing the tape heads” on page 59).
Specifications AUDIO POWER SPECIFICATIONS: (USA model only) POWER OUTPUT AND TOTAL HARMONIC DISTORTION with 6 ohm loads both channels driven, from 120 Hz – 10 kHz; rates 120 watts per channel minimum RMS power, with no more than 10% total harmonic distortion from 250 milliwatts to rated output.
Inputs VIDEO (AUDIO) IN: voltage 250 mV, (phono jacks) impedance 47 kilohms MD IN: voltage 450 mV, (phono jacks) impedance 47 kilohms OPTICAL IN: (Square optical connector jacks, rear panel) MIC: sensitivity 1 mV, (Except for North impedance 10 kilohms American and European models) (phone jack) Tape player section Outputs MD OUT: (phono jacks) VIDEO OUT: (phono jack) Tuner section S-VIDEO OUT: (4-pin/mini-DIN jack) PHONES: (stereo mini jack) FRONT SPEAKER: REAR SPEAKER: CENTER SPEAKER: SUB WOOFER OUT:
Specifications (continued) Speaker Front speaker SS-S90D for MHC-S90D Front speaker SS-S9 for MHC-S9D Speaker system 3-way, 3-unit, bass-reflex type, magnetically shielded type Speaker units Woofer: 15 cm, cone type Subwoofer: 15 cm, cone type Tweeter: 2.8 cm, dome type Nominal impedance 6 ohms Dimensions (w/h/d) Approx. 235 x 470 x 265 mm Mass Approx. 7.
Glossary Dolby Pro Logic Surround Value indicating the amount of video data compressed in a DVD per second. The unit is Mbps (Mega bit per second). 1 Mbps indicates that the data per second is 1,000,000 bits. The higher the bit rate is, the larger the amount of data. However, this does not always mean that you can get higher quality pictures. As one method of decoding Dolby Surround, Dolby Pro Logic Surround produces four channels from two-channel sound.
Glossary (continued) Index (CD) / Video Index (VIDEO CD) A number that divides a track into sections to easily locate the point you want on a VIDEO CD or a CD. Depending on the disc, no indexes may be recorded. Scene On a VIDEO CD with PBC functions (page 27), the menu screens, moving pictures, and still pictures are divided into sections called “scenes”. Each scene is assigned a scene number enabling you to locate the scene you want.
Language code list For details, see pages 19, 34 and 37. The language spellings conform to the ISO 639: 1988 (E/F) standard.
Control Menu Item List Control Menu Items Function TITLE (DVD only) SCENE (VIDEO CD in PBC Playback only) TRACK (VIDEO CD only) Selects the title (DVD), the scene (VIDEO CD in PBC Playback), or the track (VIDEO CD) to be played. CHAPTER (DVD only) INDEX (VIDEO CD only) Selects the chapter (DVD) or the index (VIDEO CD) to be played. TRACK (CD only) Selects the track to be played. INDEX (CD only) Selects the index to be played. TIME/TEXT Checks the elapsed time and the remaining playback time.
Setup Display Item List You can set the following items in the Setup Display. The order of the displayed items may be different from the actual display. LANGUAGE – OSD (Select the language you want to use from the displayed language list.) (Select the language you want to use from the displayed language list.) – AUDIO (Select the language you want to use from the displayed language list. When you select ORIGINAL, you can enjoy the language given priority on the disc.
Setup Display Item List (continued) SPEAKER – SIZE CENTER YES – NONE – REAR BEHIND (LOW) – BEHIND (HIGH) – MIDDLE (LOW) – MIDDLE (HIGH) – SIDE (LOW) – SIDE (HIGH) – NONE – SUBWOOFER YES – NONE – DISTANCE FRONT – CENTER – REAR – BALANCE FRONT – REAR – LEVEL CENTER – REAR – SUBWOOFER – TEST TONE OFF – ON 1m – 12m FRONT – 1.5m FRONT – 4.
Table for the settings using SUR, EQ, and SET UP buttons SUR parameters (Press SUR) Press P or p Press O or o Initial setting Page EFFECT [XX] depends on sound field depends on sound field 50 WALL S/H [X] S (–8) to H (+8) midpoint REVERB S/L [X] S (–8) to L (+8) midpoint EQ parameters (Press EQ) FRONT BASS MID GAIN Press P or p Press O or o Page BASS [XXX] dB –8 dB to +8 dB 52 99 Hz to 1.
Adjustable parameters for each sound field The adjusted SUR and EQ parameters are stored in each sound field. The adjusted SP. LEVEL parameters are applied to all of the sound fields. < SUR EFFECT LEVEL > WALL TYPE REVERB 2CH STEREO A.F.D. NORMAL SURR. C.STUDIO A z C.STUDIO B z C.STUDIO C z V.M.DIMENS. V.SEMI M.D.
< SP. LEVEL FRONT REAR BALANCE BALANCE REAR LEVEL CENTER LEVEL > SUB WOOFER LEVEL LFE* D.COMP.* 2CH STEREO z z z z A.F.D. z z z z z z z NORMAL SURR. z z z z z z z C.STUDIO A z z z z z z z C.STUDIO B z z z z z z z C.STUDIO C z z z z z z z V.M.DIMENS. z z z z z z z V.SEMI M.D.
Adjustable parameters for each sound field (continued) < EQ > FRONT BASS (dB) FRONT BASS (Hz) FRONT MID (dB) FRONT MID (Hz) FRONT TREB (dB) FRONT TREB (Hz) 2CH STEREO z z z z z z A.F.D. z z z z z z NORMAL SURR. z z z z z z C.STUDIO A z z z z z z C.STUDIO B z z z z z z C.STUDIO C z z z z z z V.M.DIMENS. z z z z z z V.SEMI M.D.