ame[E:\SEM_Janet\Revision a\J9050000_4238553141MDSJE480CEL\4238553141\GB01COV-CEL.fm] masterpage:Right GB02REG-CEL.book Page 1 Wednesday, July 13, 2005 2:56 PM 4-238-553-14(1) MiniDisc Deck Operating Instructions Owner’s Record The model and serial numbers are located at the rear of the unit. Record the serial number in the space provided below. Refer to them whenever you call upon your Sony dealer regarding this product. Model No.____________ Serial No.
lename[E:\SEM_Janet\Revision Data\J9050000_4238553141MDSJE480CEL\4238553141\GB02REG-CEL.fm] masterpage:Left (3 column) GB02REG-CEL.book Page 2 Wednesday, July 13, 2005 2:56 PM WARNING To reduce the risk of fire or electric shock, do not expose this apparatus to rain or moisture. To prevent fire, do not cover the ventilation of the apparatus with newspapers, table-cloths, curtains, etc. And don’t place lighted candles on the apparatus.
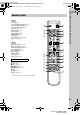
lename[E:\SEM_Janet\Revision Data\J9050000_4238553141MDSJE480CEL\4238553141\GB02REG-CELTOC.fm] GB02REG-CEL.book Page 3 Wednesday, July 13, 2005 2:56 PM masterpage:Left (3 column) Table of Contents List of Button Locations and Reference Pages Main unit................................................. 4 Remote control........................................ 5 Getting Started Hooking up the audio components ......... 6 Recording to MDs Recording to an MD................................8 Notes on recording.
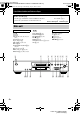
lename[E:\SEM_Janet\Revision Data\J9050000_4238553141MDSJE480CEL\4238553141\GB03PAR-CEL.fm] masterpage:Left (3 column) GB02REG-CEL.book Page 4 Wednesday, July 13, 2005 2:56 PM List of Button Locations and Reference Pages How to use this page Use this page to find the location and buttons and other parts of the system that are mentioned in the text.
lename[E:\SEM_Janet\Revision Data\J9050000_4238553141MDSJE480CEL\4238553141\GB03PAR-CEL.fm] masterpage:Left (3 column) GB02REG-CEL.
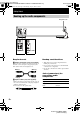
lename[E:\SEM_Janet\Revision Data\J9050000_4238553141MDSJE480CEL\4238553141\GB04GET-CEL.fm] masterpage:Left (3 column) GB02REG-CEL.book Page 6 Wednesday, July 13, 2005 2:56 PM Getting Started Hooking up the audio components AC power cord to a wall outlet A Amplifier, etc. B CD player, DBS tuner Required cords Hookup considerations A Audio connecting cords (2) (supplied) • Turn off the power of all components before making any connections.
lename[E:\SEM_Janet\Revision Data\J9050000_4238553141MDSJE480CEL\4238553141\GB04GET-CEL.fm] GB02REG-CEL.book Page 7 Wednesday, July 13, 2005 2:56 PM masterpage:Left (3 column) Other connections Getting Started To connect the AC power cord Connect the AC power cord of the deck to a wall outlet. Note If you use a timer, connect the AC power cord to the outlet of the timer.
lename[E:\SEM_Janet\Revision Data\J9050000_4238553141MDSJE480CEL\4238553141\GB05OPE-CEL.fm] masterpage:Left (3 column) GB02REG-CEL.book Page 8 Wednesday, July 13, 2005 2:56 PM Recording to MDs Recording to an MD If the MD has been partially recorded, recording starts after the recorded tracks. 1 Turn on the amplifier and program source, and select the source on the amplifier. 2 Press ?/1 to turn on the deck. The STANDBY indicator turns off. 3 Load a recordable MD into the slot (page 15).
lename[E:\SEM_Janet\Revision Data\J9050000_4238553141MDSJE480CEL\4238553141\GB05OPE-CEL.fm] masterpage:Left (3 column) GB02REG-CEL.book Page 9 Wednesday, July 13, 2005 2:56 PM To prevent accidental erasure of the recorded material Record-protect tab on page 8. Tips • The MDLP indicator lights up when you select LP2 or LP4 in step 2 above. • The deck is factory set to add “LP:” at the beginning of a track name automatically.
lename[E:\SEM_Janet\Revision Data\J9050000_4238553141MDSJE480CEL\4238553141\GB05OPE-CEL.fm] masterpage:Left (3 column) GB02REG-CEL.book Page 10 Wednesday, July 13, 2005 2:56 PM Recording tips (continued) Marking track numbers while recording — Manual/Automatic Track Marking You can mark track numbers either manually or automatically while recording. By marking track numbers at specific points, you can easily locate the points later or edit the MD.
lename[E:\SEM_Janet\Revision Data\J9050000_4238553141MDSJE480CEL\4238553141\GB05OPE-CEL.fm] masterpage:Left (3 column) GB02REG-CEL.book Page 11 Wednesday, July 13, 2005 2:56 PM Auto Cut: When the Smart Space function is on, if there is no sound input for 30 seconds or more, the deck replaces this silence with a blank space of about 3 seconds and enters recording pause. No sound input for 30 seconds or more Off On Tip You can mark track numbers even after recording has finished.
lename[E:\SEM_Janet\Revision Data\J9050000_4238553141MDSJE480CEL\4238553141\GB05OPE-CEL.fm] masterpage:Left (3 column) GB02REG-CEL.book Page 12 Wednesday, July 13, 2005 2:56 PM Recording tips (continued) Adjusting the recording level You can adjust the recording level for both analog and digital recordings. 1 Do steps 1 to 5 of “Recording to an MD” on page 8. 2 Play the portion of the program source with the strongest output.
lename[E:\SEM_Janet\Revision Data\J9050000_4238553141MDSJE480CEL\4238553141\GB05OPE-CEL.fm] masterpage:Left (3 column) GB02REG-CEL.book Page 13 Wednesday, July 13, 2005 2:56 PM Starting recording with 6 seconds of prestored audio data Synchro-recording with the audio component of your choice — Music Synchro-recording When recording from an FM or satellite broadcast, the first few seconds of material are often lost due to the time it takes you to ascertain the contents and press the record button.
lename[E:\SEM_Janet\Revision Data\J9050000_4238553141MDSJE480CEL\4238553141\GB05OPE-CEL.fm] GB02REG-CEL.book Page 14 Wednesday, July 13, 2005 2:56 PM Synchro-recording with a Sony CD player (continued) 4 Press CD-SYNCHRO STANDBY on the remote. The CD player changes to play standby and the MD deck changes to recording standby. 5 Press CD-SYNCHRO START on the remote. The deck starts recording and the CD player starts to play. The track number and elapsed recording time of the track appear in the display.
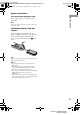
lename[E:\SEM_Janet\Revision Data\J9050000_4238553141MDSJE480CEL\4238553141\GB05OPE-CEL.fm] masterpage:Left (3 column) GB02REG-CEL.book Page 15 Wednesday, July 13, 2005 2:56 PM Playing MDs Repeat Play Operations Loading an MD Load an MD as illustrated below. With the label side up Playing an MD — Normal Play/Shuffle Play/Repeat Play 1 Turn on the amplifier and select MD on Do this Repeat only one track Press REPEAT repeatedly until “REP1” lights up in the display.
lename[E:\SEM_Janet\Revision Data\J9050000_4238553141MDSJE480CEL\4238553141\GB05OPE-CEL.fm] masterpage:Left (3 column) GB02REG-CEL.book Page 16 Wednesday, July 13, 2005 2:56 PM Playing an MD (continued) Examples: Other Operations • To select track number 30 on an MD recorded with 50 tracks, press >10, then 3 and 10/0. • To select track number 30 on an MD recorded with 200 tracks, press >10, then 10/0, 3 and 10/0. To Do this Stop play Press x. Pause play Press X.
lename[E:\SEM_Janet\Revision Data\J9050000_4238553141MDSJE480CEL\4238553141\GB05OPE-CEL.fm] masterpage:Left (3 column) GB02REG-CEL.book Page 17 Wednesday, July 13, 2005 2:56 PM Editing Recorded MDs To clear the last entered track Press CLEAR to erase the track number. Before editing To enter a track number over 10 You can edit an MD only when: Use >10. See this page for details. • The MD is recordable. • The MD play mode is normal play. 3 Repeat step 2 to enter other tracks. 4 Press N.
lename[E:\SEM_Janet\Revision Data\J9050000_4238553141MDSJE480CEL\4238553141\GB05OPE-CEL.fm] masterpage:Left (3 column) GB02REG-CEL.book Page 18 Wednesday, July 13, 2005 2:56 PM Erasing all the tracks Erasing recordings — All Erase Function — Erase Function The MD deck lets you erase unwanted tracks quickly and easily.
lename[E:\SEM_Janet\Revision Data\J9050000_4238553141MDSJE480CEL\4238553141\GB05OPE-CEL.fm] masterpage:Left (3 column) GB02REG-CEL.book Page 19 Wednesday, July 13, 2005 2:56 PM 4 While monitoring the sound, press PUSH ENTER or YES at the starting point of the portion to be erased (point A). “-Rehearsal-” and “Point A ok?” alternate in the display and the deck repeatedly plays a few seconds of the track before the point A. 5 Press PUSH ENTER or YES again if point A is correct.
lename[E:\SEM_Janet\Revision Data\J9050000_4238553141MDSJE480CEL\4238553141\GB05OPE-CEL.fm] masterpage:Left (3 column) GB02REG-CEL.book Page 20 Wednesday, July 13, 2005 2:56 PM Dividing recorded tracks (continued) 5 Press PUSH ENTER or YES again if the dividing point is correct. “Complete!” appears and the deck starts to play the newly created track. Note that new track has no name. If the dividing point is not correct, adjust the point by turning AMS (or press .
lename[E:\SEM_Janet\Revision Data\J9050000_4238553141MDSJE480CEL\4238553141\GB05OPE-CEL.fm] masterpage:Left (3 column) GB02REG-CEL.book Page 21 Wednesday, July 13, 2005 2:56 PM Moving recorded tracks — Move Function You can use this function to change the order of any track on the disc. When you move tracks, the tracks are automatically renumbered. Naming a track or an MD using the controls on the deck 1 While the deck is stopped, playing, recording, or paused, press MENU/NO.
lename[E:\SEM_Janet\Revision Data\J9050000_4238553141MDSJE480CEL\4238553141\GB05OPE-CEL.fm] masterpage:Left (3 column) GB02REG-CEL.book Page 22 Wednesday, July 13, 2005 2:56 PM Naming a track or an MD (continued) If you have selected numbers 7 Repeat steps 4 to 6 to enter the rest of Press the corresponding number button. The number is entered and the cursor shifts to the right. the name. To change a character Press m/M repeatedly until the character to be changed flashes, then repeat steps 4 to 6.
lename[E:\SEM_Janet\Revision Data\J9050000_4238553141MDSJE480CEL\4238553141\GB05OPE-CEL.fm] masterpage:Left (3 column) GB02REG-CEL.book Page 23 Wednesday, July 13, 2005 2:56 PM 3 Turn AMS (or press ./> repeatedly) until the number of the track (when erasing the track name) or “Disc” (when erasing the disc name) flashes, then press PUSH ENTER or YES. “Complete!” appears. Changing the recorded level after recording The deck starts recording over the existing track. “S.
lename[E:\SEM_Janet\Revision Data\J9050000_4238553141MDSJE480CEL\4238553141\GB05OPE-CEL.fm] masterpage:Left (3 column) GB02REG-CEL.book Page 24 Wednesday, July 13, 2005 2:56 PM Changing the recorded level after recording (continued) To cancel the operation Press MENU/NO or x in steps 1 to 6. If you press PUSH ENTER or YES in step 7 and recording starts, you cannot interrupt the operation. Notes • Do not disconnect the AC power cord or move the deck while recording is in progress.
lename[E:\SEM_Janet\Revision Data\J9050000_4238553141MDSJE480CEL\4238553141\GB05OPE-CEL.fm] masterpage:Left (3 column) GB02REG-CEL.book Page 25 Wednesday, July 13, 2005 2:56 PM Other Functions Fading in and fading out Fade-in Recording gradually increases the signal level at the start of recording. Fade-out Recording gradually decreases the signal level at the end of recording. Falling asleep to music — Sleep Timer You can set the deck so that it turns off automatically after a specified duration.
lename[E:\SEM_Janet\Revision Data\J9050000_4238553141MDSJE480CEL\4238553141\GB05OPE-CEL.fm] masterpage:Left (3 column) GB02REG-CEL.book Page 26 Wednesday, July 13, 2005 2:56 PM Additional Information Precautions On safety • Should any solid object or liquid fall into the cabinet, unplug the deck and have it checked by qualified personnel before operating it any further. • Caution – The use of optical instruments with this product will increase eye hazard.
lename[E:\SEM_Janet\Revision Data\J9050000_4238553141MDSJE480CEL\4238553141\GB05OPE-CEL.fm] masterpage:Left (3 column) GB02REG-CEL.book Page 27 Wednesday, July 13, 2005 2:56 PM The remaining recording time does not increase even after erasing numerous short tracks Tracks under 12 seconds1) in length are not counted and so erasing them may not lead to an increase in the recording time. 1) During stereo recording.
lename[E:\SEM_Janet\Revision Data\J9050000_4238553141MDSJE480CEL\4238553141\GB05OPE-CEL.fm] masterpage:Left (3 column) GB02REG-CEL.book Page 28 Wednesday, July 13, 2005 2:56 PM Troubleshooting If you experience any of the following difficulties while using the deck, use this troubleshooting guide to help you remedy the problem. Should any problem persist, consult your nearest Sony dealer. The deck does not operate or operates poorly. The MD may be dirty or damaged. Replace the MD.
lename[E:\SEM_Janet\Revision Data\J9050000_4238553141MDSJE480CEL\4238553141\GB05OPE-CEL.fm] masterpage:Left (3 column) GB02REG-CEL.book Page 29 Wednesday, July 13, 2005 2:56 PM C71/Din Unlock • The sporadic appearance of this message is caused by the digital signal being recorded. This will not affect the recording. • While recording from a digital component connected through the DIGITAL IN connector, the digital connecting cable was unplugged or the digital component turned off.
lename[E:\SEM_Janet\Revision Data\J9050000_4238553141MDSJE480CEL\4238553141\GB05OPE-CEL.fm] masterpage:Left (3 column) GB02REG-CEL.book Page 30 Wednesday, July 13, 2005 2:56 PM Display messages (continued) Coding (S.F) Edit NOW Modulation system You pressed ?/1 while in S.F Edit (changing the recording level after recording, Fade-in, Fade-out) mode. If you turn off the deck while in S.F Edit mode, any changes that you have made will not be made properly. Finish the changes and leave S.
lename[E:\SEM_Janet\Revision Data\J9050000_4238553141MDSJE480CEL\4238553141\GB05OPE-CEL.fm] GB02REG-CEL.