3-868-000-13(1) Portable MiniDisc Recorder GB Operating Instructions ________________________ ES Manual de instrucciones ______________________ MZ-B50 ©2000 Sony Corporation
WARNING To prevent fire or shock hazard, do not expose the unit to rain or moisture. To avoid electrical shock, do not open the cabinet. Refer servicing to qualified personnel only. Caution The use of optical instruments with this product will increase eye hazard.
GB 3-GB
Table of contents Preparing a power source ................................ 6 Recording an MD right away! ........................... 8 Playing an MD right away! .............................. 11 Various ways of recording .............................. 13 VOR (Voice Operated Recording) .......................................................13 Recording from a microphone ..............................................................14 Recording from externally connected equipment ............................
Editing recorded tracks .................................. 26 Adding a track mark ............................................................................. 26 Track marking to divide a recording .............................................. 26 Track marking important points .................................................... 26 Erasing a track mark ............................................................................ 27 Erasing tracks ............................................................
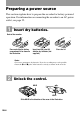
Preparing a power source This section explains how to prepare the recorder for battery-powered operation. For information on connecting the recorder to an AC power outlet, see page 32. 1 Insert dry batteries. Back of the recorder E e Press and slide the battery compartment lid as shown in the illustration. Insert two LR6 (size AA) alkaline dry batteries (not supplied). Close the lid. Notes • Do not use manganese dry batteries. If you do, recording may not be possible.
Charging the built-in battery for the clock When you use the recorder for the first time or after a long period of disuse, charge the built-in battery for the clock. After setting the clock, leave the dry batteries installed for about more than two hours so that the built-in battery is automatically charged. You can use the recorder while charging. Note that various settings, such as clock, return to the factory settings if you take out dry batteries while charging.
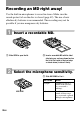
Recording an MD right away! Use the built-in microphones to record in stereo. Make sure the record-protect tab on the disc is closed (page 42). The use of new alkaline dry batteries is recommended. The recording may not be possible if you use manganese dry batteries. 1 Insert a recordable MD. 1 Slide OPEN to open the lid. 2 Insert a recordable MD with the label side facing up, and press down hard on the lid (at the center of the front edge as shown above) to close it firmly.
3 Select the recording mode. 1 Slide REC MODE to STEREO. When you set the REC MODE switch to MONO, the recording will be in monaural, but the recording time will be two times longer than in stereo. Make sure not to switch the recording mode while recording. REC MODE 4 Record an MD. 1 built-in microphones xSTOP Connect firmly to i REC indicator zREC x Press zREC. “REC” and “STEREO” appears, REC indicator lights up, and then recording starts.
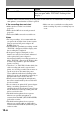
To Press Remove the MD xSTOP to stop recording and open the lid. (The lid does not open while “TOC Edit” flashing in the display.) 1) The REC indicator flashes during recording pause. Track marks are not added while recording with microphones, even when the recorder is paused. If the recording does not start • Make sure the recorder is not locked (page 25). • Make sure the MD is not record-protected (page 42). • Premastered MDs cannot be recorded over.
Playing an MD right away! You can play recordable MDs or premastered MDs. Sound output from the built-in speaker is monaural, but stereo listening is possible through the supplied headphones/earphones with a remote control. 1 Insert an MD. 1 Slide OPEN to open the lid. 2 Insert an MD with the label side facing up, and press down hard on the lid (at the center of the front edge as shown above) to close it firmly. 1 Press NPLAY. 2 Turn VOL to adjust the volume.
To listen in stereo Connect the supplied headphones/earphones with a remote control to the i jack on the recorder. On the remote control, use the >N button to start playback, the xSTOP button to stop the recorder, and the VOL control to adjust the volume. If you are using the remote control, you will hear short beeps whenever you press the >N button, and a long beep whenever you press the xSTOP button. To Press (Beeps in the headphones/earphones) Find the beginning of the current track .
Various ways of recording z VOR (Voice Operated Recording) VOR causes the recorder to automatically record when there is sound, and to pause when there is no sound. This allows you to record without troublesome button operations. built-in microphones MIC SENS REC MODE VOR indicator VOR automatically turns off when you press the xSTOP button to stop recording.
Notes Recording from a microphone Connect a stereo microphone (ECM-717, etc.; not supplied) to the MIC (PLUG IN POWER) jack. The recorder input automatically switches to the externally connected microphone input. Stereo microphone (not supplied) REC MODE to MIC (PLUG IN POWER) MIC SENS 1 Slide MIC SENS to H (high) or L (low). 2 3 Slide REC MODE to STEREO. Insert a recordable MD and press zREC. For other operations on recording, see “Recording an MD right away!” (page 8).
Recording from externally connected equipment The input jack of this recorder works as both digital and analog input jacks. Connect the recorder to a CD player or a cassette recorder using either digital (optical) input or analog (line) input. To record, see “Recording with digital (optical) input (optical cable required)” (page 16) to record using digital (optical) input and “Recording with analog (line) input (line cable required)” (page 17) to record using analog (line) input.
z Recording with digital (optical) input (optical cable required) Connect to a digital source using an optical cable (not supplied) to make digital recordings. Digital recording is possible even from digital equipment with different sampling rates, such as a DAT deck or a BS tuner, using the built-in sampling rate converter. CD player, MD player, digital amplifier, etc. Portable CD player, etc. Optical miniplug Optical plug POC-15B etc. (not supplied) POC-15AB etc.
Recording with analog (line) input (line cable required) Connect the recorder with a line cable (not supplied) to make analog recording. The sound will be sent from the connected equipment as analog signal but will be sent recorded digitally on the disc. CD player, cassette recorder, etc.(source) Play the source sound. For other operations on recording, see “Recording an MD right away!” (page 8). z When you record in monaural, you can record twice as much as in stereo (page 19).
To start/stop recording in sync with the source player (Synchro-recording) 4 Play the source sound. The recorder starts recording when it receives the playing sound. To stop recording, press xSTOP. z You can easily make digital recordings of a digital source on an MD. Before synchro-recording, make connections to the digital source with a digital cable, and insert a recordable MD. CD players, etc. REC MODE zREC • When you record in monaural, you can record twice as much as in stereo (page 19).
Recording in monaural for double the normal recording time Setting the clock to stamp the recorded time For longer recordings, choose to record in monaural. The recording time becomes double the normal. To stamp the date and time on the MD when you record, you first need to set the clock. ./> zREC REC MODE xSTOP NPLAY 1 2 Slide REC MODE to MONO. Insert a recordable MD and press zREC. For other operations on recording, see “Recording an MD right away!” (page 8) 1 To stop recording, press xSTOP.
If you make a mistake while setting the clock Press xSTOP, and set the clock again from step 1. You can skip a step by pressing NPLAY. To display the current time When the recorder is not operating or while recording, press DISPLAY repeatedly until the current time appears in the display. Checking the remaining time or the recording position You can check the remaining time, track number, etc. when recording or during stop.
In stop mode A B Track number Elapsed time Track name1) Remaining time for recording Disc name1) Remaining time after the current location Current date2) Current time2) 1) Appears 2) Appears only if the track has been labeled. only when the clock is set. To know the recording condition The REC indicator lights up or flashes according to the recording condition.
Various ways of playback Enhancing voice clarity during playback (Voice Up) During stereo playback, the Voice Up function emphasizes the left-right orientation of individual voices, making them easier to distinguish and hear. This function is effective when using the supplied headphones/earphones to listen to stereo recordings made at meetings and conferences, etc. Finding a point quickly (Easy Search) Use the Easy Search function to find a particular point quickly.
• If you reach the beginning of the disc while using the Easy Search function, the recorder will start playing automatically. If you reach the end of the disc while using the Easy Search function, “END” will appear in the display. If this happens, press the xSTOP button to stop the recorder. Playing tracks repeatedly You can play tracks repeatedly in two ways — all repeat and single repeat. Listening at a fast speed (Fast Playback) You can reduce the listening time by using the Fast Playback function.
Emphasizing bass (DIGITAL MEGA BASS) The mega bass function intensifies low frequency sound for richer quality audio reproduction. It affects only the sound from the headphones/earphones. Checking the remaining time or the playing position You can check the track name, disc name, etc. during playback. DISPLAY MEGA BASS 1 1 Press MEGA BASS while the recorder is playing. Each time you press the button, the indication changes as follows. Press DISPLAY while the recorder is playing.
Locking the controls (HOLD) To prevent the buttons from being accidentally operated when you carry the recorder, use this function. HOLD HOLD 1 Slide HOLD to the direction of the .. On the recorder, slide HOLD to lock the controls of the recorder. On the remote control, slide HOLD to lock the controls of the remote control. Slide HOLD in the opposite direction of the arrow to unlock the controls.
Editing recorded tracks You can edit your recordings by adding/ erasing track marks or labeling tracks and MDs. Premastered MDs cannot be edited. Notes on editing • Do not move or jog the recorder while “TOC Edit”* is flashing in the display. If you do, the editing results will not be saved to the disc. • The lid will not open during an editing operation or while “TOC Edit” appears in the display. • You cannot edit tracks on an MD that is record-protected.
1 Press TRACK MARK on the remote for 2 seconds or more at the desired point while recording. A special track mark is added and the track number will increase by one. “!MARK ON!” appears in the display and “TT” is automatically added at the beginning of a track name. Erasing a track mark When you erase a regular track mark or a special track mark, the track numbers will change as follows.
Notes To erase a small section of a track • You cannot erase a track mark that has been written between a track recorded in stereo and a track recorded in monaural. If you try to erase such a track mark, “SORRY” appears in the display. • You cannot erase a track mark that has been written between a track recorded through a digital connection and a track recorded through an analog connection. If you try to erase such a track mark, “SORRY” appears in the display.
Moving recorded tracks You can change the order of the recorded tracks. Example Move track C from the third to the second track. Press EDIT/ENTER again. The track moves to the selected destination track. To cancel moving, press xSTOP or TRACK MARK. Labeling recordings Before moving A B C D A C B D After moving EDIT/ENTER .REVIEW/AMS/ >CUE/AMS 5 TRACK MARK You can name tracks during playback, discs during stop, and both during recording. Each name can be as long as 200 letters.
Labeling a disc during stop 1 Insert a disc. When a disc is already inserted, make sure the recorder is stopped. 2 Press EDIT/ENTER. “ : Name” flashes in the display. 3 Press EDIT/ENTER again. The disc is ready to be labeled. 4 Press . or > repeatedly to select a letter and press N to enter. The selected letter stops flashing and the cursor moves to the next input position. 1 Insert a disc and play the track you want to label. 2 Press EDIT/ENTER.
Notes • When the recording is stopped while labeling a track or a disc during recording, or when the playback moves on to the next track while labeling a track, the input at that point is entered automatically. • When recording through the built-in microphones, the sound of the recorder operations, such as the pressing of buttons, will also be recorded. To avoid this, you should label a disc or a track after completing the recording.
Power sources You can power the recorder not only with alkaline dry batteries (not supplied) but also with house current. You cannot, however, use manganese dry batteries. When to replace the batteries You can check the battery condition with the battery indication which is displayed while using the player. The battery indicator changes as the table below due to the battery condition. The battery level indicator is approximate. Battery indicator Condition t Battery power decreasing.
Additional information On the headphones/earphones Precautions On safety Do not put any foreign objects in the DC IN 3V jack. On power sources • Use LR6 (size AA) batteries, house current, or car battery. • The recorder is not disconnected from the AC power source (mains) as long as it is connected to the wall outlet, even if the recorder itself has been turned off.
Notes on batteries Incorrect battery usage may lead to leakage of battery fluid or bursting batteries. To prevent such accidents, observe the following precautions: • Insert the + and – poles of the batteries correctly. • Do not try to recharge dry batteries. • When the recorder is not to be used for a long time, be sure to remove the batteries. • If a battery leak should develop, carefully and thoroughly wipe away battery fluid from the battery compartment before inserting new ones.
Troubleshooting Should any problem persist after you have made these checks, consult your nearest Sony dealer. Symptom Cause/Solution The recorder does • Audio sources may not be securely connected. not work or works , Disconnect the audio sources once and connect them again poorly. (pages 16, 17). • The HOLD function is turned on (“HOLD” appears in the display when you press an operation button on the recorder). , Disable HOLD by sliding the HOLD switch in the opposite direction of the arrow (page 25).
Symptom Cause/Solution No sound comes through the headphones/ earphones. • The headphones/earphones plug is not firmly connected. , Plug in the plug of the headphones/earphones firmly to the remote control. Plug in the plug of the remote control firmly to i. • Volume is too low. , Adjust the volume by turning VOL. • Dirty plugs. , Clean the plug on the end of the headphones/earphones cord and the plug on the end of the remote control cord. An MD is not played from the first track.
System limitations The recording system in your MiniDisc recorder is radically different from those used in cassette and DAT decks and is characterized by the limitations described below. Note, however, that these limitations are due to the inherent nature of the MD recording system itself and not to mechanical causes. Symptom Cause “TR FULL” appears even before the disc has reached the maximum recording time (60, 74, or 80 minutes).
Messages If the following error messages flash in the display window, check the chart below. Error message Meaning/Remedy BLANKDISC • An MD with no recording on it is inserted. , Insert a recorded MD. BUSY • You tried to operate the recorder while it was accessing the recorded data. , Wait until the message goes out (in rare cases, it may take 2–3 minutes). Data Save • The MD player is recording information (sounds) from the memory to the disk. , Wait until this process is completed.
Error message Meaning/Remedy NO COPY • You tried to make a copy from a disc that is protected by the Serial Copy Management System. You cannot make copies from a digitally connected source which was itself recorded using digital connection. , Use analog connection instead (page 17). NO DISC • You tried to play or record with no disc in the recorder. , Insert an MD. NO SIGNAL • The recorder could not detect digital input signals. , Make sure that the source is connected firmly (page 16).
Outputs Specifications System Audio playing system MiniDisc digital audio system Laser diode properties Material: GaAlAs Wavelength: λ = 790 nm Emission duration: continuous Laser output: less than 44.6 µW (This output is the value measured at a distance of 200 mm from the lens surface on the optical pick-up block with 7 mm aperture.
How the MiniDisc got so small What is an MD? How MiniDisc works MiniDisc (MD) comes in two types: premastered (prerecorded) and recordable (blank). Premastered MDs, recorded at music studios, can be played back almost endlessly. However, they can’t be recorded on or over like cassette tapes. To record, you must use a “recordable MD”. Premastered MDs Premastered MDs are recorded and played like regular CDs.
Shock-Resistant Memory One major drawback of optical read systems is that they can skip or mute when subjected to vibration. The MD system resolves this problem by using a buffer memory that stores audio data. Premastered software such as CDs or MDs. To protect a recorded MD Digital recording To record-protect an MD, slide open the tab at the side of the MD. In this position, the MD cannot be recorded. To record again, slide the tab back so the tab is visible.
Looking at the controls See pages in ( ) for more details. Front of the recorder 1 qd 2 qf 3 qg 4 qh 5 qj 6 qk 7 ql 8 w; 9 wa 0 ws qa wd qs wf A EASY SEARCH +/– buttons (22)(30) B VOR indicator (13) C PLAY MODE button (23)(30) D DISPLAY button (20)(24)(30) E .
Back of the recorder 1 4 2 5 6 3 7 A Battery compartment (6) B CLOCK SET button (19) C SYNCHRO REC (synchro-recording) switch (18) D E F G MIC (PLUG IN POWER) jack (14) LINE IN (OPTICAL) jack (16)(17) MIC SENS switch (8) MEGA BASS button (24) The display window A J B C D E F G K H I P A V-UP indication (22) B Fast Playback indication (23) C Disc indication Shows that the disc is rotating for recording, playing or editing an MD.
M REMAIN (remaining time/tracks) indication (20)(24) Lights up along with the remaining time of the track, the remaining time of the MD, or the remaining number of tracks. N REC DATE (recorded/current date) indication (24) Lights up along with the date and time the MD was recorded. When only “DATE” lights up, the current date and time are displayed. O Time display (20)(24) P Level meter Shows the volume of the MD being played or recorded.
ADVERTENCIA Para evitar incendios o descargas eléctricas, no exponga la unidad a la lluvia ni a la humedad. Para evitar descargas eléctricas, no abra la unidad. En caso de avería, solicite los servicios de personal cualificado. Precaución El uso de instrumentos ópticos con este producto incrementa el riesgo de lesiones oculares.
ES 3-ES
Índice Preparación de la fuente de alimentación ....... 6 Grabación de un MD ......................................... 8 Reproducción de un MD .................................. 11 Opciones de grabación ................................... 13 VOR (Grabación accionada por la voz) ................................................13 Grabación con un micrófono ................................................................14 Grabación con un equipo conectado externamente ..............................
Edición de pistas grabadas ............................ 26 Adición de una marca de pista ............................................................. 26 Marcas de pista para dividir una grabación ................................... 26 Marcas de pista en puntos importantes .......................................... 26 Borrado de una marca de pista ............................................................. 27 Borrado de pistas ...............................................................................
Preparación de la fuente de alimentación En esta sección se explica cómo preparar la grabadora para el funcionamiento con pilas. Para obtener información sobre la conexión de la grabadora a una toma de ca, consulte la página 32. 1 Inserte las pilas secas. Parte posterior de la grabadora E e Presione y deslice la tapa del compartimento de las pilas como se muestra en la ilustración. Inserte dos pilas secas alcalinas LR6 (tamaño AA) (no suministradas). Cierre la tapa.
Carga de la pila incorporada del reloj Cuando utilice la grabadora por primera vez o después de un largo período sin utilizarla, cargue la pila incorporada del reloj. Después de ajustar el reloj, deje instaladas las pilas secas durante aproximadamente más de dos horas, para que la pila incorporada se cargue de forma automática. Puede utilizar la grabadora mientras se realiza la carga.
Grabación de un MD Utilice los micrófonos incorporados para grabar en estéreo. Compruebe que la lengüeta de protección contra grabación en el disco está cerrada (página 42). Se recomienda el uso de pilas secas alcalinas nuevas. Quizá no se pueda efectuar la grabación si se utilizan pilas secas de manganeso. 1 Inserte un MD grabable. 1 Deslice OPEN para abrir la tapa.
3 Seleccione el modo de grabación. 1 Deslice REC MODE a STEREO. Cuando sitúe el interruptor REC MODE en MONO, la grabación se realizará en modo monofónico, pero el tiempo de grabación será dos veces mayor que en estéreo. No cambie el modo de grabación durante la grabación. REC MODE 4 Grabe un MD. 1 micrófonos incorporados xSTOP Conéctelo firmemente Indicador REC ai zREC x Pulse zREC. Aparecen “REC” y “STEREO”, el indicador REC se ilumina y se inicia la grabación.
Para Pulse Realizar una pausa1) XPAUSE durante la grabación. Pulse otra vez XPAUSE para reanudar la grabación. Extraer el MD xSTOP para detener la grabación y abrir la tapa. (La tapa no se podrá abrir mientras “TOC Edit” parpadee en el visor.) 1) El indicador REC parpadea en el modo pausa durante la grabación. No se añaden marcas de pista mientras se realiza una grabación con micrófonos, incluso si se hace una pausa en la grabadora.
Reproducción de un MD Puede reproducir MD grabables o minidiscos comerciales pregrabados. La salida de sonido desde el altavoz incorporado es monofónica, pero la escucha en estéreo es posible mediante los auriculares/cascos con mando a distancia suministrados. 1 Inserte un MD. 1 2 Deslice OPEN para abrir la tapa. Inserte un MD con la cara de la etiqueta hacia arriba y presione con fuerza la tapa hacia abajo (en el centro, como se muestra en la ilustración) para cerrarla bien. 2 Reproduzca un MD.
Para escuchar en estéreo Conecte los auriculares/cascos con mando a distancia suministrados a la toma i de la grabadora. En el mando a distancia, utilice el botón >N para iniciar la reproducción, el botón xSTOP para detener la grabadora y el control VOL para ajustar el volumen. Cuando utilice el mando a distancia, escuchará pitidos cortos cuando pulse el botón >N y un pitido prolongado cuando pulse el botón xSTOP. Para Pulse (pitidos en los auriculares/cascos) Localizar el inicio de la pista .
Opciones de grabación z VOR (Grabación accionada por la voz) VOR se apaga automáticamente cuando se pulsa el botón xSTOP para detener la grabación. VOR hace que la grabadora grabe automáticamente cuando hay sonido y que realice una pausa cuando no lo hay. Esto permite grabar sin complicadas operaciones con botones.
z Grabación con un micrófono Conecte un micrófono estéreo (ECM-717, etc.; no suministrado) a la toma MIC (PLUG IN POWER). La entrada de la grabadora cambia automáticamente a la entrada del micrófono conectada externamente. Micrófono estéreo (no suministrado) REC MODE a MIC (PLUG IN POWER) MIC SENS 1 Deslice MIC SENS a H (alta) o L (baja). 2 3 Deslice REC MODE a STEREO. 14-ES Inserte un MD grabable y pulse zREC.
Grabación con un equipo conectado externamente La toma de entrada de esta grabadora funciona como toma analógica y digital. Conecte la grabadora a un reproductor de CD o a una grabadora de cassette mediante una entrada digital (óptica) o una entrada analógica (línea).
Grabación con entrada digital (óptica) (requiere cable óptico) Efectúe la conexión a una fuente digital por medio de un cable óptico (no suministrado) para realizar grabaciones digitales. Gracias al convertidor de frecuencia de muestreo incorporado, la grabación digital se puede realizar desde equipos con una frecuencia de muestreo diferente, como una platina DAT o un sintonizador BS. Reproductor de CD, de MD, amplificador digital, etc. Reproductor portátil de CD, etc.
Grabación con entrada analógica (línea) (requiere cable de línea) Conecte la grabadora con un cable de línea (no suministrado) para realizar una grabación analógica. El sonido se enviará desde el equipo conectado como una señal analógica, pero se enviará grabado digitalmente en el disco. Reproductor de CD, grabadora de cassette, etc. (fuente) 3 Reproduzca el sonido de la fuente. Para obtener información sobre otras opciones de grabación, consulte “Grabación de un MD” (página 8).
Cómo iniciar y detener la grabación sincronizada con el reproductor fuente (grabación sincronizada) En un MD puede realizar fácilmente grabaciones digitales de una fuente digital. Antes de efectuar la grabación sincronizada, realice las conexiones con la fuente digital, empleando un cable digital, e inserte un MD grabable. Reproductores de CD, etc. REC MODE zREC 3 Pulse zREC. La grabadora está en modo de espera para iniciar la grabación. 4 Reproduzca el sonido de la fuente.
Grabación monofónica para duplicar el tiempo normal de grabación Ajuste del reloj para incluir la hora de grabación Para grabaciones más largas, elija grabar en modo monofónico. El tiempo de grabación será el doble del normal. Para incluir la fecha y la hora en el MD cuando lo grabe, primero tiene que ajustar el reloj. ./> zREC REC MODE xSTOP NPLAY 1 2 Deslice REC MODE a MONO. Inserte un MD grabable y pulse zREC.
4 Repita los pasos 2 y 3 para introducir el mes, el día, la hora y los minutos. Cuando pulse NPLAY para introducir los minutos, el reloj empezará a funcionar. Si se equivoca mientras ajusta el reloj Pulse xSTOP y vuelva a ajustar el reloj desde el paso 1. Puede saltarse un paso pulsando NPLAY. Comprobación del tiempo restante o de la posición de grabación Puede comprobar el tiempo restante, el número de pista, etc., durante la grabación o cuando la grabadora está parada.
En el modo de parada A B Número de pista Tiempo transcurrido Nombre de pista1) Tiempo restante de grabación Nombre del disco1) Tiempo restante a partir de la posición actual Fecha actual2) Hora actual2) 1) Sólo aparece si la pista o el disco se han etiquetado. 2) Sólo aparece si el reloj está ajustado. Para saber el estado de grabación El indicador REC se ilumina o parpadea en función del estado de la grabación.
Opciones de reproducción Mejora de la claridad de la voz durante la reproducción (Voice Up) Cómo encontrar un punto concreto rápidamente (Easy Search) Durante la reproducción en estéreo, la función Voice Up enfatiza la orientación izquierda-derecha de cada una de las voces, lo que permite que sea más fácil oírlas y distinguirlas. Esta función es eficaz al utilizar los auriculares/cascos suministrados para escuchar grabaciones estereofónicas realizadas en reuniones y conferencias, etc.
• Si llega al principio del disco mientras está utilizando la función de búsqueda fácil, la grabadora comenzará la reproducción automáticamente. Si llega al final del disco mientras está utilizando la función de búsqueda fácil, aparecerá “END” en el visor. Si esto ocurre, pulse el botón xSTOP para detener la grabadora. Reproducción de pistas de forma repetida Puede reproducir pistas de forma repetida de dos maneras: repetición de todos los temas y repetición de un tema.
Potenciación de los graves (DIGITAL MEGA BASS) La función Mega Bass intensifica los sonidos de baja frecuencia para obtener una mejor calidad en la reproducción de audio. Sólo afecta al sonido de los auriculares/cascos. Comprobación del tiempo restante o de la posición de reproducción Durante la reproducción, puede comprobar el nombre de la pista, el nombre del disco, etc. DISPLAY MEGA BASS 1 Pulse MEGA BASS mientras la grabadora está en modo de reproducción.
Bloqueo de los controles (HOLD) Use esta función para evitar el accionamiento involuntario de los botones mientras transporta la grabadora. HOLD HOLD 1 Deslice HOLD en la dirección de la .. En la grabadora, deslice HOLD para bloquear los controles de la grabadora. En el mando a distancia, deslice HOLD para bloquear los controles del mando a distancia. Deslice HOLD en la dirección opuesta a la de la flecha para desbloquear los controles.
Edición de pistas grabadas Puede editar las grabaciones y añadir o borrar marcas de pista o etiquetar pistas y MD. Los MD comerciales pregrabados no se pueden editar. Notas sobre la edición • No mueva ni sacuda la grabadora mientras “TOC Edit”* esté parpadeando en el visor. Si lo hace, los resultados de la edición no se guardarán en el disco. • La tapa no se podrá abrir durante una operación de edición o mientras aparece “TOC Edit” en el visor.
1 Durante la grabación, pulse TRACK MARK en el mando a distancia durante 2 o más segundos en el punto adecuado. Se añade una marca de pista especial y el número de pista aumentará en uno. Aparece “!MARK ON!” en la pantalla y se añade automáticamente “TT” al principio de un nombre de pista. Borrado de una marca de pista Cuando borre una marca de pista normal o una marca de pista especial, los números de pista cambiarán de la manera siguiente.
Notas • No se puede borrar una marca de pista que se ha escrito entre una pista grabada en estéreo y una pista grabada en modo monofónico. Si intenta borrar una marca de pista de este tipo, “SORRY” aparecerá en el visor. • No se puede borrar una marca de pista que se ha escrito entre una pista grabada mediante una conexión digital y una pista grabada mediante una conexión analógica. Si intenta borrar una marca de pista de este tipo, “SORRY” aparecerá en el visor.
Cambio de orden de pistas grabadas Puede cambiar el orden de las pistas grabadas. Ejemplo Mover la pista C de la tercera a la segunda pista. Antes de cambiar el orden A B C D A C B D Después de cambiar el orden EDIT/ENTER .REVIEW/AMS/ > CUE/AMS 1 TRACK MARK Mientras reproduce la pista que quiere cambiar de lugar, pulse EDIT/ENTER. “ : Name” parpadea en el visor y la grabadora reproduce la pista seleccionada de forma repetida. 2 Pulse .
Etiquetado de un disco con la grabadora parada 1 Inserte un disco. Cuando el disco ya está insertado, compruebe que la grabadora está parada. 2 Pulse EDIT/ENTER. “ : Name” parpadea en el visor. 3 Vuelva a pulsar EDIT/ENTER. Ya se puede etiquetar el disco. 4 Pulse . o > varias veces para seleccionar una letra o pulse N para introducirla. La letra seleccionada deja de parpadear y el cursor se desplaza a la posición de entrada siguiente.
Para volver a etiquetar grabaciones Siga los pasos correspondientes al método de etiquetado hasta que la pista o el disco estén preparados para etiquetarlos. Introduzca un nuevo carácter sobre el que desea cambiar y, a continuación, pulse el botón EDIT/ENTER. Notas • Si la grabación se interrumpe mientras se etiqueta un disco o una pista durante la grabación, o si la reproducción pasa a la pista siguiente mientras se etiqueta una pista, la entrada en ese punto se introduce automáticamente.
Fuentes de alimentación Puede proporcionar alimentación a la grabadora no sólo con las pilas secas alcalinas (no suministradas), sino también con corriente de la red. Sin embargo, no se pueden utilizar pilas secas de manganeso. Cuándo hay que sustituir las pilas Puede comprobar el estado de las pilas con la indicación de la pila que se visualiza mientras utiliza el reproductor. El indicador de las pilas cambia como se indica en la tabla siguiente, en función del estado de las pilas.
Información adicional Auriculares/cascos Precauciones Seguridad No ponga objetos extraños en la toma DC IN 3V. Fuentes de alimentación • Utilice pilas LR6 (tamaño AA), corriente de la red o la batería de un automóvil. • Incluso aunque la grabadora se haya apagado, permanece conectada a la fuente de alimentación de ca (toma de corriente) mientras esté conectada a la toma de red de la pared.
• El polvo depositado en la lente puede impedir que la unidad funcione correctamente. Compruebe que cierra la tapa del compartimento del disco después de insertar o extraer un MD. Notas sobre las pilas Un uso incorrecto de las pilas puede producir una fuga del líquido de éstas o una explosión. Para evitar esos accidentes, observe las precauciones siguientes: • Respete la polaridad + y – de las pilas. • No intente recargar las pilas secas.
Solución de problemas Si el problema persiste después de haber realizado estas comprobaciones, póngase en contacto con el proveedor de Sony más próximo. Problema Causa/Solución • Puede que no estén bien conectadas las fuentes de audio. La grabadora no funciona o lo hace , Desconecte las fuentes de audio y vuelva a conectarlas deficientemente. (páginas 16, 17). • La función HOLD está activada (“HOLD” aparece en el visor cuando pulsa un botón de la grabadora).
Problema Causa/Solución La tapa no se abre. • Las pilas se han agotado o las fuentes de alimentación se han desconectado durante la grabación o la edición. , Sustituya las pilas agotadas por unas nuevas o conecte de nuevo la fuente de alimentación. No llega sonido a • El enchufe de los auriculares/cascos no está conectado firmemente. través de los , Conecte firmemente el enchufe de los auriculares/cascos al auriculares/cascos. mando a distancia. Conecte firmemente el enchufe del mando a distancia a i.
Limitaciones del sistema El sistema de grabación de la grabadora de MiniDisc es radicalmente diferente de los empleados en las platinas DAT y de cassette y se caracteriza por las limitaciones que se describen a continuación. No obstante, tenga en cuenta que esas limitaciones se deben a la naturaleza del propio sistema de grabación de MD y no a causas mecánicas. Síntoma Causa “TR FULL” aparece incluso antes de que el disco haya llegado al tiempo máximo de grabación (60, 74 u 80 minutos).
Mensajes Si los mensajes de error siguientes parpadean en el visor, consulte la tabla que figura a continuación. Mensaje de error BLANKDISC BUSY Data Save DISC ERR DISC FULL EDITING Hi DC in HOLD LOW BATT MEM OVER MENU 38-ES Significado/Solución • Se ha insertado un MD que no contiene ninguna grabación. , Inserte un MD grabado. • Ha intentado accionar la grabadora mientras ésta accedía a datos grabados. , Espere hasta que el mensaje desaparezca (en casos excepcionales puede tardar 2–3 minutos).
Mensaje de error NAME FULL NO COPY NO DISC NO SIGNAL P/B ONLY PROTECTED SORRY TEMP OVER TOC Edit TR FULL TrPROTECT Significado/Solución • Ha intentado introducir más de 200 caracteres para etiquetar un disco o una sola pista. • Ha intentado introducir un total de más de 1 700 caracteres para nombres de pista o de disco durante la reproducción o la parada. , Introduzca los caracteres sin sobrepasar el límite.
Salidas Especificaciones Sistema Sistema de reproducción de audio Sistema MiniDisc de audio digital Propiedades del diodo láser Material: GaAlAs Longitud de onda: λ = 790 nm Duración de la emisión: continua Salida del láser: inferior a 44,6 µW (Esta salida es el valor medido a una distancia de 200 mm de la superficie de la lente del bloque de captura óptica con una abertura de 7 mm.
¿Qué es un MD? ¿Cómo funciona un MD? Hay dos tipos de MiniDisc (MD): comercial (pregrabado) y grabable (en blanco). Los MD comerciales, grabados en estudios, se pueden reproducir casi indefinidamente. Sin embargo, no se pueden grabar como si fueran cintas de cassette. Para grabar, debe emplear un “MD grabable”. MD comerciales pregrabados Los MD comerciales pregrabados se graban y reproducen como los CD normales.
Memoria resistente contra golpes Un inconveniente importante de los sistemas de lectura óptica es que pueden saltar o desactivarse cuando están sujetos a vibraciones. El sistema de MD resuelve este problema mediante el uso de memoria intermedia que almacena datos de audio. Software comercial pregrabado, como CD o MD. Grabación digital Para proteger un MD grabado Para proteger un MD contra grabación, deslice hasta la posición de abierta la lengüeta situada en el lateral del MD.
Controles Consulte las páginas indicadas entre ( ) para obtener más detalles. Parte frontal de la grabadora 1 qd 2 qf 3 qg 4 qh 5 qj 6 qk 7 ql 8 w; 9 wa 0 ws qa wd qs wf A Botones EASY SEARCH +/– (22)(30) B Indicador VOR (13) C Botón PLAY MODE (23)(30) D Botón DISPLAY (20)(24)(30) E Botón .
Parte posterior de la grabadora 1 4 2 5 6 3 7 A Compartimento de la pila (6) B Botón CLOCK SET (19) C Interruptor SYNCHRO REC (grabación sincronizada) (18) D E F G Toma MIC (PLUG IN POWER) (14) Toma LINE IN (OPTICAL) (16)(17) Interruptor MIC SENS (8) Botón MEGA BASS (24) Visor A J B C D E F G K H I P A Indicación V-UP (22) B Indicación Fast Playback (23) C Indicación de disco Muestra que el disco gira para grabar, reproducir o editar un MD.
M Indicación REMAIN (pistas/tiempo restante) (20)(24) Se ilumina junto con el tiempo restante de la pista, el tiempo restante del MD o el número de pistas restantes. N Indicación REC DATE (fecha de grabación/actual) (24) Se ilumina junto con la fecha y la hora en que se grabó el MD. Cuando sólo se ilumina “DATE”, se muestran la fecha y la hora actuales. O Visualización de la hora (20)(24) P Medidor de nivel Muestra el volumen del MD que se está reproduciendo o grabando.
Sony Corporation Printed in Japan