Network Audio System/Server Operating Instructions Getting started Network connections Enjoying audio content Enjoying Sony MultipleRoom Products Additional information Troubleshooting Precautions/Specifications ©2010 Sony Corporation Printed in China 4-192-583-11(1) NAS-SV20i/SV20Di
WARNING To reduce the risk of fire or electric shock, do not expose this apparatus to rain or moisture. To reduce the risk of fire, do not cover the ventilation opening of the apparatus with newspapers, tablecloths, curtains, etc. Do not place the naked flame sources such as lighted candles on the apparatus. To reduce the risk of fire or electric shock, do not expose this apparatus to dripping or splashing, and do not place objects filled with liquids, such as vases, on the apparatus.
by turning the equipment off and on, the user is encouraged to try to correct the interference by one or more of the following measures: – Reorient or relocate the receiving antenna. – Increase the separation between the equipment and receiver. – Connect the equipment into an outlet on a circuit different from that to which the receiver is connected. – Consult the dealer or an experienced radio/TV technician for help.
Disposal of Old Electrical & Electronic Equipment (Applicable in the European Union and other European countries with separate collection systems) This symbol on the product or on its packaging indicates that this product shall not be treated as household waste. Instead it shall be handed over to the applicable collection point for the recycling of electrical and electronic equipment.
Before operating this product About copyright protection Music data cannot be used without the permission of the copyright holder except when used solely for personal enjoyment. About the illustrations used in this manual Illustrations and screens used in this manual may vary from the actual screens. The model for the USA is basically used for the illustrations in this manual.
Table of Contents Before operating this product ...................................................................5 Features of this unit..................................................................................9 Enjoying various music ......................................................................9 Using the unit with DLNA-compliant devices .........................................9 Getting started Checking the supplied accessories........................................................
Enjoying audio content Listening to an iPod or iPhone ............................................................... 33 Selecting the operation mode ........................................................... 34 Listening to DAB/DAB+ (available for the UK model only)...................... 36 Performing a DAB/DAB+ Initial Scan ................................................. 36 Tuning in a DAB/DAB+ station .......................................................... 36 Presetting DAB/DAB+ stations ..........
Using the timer.......................................................................................59 Using the Sleep Timer .....................................................................59 Using the Play Timer .......................................................................59 Viewing the information of the unit..........................................................61 Managing the system.............................................................................
Features of this unit Enjoying various music You can enjoy listening to music from sound sources with large amounts of music content. You can listen to your iPod or iPhone (page 33), play audio content stored on a server (such as your computer) (page 38), and play audio content streamed by music services via the Internet (page 44).
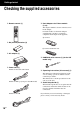
Getting started Checking the supplied accessories ❏ Remote control (1) ❏ Dock Adapters for iPhone models (1 set) The adapter number is shown on the bottom of Dock Adapter. For iPod models, use the Dock Adapter supplied with your iPod, or purchase a compatible dock adapter from Apple Inc.
Guide to parts and controls A SLEEP and TIMER buttons • SLEEP button (page 59) Use to set or confirm the sleep timer setting. • TIMER button (page 60) Use to set the timer. Getting started Remote control B Numeric*/text buttons Use to select a track during playback or to enter text (pages 19, 27, 37, 45, 57). C MEMORY button Use to preset DAB/DAB+ stations (UK model only) (page 37) or stations of the music services (page 45). D ALPHABET SEARCH button Use to search for an item using a keyword (page 49).
H ./>, m/M buttons • . and > buttons (pages 34, 36) Use to find the beginning of the current, the previous, or the next track. Press and hold the button to find a point in a track when the iPod & iPhone function is selected. Use to select a preset DAB/DAB+ station, or the previous or the next DAB/DAB+ station in a service component list (UK model only). • m/M buttons (page 34) Use to find a point in a track.
Main unit Getting started A Remote sensor B ?/1 (power) button and the on/standby indicator • ?/1 (power) button (page 17) Use to turn the power on or off. • On/standby indicator (page 17) The color indicates the power status of the unit. – Green: The unit is turned on. – Red: The “Network Standby” mode of the unit is set to “Off.” – Amber: The “Network Standby” mode of the unit is set to “On.” C Display window For details on the contents of the display, see “Display window” (page 14).
Display window I DSGX indicator Lights up when the DSGX function is set to “DSGX On” (page 58). J Play mode indicators Light up when the play mode is set (page 48). A Function indicators Light up when a function is selected (pages 18, 33). B Text information Displays various information such as track names, album names, artist names, clock, progress bar, etc. The following symbols appear on the display. The meaning of each symbol is as follows.
Preparing the unit and the remote control Note If you place the unit in an unstable location, it may move when you connect or disconnect cables. Hold the unit firmly when you connect or disconnect cables. Getting started Connecting the antenna and the power cord WARNING DO NOT plug the power cord into a wall outlet until all other connections have been made.
2 Connect the power cord to the AC adaptor. Remove the battery compartment lid, and then insert the supplied R6 (size AA) batteries (E end first) matching the polarities as shown below. When the remote control is no longer able to operate the unit, replace both batteries with new ones. AC adaptor Power cord 3 Inserting batteries into the remote control Connect the AC adaptor to the unit, and then plug the power cord into a wall outlet. To the DC IN 19.
Basic operations ?/1 FUNCTION SETTINGS M/m/ENTER BACK OPTIONS Turning on this unit 1 To turn off the unit Press ?/1 on either the remote control or the main unit. When the unit is turned off and enters the standby mode, the color of the on/standby indicator changes. The unit has two standby modes, network standby - off and network standby - on. For details, see “Setting the network standby mode” (page 18).
Setting the network standby mode Selecting items with the unit While the “Network Standby” mode is set to “On,” the unit can always be connected and controlled over the network. You can use the M/m/ENTER buttons to select an item (menu item, artist, track, etc.) and enter the selection. 1 Press SETTINGS to enter the settings menu. 1 2 Press M/m to select “Network Standby” and press ENTER. 3 Press M/m to select “Off” or “On” and press ENTER.
Entering text Example of a character input display Entering text may be required during some setup operations such as network settings. You can enter text using the remote control. The display shown below is an example of the character input display that appears when you are searching for an item using a keyword.
To enter punctuation marks (e.g., !, ?, etc.) or symbols (e.g., #, %, etc.) Press 1 or 0 of the numeric/text button repeatedly while the type of characters is set to “abc” or “ABC.” To enter a space Press 0 of the numeric/text button repeatedly while the type of characters is set to “abc” or “ABC.” To delete a character Press CLEAR. Characters that are assigned to each numeric/text button The table below shows the characters and numbers that you can enter for each type (“abc,” “ABC,” or “123”).
Performing initial setup operations WARNING Do not disconnect the power cord while the unit is making the initial setup operations. Doing so may cause the unit to malfunction. 3 When the “Start setup?” display appears, select “OK.” The unit starts making the initial settings. 4 Getting started When the unit is turned on for the first time after you purchase it, initial setup operations are required.
the rear of the unit. See step 1 of “Setting up a wired network” (page 30), as well. When the network settings have been completed, the unit changes to the clock settings display. 5 When the “Date&Time” display appears, select “Auto” or “Manual.” For details on the clock settings, refer to the respective page (as follows) to set the clock. • When you select “Auto”: Go to step 5 of “Setting the clock through an Internet connection” (page 23).
Setting the clock 3 Select “Date&Time Setting Method.” The “Date&Time” display appears. If you are performing the initial setup operation and indicated that you want to set the clock (page 22), this display appears. Getting started The time on the clock must be set correctly for the proper operation of functions. The clock can be set either automatically by connecting the unit to the Internet, or manually using the remote control. SETTINGS M/m/
A list of available time zones The following items appear in step 5. Select the city where the unit is being used.
Network connections Connecting the unit to your home network (network settings) This section explains how to connect the unit to your home network. You can connect the unit to the network either through a wireless or a wired LAN. Check your connection method using the chart below. For details on which connection method your wireless LAN router/access point supports, refer to the operating manual of your wireless LAN router/access point.
Checking the wireless LAN environment of your home network • Before connecting to your home network, you need to • Read the following first Internet*1 • Wireless LAN router/ access point prepare a wireless LAN router/access point. For details, refer to the operating manual of the device. Depending on your home network environment, the wireless LAN router/access point may have been set up such that it cannot be connected using WPS, even though it is compatible with WPS.
2 When “ ” is displayed, the message is continued to the next page. Press m to see the entire text string. Select “Connection Method.” 4 Select “Wireless LAN.” 5 Select “Access Point Scan.” 8 The unit automatically starts searching for access points and displays a list of network names (SSIDs) of available access points. The unit can display a maximum of 20 network names (SSIDs) on the list. Select the network name (SSID) from the list.
When “ ” is displayed, the message is continued to the next page. Press m to see the entire text string. 3 Select “Connection Method.” The “Connection” display appears. If you are performing the initial setup operation and indicated that you want to set the network connection (page 21), this display appears. Setting up a wireless network using an access point compliant with WPS You can easily set up a wireless network using an access point compliant with WPS.
6 When the message that tells you to press the WPS button on the access point appears, press the WPS button on the access point for a few seconds, within two minutes. WPS button on the wireless LAN router/access point 7 When “Save settings and check connection. Press ENTER to continue.” appears, press ENTER. It may take a while for the unit to complete the network settings. When the network settings have been completed, “Complete.” appears and lights up on the display.
Setting up a wired network 1 Connect the unit to a device that is connected to the server. Back of the unit Read the following first Router, hub, etc. Internet*1 Back of the unit To the NETWORK port Router Network (LAN) cable Server The connection configuration depends on the environment of your home network. • When the server (a computer, etc.) is connected to a router or a hub: t If an unused port is available on the router or on the hub, connect the unit to that port.
5 6 Select “Wired LAN.” The unit automatically starts setting up the network connection. When “Save settings and check connection. Press ENTER to continue.” appears, press ENTER. When “Playback and network functions cannot be used during the setup. Press ENTER to continue.” appears, press ENTER. When “ ” is displayed, the message is continued to the next page. Press m to see the entire text string. 3 4 Select “Tools” - “Advanced Settings.
To use a proxy server If you need to use a proxy server (for example, when you are instructed to use a proxy server by your Internet service provider), be sure to prepare the proxy address and the port number in advance. 1 Press SETTINGS to enter the settings menu and select “Network Settings.” 2 When “Playback and network functions cannot be used during the setup. Press ENTER to continue.” appears, press ENTER. Confirming the network settings You can confirm the network status and settings.
Enjoying audio content Listening to an iPod or iPhone • When “Remote UI Mode” is set to “On”: You can operate your iPod/iPhone with the remote control and listen to audio content stored on your iPod/iPhone. See “Compatible iPod/iPhone models” (page 73) for iPod/iPhone models that can be connected to this unit. Operate the iPod/iPhone with the remote control of the unit or the main unit, browsing the items on the display of the unit. For details on “Remote UI Mode,” see page 34.
Notes To • The cover art and released year cannot be displayed on • the unit. The unit does not save the information on the last track played if one of the following operations is carried out. – The power cord is disconnected from the wall outlet. – The iPod/iPhone is removed from the unit. – The unit is turned off and enters the network standby - off mode. – The play mode was set to a mode other than “Normal” when the unit was last turned off. – “Remote UI Mode” is changed.
• Remote UI mode - off (factory setting): You can use the buttons and controls on your iPod/iPhone to operate it. You can also use some buttons on the unit and the remote control, but the iPod/iPhone content lists are not displayed on the unit. Notes • An iPod/iPhone cannot be charged when the unit is • • • • Note You cannot use the buttons and controls on your iPod/ iPhone in the remote UI mode - on mode. • • To change the operation mode, do the following.
Listening to DAB/DAB+ (available for the UK model only) You can tune in DAB/DAB+ stations. Presetting stations in advance allows you to recall them by number. DAB/DAB+ stations can be received with the UK model only. Tip You can perform the Initial Scan manually. Press OPTIONS and select “Initial Scan.” When “Start Initial Scan? Press ENTER.” appears, press ENTER.
Press DISPLAY repeatedly to view information such as ensemble label or frequency of the current station. Press BACK to return to the service component list. Tip For better broadcast reception, try changing the direction or location of the antenna (aerial). For example, position the antenna near or outside a window. If the reception does not improve, it is recommended that you connect an optional external antenna.
Listening to audio content stored on a server This unit can play audio content that is stored on a server device (such as a computer) that supports the DLNA (Digital Living Network Alliance) standards. To listen to audio content stored on a server • First of all, you need to connect the unit to your home network. t See “Connecting the unit to your home network (network settings)” (page 25) • When you connect the unit to a home network, you need to set up the server.
1 Go to [Start] - [Control Panel]. 6 Select [Change advanced sharing settings]. 2 Select [View network status and tasks] under [Network and Internet]. 7 Select [Choose media streaming options...] from [Media streaming]. 8 If [Media streaming is not turned on] appears in the Media streaming options window, select [Turn on media streaming]. 9 Select [Allow All]. Enjoying audio content The [Network and Sharing Center] window appears.
11 12 Select [OK] to close the window. Connect the unit to the server. After you finish setting up Windows Media Player 12, refresh the server list of the unit and select this server from the server list. For details on selecting a server, see “To refresh the server list” (page 43). The [Network and Sharing Center] window appears. 5 Select [Customize].
10 Select [Settings...] that appears beside [Share my media to:]. 11 Add a check mark to [Allow new devices and computers automatically] and select [OK]. Note Uncheck this item after you confirm that the unit can connect to the server and play audio data on the server in step 12. 12 Playing audio content stored on a server The unit can play audio content stored on the server in the MP3, LinearPCM, WMA, AAC* and HE-AAC formats.
• Press BACK to go to the next higher directory. • Press ENTER to go to the next lower directory. 4 Artist name Track (item) number Track name Elapsed time Codec Tips • If you select a folder (such as an artist folder, genre folder, etc.) and press the N button, the unit plays all items in the selected folder.
To refresh the server list If you cannot find the desired server in the server list (such as when you add a new server on the network but it does not appear on the server list, or when the server you normally use does not appear in the server list), refresh the server list. 1 Press FUNCTION repeatedly to select the Home Network function. If the unit automatically connects to the server that it was connected to the last time, press BACK repeatedly until the server list appears. 2 “Scanning...
Listening to music services You can listen to music services offered on the Internet with this unit (Music Services function). To use this function, the unit has to be connected to the network and the network has to be connected to the Internet. For details on setting up the network, see “Connecting the unit to your home network (network settings)” (page 25). Refer to the following URL for details and further information on Music Services. http://www.sony.
To refresh the service list If the unit cannot find the music services, refresh the service list. 1 2 Press SETTINGS to enter the settings menu and select “Music Services Settings.” When “Playback and network functions cannot be used during the setup. Press ENTER to continue.” appears, press ENTER. When “ ” is displayed, the message is continued to the next page. Press m to see the entire text string. Press BACK repeatedly until the list of service providers appears.
To check the registration code You may be required to enter the registration code of the unit when you enjoy a new music service. 1 Press SETTINGS to enter the settings menu and select “Music Services Settings.” 2 When “Playback and network functions cannot be used during the setup. Press ENTER to continue.” appears, press ENTER. When “ ” is displayed, the message is continued to the next page. Press m to see the entire text string. 3 Select “Registration Code.
Listening to audio content from an external component (Audio In) 1 Press VOLUME – to turn the volume down to its lowest level. To adjust the input level If the sound volume is too high or too low, you can change the input level on the unit according to the output level of the connected component. 1 While the AUDIO IN function is selected, press OPTIONS to enter the options menu and select “AUDIO IN Sensitivity.” 2 Select “Low(Line Out)” or “High(Headphone Out).
Changing the play mode You can listen to tracks in random order (shuffle play) or one track repeatedly (repeat play). play mode can be changed with the iPod & iPhone function and the Home Network function only. Play mode/ indicator Description Normal/(none) The unit plays all tracks for the selected playback range (artist, album, etc.) in sequential order. Repeat/REP The unit plays all tracks for the selected playback range (artist, album, etc.) repeatedly.
Searching for an item using a keyword When a list of an item (such as an artist list, a track list, etc.) is displayed, you can enter a keyword to search for the desired item. This function can be used for the iPod & iPhone function*, the Home Network function, and the Music Services function. Input area Current location of the cursor/ number of characters you have entered 3 Numeric/ text buttons When you finish entering the keyword, press ENTER. “Searching…” appears on the display.
Enjoying Sony Multiple-Room Products Using the PARTY STREAMING function You can play back audio content that is being played back on this unit or on another device that has a PARTY STREAMING function at the same time, via your home network. While using the PARTY STREAMING function, the device that starts a PARTY and streams the audio content is called the “PARTY host,” and the device that joins a PARTY and plays the audio content streamed from the PARTY host is called a “PARTY guest.
Joining a PARTY The unit can join a PARTY which has been started by another device so that you can enjoy the same audio content as that being played in a different room. When another device (PARTY host) is having a PARTY, press PARTY. The unit joins the PARTY as a PARTY guest. To leave a PARTY Press PARTY. Tips • If the “Network Standby” mode of the unit is set to Notes • You cannot join a PARTY in the following cases: – you have a PARTY on this unit. – you have already joined another PARTY.
Connecting the unit with other DLNAcompliant devices This unit complies with the DLNA standard. You can enjoy listening to music in various ways by connecting the unit to other DLNA-compliant devices over your home network. When using the unit together with other DLNAcompliant devices, the unit can perform three different roles, as a server, as a player, and as a renderer (network controlled player). About DLNA DLNA is an abbreviation for Digital Living Network Alliance.
This section explains how to enjoy music with DLNA-compliant devices on your home network, using some examples. Note The unit is set to allow all devices access to the unit automatically as the factory setting. You can select and register devices which can or cannot access this unit. For details, see “Setting up access permission” (page 55) and “Using lists of permitted and non-permitted devices” (page 55).
Playing audio content streamed from a server (such as a computer) using a controller You can use a DLNA controller to stream audio content stored on a server (such as a computer) to the unit. • Check that all devices are connected to your home network and set up correctly. • Check that the unit and the server are turned on or the unit and the server are in the network standby - on mode. • Check that the unit and the controller are allowed to access the server.
Additional information Setting up the functions related to network operations 4 Select “Auto” or “Manual.” Display SETTINGS Manual When a new device accesses the unit, the unit does not add the device to the list of permitted devices, but to the “Pending Devices” list of the unit (page 55). OPTIONS When a new device is added on the network and accesses the unit, you can select whether the unit adds the device to the list of permitted devices automatically or manually.
As “Access Permission Settings” is set to “Auto” (factory setting) (page 55), the unit adds new devices that have accessed the unit to the “Permitted Devices” list automatically. You can view each list and edit it. Up to 20 devices can be added to a list. Display Description Delete All You can select from “Cancel” and “OK.” Select “OK” to delete all the devices on the list.
3 4 Select “SMART SELECT.” Naming the unit Select “On” ( ) or “Off.” You can name this unit so that the unit can be recognized by this name by other devices on the home network. ( : Factory setting) 1 Press SETTINGS to enter the settings menu and select “Optional Network Settings.” 2 You can set the unit to use the PARTY STREAMING function. When “Playback and network functions cannot be used during the setup. Press ENTER to continue.” appears, press ENTER.
Changing the sound setting DSGX SOUND EFFECT SETTINGS Selecting a sound style You can select a sound style from five preset equalizer settings to match the genre of the music. M/m/ENTER Press SOUND EFFECT repeatedly. Each time you press the button, the sound style changes as follows. “Standard” ( ) t “Dynamic” t “Relax” t “Vivid” t “Live” t “Standard” t ... ( Generating a more dynamic sound (Dynamic Sound Generator X-tra) You can reinforce the bass and the treble to create a more powerful sound.
Using the timer on the display. It keeps flashing until the unit enters the standby mode. You can change the function (sound source, such as the iPod & iPhone function, the Home Network function, etc.) before the Sleep Timer turns the unit off. After the selected time elapses, the unit enters standby mode automatically.
2 • If the unit is already turned on at the preset starting Press TIMER. time, the Play Timer will not be activated. • The Play Timer may not be activated depending on the status of the connected iPod/iPhone. 3 • If you select the Music Services function as the sound When “TIMER Setting” appears, press ENTER. The “Start Time” setting display appears, and the “cPLAY” indicator starts flashing rapidly. 4 Set the starting time. Press M/m to change the hour and press ,.
Viewing the information of the unit You can view the information of the unit. SETTINGS M/m/ENTER Press SETTINGS to enter the settings menu and select “Device Details.” 2 Select the item you want to view. Display Description Model Name This is the name that is set for this unit and is displayed on the server. System Software You can view the firmware version of this unit. MAC Address(Wired LAN) You can check the MAC address for the wired network of the unit.
Managing the system 2 SETTINGS M/m/ENTER When “Playback and network functions cannot be used during the setup. Press ENTER to continue.” appears, press ENTER. When “ ” is displayed, the message is continued to the next page. Press m to see the entire text string. The unit starts checking the available system update. Updating the system application By downloading the latest version of the system application, you can take advantage of the newest functions.
To go back to the previous display Press BACK before the unit starts the system update. You cannot go back to the previous display after the update starts. Formatting the system This function formats the unit and restores it to the condition it was at the time of purchase. Note that this process deletes all settings and information (e.g., clock setting, network settings). Press SETTINGS to enter the settings menu and select “All Reset.
Troubleshooting Troubleshooting If a problem occurs while operating the unit, follow the steps described below before consulting your nearest Sony dealer. If an error message appears, it is recommended that you make a note of its contents for reference. 1 Check to see if the problem is listed in this “Troubleshooting” section. 2 Check the following customer support site.
The on/standby indicator remains lit after you unplug the power cord. , The on/standby indicator may not turn off immediately after you unplug the power cord. This is not a malfunction. The indicator will turn off after 30 seconds. The clock is displayed after you turn the unit off. , If the “Network Standby” mode is set to “On,” the clock is displayed when the unit is turned off. information on the network connection, refer to the customer support site (page 64).
The iPod/iPhone cannot be charged. , Make sure the iPod/iPhone is connected securely. , You can use the unit as a battery charger for an iPod/ iPhone when the unit is on or when “Network Standby” set to “On” (page 35). “Remote UI Mode” is automatically set to “On” when an iPod/iPhone is connected to the iPod/iPhone dock of the unit. , This may sometimes happen, depending on the iPod/ iPhone model you are using. “Remote UI Mode” cannot be set to “Off.
, You cannot play the following tracks: • A track that violates playback restrictions. • A track with irregular copyright information. • A track that you purchased at an online music store that does not allow home network streaming. • A track in a format not supported by the unit (page 41). , Confirm that the selected track has not been erased from the server. If the track has been erased, select another track. , Make sure that the router/wireless LAN router/access point is turned on.
Music Services You cannot connect the unit to a service. The unit works poorly. , Make sure that the router/wireless LAN router/access , The unit may be under the influence of static point is turned on. , Confirm the network status. Enter the settings menu and select “Network Settings” - “Tools” “Connection Diagnosis” (page 32). If an error occurs, an error number appears and “!” appears next to the error item.
Messages No Service Common messages There is no service available. Perform DAB/DAB+ Initial Scan (page 36), or refresh the service list (page 45). Browse Limit Not Available You tried to select the 11th level in a file tree while the unit can select down only to the 10th level. The operation that you performed is unavailable or invalid. Cannot connect.
No more can be added. System update You cannot add anymore items. (Appears when you try to add a server to a list.) Cannot download. No Server The unit failed downloading the update data while performing the system update. Enter the settings menu and update the system again (page 62). There is no server that the unit can connect to. Try refreshing the server list (page 43). Music Services The unit cannot update the system application. Contact your nearest Sony dealer. Cannot refresh Service List.
Precautions/Specifications Precautions On safety About the AC adaptor • Completely disconnect the power • Use the AC adaptor supplied with cord (mains lead) from the wall socket (mains) if it is not going to be used for an extended period of time. When unplugging the unit, always grip the plug. Never pull the cord itself. Should any solid object or liquid get into the unit, unplug the unit, and have it checked by qualified personnel before operating it again.
Specifications Wireless LAN section Frequency Label 201.072 MHz 8D Compatible standards: 202.928 MHz 9A 204.640 MHz 9B 206.352 MHz 9C 208.064 MHz 9D Radio frequency: 209.936 MHz 10A Power consumption: 2.4 GHz 211.648 MHz 10B 10 watts 213.360 MHz 10C DAB/DAB+ tuner section (UK model only) 215.072 MHz 10D 216.928 MHz 11A 218.640 MHz 11B Approx. 5.3 watts at the network standby - on mode 0.5 watts or lower at the network standby - off mode 220.352 MHz 11C Tuner: 222.
Compatible iPod/iPhone models You can use the following iPod/iPhone models on this unit. Update your iPod/iPhone with the latest software before using it.
The menu tree for the settings menu You can set the various settings using the settings menu. The following menu tree shows an overview of the settings for the settings menu.
Glossary AAC DNS MP3 Abbreviation for Advanced Audio Coding. It is a standard for audio file compression determined by the MPEG (Motion Picture Experts Group), an ISO (International Organization for Standardization)/ IEC (International Electrotechnical Commission) working group. Abbreviation for Domain Name System. A server that translates domain names to IP addresses, or IP addresses to domain names. A DNS is identified by an IP address. Also called a “DNS server.
WEP Abbreviation for Wired Equivalent Privacy. An encryption key used in wireless LAN networks. As an IEEE standard based on RC4 algorithm cryptography, WEP is used to secure IEEE 802.11b wireless networks. During the transmission of a message between a wireless LAN access point and a client device, the sending side encrypts the data and the receiving side decrypts it. For communication to occur, both devices must use a common code key, which is called the “WEP key.
Precautions/Specifications Index A E N AAC 75 Access control 56 Access Permission 55 Access point 27 Alphabet search 49 Audio format 41 Audio In 47 Editing Permitted/Pending devices list 56 Server list 43 Name of the unit Add 57 Check 61 Network name 26 Network settings 25 Confirm 32 Connection method 25 Optional settings 55 Wired 30 Wireless 26 Network standby 17, 18 C D DAB/DAB+ Initial Scan 36 Listening 36 Preset 37 DAB/DAB+ wire antenna 10, 15 Default gateway 31, 32 DHCP 75 DLNA 52, 75 Player 5
Server 31, 38 Audio format 41 Delete 43 List 43 Listening 41 Refresh 43 Windows 7 38 Windows Vista/XP 40 Server list Delete 43 Refresh 43 Settings Access permission 55 Clock 23 Initial setup 21 Network connection 25 Optional network settings 55 Server 38 Sound 58 Timer 59 Windows 7 38 Windows Vista/XP 40 Settings menu 18 Sleep Timer 59 SMART SELECT 56 SOUND EFFECT 58 Sound sources that can be streamed from the unit 52 SSID 26, 75 Standby mode 17, 18 Subnet mask 31, 32 Supplied accessories 10 Support site 64
END-USER LICENSE AGREEMENT FOR SONY SOFTWARE You should carefully read the following agreement before using the SONY SOFTWARE (defined below). Using the SONY SOFTWARE indicates your acceptance of the agreement. If you do not agree with it, you are not authorized to use the SONY SOFTWARE.
SONY AUTHORIZED REPRESENTATIVE SHALL CREATE A WARRANTY OR IN ANY WAY INCREASE THE SCOPE OF THIS WARRANTY. SOME JURISDICTIONS DO NOT ALLOW THE EXCLUSION OF IMPLIED WARRANTIES, IN WHICH CASE THE ABOVE EXCLUSION WOULD NOT APPLY TO YOU. Without limiting any of the foregoing, it is specifically provided that the SONY SOFTWARE is not designed or intended for use on any product other than the PRODUCT.
Important information on software Included with this product are software applications for which permission for use has been obtained either directly or indirectly by Sony Corporation (hereafter Sony) through a third party. Make sure to read this important information regarding these software applications.
GNU GENERAL PUBLIC LICENSE Version 2, June 1991 Copyright (C) 1989, 1991 Free Software Foundation, Inc. 51 Franklin Street, Fifth Floor, Boston, MA 02110-1301, USA Everyone is permitted to copy and distribute verbatim copies of this license document, but changing it is not allowed. Preamble The licenses for most software are designed to take away your freedom to share and change it.
you provide a warranty) and that users may redistribute the program under these conditions, and telling the user how to view a copy of this License. (Exception: if the Program itself is interactive but does not normally print such an announcement, your work based on the Program is not required to print an announcement.) These requirements apply to the modified work as a whole.
or she is willing to distribute software through any other system and a licensee cannot impose that choice. This section is intended to make thoroughly clear what is believed to be a consequence of the rest of this License. 8.
License. Of course, the commands you use may be called something other than `show w’ and `show c’; they could even be mouse-clicks or menu items--whatever suits your program. You should also get your employer (if you work as a programmer) or your school, if any, to sign a “copyright disclaimer” for the program, if necessary. Here is a sample; alter the names: Yoyodyne, Inc., hereby disclaims all copyright interest in the program `Gnomovision’ (which makes passes at compilers) written by James Hacker.
recipients should know that what they have is not the original version, so that the original author’s reputation will not be affected by problems that might be introduced by others. Finally, software patents pose a constant threat to the existence of any free program. We wish to make sure that a company cannot effectively restrict the users of a free program by obtaining a restrictive license from a patent holder.
c) You must cause the whole of the work to be licensed at no charge to all third parties under the terms of this License.
b) c) d) e) 1 and 2 above); and, if the work is an executable linked with the Library, with the complete machine-readable “work that uses the Library”, as object code and/or source code, so that the user can modify the Library and then relink to produce a modified executable containing the modified Library. (It is understood that the user who changes the contents of definitions files in the Library will not necessarily be able to recompile the application to use the modified definitions.
geographical distribution limitation excluding those countries, so that distribution is permitted only in or among countries not thus excluded. In such case, this License incorporates the limitation as if written in the body of this License. 13.The Free Software Foundation may publish revised and/or new versions of the Lesser General Public License from time to time. Such new versions will be similar in spirit to the present version, but may differ in detail to address new problems or concerns.
Notice regarding other third-party software This product contains the following software applications for which Sony has been licensed either directly or indirectly by third parties. 1. OpenSSL (including the library called “Original SSLeay”) 2. libcurl 3. libjpeg 4. libpng 5. ncurses 6. ntp 7. zlib 8. Expat 9. NetBSD 10.libcap By request of the copyright holders of these software applications, Sony provides our customers with the following notice. 1. OpenSSL Copyright (c) 1998 - 2007 The OpenSSL Project.
SOFTWARE, EVEN IF ADVISED OF THE POSSIBILITY OF SUCH DAMAGE. 2. libcurl COPYRIGHT AND PERMISSION NOTICE Copyright (c) 1996 - 2008, Daniel Stenberg, . All rights reserved. Permission to use, copy, modify, and distribute this software for any purpose with or without fee is hereby granted, provided that the above copyright notice and this permission notice appear in all copies.
1. Redistributions of source code must retain the above copyright notice, this list of conditions and the following disclaimer. 2. Redistributions in binary form must reproduce the above copyright notice, this list of conditions and the following disclaimer in the documentation and/or other materials provided with the distribution. 3.
Trademarks, etc. • This software is based in part on the work of the • • THIS PRODUCT IS LICENSED UNDER THE AVC PATENT PORTFOLIO LICENSE FOR THE PERSONAL AND NON-COMMERCIAL USE OF A CONSUMER TO (i)ENCODE VIDEO IN COMPLIANCE WITH THE AVC STANDARD (“AVC VIDEO”) AND/OR (ii)DECODE AVC VIDEO THAT WAS ENCODED BY A CONSUMER ENGAGED IN A PERSONAL AND NON-COMMERCIAL ACTIVITY AND/OR WAS OBTAINED FROM A VIDEO PROVIDER LICENSED TO PROVIDE AVC VIDEO. NO LICENSE IS GRANTED OR SHALL BE IMPLIED FOR ANY OTHER USE.