NW-HD3 Operating Instructions Network Walkman Portable Hard Disk Audio Player To go to the section you want to read, click the title in the PDF Bookmarks, the title in the “Table of Contents” of the Operating Instructions, or the page in the sentences.
Owner’s Record For the customers in the USA The model and serial numbers are located at the rear of the player. Record the serial number in the space provided below. Refer to these numbers whenever you call upon your Sony dealer regarding this product. Model No. NW-HD3 Serial No. ___________________________ INFORMATION: WARNING To prevent fire or shock hazard, do not expose the unit to rain or moisture. Do not install the appliance in a confined space, such as a bookcase or built-in cabinet.
Table of Contents Notice for Users .............................................. 4 Precautions ....................................................... 5 On safety ................................................................. 5 On installation....................................................... 5 On heat build-up .................................................. 5 On the headphones .............................................. 5 On cleaning ..........................................................
Notice for Users On the supplied software • Copyright laws prohibit reproducing the software or the manual accompanying it in whole or in part, or renting the software without the permission of the copyright holder. • In no event will SONY be liable for any financial damage, or loss of profits, including claims made by third parties, arising out of the use of the software supplied with this player.
Precautions On safety • Do not put any foreign objects in the DC IN jack of the USB adaptor. • Be sure not to short-circuit the terminals of the USB adaptor with other metallic objects. Caring for others Keep the volume at a moderate level. This will allow you to hear outside sounds and to be considerate to the people around you. Warning If there is lightning when you are using the player, take off the headphones immediately.
Getting Started Checking the Supplied Accessories • Headphones (1) • USB adaptor (1) (For connecting to the supplied USB cable and the supplied AC power adaptor) • Dedicated USB cable (1) • AC power adaptor (1) • Carrying case (1) • CD-ROM (1) * (SonicStage, PDF of Operating Instructions) • Quick Start Guide (1) * Do not play this CD-ROM on an audio CD player. For customers in the US The AC power adaptor supplied with this unit is not intended to be serviced.
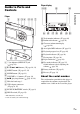
Guide to Parts and Controls Player display Getting Started Player Track number indicator ( page 20) Bookmark indicator ( page 24) Character information display ( page 20) Atrac3plus/MP3 indicator ( page 19) Playback progress bar ( page 20) Playback indicator ( page 20) (headphones)/LINE OUT jack ( page 18) , , , buttons ( page 20, 21) MENU button ( page 25, 29) MODE button ( page 21) VOLUME +*/– buttons ( pa
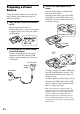
3 Preparing a Power Source Charge the built-in lithium-ion rechargeable battery before using it for the first time or when it is depleted. 1 Slide the BUILT-IN BATTERY switch to ON. The protection for the built-in rechargeable battery is released and power is supplied to the player. Keep the switch to ON position. Connect the USB adaptor to the player. Insert the USB adaptor as shown below until it clicks into place. Charging of the battery starts.
To remove the USB adaptor from the player While pressing the gray buttons on both sides, push the USB adaptor inward, and then pull it outward. Turn on your computer and connect the USB cable to your computer ( page 14). The CHG lamp lights up on the USB adaptor and charging of the battery starts. It takes approximately 5 hours to charge. When the player is connected to the AC power adaptor, the power is supplied from the AC power adaptor.
Installing SonicStage on Your Computer Using the supplied CD-ROM, install the SonicStage on your computer. Preparing the required system The following system environment is required. Computer Operating System Display Others IBM PC/AT or Compatible • CPU: Pentium II 400 MHz or higher (Pentium III 450 MHz or higher is recommended.) • Hard disk drive space: 200 MB or more (1.5 GB or more is recommended.
Installing SonicStage 1 Turn on your computer and start up Windows. 2 Insert the supplied CD-ROM into the CD drive of your computer. The setup program starts up automatically and the installation window appears. Depending on the region, a window may appear asking you to select your country. In this case, follow the displayed instructions. 3 Click the region in which you will use SonicStage software. 4 Click “Install SonicStage,” and then follow the displayed instructions.
Importing Audio Data to Your Computer 1 Record and store tracks (audio data) from an audio CD to the SonicStage “My Library” on the hard disk drive of your computer. You can record or import tracks from other sources such as the Internet and your computer’s hard disk. Refer to SonicStage Help for details ( page 16).
3 4 If necessary, change the format and bit rate for audio CD recording. Click “Format/Bit Rate” on the right side of the SonicStage window to display “CD Recording Format [My library]” dialog box. The default setting is OpenMG Audio (ATRAC3plus) for format and 64 kbps for bit rate. 5 Click on the SonicStage window. The recording of the selected tracks starts. To stop recording Click window.
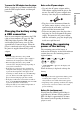
Transferring Audio Data to the Player Transfer the tracks (audio data) stored in SonicStage “My Library” on your computer to the player in ATRAC3plus/MP3 format. The audio data to be transferred includes the information, such as an artist name and an album name (original album name) in the CD information. “Transfer” “ATRAC Audio Device” 1 Connect the USB adaptor to your computer and the AC power adaptor. Connect from to as shown below.
2 USB adaptor connector USB adaptor 3 Click “Transfer” on the right side of the SonicStage window. The screen is switched to the Transfer window. 4 Select “ATRAC Audio Device” from the Transfer Destination list on the right side of the SonicStage window. 5 Click the tracks you want to transfer from the My Library list on the left side of the SonicStage window. To transfer more than one track, hold down the “Ctrl” key while selecting the tracks. To transfer all tracks of the album, click the album.
Notes • Do not disconnect the USB cable or the USB connector while the data is being transferred. If you do, the data being transferred may be destroyed. • Use of the player with a USB hub or a USB extension cable is not guaranteed. Always connect the player to the computer directly using the supplied USB cable. • Some USB devices connected to the computer may interfere with the proper operation of the player. • The control buttons on the player are all disabled while it is connected to a computer.
To understand SonicStage Help The left side frame The right side frame To search for a word inside an explanation “Type in the keyword to find” text box “Search” “List Topics” Getting Started 1 Double click “ Overview” in the leftside frame of SonicStage Help. 2 Click “ About This Help File.” The explanation will appear in the rightside frame. Scroll the display if necessary. Click underlined words to jump to their explanations.
Playback Playing Back 2 Transfer audio data from your computer to the player beforehand ( page 14). You can change the language to your own for the menu and the messages in the display ( page 31). 1 Press . (play) appears on the left bottom of the display and the player starts playback. After setting the BUILT-IN BATTERY switch to ON ( page 8), connect headphones to the player. Headphones to (headphones)/ LINE OUT jack appears. 3 Adjust the volume by pressing VOLUME +/–.
Notes • MP3 format files that are not playable on the player can still be transferred to the player. • When trying to play an MP3 audio track that cannot be played on this player, playback will stop. Press to select other tracks. • When using the built-in battery, if the player is not operated for about 30 seconds while in stop mode, the display automatically turns off. When scrolling track titles, etc., the display turns off about 30 seconds after scrolling is finished.
Basic playback operations (Play, stop, search) To Operation Play from a point where you stopped the player previously Press . Playback starts from the point where you stopped. Stop playback Press . Find the beginning of the current track Press once. Find the beginning of previous tracks* Press repeatedly. Find the beginning of the next track* Press once. Find the beginning of succeeding tracks* Press repeatedly. Go backwards quickly Press and hold .
Playing Back Tracks Selected by MODE 1 (Artist, Album, Genre, Group, etc.) Artist ( ) Album ( )* Genre ( ) Group ( )** Others Return to Artist MODE appears. Playback By grouping the tracks in the player into a “MODE,” such as by “Artist” or “Album,” you can select tracks you want to listen to. There are five MODEs, and the steps here use the displays of the “Artist” MODE as an example. For details about the displays of each MODE, see page 23.
3 To search tracks more, press . Artist selected in step 2. To return to the display where you start playback Press and hold MODE. To return to the display where you select a MODE Press MODE. To return to the track list Press or . Albums of the selected artist appear. 4 22 GB Press or to select an item, and then press . Playback starts from the track you selected or the first track of the item (artist, album, etc.) you selected.
MODE displays The display differs depending on the MODE. You can start playback by pressing in all the displays.
Adding a bookmark (Bookmark track play) You can play your favorite tracks by adding a Bookmark to them. To play bookmarked tracks, select “Others” MODE ( page 21). 1 During playback of the track where you want to add a Bookmark, press and hold or . The number of bookmarks (the number of bookmarked tracks/the number of possible bookmark) appears, and then (Bookmark) lights up. 2 If you want to add a Bookmark to two or more tracks, repeat step 1. You can add Bookmarks to up to 100 tracks.
Changing Playback Options (Play Mode) 3 1 2 Press MENU. The MENU display appears. Press or to select “Play Mode,” and then press . The Play Mode display appears. Playback You can use various playback options, such as selecting songs you want to listen to and playing songs in random order. For details about playback options (Play Mode), see page 26, 27. You can also play songs repeatedly using the playback options you choose (repeat play, page 28).
Playback options (Play Mode) A range of tracks to be played (“Play unit” page 27) differs depending on the MODE ( page 21) where you start playback. In the MENU display/icon Normal/No icon (Normal play) 1 Track/1 (Single play) Play Unit/ (Play unit play) Track SHUF/ SHUF (Shuffle play) SHUF Unit SHUF/ (Play unit shuffle play) 26 GB Explanation All the tracks after the selected track are played once in the track number order. When you select an item (album, artist, etc.
What is a “play unit” ? All the items (an artist, an album, a track, etc.) on the list when you start playback is called a “play unit.” When you change the Play Mode, the play unit changes to all the tracks recorded in the player. On playback of a play unit Example: When you select Artist MODE Albums Tracks All the tracks of all the artists make a play unit. All the tracks in all the albums of the artist “Y & J” make a play unit.
Playing tracks repeatedly (Repeat play) Playback of tracks repeats in the playback options selected in page 25. 1 Select the playback option you want to repeat ( page 25). 2 Press MENU. The MENU display appears. To repeat all the tracks Select a MODE other than “Others” (“Artist” MODE, etc.) and then follow steps 1 to 5. To cancel set up Press MENU to return to the MENU display. Press and hold MODE or press MENU in the MENU display to return to the display before step 2.
Changing Sound Quality and Settings For details about various setting items, see page 30. 1 Press MENU. The MENU display appears. To return to the previous display Press . To cancel set up Press MENU to return to the MENU display. Press and hold MODE or press MENU in the MENU display to return to the display before step 1. Note When “V-SUR” or “Sound EQ” is selected, the sound settings do not work for MP3 tracks. To change sound quality of MP3 tracks, adjust the “Digital Sound Preset” sound setting.
Setup items Item Options (: Default setting) Sound (Sound setting) Off V-SUR1) 2) Sound EQ1) 2) Digital Sound Preset2) AVLS 3) (Limiting volume) On Off Beep (Sound of operation) On Audio Out (External audio output) Headphone Contrast (Adjustment of the display) Second Off Line Out from the right – to + Plays tracks in normal sound quality. Studio (VS) Live (VL) Club (VC) Arena (VA) Heavy (SH) Pops (SP) Jazz (SJ) Unique (SU) Custom1 (S1) Recreates the sound of a recording studio.
Items Backlight (LCD backlight of the display) Language (Display language) The messages and the menus are in Japanese. The messages and the menus are in English. English Français The messages and the menus are in French. Deutsch Italiano The messages and the menus are in German. The messages and the menus are in Italian.
Customizing sound quality (Sound EQ - Custom) You can adjust the sound quality for each frequency range individually, checking the settings on the display. 1 After selecting “Sound” in step 2 in “Changing Sound Quality and Settings” ( page 29), select “Custom1” or “Custom2” of “Sound EQ.” 4 Repeat steps 2 and 3 to make adjustments for the remaining frequency ranges. 5 Press . The MENU display appears. To cancel set up Press MENU to return to the MENU display.
Adjusting treble and bass emphasis 3 (Digital Sound Preset) You can preset the treble and bass levels to your preference. While checking the display, adjust the emphasis settings. 1 Press or to select the sound level. The sound level can be adjusted in eight levels. Sound quality Bass Treble 4 Default settings Sound quality 2 Custom3 Custom4 (S3) (S4) Bass +1 +3 Treble ±0 ±0 OFF (NORMAL SOUND) ±0 ±0 Press or to select “Treble” or “Bass”.
Other Functions Transferring Audio Data Back to Your Computer 4 Click the tracks you want to transfer to My Library in the Network Walkman list on the right side of the SonicStage window. To transfer more than one track, hold down the “Ctrl” key while selecting the tracks. To transfer all tracks of the album, click the album. 5 Click on the SonicStage window. Transfer of the tracks selected in step 4 starts. You can check the transferring status on the SonicStage window.
Connecting Other Devices You can listen to tracks through a stereo system and record tracks in the player onto a MiniDisc or a cassette tape. See the instruction manual that comes with the device you want to connect. Be sure to turn off all devices before making the connections and changing the settings and explained below. to (headphones)/ LINE OUT jack You need to change the setting for “Audio Out” in the MENU display to output sound to the connected device. The settings of “Audio Out” are shown below.
Storing Data Other Than Audio Files Resetting to the Factory Settings You can transfer data from the hard disk of a computer to the built-in hard disk of this player using Windows Explorer. The built-in hard disk of the player is displayed in Windows Explorer as an external drive (as a removable storage). Reset all the settings in the MENU display to the factory settings. 1 While the player is stopped, press MENU. The MENU display appears. 2 Press or to select “Format,” and then press .
4 Press to select “Yes,” and then press . The message appears, and then the Format display appears. To cancel set up In step 4, select “No,” and then press . The Format display appears. Press MENU to return to the MENU display. Press and hold MODE or press MENU in the MENU display to return to the display before step 1. To return to the display where you select a MODE Press MODE. Initializing Hard Disk You can initialize the built-in hard disk of the player.
3 Press to select “Initialize Hard Disk,” and then press . The Initialize Hard Disk display appears. 4 Press to select “Yes,” and then press . 5 Press to select “Yes,” and then press . The message appears, and then the Format display appears. To cancel set up In step 5, select “No,” and then press . The Format display appears. Press MENU to return to the MENU display. Press and hold MODE or press MENU in the MENU display to return to the display before step 1.
Additional Information Notes on Disposing of the Unit 4 Slide the side part () and remove the two screws () on the side of this player. This player has a built-in lithium-ion rechargeable battery. When you dispose of the player, be sure to dispose of it properly. Certain countries may regulate disposal of the battery used to power this product. Please consult with your local authority. Notes • Never disassemble the player except when disposing it.
7 Remove the built-in battery. 8 Pull the connecting cord between the battery and the player to separate the connector.
Troubleshooting If you experience trouble with your player, try the following solutions. 1 Set the BUILT-IN BATTERY switch to OFF, and then set to ON again. The data is not lost when you set it to OFF. 2 Check the symptoms in “Troubleshooting.” 3 If the problem persists, consult your nearest Sony dealer. Power Symptom The CHG lamp does not light. Case and/or corrective action The terminals of the USB adaptor are dirty. Wipe them with a soft, dry cloth. The player is not connected to the USB adaptor.
Sound Symptom There is no sound. Noise is heard. Case and/or corrective action The volume does not increase. “AVLS” is set to “On.” Set it to “Off” ( page 30). There is no sound from the right channel of the headphones. The headphone plug is not connected properly. Connect it to (headphones)/LINE OUT jack securely ( page 18). The volume cannot be adjusted. “Audio Out” is set to “Line Out.
The display turns off. The display automatically turns off if there is no operation for about 30 seconds (when using the battery) or about 3 minutes (when using the AC power adaptor) in stop mode. When scrolling track titles, etc., the display turns off about 30 seconds or about 3 minutes after scrolling is finished. Also, the display turns off when pressing and holding MENU. For all the cases, press any button to turn on the display again.
Symptom The player is not recognized by the computer when it is connected to the computer. Case and/or corrective action The USB adaptor is not connected correctly to the player. Insert the USB adaptor securely until it reaches to the end and clicks into place ( page 8). The USB cable is not connected properly. Disconnect the USB cable and then reconnect it. A USB hub is used. Connecting via a USB hub is not guaranteed. Connect the USB cable directly to the computer.
Symptom Case and/or corrective action Audio data is transferred back to your computer and remaining transferable count increases without operations occasionally when the player is connected to the computer. If a track is deleted from the player using the SonicStage software installed on a computer other than the one used for transfer to the player, the track will be transferred back automatically when the player is connected to the computer that you used for transfer to the player.
Error Messages Follow the instructions below if an error message appears in the display. Message AVLS NO VOLUME OPERATION BOOKMARK FULL Meaning The volume exceeds the maximum volume of AVLS. Set “AVLS” to “Off” ( page 30). The number of bookmarks exceeds the limit. Remove unnecessary bookmarks ( page 24). CANNOT OPERATE STOP “Format” in the MENU display is selected during playback. Stop playback and select “Format” again.
Message HDD NOT INITIALIZED CORRECTLY Meaning • The hard disk of the player is not correctly initialized. • The hard disk of the player was initialized on the computer. • The hard disk of the player has not been initialized because it was changed. The HOLD switch is set to ON. Corrective action When “Audio Out” is set to “Line Out,” you are trying to change the volume or the setting of “Sound.” There is no remaining battery power. Set “Audio Out” to “Headphone” ( page 30).
Specifications Index Maximum recordable number of track (Approx.)* Symbols ATRAC3 5,000 (132 kbps) 6,000 (105 kbps) 10,000 (66 kbps) ATRAC3plus 2,500 (256 kbps) 10,000 (64 kbps) 13,000 (48 kbps) MP3 5,000 (128 kbps) 10,000 (64 kbps) * When transferring four-minute tracks Sampling frequency 44.1 kHz (ATRAC3plus), 32/44.
D P Deutsch 31 Digital Sound Preset 30, 33 Player display 7, 20 Play Mode 26 Play Unit 27 Play unit play 26 Play unit shuffle play 26 Pops 30 Positive 31 E English 31 Español 31 F Find the beginning of a track 20 Français 31 G Genre 23 Group 23 Grouping tracks 21 H Headphone 30, 35 Headphones 6 Heavy 30 HOLD function 19 I Italiano 31 Japanese 31 Jazz 30 K Korean 31 L Language 31 Line Out 30, 35 Live 30 M MODE 21 MP3 19 My Library (SonicStage) 12, 14, 34 N Negative 31 New Tracks 23 Normal play 2
Sony Corporation