Help Guide Linear PCM Recorder PCM-A10 Use this Help Guide when you have any questions on how to use your linear PCM recorder. The contents of the Help Guide may be subject to change without notice due to updates to the product's specifications.
Display window while the recording information is displayed Display window while the current file information is displayed Display window while the file search categories are displayed Power Charging the battery with a computer Disconnecting the linear PCM recorder from the computer Turning the power on Turning the power off Making the initial settings Preventing unintentional operations Placing the linear PCM recorder into the HOLD state (HOLD) Releasing the linear PCM recorder from the HOLD state Maint
Starting recording slightly in advance (PRE REC) Using the recording delay function Switching the memory storage to keep recording (Cross-Memory REC) Recording automatically in response to the input sound volume – the VOR function Recording with other devices Recording with an external microphone Recording audio from an external device with the synchronized recording function (SYNC REC) Recording without using the synchronized recording function Using external devices for recording Recording the playback
What you can do with the connected Bluetooth audio device Registering (pairing) an audio device and establishing a Bluetooth connection Establishing a Bluetooth connection with a registered (paired) Bluetooth audio device Establishing a Bluetooth connection with the one-touch operation (NFC connection) Changing the settings of the Bluetooth function Disconnecting the Bluetooth connection Re-establishing the Bluetooth connection Viewing the Bluetooth information Notes on the Bluetooth function Linear PCM re
Deleting a track mark Deleting all the track marks in the selected file at one time Dividing files Dividing a file at the current playback point Dividing a file at all the track mark points Changing names Changing a folder name Changing a file name Protecting a file Settings menu Using the Settings menu List of the Settings menu items Menu items with selectable setting items Selecting the recording mode (REC Mode) Selecting the sensitivity level of the built-in microphones (Built-In Mic Sensitivity) Re
Checking the information about the linear PCM recorder (System Information) Computer Connecting the linear PCM recorder to a computer Structure of folders and files Copying files from the linear PCM recorder to a computer Copying music files from a computer to the linear PCM recorder Playing music files on the linear PCM recorder that were copied from a computer Using the linear PCM recorder as a USB storage device Software What you can do with Sound Organizer 2 (for Windows only) System requirements for
The recorded file is noisy and you want to record with less noise. A rustling noise is recorded. A clipping or breaking noise is recorded. Noise is recorded when you use an external microphone (not supplied) for recording. You hear noise when using the headphones (not supplied) for playback. The volume of the audio you recorded from an external device is low or you hear squeaking noises when you listen to the audio via the built-in speaker.
The Equalizer function does not change sound quality. Playback speed is too fast or too slow. Editing You cannot divide a file. You cannot move a file. You cannot copy a file to a different folder. Track marks are not detected. The folder or file you created is not displayed. Clock The recording date of a file appears as [----/--/--] or [--:--]. Display The remaining recording time on the display window is shorter than the one displayed on the computer.
Software operations (Sound Organizer 2) You cannot install Sound Organizer 2. The linear PCM recorder is not detected by Sound Organizer 2. The playback volume of the computer is low or you hear no audio from the computer. You cannot play or edit stored files. The counter or slider does not operate correctly or you hear noise. Operations slow down as the number of stored files increases. The computer seems to freeze while a file is being saved, added, or deleted. Sound Organizer 2 freezes during start-up.
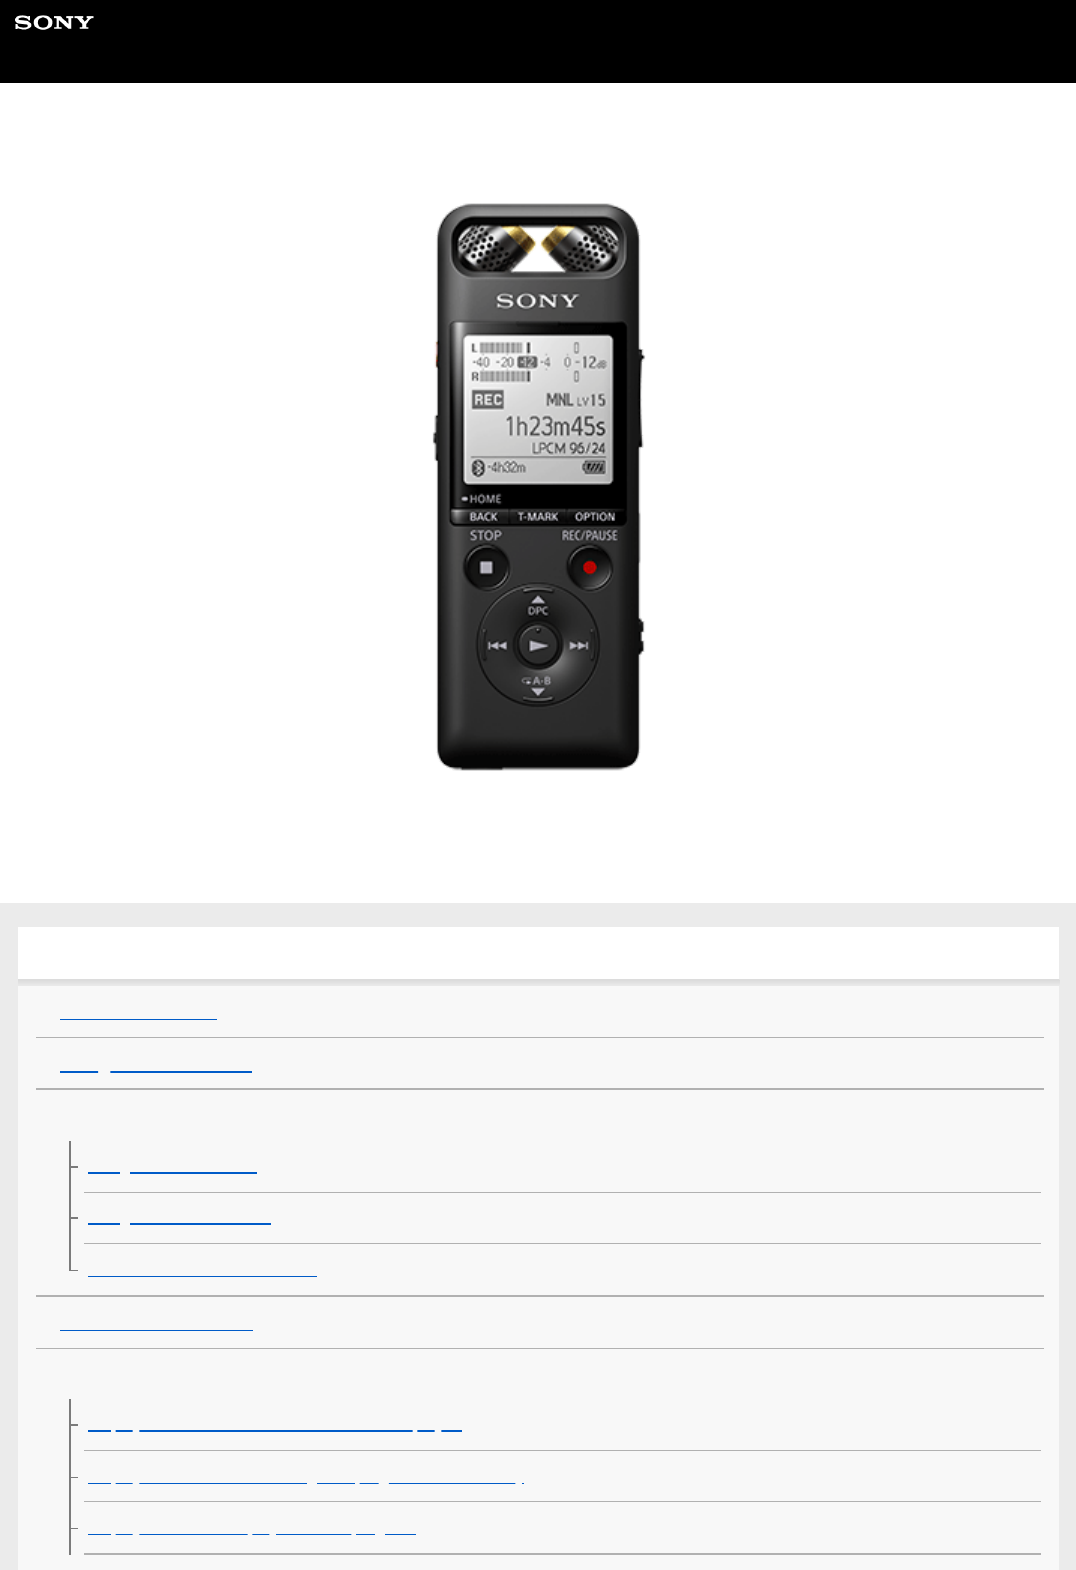
Help Guide Linear PCM Recorder PCM-A10 Parts and controls 1. Built-in microphones 2. Peak indicator 3. Display window 4. OPTION button 5. T-MARK (track mark) button 6. BACK/ HOME button 7. STOP button 8. REC/PAUSE (record/pause) button, recording indicator 9. (play/enter) button (*1) 10. Control button ( DPC (Digital Pitch Control), A-B (repeat A-B), (review/fast backward), forward)) 11. (headphones) jack 12. USB connector cover (You can find the USB connector retracted behind the cover.
16. Built-in Bluetooth antenna (*2) 17. (N-mark) (Put an NFC-enabled smartphone onto this mark to establish an NFC pairing.) 18. Hole for attaching the tripod (No tripod is supplied with your linear PCM recorder.) 19. (microphone) jack 20. HOLD•POWER switch (*3) 21. microSD card slot (The card slot is located under the cover.) 22. Slot cover 23. Built-in speaker 24. Strap hole (No strap is supplied with your linear PCM recorder.
Help Guide Linear PCM Recorder PCM-A10 Using the wind screen When you use your linear PCM recorder outdoors, put the supplied wind screen over the built-in microphones to minimize wind noise. Make sure that the wind screen is tightly fit around the linear PCM recorder. If not, the wind screen will produce no effect.
Help Guide Linear PCM Recorder PCM-A10 Using the HOME menu On your linear PCM recorder, the HOME menu is the starting point for all functions. The HOME menu allows you to select a function, search for recorded files, or change the settings on the linear PCM recorder. 1 Press and hold BACK/HOME. The HOME menu appears. 2 Press or to select the function you want to use, and then press . You can select the following functions: Music: You can select music files imported from a computer for playback.
You can display the Settings menu and change various settings on the linear PCM recorder. Back to XX(*): Select this function to return to the screen before you displayed the HOME menu. * The function you are currently using is displayed in [XX]. Hint While the HOME menu is on the display window, you can press menu.
Help Guide Linear PCM Recorder PCM-A10 Using the OPTION menu You can display the OPTION menu by pressing OPTION. The OPTION menu items vary depending on the selected function of your linear PCM recorder. Note The OPTION menu may not appear, depending on the screen on the display window. 1 Select the function you want to use on the HOME menu, and then press OPTION. The OPTION menu associated with the selected function appears.
4-740-912-31(1) Copyright 2018 Sony Corporation 16
Help Guide Linear PCM Recorder PCM-A10 List of the OPTION menu items The following lists the OPTION menu items. To display the OPTION menu, press OPTION. Depending on the operation or condition, some of the items may not be displayed. Record The following menu items are available while: - recording is in progress. - recording is on standby.
The following menu items are available while: - the recorded files are listed. - playback of a recorded file is in progress. - playback of a recorded file is on standby.
Change File Name: Changing a file name File Information: Display window while the current file information is displayed Create Folder: Creating a folder Delete Folder: Deleting a folder Change Folder Name: Changing a folder name Music The following menu items are available while: - playback of a file that is imported from a computer is in progress. - playback of a file that is imported from a computer is on standby.
Delete All Files: Deleting all files in the searched folder or list File Information: Display window while the current file information is displayed Delete Folder: Deleting a folder Related Topic Using the OPTION menu 4-740-912-31(1) Copyright 2018 Sony Corporation 20
Help Guide Linear PCM Recorder PCM-A10 About folders and files The following illustrates the structure of folders and files that you can view on your linear PCM recorder. Under [ Recorded Files] [FOLDER01]: Recorded files are stored.
Structure of folders and files 4-740-912-31(1) Copyright 2018 Sony Corporation 22
Help Guide Linear PCM Recorder PCM-A10 Display window while the HOME menu is displayed The following describes the HOME menu on the display window. Note The above screen is provided for explanatory purposes. It may look different from what you actually see on your linear PCM recorder. 1. HOME menu items You can select one of the following: : Music : Recorded Files : Record : Bluetooth : Settings : Back to XX (The function you are currently using is displayed in [XX].
Help Guide Linear PCM Recorder PCM-A10 Display window while recording is in progress or on standby The following describes the display window while recording is in progress or on standby. A: During recording with manual volume adjustment B: During recording with the Auto Gain Ctrl function Note The above screen is provided for explanatory purposes. It may look different from what you actually see on your linear PCM recorder. 1.
8. Battery indicator 9. Elapsed time indicator Indicates the elapsed time of the current recording. 10. Scene Select indicator Indicates the recording scene that is currently selected. : Auto Voice Rec : Meeting : Lecture : Voice Notes : Interview : Soft Music : Loud Music : My Scene 1 : My Scene 2 11. Microphone sensitivity indicator Indicates the sensitivity level of the built-in microphones or the external microphone that is currently selected.
Help Guide Linear PCM Recorder PCM-A10 Display window while playback is in progress The following describes the display window during playback. Note The above screens are provided for explanatory purposes. They may look different from what you actually see on your linear PCM recorder. 1. File information Indicates information about the file you are playing. Files recorded with your linear PCM recorder are indicated as follows: : File name: recording date_recording time.file format (e.g. 181010_1010.
Indicates the file number of the playing file in the format (current file number)/(total number of files to play). 8. Clear Voice indicator (only indicated for the files in [ Recorded Files]) Indicates that [Clear Voice] is set to one of the following on the OPTION menu. : Clear Voice 1 : Clear Voice 2 9. Sleep timer indicator Indicates that the sleep timer function is active. 10. Protect indicator Indicates that the file you are playing is protected. 11.
Help Guide Linear PCM Recorder PCM-A10 Display window while the recording information is displayed You can view the recording information of your linear PCM recorder, including the remaining recording time and the memory storage and storage folder settings for recorded files. To display the recording information, while recording is on standby, select [REC Information] on the OPTION menu, and then press . The following recording information is available: Available Rec.
While recording is on standby, you can press STOP to view the recording information of your linear PCM recorder.
Help Guide Linear PCM Recorder PCM-A10 Display window while the current file information is displayed You can view the information (file length, recording mode, recording date and time etc.) about the recorded file you selected. Note The following screens are provided for explanatory purposes. They may look different from what you actually see on your linear PCM recorder.
File Length: Recording length of the file indicated in hours, minutes, and seconds. Codec: Codec type for music files. Bit Rate: Bit rate for music files. Sample Rate: Sampling rate for music files. Bit Depth: Bit depth for music files. Location: Memory storage for recorded files. File Path: Path to the file.
Help Guide Linear PCM Recorder PCM-A10 Display window while the file search categories are displayed When you select [ Recorded Files] or [ appear on the display window. Music] on the HOME menu, the search categories of the stored files Note The following screens are provided for explanatory purposes. They may look different from what you actually see on your linear PCM recorder.
4-740-912-31(1) Copyright 2018 Sony Corporation 33
Help Guide Linear PCM Recorder PCM-A10 Charging the battery with a computer You can use a computer to charge the battery of your linear PCM recorder. If you use the linear PCM recorder for the first time or you have not used it for an extended period of time, charge the battery until the indicator appears on the display window. It takes about 3 hours (*) to fully charge the exhausted battery. * Approximate time period that requires to charge the exhausted battery at room temperature.
Note If your linear PCM recorder is connected to a computer which is not running or in a power saving mode (standby or sleep), the battery will not charge.
Help Guide Linear PCM Recorder PCM-A10 Disconnecting the linear PCM recorder from the computer Be sure to follow the procedure below, otherwise you may not be able to play the files stored on your linear PCM recorder due to data corruption. 1 Make sure that the [Accessing] message is not on the display window. 2 Perform the following operation on the computer. On the Windows taskbar at the bottom right of the desktop, click the following icon. Then, click [Eject PCMRECORDER].
Help Guide Linear PCM Recorder PCM-A10 Turning the power on 1 Slide the HOLD•POWER switch to [POWER] and hold it until the display window turns on. Hint The Auto Power Off function on your linear PCM recorder is set to [30min] by default to save battery power. If you leave the linear PCM recorder unused for 30 minutes, it will automatically turn off. If the sleep timer is active, your linear PCM recorder will turn off automatically in the specified period of time.
Help Guide Linear PCM Recorder PCM-A10 Turning the power off 1 Slide the HOLD•POWER switch to [POWER] and hold it until [Power Off] appears on the display window. Note To restart your linear PCM recorder, slide the HOLD•POWER switch to [POWER] and hold it for 8 seconds or longer. While the linear PCM recorder is in operation and you restart it, the data that is stored on the linear PCM recorder or the linear PCM recorder settings may be deleted.
Help Guide Linear PCM Recorder PCM-A10 Making the initial settings When you turn on your linear PCM recorder for the first time, the Configure Initial Settings screen appears on the display window. Make the initial settings, such as selecting the display language, setting the clock, and turning on/off the beep sound. 1 Press to select [Yes]. 2 Press or to select the display language, and then press .
4 Press or to select [Next], and then press . The setting window for turning the beep sound on or off is displayed. 5 Press or to select [ON] or [OFF] to turn on or off the beep sound, and then press . When the initial settings finish, the completion message and then the HOME menu appear. Note The default date display format depends on the country or region of your purchase.
Help Guide Linear PCM Recorder PCM-A10 Placing the linear PCM recorder into the HOLD state (HOLD) You can disable all the buttons (HOLD) on your linear PCM recorder in order to prevent unintentional operations while you carry around the linear PCM recorder. 1 Slide the HOLD•POWER switch to [HOLD].
Help Guide Linear PCM Recorder PCM-A10 Releasing the linear PCM recorder from the HOLD state When your linear PCM recorder is placed in the HOLD state, pressing any button displays [HOLD... Slide HOLD Switch to Activate.] on the display window. Release the linear PCM recorder from the HOLD state before you use it. 1 Slide the HOLD•POWER switch to the center dot.
Help Guide Linear PCM Recorder PCM-A10 Maintaining the moderate volume level (European model only) The linear PCM recorder limits the maximum volume to allow you to listen to the sound at a moderate volume level when using the headphones. When you try to adjust the volume to a level that exceeds the specified level, the [Check The Volume Level] message appears.
Help Guide Linear PCM Recorder PCM-A10 Recording with manual volume adjustment (manual recording) You can manually select the optimum recording volume level for the sound source. Note If you accidentally touch your linear PCM recorder or let an object come in contact with it while recording is in progress, rustling or scratching noises may be recorded. Hint Before you start recording, we recommend you first make a trial recording or monitor the recording.
6 Press or to select the optimum recording volume level for the sound source. You can check the current recording volume level on the peak level meters. Adjust the recording volume so that the recording volume level stays around -12 dB, which fits within the optimum range ( ). If too loud sounds are detected during recording, [OVER] ( ) appears on the display window and the peak indicator ( ) lights.
We recommend that you monitor the ongoing recording by connecting headphones (not supplied) to the However, you cannot monitor the recording with the Bluetooth headphones. (headphones) jack. You can still press REC/PAUSE to start recording while playback is in progress or a menu is on the display window. You can still press REC/PAUSE to pause the ongoing recording while a menu is on the display window. Recorded files are named as [(recording date)_(recording time).(file format)] (e.g. 181010_1010.
Help Guide Linear PCM Recorder PCM-A10 Recording with the built-in microphones (Auto Gain Ctrl recording) You can record audio with the selected sensitivity level of the built-in microphones and recording mode. Note If you accidentally touch your linear PCM recorder or let an object come in contact with it while recording is in progress, rustling or scratching noises may be recorded. Hint Before you start recording, we recommend you first make a trial recording or monitor the recording.
3 Change the angle of your linear PCM recorder's built-in microphones ( microphones. ) to adjust the directivity of the You can change the angle with your fingertip. 4 Turn your linear PCM recorder so that its built-in microphones point in the direction of the target sound source. 5 Press REC/PAUSE. appears on the display window to indicate that recording has started, and the recording indicator ( ) lights in red. You do not need to press and hold REC/PAUSE while recording.
Note While [Saving...] is on the display window, your linear PCM recorder is saving the file to the memory storage. If the linear PCM recorder is running on AC power, do not disconnect the USB AC adaptor (not supplied) to avoid data corruption. Hint You can still press REC/PAUSE to start recording while playback is in progress or a menu is on the display window. You can still press REC/PAUSE to pause the ongoing recording while a menu is on the display window.
Help Guide Linear PCM Recorder PCM-A10 About the peak level meters During recording, the peak level ( levels for the input sound. ) appears for the left and right built-in microphones to indicate the recording volume Please adjust the orientation of the built-in microphones, the distance from the sound source, or the sensitivity setting of the microphones so that the recording volume level stays around -12 dB, which fits within the optimum range, as illustrated above.
Help Guide Linear PCM Recorder PCM-A10 Monitoring the recording audio It is recommended that you monitor the ongoing recording. You can monitor the ongoing recording by connecting headphones (not supplied) to the (headphones) jack. (headphones) jack. 1 Connect headphones (not supplied) to the 2 Press VOL -/+ to adjust the monitoring volume. Changing the monitoring volume does not affect the recording volume.
Help Guide Linear PCM Recorder PCM-A10 Additional operations available during recording You can perform the following operations during recording. To pause a recording Press REC/PAUSE. While a recording is paused, the recording indicator flashes in red and flashing appears on the display window. To restart the recording from a pause Press REC/PAUSE again. The recording restarts from the paused point. (To completely stop recording after you paused the recording, press STOP.
Help Guide Linear PCM Recorder PCM-A10 Changing the memory storage and the storage folder for recorded files By default, the recorded files via the built-in microphones are stored in the [FOLDER01] folder of the built-in memory. To change the memory storage and the storage folder for recorded files, follow the steps below: 1 While recording is on standby, select [Recording Folder] on the OPTION menu, and then press The Memory Selection screen is displayed on the display window.
Help Guide Linear PCM Recorder PCM-A10 Taking full advantage of the adjustable microphones You can manually change the positioning of the built-in microphones in three ways to best suit the recording scene. Both microphones are positioned to point in the same direction (Zoom-in positioning) The built-in microphones collect sounds mostly from the direction in which they point.
Help Guide Linear PCM Recorder PCM-A10 Selecting a recording scene for an individual situation According to a particular recording situation, you can change some recording settings, including the recording mode and the sensitivity level of the built-in microphones, at once by selecting one of the recording scenes (Scene Select). For [My Scene 1] and [My Scene 2], you can customize their recording settings to suit your preference.
Hint For songs and music, we recommend that you record them manually or use the Rehearsal function for recording.
Help Guide Linear PCM Recorder PCM-A10 Customizing the recording settings for [My Scene] You can customize the recording settings for [My Scene 1] or [My Scene 2] of the Scene Select function to make a recording scene that suits your preference. 1 Use the Settings menu to set the following: The following recording menu items can be set. REC Mode Built-In Mic Sensitivity Ext.
Help Guide Linear PCM Recorder PCM-A10 Tips for better recording Recording at a meeting Place your linear PCM recorder close to speakers of the meeting. You can reduce noise (vibrations from the desk, etc.) by placing the linear PCM recorder on a soft cloth, such as a handkerchief. For recording a meeting, it is suitable to select [Auto Voice Rec] or [Meeting] of the Scene Select function.
Recording an interview Place your linear PCM recorder so that the built-in microphones point in the direction of the interviewee. For recording an interview, it is suitable to select [Auto Voice Rec] or [Interview] of the Scene Select function. Recording a soft music performance With your linear PCM recorder, you can record immersive stereo sound by placing it close to musical instruments.
Related Topic Selecting a recording scene for an individual situation Reducing noise during recording (Recording Filter) Selecting the sensitivity level of the built-in microphones (Built-In Mic Sensitivity) 4-740-912-31(1) Copyright 2018 Sony Corporation 60
Help Guide Linear PCM Recorder PCM-A10 Default settings for the recording scenes of the Scene Select function By default, the settings for the recording scenes of the Scene Select function are as follows: Auto Voice Rec Meeting Lecture Voice Notes Interview REC Mode MP3 192kbps MP3 192kbps MP3 192kbps MP3 128kbps MP3 128kbps Built-In Mic Sensitivity Auto Medium High Low Medium Ext.
Help Guide Linear PCM Recorder PCM-A10 Using the microSD card as a storage for recorded files In addition to the built-in memory, you can record files on a microSD card (not supplied). 1 Make sure that no linear PCM recorder operations are in progress, and then open the cover of the microSD card slot. 2 Hold a microSD card with the terminal side facing away from you and insert it into the microSD card slot until it clicks into place. 3 Close the cover of the microSD card slot.
6 Press or to select the folder where you want to store recorded files, and then press . To create a new folder, see Creating a folder for instructions. Note If the microSD card is not detected by your linear PCM recorder, remove it from the slot and then insert it back in. Keep any liquid and any metal or flammable object away from the microSD card slot to avoid a fire or shock hazard or malfunctions of your linear PCM recorder.
Help Guide Linear PCM Recorder PCM-A10 Recording with the optimum recording volume (Rehearsal function) If you can check the recording volume in advance, it will be easier to use the Rehearsal function for adjusting the recording volume level. 1 While recording is on standby or your linear PCM recorder is paused for recording, press REHEARSAL on the recorder. [Rehearsal Mode] appears on the display window and the recording indicator flashes in red. 2 Rehearse the loudest part of a musical composition.
When [Auto Gain Ctrl] is selected for [Built-In Mic Sensitivity], you cannot use the Rehearsal function. Select [Yes] when [Change Sensitivity Setting to Manual to Start Rehearsal Mode?] appears on the display window. You can also use the Rehearsal function on the smartphone app, REC Remote.
Help Guide Linear PCM Recorder PCM-A10 Starting recording slightly in advance (PRE REC) The Pre-recording function starts recording up to 5 seconds before you start recording. This function comes in handy when you do not want to miss the beginning of a sudden recording event, such as an interview or an outdoor recording. A: About 5 seconds of the ongoing audio stream is buffered. B: Press and hold REC/PAUSE to make the recorder pause for recording. C: Press REC/PAUSE. D: Recording start.
Hint If you use the built-in microphones for recording with the Pre-recording function, noises may be recorded when you press REC/PAUSE. We recommend that you use an external microphone for recording with the Pre-recording function. If you stop pre-recording without starting regular recording, the buffered in the recorder's memory during the pre-recording period will be cleared. To cancel the Pre-recording function, select [OFF] in step 2.
Help Guide Linear PCM Recorder PCM-A10 Using the recording delay function You can set your linear PCM recorder to start recording automatically when the specified period of time expires. 1 While recording is on standby, select [Recording Delay] on the OPTION menu, and then press 2 Press or to select the desired period of time, and then press . . You can select from [15sec] to [60min]. The countdown screen is displayed. When the specified period of time expires, recording starts.
Related Topic Using the sleep timer (Sleep Timer) Setting the time period before the linear PCM recorder automatically turns off (Auto Power Off) 4-740-912-31(1) Copyright 2018 Sony Corporation 69
Help Guide Linear PCM Recorder PCM-A10 Switching the memory storage to keep recording (Cross-Memory REC) You can turn on the Cross-Memory REC function to automatically switch the storage for recorded files to the alternate memory storage and keep recording when the capacity of the built-in memory or the microSD card is used up. 1 While recording is on standby, select [Cross-Memory REC] on the OPTION menu, and then press 2 Press or to select [ON], and then press . .
Help Guide Linear PCM Recorder PCM-A10 Recording automatically in response to the input sound volume – the VOR function You can set your linear PCM recorder to automatically start when the input sound volume reaches the predefined level, and pause when the volume decreases below the level. 1 While recording is on standby, in progress, or paused, select [VOR] on the OPTION menu, and then press . 2 Press or to select [ON], and then press . [VOR] is set to [OFF] by default. 3 Press REC/PAUSE.
Help Guide Linear PCM Recorder PCM-A10 Recording with an external microphone You can connect an external microphone to your linear PCM recorder and use it for recording. 1 While no linear PCM recorder operations are in progress, connect an external microphone ( (microphone) jack. [Ext. Input Setting] appears on the display window. If not, select [ Setting] from the HOME menu. 2 Press or to select [MIC IN], and then press ) to the Settings] - [Recording Settings] - [Ext. Input .
Help Guide Linear PCM Recorder PCM-A10 Recording audio from an external device with the synchronized recording function (SYNC REC) You can make music files without using a computer by recording audio/music from the device (a radio cassette recorder, a tape recorder, TV, etc.) connected to your linear PCM recorder. With the synchronized recording function turned on, the linear PCM recorder pauses after 2 seconds of no audio input.
appears and the linear PCM recorder starts synchronized recording. When no audio input continues for 2 seconds, flashing appears on the display window and the linear PCM recorder pauses. When audio input resumes, it restarts recording, saving the audio to a new file.
Help Guide Linear PCM Recorder PCM-A10 Recording without using the synchronized recording function You can make music files without using the computer by recording sound/music from other equipment such as a radio cassette recorder, a tape recorder, etc. connected to the linear PCM recorder.
Related Topic Recording the playback audio of the linear PCM recorder on an external device Recording audio from an external device with the synchronized recording function (SYNC REC) 4-740-912-31(1) Copyright 2018 Sony Corporation 76
Help Guide Linear PCM Recorder PCM-A10 Recording the playback audio of the linear PCM recorder on an external device You can connect an external device to your linear PCM recorder and record playback audio from the linear PCM recorder. Before you start recording, we recommend you make a trial recording first. 1 Connect one end of an audio connection cable to the (headphones) jack on the linear PCM recorder and the other end to the external input jack on the external device.
Help Guide Linear PCM Recorder PCM-A10 Playing a file You can select a file from the HOME menu for playback. Music] or [ 1 Select [ 2 Search and select a file. Recorded Files] on the HOME menu, and then press . For instructions on searching a file, see Selecting a file. 3 Press . Playback starts. 4 Press VOL -/+ to adjust the playback volume.
4-740-912-31(1) Copyright 2018 Sony Corporation 79
Help Guide Linear PCM Recorder PCM-A10 Selecting a file You can select a file from the HOME menu for playback or editing. Music] or [ Recorded Files] on the HOME menu, and then press 1 Select [ 2 Select a file search category. . Press or to select one of the following file search categories, and then press .
Help Guide Linear PCM Recorder PCM-A10 Locating a playback point with the track mark list (Track Mark List) You can locate a playback point by selecting a track mark on the Track Mark List screen. 1 While playback is on standby or in progress, select [Track Mark List] on the OPTION menu, and then press . 2 Press or to the desired track mark, and then press . File playback starts from the selected track mark point.
Help Guide Linear PCM Recorder PCM-A10 Additional operations available during playback You can perform the following operations while playback is in progress. To stop at the current position Press STOP. To resume playback from that point, press . To go back to the beginning of the current file Press once. If track marks are added and the Easy Search function is turned off, the previous track mark point toward the beginning of the file is located. To go back to previous files Press repeatedly.
Help Guide Linear PCM Recorder PCM-A10 Reducing noise in the playback audio to make human voices sound clearer – the Clear Voice function The Clear Voice function reduces ambient noises to make human voices distinctive. You will hear human voices more clearly in the playback audio. 1 While playback is on standby or in progress, select [Clear Voice] on the OPTION menu, and then press 2 Press or to select [Clear Voice 1] or [Clear Voice 2], and then press . .
Help Guide Linear PCM Recorder PCM-A10 Using the transcription playback mode In the transcription playback mode, you can fast-forward or fast-rewind to search for a particular point as well as use the DPC (Digital Pitch Control) function to slow down the playback speed. This is useful when you want to transcribe a recorded file of a meeting, etc. 1 While playback is on standby, select [Transcription Playback Mode] on the OPTION menu, and then press . 2 Press to start playback.
To exit the transcription playback mode, select [End Transcription Playback Mode] on the OPTION menu while your linear PCM recorder is in the transcription playback mode or playback is on standby. To listen to other files, press BACK/HOME to display the file list, and then select a file.
Help Guide Linear PCM Recorder PCM-A10 Adjusting the playback speed – the DPC (Digital Pitch Control) function You can adjust the playback speed in a range from 0.25 times to 3.00 times. Changing the playback speed does not affect the playback audio. Files will play in natural tones, thanks to digital processing. You can also change the playback speed while your linear PCM recorder is in the transcription playback mode. 1 While playback is on standby or in progress, press DPC (Digital Pitch Control).
3.00 times - 0.
Help Guide Linear PCM Recorder PCM-A10 Adjusting the musical pitch (Key Change) You can change the musical pitch (key) without changing the playback speed of music files or recorded files. 1 While playback is in progress, select [Key Change] on the OPTION menu, and then press 2 Press or to adjust the musical pitch. To raise in pitch by a half step ( 1 to 6) To lower in pitch by a half step ( 1 to 6) By default, the musical pitch is set to [0]. 3 Press .
Help Guide Linear PCM Recorder PCM-A10 Selecting a sound quality setting (Equalizer) You can select a sound quality setting in accordance with a music genre. You can also define sound quality settings and add them as custom settings. 1 While playback is on standby or in progress, select [Equalizer] on the OPTION menu, and then press 2 Press or to select the desired sound quality setting, and then press .
Help Guide Linear PCM Recorder PCM-A10 Selecting the playback mode You can select the playback mode that suits your needs. 1 While playback is on standby or in progress, select [Play Mode] on the OPTION menu, and then press 2 Press or to select a playback mode, and then press . Description of menu items You can select one of the following items: Normal: Plays the files in the specified range one by one. Repeat: Plays the files in the specified range repeatedly.
Help Guide Linear PCM Recorder PCM-A10 Specifying a segment of a file to play repeatedly (A-B repeat) You can specify the starting point A and the finishing point B in a file to play the segment between the specified points repeatedly. 1 While playback is on standby or in progress, press A-B to specify the starting point A. [A-B B?] appears on the display window. 2 Press [ A-B again to specify the finishing point B. A-B] appears and the specified segment plays repeatedly.
Help Guide Linear PCM Recorder PCM-A10 Repeatedly playing the current file (Button-hold repeat playback) You can repeat playback of the file you are currently playing with a simple operation. 1 While playback is in progress, press and hold . appears on the playback screen and the current file plays repeatedly. Note You cannot turn on the button-hold repeat playback function while the A-B repeat playback function is active.
Help Guide Linear PCM Recorder PCM-A10 Specifying the playback range in the stored file list You can specify the playback range in the playback file list. The contents in the playback range vary depending on the selected file search category for the recorded files or music. Recorded Files] or [ Music] on the HOME menu, and then press .
Help Guide Linear PCM Recorder PCM-A10 Listening to sound in loud volume The built-in speaker is provided mainly for checking recorded audio files. If you find the volume not loud enough or have difficulty in understanding what you hear, use headphones (not supplied) or active speakers (not supplied). Use headphones: Connect headphones to the (headphones) jack. Use external speakers: Connect active speakers to the (headphones) jack.
Help Guide Linear PCM Recorder PCM-A10 Searching forward/backward (Cue/Review) To locate the point from which you want to play, search forward or backward while playback is on standby or in progress. To search forward (Cue): While playback is on standby or in progress, press and hold playback. and release it at the point you want to resume To search backward (Review): While playback is on standby or in progress, press and hold playback.
Help Guide Linear PCM Recorder PCM-A10 Locating the desired playback point quickly (Easy Search) The Easy Search function helps you quickly locate the point from which you want to play. To quickly locate your desired portion of a long recording, such as a recording of a meeting, specify the time period for forward/reverse skipping. 1 While playback is on standby or in progress, select [Easy Search] on the OPTION menu, and then press 2 Press 3 Specify the time period for forward/reverse skipping.
4-740-912-31(1) Copyright 2018 Sony Corporation 98
Help Guide Linear PCM Recorder PCM-A10 What you can do with the connected Bluetooth audio device By establishing a BLUETOOTH® connection between a Bluetooth audio device and the linear PCM recorder, you can wirelessly listen to playback audio from the Bluetooth audio device as well as perform the following: Remote operations of the linear PCM recorder (playing, stopping, fast-rewinding, fast-forwarding, and other operations) from the Bluetooth audio device Remote volume control of the Bluetooth audio devi
Help Guide Linear PCM Recorder PCM-A10 Registering (pairing) an audio device and establishing a Bluetooth connection To establish a wireless connection between Bluetooth audio devices for the first time, you need to have the devices registered with each other. This device registration process is called [pairing]. 1 Place the Bluetooth audio device with which you want to establish a Bluetooth connection in pairing mode. Be sure to place the linear PCM recorder within 1 m (3.
While a Bluetooth connection is established, no audio is output to the headphones connected to the on the linear PCM recorder. To use the connected headphones for listening, disconnect the Bluetooth connection. (headphones) jack Note The device registration (pairing) information is cleared in the following cases. You need to register (pair) the device with your linear PCM recorder once again. The settings on either or both devices are reset to the default settings, for example, due to initialization.
Help Guide Linear PCM Recorder PCM-A10 Establishing a Bluetooth connection with a registered (paired) Bluetooth audio device When your linear PCM recorder and a Bluetooth audio device are already registered (paired) with each other, you can simply establish a Bluetooth connection between the devices. 1 Turn on the Bluetooth function on the Bluetooth audio device as needed. 2 On the linear PCM recorder, select [ Bluetooth] - [Audio Device] - [Connect] from the HOME menu.
Hint Bluetooth wireless technology allows connection at distance of up to about 10 meters (33 feet). However, the effective range may vary depending on obstructions (people, metals, wall, etc.) or signal status. If the same Bluetooth audio device name is displayed multiple times, check the device that you want to register (pair) for its Device Address. To find out the Device Address for the Bluetooth audio device, refer to the operating instructions supplied with the device.
Help Guide Linear PCM Recorder PCM-A10 Establishing a Bluetooth connection with the one-touch operation (NFC connection) You can register (pair) an NFC-compatible Bluetooth audio device and establish a Bluetooth connection with your linear PCM recorder by simply putting the recorder onto the device. NFC (Near Field Communication) is a technology enabling short-range wireless communication. 1 If the Bluetooth audio device has the NFC switch, turn on the switch.
Changing the settings of the Bluetooth function Notes on the Bluetooth function 4-740-912-31(1) Copyright 2018 Sony Corporation 105
Help Guide Linear PCM Recorder PCM-A10 Changing the settings of the Bluetooth function This topic explains how to: select an audio quality priority for the Bluetooth streaming. change the volume control mode for the Bluetooth streaming. To select an audio quality priority for the Bluetooth streaming You can select an audio quality priority for the Bluetooth streaming. 1. While playback is on standby, select [ Bluetooth] - [Audio Device] - [Wireless Audio Quality] from the HOME menu. 2.
Help Guide Linear PCM Recorder PCM-A10 Disconnecting the Bluetooth connection The procedure to disconnect the Bluetooth connection depends on the way you established the connection between the audio device and your linear PCM recorder. If you followed the steps in Registering (pairing) an audio device and establishing a Bluetooth connection: Select [ Bluetooth] - [Audio Device] - [Disconnect] from the HOME menu of the linea PCM recorder.
Help Guide Linear PCM Recorder PCM-A10 Re-establishing the Bluetooth connection The procedure to re-establish the Bluetooth connection depends on the way you previously established the connection between the audio device and your linear PCM recorder.
Help Guide Linear PCM Recorder PCM-A10 Viewing the Bluetooth information To view the information about the Bluetooth function, follow the step below: 1 Select [ Bluetooth] - [Bluetooth Information] from the HOME menu of the linear PCM recorder, and then press .
Help Guide Linear PCM Recorder PCM-A10 Notes on the Bluetooth function Depending on the Bluetooth audio device connected with your linear PCM recorder, the communication environment, or the ambient conditions, you may hear noises or audio dropouts. To optimize the Bluetooth communications, observe the following. Place your linear PCM recorder and the Bluetooth audio device as close together as possible (up to 10 m (33 feet) according to the Bluetooth standards).
Turn off the wireless LAN device when performing Bluetooth communications within about 10 m (33 feet) of a wireless LAN device.
Help Guide Linear PCM Recorder PCM-A10 Features of REC Remote With REC Remote installed on a smartphone, you can connect to your linear PCM recorder via a Bluetooth connection and: start/stop recording turning on/off the Rehearsal function check/adjust the recording volume levels add track marks change the recording settings Note REC Remote is merely an app designed for audio recording. You cannot use it for playback or sound monitoring during recording.
Viewing the Bluetooth information Notes on the Bluetooth function 4-740-912-31(1) Copyright 2018 Sony Corporation 113
Help Guide Linear PCM Recorder PCM-A10 Getting ready to use REC Remote To use REC Remote, you need to install REC Remote on a smartphone. Note To connect your linear PCM recorder and REC Remote via a wireless connection, you need the latest version of REC Remote. When the smartphone already has REC Remote installed, update it to the latest version. 1 Search Google Play or App Store for [REC Remote]. 2 Follow the on-screen instructions to install REC Remote on the smartphone.
Help Guide Linear PCM Recorder PCM-A10 Establishing a Bluetooth connection between the smartphone and the linear PCM recorder To establish a Bluetooth connection, you need to make device registration (pairing) between a smartphone and the linear PCM recorder in advance. Pairing means having Bluetooth devices registered with each other to establish a wireless connection for the first time. 1 Do the following on your linear PCM recorder.
When the operation screen of REC Remote appears on the smartphone, the Bluetooth connection should be successfully established. Proceed to Using the smartphone for linear PCM recorder operations. Note The device registration (pairing) information is cleared in the following cases. You need to have the devices registered (paired) with each other once again. The settings on either or both devices are reset to the default settings, for example, due to initialization.
Help Guide Linear PCM Recorder PCM-A10 Establishing a Bluetooth connection with the one-touch operation (NFC connection) If a smartphone has the NFC function, follow the steps below to establish a Bluetooth connection between the smartphone and your linear PCM recorder. 1 Turn on your linear PCM recorder. 2 On the smartphone, turn on the NFC function. 3 Start REC Remote. 4 Put the smartphone onto your linear PCM recorder aligning the marks on both devices with each other.
connection in the same manner.
Help Guide Linear PCM Recorder PCM-A10 Using the smartphone for linear PCM recorder operations When a Bluetooth connection is established, the REC Remote screen appears on the smartphone. 1. Use the recording operation buttons. You can start ( ), pause ( ), or stop ( ) recording. 2. Display the settings screen. Select the [RECORDING SETTINGS] tab. Then, you can change the recording settings and the REC Remote settings. 3. View the help.
Help Guide Linear PCM Recorder PCM-A10 Disconnecting the Bluetooth connection The procedure to disconnect the Bluetooth connection depends on the way you established the connection between the smartphone and your linear PCM recorder. If you followed the steps in [Establishing a Bluetooth connection between the smartphone and the linear PCM recorder]: Select [ Bluetooth] - [Bluetooth ON/OFF] - [OFF] from the HOME menu of the linear PCM recorder.
Help Guide Linear PCM Recorder PCM-A10 Re-establishing the Bluetooth connection (for Android) The procedure to re-establish the Bluetooth connection depends on the way you previously established the connection between the smartphone and your linear PCM recorder. If you followed the steps in [Establishing a Bluetooth connection between the smartphone and the linear PCM recorder]: 1 Select [ Bluetooth] - [Bluetooth ON/OFF] - [ON] from the HOME menu of the linear PCM recorder, and then press .
Help Guide Linear PCM Recorder PCM-A10 Re-establishing the Bluetooth connection (for iOS) To re-establish the Bluetooth connection between the iPhone and your linear PCM recorder, follow the steps below: 1 Select [ Bluetooth] - [Bluetooth ON/OFF] - [ON] from the HOME menu of the linear PCM recorder, and then press . 2 On the iPhone, select [PCM-A10] on the Bluetooth settings screen. 3 On the iPhone, start REC Remote.
Help Guide Linear PCM Recorder PCM-A10 Deleting a file You can select a file and delete it. Note Once you have deleted a file, you will not be able to restore it. 1 Select a file you want to delete. 2 Select [Delete a File] on the OPTION menu, and then press . [Delete?] appears and the specified file plays for confirmation. 3 Press or to select [Yes], and then press . [Please Wait] appears on the display window and the selected file will be deleted. Note You cannot delete a protected file.
Deleting a folder 4-740-912-31(1) Copyright 2018 Sony Corporation 124
Help Guide Linear PCM Recorder PCM-A10 Deleting all files in the searched folder or list You can select a folder or list from the file search results and delete all of the contained files. Music] or [ Recorded Files] on the HOME menu, and then press .
Help Guide Linear PCM Recorder PCM-A10 Deleting a folder You can select a folder and delete it. Music] or [ Recorded Files] on the HOME menu, and then press 1 Select [ 2 Press or to select [Folders], and then press 3 Press or to select the desired folder. 4 Select [Delete Folder] on the OPTION menu, and then press . . . [Delete Folder?] appears on the display window. 5 Press or to select [Yes], and then press . The selected folder is deleted.
Deleting all files in the searched folder or list 4-740-912-31(1) Copyright 2018 Sony Corporation 127
Help Guide Linear PCM Recorder PCM-A10 Moving a file to a different folder You can select a file and move it to another folder. 1 Select the file you want to move. 2 While playback is on standby, select [Move File] on the OPTION menu, and then press 3 Press 4 Press or or to select [Move to Built-In Memory] or [Move to SD Card], and then press to select the destination folder, and then press . . .
Help Guide Linear PCM Recorder PCM-A10 Copying a file to a different folder You can select a file and copy it to another folder, which is useful in making a backup copy. 1 Select the file you want to copy. 2 While playback is on standby, select [File Copy] on the OPTION menu, and then press 3 Press 4 Press or or to select [Copy to Built-In Memory] or [Copy to SD Card], and then press to select the destination folder, and then press . . .
Help Guide Linear PCM Recorder PCM-A10 Creating a folder Recorded files are stored in [FOLDER01] under [ this default folder to it. Recorded Files] by default. You can create a new folder and change Recorded Files] on the HOME menu, and then press . 1 Select [ 2 Press 3 Select [Built-In Memory] or [SD Card] on the Folders screen, and then press 4 Select [Create Folder] on the OPTION menu, and then press 5 Select or or to select [Folders] as the file search category, and then press .
Help Guide Linear PCM Recorder PCM-A10 Adding a track mark You can add a track mark at a point where you want to divide a file later or you want to locate during playback. You can add a maximum of 98 track marks to a single file. 1 While recording is in progress or paused, or while playback is in progress or on standby, press T-MARK at the point you want to add a track mark. The (track mark) indicator flashes three times, and a track mark is added. Note You cannot add track marks to a protected file.
With the smartphone app (REC Remote), you can select a track mark to add from 4 types.
Help Guide Linear PCM Recorder PCM-A10 Adding track marks automatically You can add track marks automatically at specified intervals while regular recording is in progress. 1 Select [ 2 Press or to select [Interval], and then press 3 Press or to select the interval length and then press Settings] - [Recording Settings] - [Auto Track Marks] from the HOME menu, and then press . . . You can select [5min], [10min], [15min], or [30min]. The Auto Track Marks function is turned on.
Help Guide Linear PCM Recorder PCM-A10 Deleting a track mark You can delete the closest track mark before the point where you stopped playback. 1 Select the file from which you want to delete track marks. 2 Play the file and stop at a point after the track mark you want to delete. 3 Select [Delete Track Marks] - [This Track Mark] from the OPTION menu, and then press . [Delete Track Mark?] appears on the display window. 4 Press or to select [Yes], and then press .
Deleting all the track marks in the selected file at one time 4-740-912-31(1) Copyright 2018 Sony Corporation 135
Help Guide Linear PCM Recorder PCM-A10 Deleting all the track marks in the selected file at one time You can delete all the track marks of the selected file. 1 Select the file from which you want to delete the track marks. 2 Select [Delete Track Marks] - [All Track Marks] from the OPTION menu, and then press . [Delete All Track Marks?] appears on the display window. 3 Press or to select [Yes], and then press . [Please Wait] appears and all the track marks will be deleted at one time.
Help Guide Linear PCM Recorder PCM-A10 Dividing a file at the current playback point You can divide a single file into two files. Dividing a file helps you quickly locate the point from which you want to play in a long recording file, such as a meeting recording. You can further divide either of the divided files. 1 Select the file that you want to divide, and then play the file and stop at a point where you want to divide the file.
Hint To cancel the dividing process, select [No] in step 4, and then press . On your linear PCM recorder, you cannot combine divided files. [Sound Organizer 2] is capable of dividing and combining files. Track marks located near the beginning and end of the source file may not be used for dividing and remain in the divided files.
Help Guide Linear PCM Recorder PCM-A10 Dividing a file at all the track mark points You can divide a file at all the track mark points. 1 Select the file that you want to divide. 2 While playback is on standby, select [Divide] - [At All Track Marks] from the OPTION menu, and then press . [Divide at All Track Marks?] appears on the display window. 3 Press or to select [Yes], and then press .
Dividing a file at the current playback point 4-740-912-31(1) Copyright 2018 Sony Corporation 140
Help Guide Linear PCM Recorder PCM-A10 Changing a folder name You can change the name of the folders for storing the files you record with your linear PCM recorder by selecting a folder name from the template. Recorded Files] on the HOME menu, and then press . 1 Select [ 2 Press 3 Select [Built-In Memory] or [SD Card] on the Folders screen. 4 Press 5 Select [Change Folder Name] on the OPTION menu, and then press 6 Press or or or to select [Folders].
4-740-912-31(1) Copyright 2018 Sony Corporation 142
Help Guide Linear PCM Recorder PCM-A10 Changing a file name You can change the name of the files stored under [ templates. Recorded Files] on the HOME menu by adding one of the prefix 1 Select the file that you want to rename. 2 While playback is on standby, select [Change File Name] on the OPTION menu, and then press 3 Press or to select the desired prefix, and then press . .
Help Guide Linear PCM Recorder PCM-A10 Protecting a file To prevent a file from being accidentally deleted or edited, you can protect an important file. A protected file is marked with the (protect) indicator and regarded as a read-only file that you cannot delete or edit. 1 Select the file that you want to protect. 2 While playback is on standby, select [Protect] on the OPTION menu, and then press [Please Wait] and then [Protected] appear on the display window and the file is protected.
Help Guide Linear PCM Recorder PCM-A10 List of the Settings menu items The following lists the Settings menu items on the HOME menu.
Adjusting the musical pitch (Key Change) Easy Search: Locating the desired playback point quickly (Easy Search) Play Mode: Selecting the playback mode Playback Range: Specifying the playback range in the stored file list Common Settings LED: Turning the recording/peak indicator on or off (LED) Backlight: Selecting the backlight setting (Backlight) Beep: Turning the beep sound on or off (Beep) Language: Selecting the display language (Language) Date&Time: Setting the clock (Date&Time) Selecting the date dis
Help Guide Linear PCM Recorder PCM-A10 Selecting the recording mode (REC Mode) You can set the recording mode for audio recordings. Set this menu item before you start recording. 1 Select [ 2 Press 3 Press and hold BACK/HOME to return to the HOME menu. Settings] - [Recording Settings] - [REC Mode] from the HOME menu, and then press or to select the desired recording mode, and then press To return to the screen before you displayed the HOME menu, press . STOP.
Help Guide Linear PCM Recorder PCM-A10 Selecting the sensitivity level of the built-in microphones (Built-In Mic Sensitivity) You can select the sensitivity level of the built-in microphones. You can reduce noises to be recorded by lowing the microphone sensitivity. The lower the sensitivity is, the fewer ambient or distant noises are recorded. Set this menu item before you start recording. 1 Select [ press .
Note While recording audio from an external device is in progress, the Ext. Input Setting function is enabled and the Built-In Mic Sensitivity function is disabled.
Help Guide Linear PCM Recorder PCM-A10 Reducing noise during recording (Recording Filter) With the Recording Filter function, you can reduce noise in the recordings. 1 Select [ 2 Press 3 Press and hold BACK/HOME to return to the HOME menu. Settings] - [Recording Settings] - [Recording Filter] from the HOME menu, and then press or to select [NCF(Noise Cut)] or [LCF(Low Cut)], and then press To return to the screen before you displayed the HOME menu, press . STOP.
Selecting the audio input type and the sensitivity level of the external microphone (Ext.
Help Guide Linear PCM Recorder PCM-A10 Adjusting the recording volume for input sounds to avoid sound distortion (LIMITER) You can turn on the LIMITER function to automatically adjust the recording volume for sudden, loud input sounds during manual recording to avoid sound distortion. 1 While recording is on standby, select [LIMITER] on the OPTION menu, and then press 2 Press or to select [ON], and then press . .
Help Guide Linear PCM Recorder PCM-A10 Selecting the audio input type and the sensitivity level of the external microphone (Ext. Input Setting) You can select the audio input type ([MIC IN] or [Audio IN]) of the 1 Settings] - [Recording Settings] - [Ext. Input Setting] from the HOME menu, and then press Select [ If an external microphone is not connected to the appears. 2 Press (microphone) jack and the sensitivity level. or .
For Music: You can select one of the following sensitivity levels for recording music. High(Music): Suitable for recording small-group chorus performances and distant musical instrument sounds. Medium(Music): Suitable for recording live music from a distance of 1 to 2 meters (40 to 80 inches), such as chorus or musical instrument lessons. Low(Music): Suitable for recording live loud music, such as band performances.
Help Guide Linear PCM Recorder PCM-A10 Turning the recording/peak indicator on or off (LED) You can set the recording/peak indicator to turn on or off during linear PCM recorder operations. 1 Select [ 2 Press 3 Press and hold BACK/HOME to return to the HOME menu. Settings] - [Common Settings] - [LED] from the HOME menu, and then press or to select [ON] or [OFF], and then press . . To return to the screen before you displayed the HOME menu, press STOP.
Help Guide Linear PCM Recorder PCM-A10 Selecting the backlight setting (Backlight) You can select a period of time to turn on the backlight of the display window or select the backlight to stay unlit. 1 Select [ 2 Press 3 Press and hold BACK/HOME to return to the HOME menu. Settings] - [Common Settings] - [Backlight] from the HOME menu, and then press or to select the desired setting, and then press . . To return to the screen before you displayed the HOME menu, press STOP.
Help Guide Linear PCM Recorder PCM-A10 Selecting the display language (Language) You can select the language to be used for messages, menus, folder names, etc. 1 Select [ 2 Press Settings] - [Common Settings] - [Language] from the HOME menu and then press or to select the language that you want to use, and then press . .
Help Guide Linear PCM Recorder PCM-A10 Setting the clock (Date&Time) You can set the clock of your linear PCM recorder. Be sure to set it before you start recording. 1 Select [ press . 2 Set the current date and time. Settings] - [Common Settings] - [Date&Time] - [Set Date/Time] from the HOME menu, and then Press or to set an item, and then press . Repeat the actions to set all items. To move the focus backward or forward, press the previous item.
Help Guide Linear PCM Recorder PCM-A10 Selecting the date display format (Date Display Format) You can select the date display format to suit your preference. 1 Select [ Settings] - [Common Settings] - [Date&Time] - [Date Display Format] from the HOME menu, and then press . 2 Press 3 Press and hold BACK/HOME to return to the HOME menu. or to select the desired format, and then press . To return to the screen before you displayed the HOME menu, press STOP.
Help Guide Linear PCM Recorder PCM-A10 Selecting the clock display format (Time Display) You can select either the 12-Hour or 24-Hour format. 1 Select [ press . Settings] - [Common Settings] - [Date&Time] - [Time Display] from the HOME menu, and then 2 Press to select the desired format, and then press 3 Press and hold BACK/HOME to return to the HOME menu. or . To return to the screen before you displayed the HOME menu, press STOP.
Help Guide Linear PCM Recorder PCM-A10 Turning the beep sound on or off (Beep) You can turn the operation beep sound on or off. 1 Select [ 2 Press 3 Press and hold BACK/HOME to return to the HOME menu. Settings] - [Common Settings] - [Beep] from the HOME menu, and then press or to select [ON] or [OFF], and then press . To return to the screen before you displayed the HOME menu, press STOP.
Help Guide Linear PCM Recorder PCM-A10 Using the sleep timer (Sleep Timer) If you set the sleep timer, your linear PCM recorder will turn off automatically when the specified period of time expires. 1 Select [ 2 Press Settings] - [Common Settings] - [Sleep Timer] from the HOME menu, and then press or to select the desired time period, and then press . . You can select [OFF] (default setting), [15min], [30min], [60min], [90min], or [120min]. 3 Press and hold BACK/HOME to return to the HOME menu.
Help Guide Linear PCM Recorder PCM-A10 Setting the time period before the linear PCM recorder automatically turns off (Auto Power Off) You can set your linear PCM recorder to automatically turn off if it is left unused for the specified period time. 1 Select [ 2 Press 3 Press and hold BACK/HOME to return to the HOME menu. Settings] - [Common Settings] - [Auto Power Off] from the HOME menu, and then press or to select the desired time period, and then press . .
Releasing the linear PCM recorder from the HOLD state Using the recording delay function 4-740-912-31(1) Copyright 2018 Sony Corporation 164
Help Guide Linear PCM Recorder PCM-A10 Resetting all menu settings to the default ones (Reset All Settings) You can reset all menu settings to the default ones except for the following: Clock settings (Date&Time) Display language settings (Language) 1 While recording or playback is on standby, select [ Settings] - [Common Settings] - [Reset/Format] [Reset All Settings] from the HOME menu, and then press . [Default Value?] appears on the display window. 2 Press or to select [Yes], and then press .
Help Guide Linear PCM Recorder PCM-A10 Formatting the memory (Format Built-In Memory/Format SD Card) You can format either the built-in memory of your linear PCM recorder or the microSD card. Formatting the built-in memory will delete all of the stored data and restore the original folder structure at your purchase. 1 While recording or playback is on standby, select [ Settings] - [Common Settings] - [Reset/Format] [Format Built-In Memory] or [Format SD Card] from the HOME menu, and then press .
Help Guide Linear PCM Recorder PCM-A10 Checking the remaining recording time (Available Rec. Time) You can display the remaining recording time in the current recording mode in hours, minutes, and seconds. 1 Select [ . 2 Press and hold BACK/HOME to return to the HOME menu. Settings] - [Common Settings] - [Available Rec. Time] from the HOME menu, and then press To return to the screen before you displayed the HOME menu, press STOP.
Help Guide Linear PCM Recorder PCM-A10 Checking the information about the linear PCM recorder (System Information) You can display the information about your linear PCM recorder , such as the linear PCM recorder 's model name and the software version number. 1 Select [ . 2 Press and hold BACK/HOME to return to the HOME menu. Settings] - [Common Settings] - [System Information] from the HOME menu, and then press To return to the screen before you displayed the HOME menu, press STOP.
Help Guide Linear PCM Recorder PCM-A10 Connecting the linear PCM recorder to a computer To exchange files between your linear PCM recorder and a computer, connect the linear PCM recorder to the computer. 1 Slide the USB slide lever on the back of the linear PCM recorder in the direction of the arrow to push out the USB connector, and insert it into the USB port on a running computer. 2 Make sure the linear PCM recorder is successfully detected by the computer.
Help Guide Linear PCM Recorder PCM-A10 Structure of folders and files You can use a computer to view the structure of folders and files on the built-in memory of your linear PCM recorder or on the microSD card. Connect the linear PCM recorder to the computer and use the Explorer (Windows) or the Finder (Mac) to open [PCMRECORDER] or [MEMORY CARD].
A: microSD card B: Folder for storing files recorded with your linear PCM recorder C: Folder for storing files transferred from the computer D: Your linear PCM recorder is not capable of detecting any folders and files stored at these folder structure levels. * Files stored in the REC_FILE folder appear in [ Recorded Files] while those in the MUSIC folder appear in [ file, make sure you put it either in the REC_FILE folder or in the MUSIC folder.
Help Guide Linear PCM Recorder PCM-A10 Copying files from the linear PCM recorder to a computer You can copy files and folders from your linear PCM recorder to a computer to store them. 1 Connect the linear PCM recorder to the computer. 2 Copy files or folders you want to transfer to the computer. Drag and drop the files or folders you want to copy from [PCMRECORDER] or [MEMORY CARD] to the local disk on the computer. 3 Disconnect the linear PCM recorder from the computer.
Help Guide Linear PCM Recorder PCM-A10 Copying music files from a computer to the linear PCM recorder You can copy music and audio files (FLAC (.flac) / LPCM (.wav) / MP3 (.mp3) / WMA (.wma) / AAC-LC (.m4a)) from a computer to your linear PCM recorder by drag and drop. 1 Connect the linear PCM recorder to the computer. 2 Copy the folder containing music files to the linear PCM recorder.
Help Guide Linear PCM Recorder PCM-A10 Playing music files on the linear PCM recorder that were copied from a computer You can play the music files that you copied from a computer on your linear PCM recorder. 1 Select [ Recorded Files] or [ Music] on the HOME menu and press , and then select a file. You can search [ Recorded Files] for the files that you copied from a computer to the REC_FILE folder; and [ Music] for the files that you copied to the MUSIC folder.
Help Guide Linear PCM Recorder PCM-A10 Using the linear PCM recorder as a USB storage device You can connect your linear PCM recorder to a computer and use it as a USB storage device. To use the linear PCM recorder as a USB storage device, you need a computer that meets the system requirements. For more information, see System requirements.
Help Guide Linear PCM Recorder PCM-A10 What you can do with Sound Organizer 2 (for Windows only) You can install Sound Organizer 2 using the installer file (SoundOrganizer_V2001.exe) stored on the built-in memory of your linear PCM recorder. Sound Organizer 2 allows you to exchange files between your linear PCM recorder and a computer. You can play songs imported from other media (music CDs, etc.) and audio files (MP3 files, etc.
Deleting files from the linear PCM recorder You can delete files stored on your linear PCM recorder. When you want increase the remaining free space on the linear PCM recorder or you find unnecessary files on the linear PCM recorder, you can directly delete files from Sound Organizer 2. Transferring files to the linear PCM recorder You can transfer music and audio files from Sound Organizer 2 to the built-in memory of your linear PCM recorder and enjoy them on the linear PCM recorder.
Help Guide Linear PCM Recorder PCM-A10 System requirements for Sound Organizer 2 The following lists the system requirements for Sound Organizer 2. Operating systems Windows 10 Windows 8.1 Windows 7 Service Pack 1 or higher Note One of the above operating systems should be pre-installed at shipment. Upgraded operating systems or multi-boot environments are not supported. IBM PC/AT or compatible CPU Windows 7/Windows 8.1/Windows 10: Processor of 1.66 GHz or higher Memory Windows 7/Windows 8.
Help Guide Linear PCM Recorder PCM-A10 Installing Sound Organizer 2 (for Windows only) Install Sound Organizer 2 on a computer. Note Be sure to install Sound Organizer 2 on the computer that has already Sound Organizer (Ver. 1.6) installed as well. When installing Sound Organizer 2, log in to an account with administrator privileges. Also, if you are using Windows 7/Windows 8.1 and the [User Account Control] window appears, confirm the contents of the window and then click [Yes].
3 Double-click [PCMRECORDER] - [FOR WINDOWS]. 4 Double-click [SoundOrganizer_V2001] (or [SoundOrganizer_V2001.exe]). Depending on the version of your operating system, the setup preparation process (file extraction) may start automatically without showing any notice. In such a case, follow the on-screen instructions. 5 When the [Welcome to Sound Organizer 2 Installer] window appears, click [Next].
9 When the [Sound Organizer 2 has been installed successfully.] window appears, make sure that [Launch Sound Organizer 2 Now] is selected, and then click [Finish]. Note You may need to restart the computer after you installed Sound Organizer 2.
Help Guide Linear PCM Recorder PCM-A10 The Sound Organizer 2 window (for Windows only) 1. Help Displays the help of Sound Organizer 2. For details on operations, refer to respective help topics. 2. The file list of Sound Organizer 2 (My Library) Displays a list of files included in My Library of Sound Organizer 2 in accordance with a particular operation. Recording Files: Displays a list of recording files.
Help Guide Linear PCM Recorder PCM-A10 Compatible memory cards You can use the following memory cards with your linear PCM recorder.
Help Guide Linear PCM Recorder PCM-A10 System requirements To connect your linear PCM recorder to a computer or use it as a USB storage device, the computer must meet the following system requirements. For using Sound Organizer 2 on the computer, see System requirements for Sound Organizer 2 . Operating systems Windows 10 Windows 8.1 Windows 7 Service Pack 1 or higher macOS (v10.10-v10.
Help Guide Linear PCM Recorder PCM-A10 Technical specifications Specifications Capacity (User available capacity) (*1) (*2) 16 GB (approx. 12.80 GB = 13,743,895,347 Byte) Maximum number of recorded files (for a folder) 199 files Maximum number of files 5,000 files (including folders) LPCM 96kHz/24bit (STEREO): 40 Hz - 40,000 Hz (0 to -3 dB) LPCM 48kHz/24bit (STEREO): 40 Hz - 21,000 Hz (0 to -3 dB) LPCM 48kHz/16bit (STEREO): 40 Hz - 21,000 Hz (0 to -3 dB) LPCM 44.
File extension: .m4a LPCM (*3) (*7) Quantization bit rate: 24 bit Sampling frequencies: 192/176.4/96/88.2/48/44.1 kHz File extension: .wav LPCM (*3) (*7) Quantization bit rate: 16 bit Sampling frequencies: 192/176.4/96/88.2/48/44.1/22.05 kHz File extension: .wav FLAC (*3) (*7) Quantization bit rate: 24 bit Sampling frequencies: 192/176.4/96/88.2/48/44.1 kHz File extension: .flac FLAC (*3) (*7) Quantization bit rate: 16 bit Sampling frequencies: 192/176.4/96/88.2/48/44.1/22.05 kHz File extension: .
Input impedance: approx. 3.9 kΩ Rated input level: approx. 2.5 mV Minimum input level: approx. 1 mV Audio IN Input impedance: approx. 4.7 kΩ Rated input level: approx. 2 V Minimum input level: approx. 18 mV Headphones Output jack (stereo minijack) Recommended load impedance: 16 to 32 Ω USB connector Type-A, High-Speed USB compatible Card slot microSD memory card slot 1.00 times - 0.25 times: FLAC files with the sampling frequency at 88.2 kHz or higher Playback speed control (DPC) 2.00 times - 0.
Help Guide Linear PCM Recorder PCM-A10 Maximum recording time The following lists the maximum recording time (*1) (*2) per memory by recording mode (recording scene). The maximum recording time is estimated, provided that all the folders in the memory are used. Built-in memory REC Mode (REC Scene) (*3) Maximum recording time LPCM 96kHz/24bit (STEREO) 6 hours 35 minutes LPCM 48kHz/24bit (STEREO) 13 hours 15 minutes LPCM 48kHz/16bit (STEREO) 19 hours 50 minutes LPCM 44.
REC Mode (REC Scene) (*3) 16 GB 32 GB 64 GB 128 GB MP3 128kbps (STEREO) 268 hours 536 hours 1,073 hours 2,147 hours MP3 48kbps(MONO) 715 hours 1,431 hours 2,863 hours 5,726 hours Maximum recordable time for each file (*4) REC Mode (REC Scene)(*3) Built-in memory LPCM 96kHz/24bit (STEREO) 2 hours LPCM 44.
Help Guide Linear PCM Recorder PCM-A10 Maximum playback time/number of music files The following lists the maximum playback time of a music file and the number of music files (*) by bit rate. Bit rate * Playback time Number of files 128 kbps 238 hours 3,570 files 256 kbps 119 hours 1,785 files Provided that MP3 files of 4 minutes each are transferred to the linear PCM recorder.
Help Guide Linear PCM Recorder PCM-A10 Battery life The following lists the battery life(*) for the built-in rechargeable battery by file format. The battery’s life spans provided here are all approximate.
Help Guide Linear PCM Recorder PCM-A10 Trademarks Microsoft, Windows and Windows Media are registered trademarks or trademarks of Microsoft Corporation in the United States and/or other countries. Google Play and Android are trademarks of Google LLC. microSD, microSDHC and microSDXC logos are trademarks of SD-3C, LLC. Apple, the Apple logo, iPhone, macOS, iOS and Mac are trademarks of Apple Inc., registered in the U.S. and other countries. App Store is a service mark of Apple Inc., registered in the U.S.
Help Guide Linear PCM Recorder PCM-A10 Customer support websites Please access the following support home page to get the support information about your linear PCM recorder: For customers in Europe: https://www.sony.eu/DNA For customers in Latin America: https://www.sony-latin.com/index.crp For customers in the U.S.A.: https://www.sony.com/recordersupport For customers in Canada: https://www.sony.ca/ElectronicsSupport For customers in China: https://www.sony-asia.
Help Guide Linear PCM Recorder PCM-A10 Troubleshooting Before taking your linear PCM recorder for repair, check it as follows. Check the items listed in [Troubleshooting]. Charge the linear PCM recorder. Some problems may be solved when you charge the built-in rechargeable battery of the linear PCM recorder. Restart the linear PCM recorder. Check the Sound Organizer 2 help. For details on the operation of Sound Organizer 2, refer to the Sound Organizer 2 help.
Help Guide Linear PCM Recorder PCM-A10 Restarting the linear PCM recorder When a problem persists after you have checked all corrective actions listed in the [Troubleshooting] topics, you may be able to solve the problem by restarting your linear PCM recorder. Slide the HOLD•POWER switch to [POWER] and holding it for 8 seconds or longer ( ). When the display window turns off, the restart process begins. Release the HOLD•POWER switch.
Help Guide Linear PCM Recorder PCM-A10 The recorded file is noisy and is hard to understand. Ambient noise is recorded as well as human voices. If you apply the Clear Voice function ([Clear Voice 1] or [Clear Voice 2]) to the playback audio, ambient noise in all frequency bands (noise from projectors or air conditioners, etc.) will be reduced to make human voices distinctive, and you will hear human voices more clearly.
Help Guide Linear PCM Recorder PCM-A10 The recorded file is noisy and you want to record with less noise. With the Recording Filter function ([NCF(Noise Cut)] or [LCF(Low Cut)]), you can reduce noise in the recordings. Additionally, you can use the Scene Select function to change some recording settings, including the recording mode and the sensitivity level of the built-in microphones, at once by selecting one of the recording scenes.
Help Guide Linear PCM Recorder PCM-A10 A rustling noise is recorded. If you accidentally touch your linear PCM recorder or let an object come in contact with it while recording is in progress, rustling noises may be recorded. Keep your hand away from the linear PCM recorder until you finish recording.
Help Guide Linear PCM Recorder PCM-A10 A clipping or breaking noise is recorded. A clipping or breaking noise may be recorded if your linear PCM recorder is placed extremely close to an AC power source, a fluorescent lamp, a computer, a mobile phone, or a smartphone during recording or playback. Keep the linear PCM recorder away from such devices when recording.
Help Guide Linear PCM Recorder PCM-A10 Noise is recorded when you use an external microphone (not supplied) for recording. The plug of the connected external microphone is dirty. Clean the plug.
Help Guide Linear PCM Recorder PCM-A10 You hear noise when using the headphones (not supplied) for playback. The plug of the connected headphones is dirty. Clean the plug.
Help Guide Linear PCM Recorder PCM-A10 The volume of the audio you recorded from an external device is low or you hear squeaking noises when you listen to the audio via the built-in speaker. If you record audio from a monaural external device that is connected to your linear PCM recorder with a stereo connection cable, playing the recorded files may sound low in volume or make squeaking noises when you listen to the audio via the built-in speaker.
Help Guide Linear PCM Recorder PCM-A10 You hear noise during playback even with the Clear Voice function turned on. While playback with the built-in speaker or a Bluetooth audio device or playback of the files in [ progress, the Clear Voice function does not work.
Help Guide Linear PCM Recorder PCM-A10 The linear PCM recorder does not turn on or pressing any button does not work. The built-in rechargeable battery in the linear PCM recorder is running out of power. Charge the built-in rechargeable battery. Your linear PCM recorder is turned off. Slide the HOLD•POWER switch to [POWER] and hold it until the display window turns on. Your linear PCM recorder is placed in the HOLD state. Slide the HOLD•POWER switch to the center dot.
Help Guide Linear PCM Recorder PCM-A10 The linear PCM recorder does not turn off. Slide and hold the HOLD•POWER switch to [POWER] and hold it until [Power Off] appears on the display window.
Help Guide Linear PCM Recorder PCM-A10 The linear PCM recorder automatically turns off. The Auto Power Off function on your linear PCM recorder is set to [30min] by default to save battery power. If you leave the linear PCM recorder unused for 30 minutes, it will automatically turn off. You can change the current setting with the Settings menu. When the time period that is specified for the sleep timer expires, your linear PCM recorder automatically turns off. (By default, the sleep timer is set to [OFF].
Help Guide Linear PCM Recorder PCM-A10 The battery life of the linear PCM recorder is short. The battery life values listed in this Help Guide are measured values acquired under our measurement conditions and may shorten depending on the usage of your linear PCM recorder. Your linear PCM recorder still consumes slight battery power while no operations are in progress. If you do not intend to use the linear PCM recorder for an extended period of time, it is recommended that you turn the power off.
Help Guide Linear PCM Recorder PCM-A10 You cannot charge the battery by connecting the linear PCM recorder to your computer. When your linear PCM recorder is connected to a computer which is not running, the battery will not charge. When the computer is in a power saving mode (standby or sleep), it will not charge, either. Disconnect your linear PCM recorder from the computer and connect it once again. Check the system requirements of your linear PCM recorder.
Help Guide Linear PCM Recorder PCM-A10 The battery indicator does not appear on the display window or it disappears in the middle of charging. Connection to the USB connector on your linear PCM recorder is loose.
Help Guide Linear PCM Recorder PCM-A10 The charge error indicator is flashing where the battery indicator should be displayed. If appears and flashes instead of the battery indicator, the ambient temperature is out of the range for charging the battery. Charge the battery under the temperature of 5 °C - 35 °C (41 °F - 95 °F).
Help Guide Linear PCM Recorder PCM-A10 The linear PCM recorder does not operate correctly. You may have formatted the built-in memory of your linear PCM recorder with a computer. Be sure to use the linear PCM recorder for formatting.
Help Guide Linear PCM Recorder PCM-A10 The operation indicator does not light. [LED] is set to [OFF]. Set [LED] to [ON].
Help Guide Linear PCM Recorder PCM-A10 You cannot record a file. The remaining recording time is insufficient. Related Topic Checking the remaining recording time (Available Rec.
Help Guide Linear PCM Recorder PCM-A10 You cannot store recordings on the SD card. The SD card is not selected as the memory storage for recoded files.
Help Guide Linear PCM Recorder PCM-A10 Recording is interrupted. The VOR function is turned on. To turn off the VOR function, set [VOR] to [OFF].
Help Guide Linear PCM Recorder PCM-A10 The VOR function does not work. During manual recording or synchronized recording, the VOR function does not work.
Help Guide Linear PCM Recorder PCM-A10 The input audio volume is too loud or not loud enough when you record audio from an external device. Use an audio connection cable to connect your linear PCM recorder to the headphones jack on an external device and adjust the volume level on the external device. If you use an audio connecting cable with high resistance, the recording volume will decrease. Use an audio connecting cable without resistance.
Help Guide Linear PCM Recorder PCM-A10 Recording from another device stops on its own. The synchronized recording function is active. Turn it off.
Help Guide Linear PCM Recorder PCM-A10 Input sounds are distorted. Too loud sounds are included in input. Adjust the recording volume to an appropriate level or turn down the input sound volume. When it is likely that sudden, loud input sounds are recorded, set [LIMITER] to [ON] on the OPTION menu.
Help Guide Linear PCM Recorder PCM-A10 The playback volume is low. The built-in speaker is provided mainly for checking recorded audio files. If you find the volume not loud enough or have difficulty in understanding what you hear, use headphones (not supplied) or active speakers (not supplied). The recording volume may be low. Adjust the recording volume level when recording.
Help Guide Linear PCM Recorder PCM-A10 You hear no sound from the built-in speaker. Headphones (not supplied) are connected to your linear PCM recorder. Disconnect the headphones. When your linear PCM recorder is connected with a Bluetooth audio device, no sound is output from the built-in speaker. Disconnect the Bluetooth connection.
Help Guide Linear PCM Recorder PCM-A10 You hear sound from the built-in speaker even when headphones (not supplied) are connected. When the headphones connection is loose, you may hear sound from the built-in speaker as well. Disconnect the headphones and connect them once again.
Help Guide Linear PCM Recorder PCM-A10 The Equalizer function does not change sound quality. While playback is in progress with the built-in speaker or a Bluetooth audio device, the Equalizer function does not work.
Help Guide Linear PCM Recorder PCM-A10 Playback speed is too fast or too slow. The DPC (Digital Pitch Control) setting is set to [ON], and you have changed the playback speed. Set the DPC (Digital Pitch Control) setting to [OFF], or change the playback speed to normal.
Help Guide Linear PCM Recorder PCM-A10 You cannot divide a file. You need a certain amount of free space in the built-in memory to divide a file. Because of the system limitations, you may not be able to divide a file at the very beginning or at the very end of the file. You cannot divide files other than those recorded by the linear PCM recorder (e.g. a file transferred from a computer). While playback of a file is in progress, you cannot divide the file.
Help Guide Linear PCM Recorder PCM-A10 You cannot move a file. You cannot move files in [ Music] to another folder in the built-in memory or the microSD card.
Help Guide Linear PCM Recorder PCM-A10 You cannot copy a file to a different folder. You cannot copy files in [ Music] to another folder in the built-in memory or the microSD card.
Help Guide Linear PCM Recorder PCM-A10 Track marks are not detected. Your linear PCM recorder may fail to detect the track marks that are added by any linear PCM recorder model other than PCM-A10. Use Sound Organizer 2 to copy such a file to the linear PCM recorder.
Help Guide Linear PCM Recorder PCM-A10 The folder or file you created is not displayed. If you have created a folder or file on the computer, your linear PCM recorder may fail to detect it depending on where you created it. For more information, see Structure of folders and files.
Help Guide Linear PCM Recorder PCM-A10 The recording date of a file appears as [----/--/--] or [--:--]. The file may have been recorded by a model of the linear PCM recorder other than PCM-A10. The date and time recording format varies depending on the model.
Help Guide Linear PCM Recorder PCM-A10 The remaining recording time on the display window is shorter than the one displayed on the computer. As the remaining recording time on the display window is calculated by subtracting the memory capacity required for system operations from the remaining built-in memory capacity, it may not be consistent with the one that Sound Organizer 2 shows on the computer.
Help Guide Linear PCM Recorder PCM-A10 The [Memory Full] message appears and you cannot start recording. The built-in memory is full. Delete unnecessary files from the built-in memory, or copy some files to another microSD card or a computer and delete the files.
Help Guide Linear PCM Recorder PCM-A10 The [File Full] message appears and you cannot operate the linear PCM recorder. With the built-in memory and the microSD card, your linear PCM recorder is capable of storing up to 5,000 folders and files all together in total. Delete unnecessary files from the built-in memory, or copy some files to another microSD card or a computer and delete the files.
Help Guide Linear PCM Recorder PCM-A10 The microSD card is not detected. Remove the microSD card and insert it in the correct orientation. You may have formatted the microSD card with a device other than your linear PCM recorder, such as a computer. Be sure to use the linear PCM recorder for formatting microSD cards.
Help Guide Linear PCM Recorder PCM-A10 A folder or file name appears in unreadable characters. Some characters you use on Windows Explorer or Mac Finder are not supported by your linear PCM recorder. Folder and file names containing such characters appear in unreadable characters on the linear PCM recorder.
Help Guide Linear PCM Recorder PCM-A10 Copying a file takes time. If the size of a file is large, it takes a considerable time to finish copying. Wait until the copying finishes.
Help Guide Linear PCM Recorder PCM-A10 The linear PCM recorder is not detected by the computer and you cannot transfer folders/files from the computer. Disconnect your linear PCM recorder from the computer and connect it once again. If your linear PCM recorder is connected to the computer with a USB hub (commercially available) or a USB extension cable (commercially available), remove the hub or cable and connect the linear PCM recorder directly to a USB port on the computer.
Help Guide Linear PCM Recorder PCM-A10 The file you transferred from the computer does not appear on the linear PCM recorder and you cannot play the file. Your linear PCM recorder is capable of displaying up to 8 folder levels. Your linear PCM recorder supports the FLAC (.flac), LPCM (.wav), MP3 (.mp3), WMA (.wma), and AAC-LC (.m4a) formats. Files in other formats may not be detected by the linear PCM recorder. See the technical specifications of your linear PCM recorder.
Help Guide Linear PCM Recorder PCM-A10 The computer does not start. If you start the computer with your linear PCM recorder connected to the computer, the computer may freeze or may not start properly. Disconnect the linear PCM recorder from the computer and start the computer once again.
Help Guide Linear PCM Recorder PCM-A10 You cannot establish a Bluetooth connection. Your linear PCM recorder is turned off. Turn on the linear PCM recorder and the Bluetooth audio device, and then make sure that the Bluetooth function is turned on. The battery of your linear PCM recorder is running low or almost out of power. Charge the battery with a running computer or a USB AC adaptor (not supplied). The device registration (pairing) information is cleared in the following cases.
Help Guide Linear PCM Recorder PCM-A10 You cannot establish a Bluetooth connection with the one-touch operation (NFC connection). Your linear PCM recorder is turned off. Make sure that the power to the linear PCM recorder is turned on. The NFC function of your linear PCM recorder is turned off. While playback is on standby, select [ [NFC Settings] from the HOME menu and make sure that [ON] is selected.
Help Guide Linear PCM Recorder PCM-A10 You cannot control the volume of the Bluetooth audio device. Depending on the connected Bluetooth audio device, you may not be able to control the volume of the Bluetooth audio device from your linear PCM recorder. Depending on the connected Bluetooth audio device, volume control in Standard Mode may not be supported. Disconnect the Bluetooth connection and select [ Bluetooth] - [Audio Device] - [Volume Control] - [Enhanced Mode] from the HOME menu.
Help Guide Linear PCM Recorder PCM-A10 You cannot make device registration (pairing) between the linear PCM recorder and the other device. Your linear PCM recorder and the other device are too apart from each other. Bring them closer (within 1 meter (3.3 feet) from each other) and try it once again.
Help Guide Linear PCM Recorder PCM-A10 You cannot establish a Bluetooth connection. Your linear PCM recorder is turned off. Turn on the linear PCM recorder and the other device, and then make sure that the Bluetooth function is turned on. The battery of your linear PCM recorder is running low or almost out of power. Charge the battery with a running computer or a USB AC adaptor (not supplied). The device registration (pairing) information is cleared in the following cases.
Help Guide Linear PCM Recorder PCM-A10 You cannot establish a Bluetooth connection with the one-touch operation (NFC connection). Your linear PCM recorder is turned off. Make sure that the power to the linear PCM recorder is turned on. The NFC function of your linear PCM recorder is turned off. While playback is on standby, select [ [NFC Settings] from the HOME menu and make sure that [ON] is selected.
Help Guide Linear PCM Recorder PCM-A10 You cannot install Sound Organizer 2. The capacity of the computer's hard disk is insufficient. Check the hard disk capacity. You cannot install Sound Organizer 2 on the computer with the operating system that is not supported by the software. Install the software on the computer with the supported operating system. You have logged on to Windows 7, Windows 8.1, or Windows 10 with a Guest account.
Help Guide Linear PCM Recorder PCM-A10 The linear PCM recorder is not detected by Sound Organizer 2. Check if the software is successfully installed, and then check the connections with your linear PCM recorder as follows: If your linear PCM recorder is connected to the computer with a USB hub (commercially available) or a USB extension cable (commercially available), remove the hub or cable and connect the linear PCM recorder directly to a USB port on the computer. Try another USB port on the computer.
Help Guide Linear PCM Recorder PCM-A10 The playback volume of the computer is low or you hear no audio from the computer. The computer has no sound board. The computer has no built-in speakers or no external speakers are connected. The volume of the computer is turned off. Turn up the volume of the computer. (Refer to the instruction manual of the computer.) You can change the volume of WAV files and save them using the Increase Volume feature of the Microsoft Sound Recorder.
Help Guide Linear PCM Recorder PCM-A10 You cannot play or edit stored files. Sound Organizer 2 is only capable of playing files in the supported format. Depending on the file format, you cannot use part of editorial features of the software. Refer to the help files of Sound Organizer 2.
Help Guide Linear PCM Recorder PCM-A10 The counter or slider does not operate correctly or you hear noise. You may be attempting to play one of the divided files. Save the file on the computer (*), and then transfer it to your linear PCM recorder. The file data will be optimized. * Select one of the file formats supported by the linear PCM recorder to save the file.
Help Guide Linear PCM Recorder PCM-A10 Operations slow down as the number of stored files increases. Regardless of the recording length of files, operations slow down as the total number of files stored on your linear PCM recorder increases.
Help Guide Linear PCM Recorder PCM-A10 The computer seems to freeze while a file is being saved, added, or deleted. It takes a longer time to copy or delete a large file. Wait until the copying or deleting finishes.
Help Guide Linear PCM Recorder PCM-A10 Sound Organizer 2 freezes during start-up. While the computer is accessing your linear PCM recorder, do not disconnect any cables as it may cause unstable computer operations or data corruption. There may be a conflict between Sound Organizer 2 and another driver or application.
Help Guide Linear PCM Recorder PCM-A10 List of messages HOLD... Slide HOLD Switch to Activate. All the buttons are disabled because your linear PCM recorder is in the HOLD state to prevent unintentional operations. Slide the HOLD•POWER switch to the center dot to release the linear PCM recorder from the HOLD state. (See Releasing the linear PCM recorder from the HOLD state.) Low Battery Level You cannot format the memory or delete all the files in a folder because of insufficient battery power.
Slide the HOLD•POWER switch on your linear PCM recorder to [POWER] and holding it for 8 seconds or longer to restart the linear PCM recorder. If this does not work, make a backup copy of your necessary data, and then format the built-in memory. (See Formatting the memory (Format Built-In Memory/Format SD Card).) A file system error was detected in the built-in memory or the microSD card. It may have been formatted by a computer. Use your linear PCM recorder to format the built-in memory or the microSD card.
File Protected The file you selected is protected or [read-only]. You cannot delete the file. Use your linear PCM recorder to remove the protection from the file, or use a computer to clear the read-only property. (See Protecting a file.) Protected Files Not Deleted The file you selected is protected or [read-only]. Use your linear PCM recorder to remove the protection from the file, or use a computer to clear the read-only property, and then delete the file once again. (See Protecting a file.
There is a file with the same name that has track marks. You cannot move, copy, or divide the file. New File The recording file has reached the maximum size limit (4 GB for an LPCM file, and 1 GB for an MP3 file). The file will be divided automatically and recording will continue as a new file. Cannot Divide - Exceeds Max Number of Files in Folder The sum of files in a folder or the total number of files will exceed the limit. You cannot divide the file.
[Manual] is selected for [Built-In Mic Sensitivity] or either of the audio input types under [Ext. Input Setting] on the OPTION menu. The VOR function does not work. Pairing Unsuccessful. Try Again. An attempt to make device registration (pairing) between your linear PCM recorder and a smartphone failed. Turn on the Bluetooth function on your smartphone and try again. (See Establishing a Bluetooth connection between the smartphone and the linear PCM recorder.) Cannot Connect.
Help Guide Linear PCM Recorder PCM-A10 System limitations Due to some system limitations on your linear PCM recorder, you may encounter the following issues that do not indicate malfunctions. Music files are not displayed in the sequence you expected or you cannot play them in that sequence. The music files you transferred from a computer to your linear PCM recorder are sorted by meta-data track number or file name. A recording file is divided automatically.