
Operation Manual
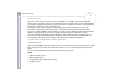
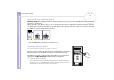
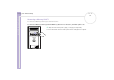
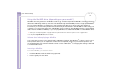
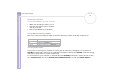

Table Of Contents
- Read this first
- Welcome
- Using your VAIO desktop
- Locating connectors
- Starting your computer
- Shutting down your computer
- Using the keyboard
- Using the shortcut keys
- Setting up the monitor
- Using the mouse
- Using the CD and DVD drives
- Using the floppy disk drive
- Using the modem
- Expansion capabilities
- Using the Memory Stick™
- Using the Net MD drive (depending on your model*)
- Using power saving modes
- Connecting peripheral devices
- Getting help
- Sony's support options
- Troubleshooting
- About the computer and software
- My computer does not start
- The message 'Press
to continue, to enter setup' appears at startup - My computer does not shut down
- My system is running slowly
- My computer locks up
- My computer or software program is not responding
- Windows® locks up during shutdown
- My mouse does not work
- My mouse needs to be set up for left-hand use
- About the display
- About CDs and floppy disks
- My CD/DVD tray does not open
- I cannot play a CD
- I cannot play a DVD-ROM
- My floppy disk drive cannot write to a disk
- When I double-click an application icon, a message such as 'You must insert the application CD in...
- Why does my CD/DVD-RW not record at the highest speed?
- The reading speed of CD-RWs/DVD-RWs* is slow
- About sound
- About the modem
- About peripherals
- About digital video captures and DVgate
- About i.LINK™ devices
- About the computer and software
- Upgrading your VAIO computer
- Precautions
- Glossary

Sony VAIO Desktop User Guide
Using your VAIO desktop
35
nN
Write-protecting a Memory Stick™
Memory Sticks™ are designed with an erasure prevention switch to protect valuable data from accidental
erasure or overwriting.
Move the tab to the right or left* to set or release write-protection. When the erasure prevention switch is
off, data can be saved on the Memory Stick™. When the erasure prevention switch is on, data can be read
from but not saved on the Memory Stick™.
* The 128 MB Memory Stick™ has a vertical lock.
Inserting a Memory Stick™
To insert a Memory Stick™, proceed as follows:
Once you have stored your data from your digital device, insert the
Memory Stick™ into the Memory Stick™ slot in the front panel.
The Memory Stick™ is automatically detected by your system and
appears in the My Computer window with its own drive.
✍ Picture may vary from actual product.
Always hold the Memory Stick™ with the arrow pointing in the correct direction when you
insert it into the slot. To avoid damaging the computer or the Memory Stick™, do not force
the Memory Stick™ into the slot if it does not insert smoothly.
LOCK
LOCK LOCK
while reading and writing data from
DRIVE