4-670-644-11 (1) Read This First Operating Instructions 1 Checking the package contents Sony CLIÉ™ handheld components 2 Charging your Sony CLIÉ™ handheld 3 Performing the initial settings 4 Basic operations of your Sony CLIÉ™ handheld 5 Taking images/movies 6 Using your CLIÉ™ handheld with your computer Enjoying your CLIÉ™ handheld Using applications Personal Entertainment Organizer PEG-NZ90 © 2003 Sony Corporation
About this manual This manual provides an overview of your CLIÉ™ handheld’s features including information about setting up your CLIÉ™ handheld and what you can do with your CLIÉ™ handheld. Checking the package contents Sony CLIÉ™ handheld components Charging your Sony CLIÉ™ handheld Performing the initial settings Basic operations of your Sony CLIÉ™ handheld Page 10 Make sure that all the accessories are supplied in the package.
Refer to the following together with this manual. Handbook (A PDF file in the CD-ROM) • When using CLIÉ handheld for the first time The basic features and operations are explained in detail. • CLIÉ handheld advanced operations The convenient features and how to make full use of your CLIÉ handheld are explained in detail. CLIÉ Application Manual (HTML format: Start up on a computer) The manual explains about how to use the supplied applications in detail.
WARNING To prevent fire or shock hazard, do not expose the unit to rain or moisture. To avoid electrical shock, do not open the cabinet. Refer servicing to qualified personnel only. For customers in the U.S.A and Canada Owner’s Record The model number and serial number are located on the back of the product. Record the model number and the serial number in the space provided below. Refer to them whenever you call upon your Sony dealer regarding this product. Model No._____________ Serial No.
RECYCLING LITHIUM-ION BATTERIES Lithium-Ion batteries are recyclable. You can help preserve our environment by returning your used rechargeable batteries to the collection and recycling location nearest you. For more information regarding recycling of rechargeable batteries, call toll free 1-800822-8837, or visit http://www.rbrc.org/ Caution: Do not handle damaged or leaking lithium-ion batteries.
FCC Radio-Frequency Exposure Statement This equipment generates and radiates radio-frequency energy. In order to comply with FCC radio-frequency radiation exposure guidelines for an uncontrolled environment, this equipment has to be installed and operated while maintaining a minimum body to antenna distance of 2.5 cm. Based on continuous exposure of 30 minutes. Users are not permitted to make changes or modify the system in any way.
Recycling the Battery Pack (Lithium-Ion battery) The supplied Battery Pack (Lithium-Ion battery) is recyclable. You can help preserve our environment by returning your used Lithium-Ion batteries to the collection and recycling location nearest you. For more information regarding recycling of rechargeable batteries, call toll free 1-800-822-8837, or visit the website (http://www.rbrc.org/). When you dispose of a CLIÉ handheld, remove the battery for recycling.
Table of Contents Checking the package contents . . . . . . . . . . . . . . . . . . . . 10 Sony CLIÉ™ handheld components. . . . . . . . . . . . 12 Locating the parts of your Sony CLIÉ handheld . . . . . . . . . . . . . . . . . . 12 Changing the operating style . . . . . . 15 Locating cradle components . . . . . . 17 Locating the controls on the supplied audio remote control . . . . . . . . . . 18 Charging your Sony CLIÉ™ handheld. . . . . . . . . . . . . . 19 Step 1: Inserting/Replacing the battery . . .
Using applications . . . . . . . 86 Troubleshooting. . . . . . . . 101 Using CLIÉ Application Manual . . . . .86 Preventing problems . . . . . . . . . . . 101 Installing add-on applications on your CLIÉ handheld . . . . . . . . . . . . . . .88 Solving problems . . . . . . . . . . . . . 102 Getting Help . . . . . . . . . . . . . . . . . 103 Introducing add-on applications . . . .89 Additional information . . . 104 Notes on use . . . . . . . . . . . . . . . . 104 Specifications . . . . . . . . . . . .
Checking the package contents Please check the accessories in the package before you start. CLIÉ handheld (1) Cradle (1) AC power adapter (1) Headphones (1) Stylus (1) Audio remote control (1) The stylus is stored in your CLIÉ handheld at the factory.
Printer cable (1) AV cable (1) Battery Pack (1) Installation CD-ROM Strap (1) Refer to the illustration below to attach the strap. Protection card (1) The protection card is stored in your CLIÉ handheld at the factory.
Sony CLIÉ™ handheld components Each part of the CLIÉ handheld and the supplied accessories is explained in the following.
Sony CLIÉ™ handheld components A Display Panel (Page 15) H Bluetooth LED (Page 82) B Screen (Page 43) I “Memory Stick” LED (Page 36) C Graffiti Writing Area (Page 43) J Scroll Button (Page 35) E Camera Lens Cover (Page 33) K Hardware Keyboard (Page 37) F Application Buttons (Page 48) L Wireless Communication Slot (Page 38) D POWER LED (Page 32) G Application Buttons (Page 48) Available only when your CLIÉ handheld is set to the turned style.
Back panel B Flash Photometric Sensor I “Memory Stick” Slot (Page 36) C Flash (Page 58) J REC LED (Page 33) D CAPTURE Button (Page 32, 50, 52, 62) K Camera Lens (Page 33) E Headphone Jack (Page 75) M Strap Hook (Page 11) F Battery Cover (Page 19) G HOLD Switch (Page 34) N Interface Connector Cover (Page 22) H POWER Switch (Page 31) O Speaker (Page 45) A Microphone (Page 74) 14 L Lens Cover Lever (Page 33)
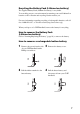
Changing the operating style Your CLIÉ handheld can be used with the display panel set in three different styles. Set your CLIÉ handheld to the “carrying style,” when carrying it around in your baggage or pocket to guard the screen from damage. Opened style Set your CLIÉ handheld to the “opened style,” when you enter data with the hardware keyboard or take images/movies of yourself. b Open the display panel until it clicks into place.
Turned style Set your CLIÉ handheld to “turned style” to make it compact when you operate it with the Stylus or use it in the Camera mode. b Open the display and rotate it as indicated by an arrow until it clicks into place b Fold the display over the keyboard Note Do not turn the display panel in any direction other than that specified and do not apply too much force. Closing the display panel Close the display panel by rotating it as indicated by an arrow.
Locating cradle components B AV output jack You can connect the supplied AV cable to view the screen of “CLIE Album” with your television (page 90). C USB Cable Connector You can connect the supplied USB cable to connect the cradle and your computer (page 68). You can also connect the supplied printer cable to print out the contents of the “CLIE Album” screen or “CLIE Viewer” screen with your printer.
Locating the controls on the supplied audio remote control You can use the audio remote control when you play back music or audio movies with an application such as Audio Player or Movie Player. A ./> Button C N/x Button B Volume Control Button D HOLD Switch b For details on operating each application, refer to the “CLIÉ Application Manual” installed on your computer.
Charging your Sony CLIÉ™ handheld Step 1: Inserting/Replacing the battery When you replace the battery, be sure to turn off your CLIÉ handheld and check that the POWER LED and “Memory Stick” LED are off prior to opening the battery cover. If you open the battery cover while the power is on, data stored on your CLIÉ handheld or data being recorded to a “Memory Stick” media may be deleted. 1 Open the battery cover.
3 Close the battery cover. Verify that the battery is completely inserted into the slot and close the battery cover. Removing the battery Slide the battery release knob as directed by the arrow and remove the battery. Tip About the built-in rechargeable button battery Your CLIÉ handheld uses the built-in rechargeable button battery to maintain data stored in the built-in memory while replacing the Battery Pack. The rechargeable button battery is automatically charged while you use your CLIÉ handheld.
About the Battery Pack Step 2: Charging the battery 1 Set up the stand of the cradle. 2 Charging your Sony CLIÉ™ handheld ■ Supplied Battery Pack The “Smart Lithium” function enables to exchange information about battery conditions between your CLIÉ handheld and the Battery Pack. Your CLIÉ handheld calculates the discharge rate according to the battery condition and displays the battery’s remaining charge on the minute time scale (page 44).
3 Connect the AC adapter to a wall outlet. 4 Open the interface connector cover of your CLIÉ handheld. To a wall outlet 5 Insert your CLIÉ handheld at an angle into the cradle and lay it back to fit into place. The POWER LED indicator of your CLIÉ handheld turns on and charging starts. It takes about four hours for your CLIÉ handheld to be fully charged for the first time. The POWER LED indicator of your CLIÉ handheld turns off when charging is completed.
Performing the initial settings 1 Slide the POWER switch. Your CLIÉ handheld turns on, and the Welcome screen is displayed. b Performing the initial settings The first time you turn on your CLIÉ handheld, you are required to make initial settings. Follow the on-screen instructions to configure the initial settings and to get accustomed to operations on your CLIÉ handheld.
2 Take out the Stylus. You can use the stylus to enter data or to select applications. Take out the Stylus Notes • Always use the point of the stylus for tapping or making strokes on the CLIÉ handheld screen. Never use a real pen, pencil, or other sharp object to write on the screen. • When you put the stylus back in its holder, push it in until it clicks into place. 3 Press lightly on the screen with the stylus. This action is called “tapping.” The Setup screen for digitizer calibration is displayed.
4 Following the on-screen instruction, tap the center of the displayed mark. Note If the digitizer is not configured correctly, the scroll bar may not operate properly, “tapping” may not work as expected, or other problems may occur. For re-configuring the digitizer, refer to “Customizing your Sony CLIÉ handheld (Preferences): Adjusting the digitizer” in the “Handbook.” Performing the initial settings After calibration is completed, a screen for setting the time and date appears.
8 Tap the Set Date box. The Set Date screen is displayed. 9 10 Tap the arrow b or B next to the year to select the current year. Tap the current month and then tap the current date. The Set Date screen closes. 11 Tap the Time Zone box. The Set Time Zone screen is displayed.
12 13 Tap the arrow V next to Daylight Saving and select ON or OFF. Tap Next. Performing the initial settings 14 Tap the region to set the time zone and then tap OK.
15 Tap Next and Done. b The initial settings are complete, and the CLIE Launcher screen is displayed. Initial settings are complete.
Basic operations of your Sony CLIÉ™ handheld This chapter describes how to start applications, enter data, and perform other basic operations. Basic operations With your CLIÉ handheld, you can use the supplied stylus to enter characters or specify an application you want to run. Taking out the stylus The stylus is stored in the holder on the display panel of your CLIÉ handheld. Note To avoid losing the stylus, always put it back in its holder after use.
Dragging Just as you can drag the mouse to select (and drag) text or move objects on your computer, you can use the stylus to drag an item on the screen of your CLIÉ handheld. Press the stylus lightly on the item, and move it along the screen surface. Using the Jog Dial™ navigator Your CLIÉ handheld is equipped with a Jog Dial™ navigator, which allows you to perform all major operations without the stylus. You can operate your CLIÉ handheld using the Jog Dial™ navigator with just one hand.
Functions of parts POWER Switch Turning on your CLIÉ handheld Slide the POWER switch. Your CLIÉ handheld turns on and the last screen you viewed is displayed. POWER Switch When your CLIÉ handheld turns on, the POWER LED (page 32) indicator lights green. Tip Note If you cannot turn on your CLIÉ handheld, make sure that if the HOLD switch is not in the HOLD position. If you try to turn on your CLIÉ handheld while the HOLD switch is in the HOLD position, the POWER LED indicator blinks green three times.
POWER LED Carrying style Opened style Turned style The LED indicator shows the status of your CLIÉ handheld by its color. LED The status of your CLIÉ handheld Lights green The power is ON. Lights orange The battery is being charged. Blinks orange Alarm notifies you at a given time if you have made an alarm setting in an application, such as Date Book. Blinks green (three times) The HOLD switch is in the HOLD position (blinks when you try to turn on your CLIÉ handheld). OFF The power is OFF.
Camera You can take still images or movies. CLOSE Note OPEN When the camera is not in use, close the lens cover by sliding the lens cover lever to the “CLOSE” position. b For details, refer to “Taking images/movies” on page 50. REC LED b For details, refer to the explanation of each application in the “CLIÉ Application Manual” installed on your computer. VOICE REC Button Press the button to record sounds. b For details, refer to “Using voice recorder” on page 74.
HOLD Switch HOLD Protects your CLIÉ handheld from accidental tapping on the screen or pressure on the POWER switch when you are carrying your CLIÉ handheld. If you slide this switch while the power is on, the screen display turns off, even during an operation. Note If you cannot turn on or operate your CLIÉ handheld, check if the HOLD switch is not in the HOLD position. If you try to turn on your CLIÉ handheld while the HOLD switch is in the HOLD position, the POWER LED indicator blinks green three times.
Scroll Button Displays text and other information that extends beyond the area of the screen. Pushing the V button scrolls down to display information below the current viewing area, and pushing the v button scrolls up to display the information above the current viewing area. Depending on the application, unique features are assigned. b For details, refer to the explanation of each application in the “CLIÉ Application Manual” installed on your computer.
“Memory Stick” Slot Insert “Memory Stick” media into this slot. The “Memory Stick” LED blinks orange while your CLIÉ handheld is writing data to or reading data from “Memory Stick” media. b For details, refer to “Using “Memory Stick®” media” in the “Handbook.” Inserting “Memory Stick” media “Memory Stick” LED The “Memory Stick” LED blinks orange while your CLIÉ handheld is writing to or reading data from “Memory Stick” media.
Removing “Memory Stick” media b Push “Memory Stick” media in Pull “Memory Stick” media out Note Make sure that your CLIÉ handheld is not writing to or reading data from “Memory Stick” media (the “Memory Stick” LED is not blinking) before removing it. If you remove “Memory Stick” media while the “Memory Stick” LED is blinking, recorded data may be deleted or damaged. You can use the hardware keyboard in the same way as with the keyboard of your computer.
Ctrl + V Pastes the selected text. Ctrl + D Deletes the selected text. Ctrl + L Turns the backlight on and off. Ctrl + H Switches to the CLIE Launcher screen. Ctrl + M Displays the menu. Ctrl + F Opens the Find dialog box. Ctrl + Same as rotating the Jog Dial™ navigator upwards. Ctrl + Same as rotating the Jog Dial™ navigator downwards. Ctrl + 3 Same as pressing the Jog Dial™ navigator. Ctrl + 3 and hold Same as keeping the Jog Dial™ navigator pressed.
Notes • Only the compact flash type data network card can be inserted into the wireless communication slot. Network cards or memory cards other than the above-mentioned will not work. Do not use any other card in your CLIÉ handheld, as it may cause a malfunction. • If your CLIÉ handheld is not working properly, remove the network card once, and insert the network card again. • There may be some data network services that may not be used, depending on the network card and provider that you are using.
Restarting your Sony CLIÉ handheld Normally, you do not need to reset your CLIÉ handheld. However, should your CLIÉ handheld not turn on or not respond, you can perform a soft reset to solve the problem. Follow the procedure below to reset your CLIÉ handheld. Performing a soft reset All records and entries stored in your CLIÉ handheld are retained even after performing a soft reset. 1 2 Take out the stylus pin by unscrewing the metal barrel from the stylus quill.
Performing a hard reset If the soft reset does not solve the problem, you need to perform a hard reset to restart your CLIÉ handheld. Notes • All records and add-on applications stored in your CLIÉ handheld will be erased by performing a hard reset. • Perform a hard reset only if a soft reset does not solve your problem. You can restore your CLIÉ handheld data if you have made a backup on your computer or “Memory Stick” media.
4 Press the v button on the keyboard panel of your CLIÉ handheld. Press the v button A hard reset is performed on your CLIÉ handheld. After restarting, the system displays “palm powered,” “CLIÉ,” and “SONY,” followed by the Welcome screen. Refer to “Performing the initial settings” on page 23. After a hard reset, only the current date and time are retained. Formats, Preferences, and other settings are restored to the factory settings.
Locating the components of the initial screen Tip If a different screen is displayed, tap the Home B Favorite Applications (shortcuts) You can create shortcuts to favorite applications. C Home Icon If you tap this icon, the Application Launcher (List of applications) screen will be displayed. G Application Manager Icons (page 46) H Application Icons (page 47) I Position Indicator J Graffiti® Writing Area This is the area for manually entering data with Graffiti® characters.
Status Bar The status bar displays the following icons for all applications. Additional icons appear according to the applications in use. Tap this icon to display the CLIE Launcher screen. Tap this icon to display the menus of the current application. Tap this icon to open the Find dialog box. Tap this icon to display the Silk Plug-In dialog box. If the Silk Plug-In is installed, you can edit the display and functions of the Silk Screen area by switching the Silk Plug-In.
Tap this icon to display the Adjust Volume dialog box. 1 Turns off the sound of your CLIÉ handheld irrespective of the volume level setting. While the Muting mode is selected, the icon is displayed in the status bar. 2 Adjusts the volume level for playback sound of audio files or movie files. 3 Adjusts the volume level for System sound, Alarm sound, and Game sound. The setting affects the General in the Preferences. b For details, refer to “Customizing your Displays the current time.
Application Manager Icons You can manage your applications with the application manager icons. The followings are featured as standard functions. : Beam, Send : Info : Delete b For details, refer to “Sony CLIÉ™ handheld basic operations: Using “CLIE Launcher”: Application manager icon” in the “Handbook.” Tip Application manager functions may be added when you install certain applications.
Using applications Your CLIÉ handheld can carry out various functions through applications. Starting an application using the Jog Dial™ navigator 1 2 Tap the Home screen. icon to display the CLIE Launcher Rotate the Jog Dial™ navigator to select an application icon and press it to start. Basic operations of your Sony CLIÉ™ handheld Tip You can also tap the desired application icon in the CLIE Launcher screen to start the application.
Starting an application using the application buttons Main body side Display panel side You can press the application button to start an application. By default, the application buttons are set to start Date Book, Address, To Do, and Memo Pad as the icons on each button show. Note Application Buttons on the display panel side are available only when your CLIÉ handheld is set to the turned style (page 16).
Entering data Entering data There are five ways to enter data on your CLIÉ handheld. Select the one that best suits you. z Hardware keyboard (page 37) You can enter data using the hardware keyboard in the same way as with the keyboard of your computer. This is useful when you want to enter lots of data. z On-screen keyboard You can enter data by tapping the keyboard that appears on the screen. your Sony CLIÉ™ handheld: Practicing entering data using the on-screen keyboard” in the “Handbook.
Taking images/ movies Taking images The simple way to take images 1 Set your CLIÉ handheld to the turned style and open the camera lens cover. Tip Set your CLIÉ handheld to the opened style when you take images of yourself. 2 Press the CAPTURE button to start “CLIE Camera S.” The application starts after a few seconds. Tip You can also select the CLIE Cam S icon in “CLIE Launcher” (page 47) to start “CLIE Camera S.
Locating components on the “CLIE Camera S” screen B “Movie Recorder” Start Button Switches the application to “Movie Recorder” for taking movies. C Custom Button (Page 56) J Album Start Button Starts “CLIE Album.” K Album Select Button Tap the button to select the album where the taken images are located. D Zoom Magnification (Page 59) L Viewer Start Button Starts “CLIE Viewer” to display the taken images. E Setup Button Displays the Camera Setup screen.
Using functions Using the self-timer 1 2 Tap the Setup screen. button to display the Camera Setup Tap Self Timer and select On. Tap the OK button. (Self-timer) is displayed on the screen. b 3 Capture the subject in the viewfinder and press the CAPTURE button fully down. Countdown starts and the image will be taken after approximately 10 seconds. Tip To cancel the self-timer during the operation Tap the button on the right of the countdown bar.
Selecting the image size/quality You can select the image size (number of pixels) and image quality (compression ratio), depending on the purpose. By tapping the you can select a favorite setting from three kinds of preset entries. button, Presetting image size/quality 1 2 button to display the Camera Setup Tap Size, Quality to display the Size, Quality screen. Select the image size/quality from the list and tap the OK button.
Selecting the location to where the captured images are to be saved 1 2 54 Tap the Setup screen. button to display the Camera Setup Tap Save to to select the location to where the captured images are to be saved. Priority MS If a “Memory Stick” media is inserted into the slot, captured images will be saved on the “Memory Stick” media. If not, captured images will be saved in the memory of your CLIÉ handheld.
Selecting the scene mode When taking images of scenes or people at night, you can use the scene mode to enhance the impact of the image. 1 2 Tap the Setup screen. button to display the Camera Setup Tap Scene to select the scene mode. Twilight Twilight Portrait Taking images/movies Normal Select this mode normally. (Default) You can take images of a night scene without ruining the effect of the scene. Since the shutter speed becomes slower, make sure you keep the camera still.
Assigning a function to the custom button You can assign your favorite function to the custom button. 1 Tap the Setup screen. button to display the Camera Setup Custom button The icon varies depending on the assigned function. 2 56 Tap Custom Button and to select a function you want to assign.
Selecting the shutter sound You can select the volume and tone quality of the shutter sound. 1 2 Tap the Setup screen. button to display the Camera Setup Tap Shutter Sound Vol to set the volume of the shutter sound. Tap Shutter Sound to select the tone quality of the shutter sound.
Selecting the flash mode You can select the flash mode according to the situation. 1 Tap the flash mode button and select a flash mode. The Flash mode icon is displayed. Auto The flash works automatically in poor light conditions. (Default) The flash works every time. On (Flashes forcibly) Off (No flash) The flash is turned off. Note Do not use a flash towards the eyes from a short distance, as a visual disturbance may occur, especially when taking pictures of a baby.