
User Manual
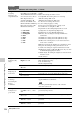

Table Of Contents
- Table of Contents
- Overview
- Preparations
- Recording
- Basic Operation Procedure
- Selecting the Video Format
- Switching the ND Filters
- Using the 5600K CC Filter
- Adjusting the White Balance
- Adjusting the Black Balance
- Displaying the Markers and Zebra Patterns
- Setting the Gain
- Setting the Electronic Shutter
- Adjusting the Iris
- Adjusting the Zoom
- Adjusting the Focus
- Reducing Flickers
- Setting the Time Data
- Recording Audio Signals
- Outputting the Color Bars and Reference Tone
- Recording Shot Marks
- Adding the OK Mark
- Rec Review
- Changing Functions of the Assignable Buttons
- Interval Recording
- Frame Recording
- Picture Cache Recording
- Slow & Quick Motion Recording
- Freeze Mix: Image Alignment
- Picture Profiles
- Deleting Clips
- Operating Planning Metadata
- Playback
- Thumbnail Screens
- Playing Back Clips
- Clip Operations
- Clip Operation Menus
- Basic Operations of the Clip Operation Menus
- Displaying the Detailed Information of a Clip
- Adding/Deleting the OK Mark to/from a Clip (HD Mode Only)
- Copying Clips
- Deleting Clips
- Displaying the EXPAND CLIP Screen
- Displaying the SHOT MARK Screen (HD Mode Only)
- Adding/Deleting Shot Marks (HD Mode Only)
- Changing the Index Frame (HD Mode Only)
- Dividing a Clip (HD Mode Only)
- Status Displays
- Menu Configuration and Detailed Settings
- Storing/Retrieving the Setting Data
- Connecting External Devices
- Appendixes

Setup Menu List
124
Menu Configuration and Detailed Settings
Assign Button
Assigning
functions to the
assignable buttons
<1> to <8>
Off / Marker / Last Clip DEL /
ATW / ATW Hold / Rec Review
/ Rec / Picture Cache / Freeze
Mix / Expanded Focus /
Spotlight / Backlight / IR
Remote / Shot Mark1 / Shot
Mark2 / VF Mode / BRT Disp /
Histogram / Lens Info / OK
Mark / LCD /VF Adjust
<1> Lens Info
<2> BRT Disp
<3> Histogram
<4> Rec
<5> Rec
<6> Off
<7> Off
<8> Off
Assign a function to the ASSIGN button of the corresponding
number.
Marker: For turning the markers on/off
Last Clip DEL: For deleting the last recorded clip
ATW: For turning ATW on/off
ATW Hold: For holding the ATW value
Rec Review: For starting a Rec Review
Rec: For starting/stopping recording
Picture Cache: For turning picture caching on/off
Freeze Mix: For executing Freeze Mix
Expanded Focus: For turning Expanded Focus on/off
Spotlight: For selecting TLCS Spotlight mode
Backlight: For selecting TLCS Backlight mode
IR Remote: For activating/deactivating the IR Remote
Commander
Shot Mark1: For adding shot mark 1 (HD mode only)
Shot Mark2: For adding shot mark 2 (HD mode only)
VF Mode: For switching between color and monochrome
modes of the viewfinder
BRT Disp: For turning the brightness level indication on/off
Histogram: For turning the histogram indication on/off
Lens Info: For turning the depth-of-field indication on/off
OK Mark: For adding an OK mark (HD mode only, not valid
in thumbnail display/playback status)
LCD/VF Adjust: For turning the brightness/contrast level bar
indication on/off
Off: No function
Tally
Setting the tally
lamps
Front
High / Low / Off
Set the brightness of the tally lamp on the front.
High: To brighten the lamp
Low: To dim the lamp
Off: To not light the lamp
Rear
On / Off
Turn the tally lamp on the rear on/off.
Hours Meter
Displaying the
hours meter
Hours (Sys) The non-resettable accumulated time of use is displayed.
Hours (Reset) The resettable accumulated time of use is displayed.
Reset
Execute/Cancel
Select “Execute” to reset the Hours (Reset) value to 0.
IR Remote
Activating/
deactivating the
Remote
Commander
On / Off Set to “On” to activate remote control operations from the
supplied IR Remote Commander.
Note
The setting automatically returns to “Off” when the
camcorder is turned off.
Battery Alarm
Setting the low
power alarm
Low BATT
5% / 10% / 15% / ... / 45% /
50%
Set the battery level at which the Low BATT warning is
generated (in steps of 5%).
BATT Empty
3% to 7%
Set the battery level at which the BATT Empty warning is
generated.
DC Low Volt1
11.5 V to 17.0 V
Set the DC IN voltage at which the DC Low Volt1 warning is
generated.
DC Low Volt2
11.0 V to 14.0 V
Set the DC IN voltage at which the DC Low Volt2 warning is
generated.
OTHERS
Menu items Subitems and setting values Contents