
User Manual
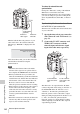


Table Of Contents
- Table of Contents
- Overview
- Preparations
- Recording
- Basic Operation Procedure
- Selecting the Video Format
- Switching the ND Filters
- Using the 5600K CC Filter
- Adjusting the White Balance
- Adjusting the Black Balance
- Displaying the Markers and Zebra Patterns
- Setting the Gain
- Setting the Electronic Shutter
- Adjusting the Iris
- Adjusting the Zoom
- Adjusting the Focus
- Reducing Flickers
- Setting the Time Data
- Recording Audio Signals
- Outputting the Color Bars and Reference Tone
- Recording Shot Marks
- Adding the OK Mark
- Rec Review
- Changing Functions of the Assignable Buttons
- Interval Recording
- Frame Recording
- Picture Cache Recording
- Slow & Quick Motion Recording
- Freeze Mix: Image Alignment
- Picture Profiles
- Deleting Clips
- Operating Planning Metadata
- Playback
- Thumbnail Screens
- Playing Back Clips
- Clip Operations
- Clip Operation Menus
- Basic Operations of the Clip Operation Menus
- Displaying the Detailed Information of a Clip
- Adding/Deleting the OK Mark to/from a Clip (HD Mode Only)
- Copying Clips
- Deleting Clips
- Displaying the EXPAND CLIP Screen
- Displaying the SHOT MARK Screen (HD Mode Only)
- Adding/Deleting Shot Marks (HD Mode Only)
- Changing the Index Frame (HD Mode Only)
- Dividing a Clip (HD Mode Only)
- Status Displays
- Menu Configuration and Detailed Settings
- Storing/Retrieving the Setting Data
- Connecting External Devices
- Appendixes

External Synchronization
141
Connecting External Devices
When multiple units of the PMW-F3K/F3L are
used in the same shooting location, recording can
be made in synchronization with a specific
reference signal, and the timecode can be
matched among all the units.
Aligning the phase of the video signal
(Genlock)
Genlock operation is enabled by supplying an SD
or HD reference signal to the GENLOCK IN
connector of the camcorder.
Valid reference signals depend on the video
format selected.
When the video format is HQ 1920/23.98P or
HQ 1440/23.98P, select either “59.94i (2-3
PullDown)” or “23.98P” with “23.98P Output”
(page 116) of the VIDEO SET menu.
NTSC Area/NTSC(J) Area
PAL Area
The phase adjustment for the reference signal can
also be made with “Genlock” (page 125) of the
OTHERS menu.
Notes
• If the reference signal is unstable, genlock is not
possible.
• The subcarrier is not synchronized.
Synchronizing the timecode of your
camcorder with that of another unit
The timecode of your camcorder can be locked to
that of another unit.
Set the unit that supplies the timecode to a mode
in which the timecode output keeps advancing
(Free Run or Clock mode).
1 Set “Timecode” of the TC/UB SET
menu as follows:
Mode: Preset
Run: Free Run
2 Press the TC/U-BIT/DURATION
button so that the timecode is displayed
on the screen.
3 Supply an HD or SD reference video
signal to the GENLOCK IN connector
and the reference timecode to the TC IN
connector.
External Synchronization
Video format Valid reference signal
HQ 1920/59.94i 1080/59.94i
480/59.94i
HQ 1920/29.97P
HQ 1920/23.98P
(23.98P Output:
59.94i(2-3PullDown))
HQ 1920/23.98P
(23.98P Output:
23.98PsF)
1080/23.98PsF
480/59.94i
HQ 1440/59.94i 1080/59.94i
480/59.94i
HQ 1440/29.97P
HQ 1440/23.98P
(23.98P Output:
59.94i(2-3PullDown))
HQ 1440/23.98P
(23.98P Output:
23.98PsF)
1080/23.98PsF
480/59.94i
SP 1440/59.94i 1080/59.94i
480/59.94i
SP 1440/23.98P
HQ 1280/59.94P 1080/59.94i
720/59.94P
480/59.94i
HQ 1280/29.97P
HQ 1280/23.98P
DVCAM59.94i SQ/EC 1080/59.94i
480/59.94i
DVCAM29.97P SQ/EC
Video format Valid reference signal
HQ 1920/50i 1080/50i
576/50i
HQ 1920/25P
HQ 1440/50i
HQ 1440/25P
SP 1440/50i
HQ 1280/50P 1080/50i
720/50P
576/50i
HQ 1280/25P
DVCAM50i SQ/EC 1080/50i
576/50i
DVCAM25P SQ/EC