
User Manual

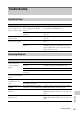

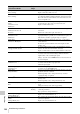
Table Of Contents
- Table of Contents
- Overview
- Preparations
- Recording
- Basic Operation Procedure
- Selecting the Video Format
- Switching the ND Filters
- Using the 5600K CC Filter
- Adjusting the White Balance
- Adjusting the Black Balance
- Displaying the Markers and Zebra Patterns
- Setting the Gain
- Setting the Electronic Shutter
- Adjusting the Iris
- Adjusting the Zoom
- Adjusting the Focus
- Reducing Flickers
- Setting the Time Data
- Recording Audio Signals
- Outputting the Color Bars and Reference Tone
- Recording Shot Marks
- Adding the OK Mark
- Rec Review
- Changing Functions of the Assignable Buttons
- Interval Recording
- Frame Recording
- Picture Cache Recording
- Slow & Quick Motion Recording
- Freeze Mix: Image Alignment
- Picture Profiles
- Deleting Clips
- Operating Planning Metadata
- Playback
- Thumbnail Screens
- Playing Back Clips
- Clip Operations
- Clip Operation Menus
- Basic Operations of the Clip Operation Menus
- Displaying the Detailed Information of a Clip
- Adding/Deleting the OK Mark to/from a Clip (HD Mode Only)
- Copying Clips
- Deleting Clips
- Displaying the EXPAND CLIP Screen
- Displaying the SHOT MARK Screen (HD Mode Only)
- Adding/Deleting Shot Marks (HD Mode Only)
- Changing the Index Frame (HD Mode Only)
- Dividing a Clip (HD Mode Only)
- Status Displays
- Menu Configuration and Detailed Settings
- Storing/Retrieving the Setting Data
- Connecting External Devices
- Appendixes

Troubleshooting
147
Appendixes
Troubleshooting
Operating Power
Symptoms Cause Remedy
The camcorder does not
power on when you set
the power switch to ON.
No battery pack is mounted and no
power is supplied to the DC IN
connector.
Mount a battery pack (page 22) or connect an AC
power using the AC-DN10 (page 23) .
The battery pack is completely
exhausted.
Replace the battery pack with a fully charged one
(page 22).
The power supply cuts
while operating.
The battery pack becomes exhausted. Replace the battery pack with a fully charged one
(page 22).
The battery pack becomes
exhausted very quickly.
The ambient temperature is very low. This owes to the battery characteristics and is not a
defect.
The battery pack is inadequately
charged.
Recharge the battery pack (page 22).
If the battery pack is soon exhausted even after you
charged it fully, it may comes to the end of its life.
Replace it with a new one.
Recording/Playback
Symptoms Cause Remedy
Recording does not start
when you press any
recording start/stop
button.
The power switch is set to OFF. Set the power switch to ON.
The SxS memory card is write-
protected.
Release the write protection (page 34), or replace the
card with a non-protected SxS memory card.
The SxS memory card is full. Replace the card with one having sufficient space.
The SxS memory card needs
restoration.
Restore the memory card (page 37).
Playback does not start
when you press the PLAY
button.
The power switch is set to OFF. Set the power switch to ON.
The supplied IR Remote
Commander does not
work.
Remote control operation is disabled. Enable remote control operation (page 32).
The battery of the IR Remote
Commander is exhausted.
Replace the battery with a new one.
Audio recording is not
possible.
The AUDIO LEVEL (CH-1/CH-2)
controls are set to the minimum level.
Adjust the audio recording levels with the AUDIO
LEVEL (CH-1/CH-2) controls (page 56).
The recorded sound is
distorted.
The audio level is too high. Adjust the audio recording levels with the AUDIO
LEVEL (CH-1/CH-2) controls (page 56), and record
again.
The recorded sound has a
high noise level.
The audio level is too low. Adjust the audio recording levels with the AUDIO
LEVEL (CH-1/CH-2) controls (page 56), and record
again.