
User Manual

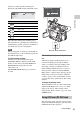
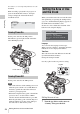
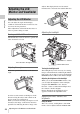

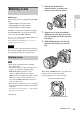

Table Of Contents
- Table of Contents
- Overview
- Preparations
- Recording
- Basic Operation Procedure
- Selecting the Video Format
- Switching the ND Filters
- Using the 5600K CC Filter
- Adjusting the White Balance
- Adjusting the Black Balance
- Displaying the Markers and Zebra Patterns
- Setting the Gain
- Setting the Electronic Shutter
- Adjusting the Iris
- Adjusting the Zoom
- Adjusting the Focus
- Reducing Flickers
- Setting the Time Data
- Recording Audio Signals
- Outputting the Color Bars and Reference Tone
- Recording Shot Marks
- Adding the OK Mark
- Rec Review
- Changing Functions of the Assignable Buttons
- Interval Recording
- Frame Recording
- Picture Cache Recording
- Slow & Quick Motion Recording
- Freeze Mix: Image Alignment
- Picture Profiles
- Deleting Clips
- Operating Planning Metadata
- Playback
- Thumbnail Screens
- Playing Back Clips
- Clip Operations
- Clip Operation Menus
- Basic Operations of the Clip Operation Menus
- Displaying the Detailed Information of a Clip
- Adding/Deleting the OK Mark to/from a Clip (HD Mode Only)
- Copying Clips
- Deleting Clips
- Displaying the EXPAND CLIP Screen
- Displaying the SHOT MARK Screen (HD Mode Only)
- Adding/Deleting Shot Marks (HD Mode Only)
- Changing the Index Frame (HD Mode Only)
- Dividing a Clip (HD Mode Only)
- Status Displays
- Menu Configuration and Detailed Settings
- Storing/Retrieving the Setting Data
- Connecting External Devices
- Appendixes

Power Supply
23
Preparations
charge level and usage time remaining are
displayed on the LCD monitor/viewfinder screen.
The camcorder indicates the remaining usage
time in minutes by calculating the available time
with the battery pack if operation is continued at
the current rate of power consumption.
Note
The operating time on a battery pack depends on
the condition (new or old) of the battery pack and
the ambient temperature.
To check in power-off status
Information on the mounted battery pack
(BATTERY INFO) is displayed on the LCD
monitor screen when you hold the DISPLAY/
BATT INFO button pressed even if the
camcorder is off.
The BATTERY INFO display goes off after 5
seconds.
If the battery charge remaining becomes
low
If the battery charge remaining decreases to a
certain level during operation (Low BATT
status), a low-battery message, flashing of the
tally lamps, and a beep sound will warn you.
If the remaining further decreases to a level at
which operation cannot be continued (BATT
Empty status), a battery-empty message appears.
Temporarily set the power switch to OFF and
connect a power source via the DC IN connector
or replace the battery pack with one that is fully
charged.
To change the message levels
The Low BATT level is set to 10% of full charge,
and the BATT Empty level is set to 3% of full
charge at the factory. These settings can be
changed with “Battery Alarm” (page 124) of the
OTHERS menu.
The camcorder can be operated on AC power by
using an AC-DN10 AC Adaptor (optional) with a
CCDD-X2 DC Cable (optional).
Icon Remaining
100% to 91%
90% to 71%
70% to 51%
50% to 31%
30% to 11%
10% to 0%
T
120min
STBY
S&
Q
REC
A: 25min
B: 50min
Z99
Using AC Power (DC IN Power)
DISPLAY/
BATT INFO
BATTERY
I NFO
0
%
50
%
100
%
Re
m
aining
Ti
m
e
:
20
m
in
DISPLAY/BATT INFO button