
User Manual

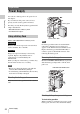
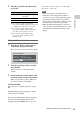
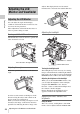

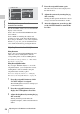

Table Of Contents
- Table of Contents
- Overview
- Preparations
- Recording
- Basic Operation Procedure
- Selecting the Video Format
- Switching the ND Filters
- Using the 5600K CC Filter
- Adjusting the White Balance
- Adjusting the Black Balance
- Displaying the Markers and Zebra Patterns
- Setting the Gain
- Setting the Electronic Shutter
- Adjusting the Iris
- Adjusting the Zoom
- Adjusting the Focus
- Reducing Flickers
- Setting the Time Data
- Recording Audio Signals
- Outputting the Color Bars and Reference Tone
- Recording Shot Marks
- Adding the OK Mark
- Rec Review
- Changing Functions of the Assignable Buttons
- Interval Recording
- Frame Recording
- Picture Cache Recording
- Slow & Quick Motion Recording
- Freeze Mix: Image Alignment
- Picture Profiles
- Deleting Clips
- Operating Planning Metadata
- Playback
- Thumbnail Screens
- Playing Back Clips
- Clip Operations
- Clip Operation Menus
- Basic Operations of the Clip Operation Menus
- Displaying the Detailed Information of a Clip
- Adding/Deleting the OK Mark to/from a Clip (HD Mode Only)
- Copying Clips
- Deleting Clips
- Displaying the EXPAND CLIP Screen
- Displaying the SHOT MARK Screen (HD Mode Only)
- Adding/Deleting Shot Marks (HD Mode Only)
- Changing the Index Frame (HD Mode Only)
- Dividing a Clip (HD Mode Only)
- Status Displays
- Menu Configuration and Detailed Settings
- Storing/Retrieving the Setting Data
- Connecting External Devices
- Appendixes

Setting the Area of Use and the Clock
25
Preparations
2 Turn the jog dial to select the desired
area of use.
1) The composite signal output from this
camcorder is an NTSC signal with a black setup
(7.5 IRE). The system frequency is 59.94i.
2) The composite signal output from this
camcorder is an NTSC signal with no black
setup. The system frequency is 59.94i.
3) The composite signal output from this
camcorder is a PAL signal. The system
frequency is 50i.
Setting the time and date
1 Turn the jog dial to set the cursor to
“Date/Time” then press the dial.
The cursor moves to the year-setting column.
2 Turn the jog dial to set the year then
press the dial.
The cursor moves to the month-setting
column.
3 Set the month, day, hour, minute, and
second in sequence in the same manner.
When you press the jog dial at “SET,” the
cursor moves back to “Date/Time.”
To finish the setting
Move the cursor to “Finish” then press the jog
dial.
The Initial Setting display disappears, and the
clock setting is completed.
Once after the Initial Setting display disappears,
the time zone and date/time settings can be
changed using the OTHERS menu (page 123).
For details on menu operations, see “Basic Menu
Operations” on page 107.
Notes
• If the clock setting is cleared because of
exhaustion of the backup battery while no
operation power was being supplied (no battery
pack and no DC IN connection), the Initial
Setting display will be displayed when you turn
the camcorder on at the next opportunity.
• While the Initial Setting display is shown, no
other operation except turning the power off is
permitted until you finish the setting for this
display.
Setting Area of use
NTSC Area NTSC area (for areas other
than Japan)
1)
NTSC(J) Area
NTSC area (Japan)
2)
PAL A rea
PAL area
3)
INITIAL
SETT
I
NG
C
ount ry
:
NTSC
(
J
)
Area
Language
:
Japanese
Ti
m
e
Z
one:
UTC
+09:00
T
O
KY
O
D
ate/Ti
m
e:
2011/01/01
00:00:00
Finish
2011/01/01
00:00:00
SET