
User Manual

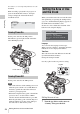
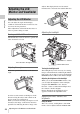

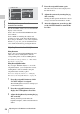
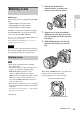

Table Of Contents
- Table of Contents
- Overview
- Preparations
- Recording
- Basic Operation Procedure
- Selecting the Video Format
- Switching the ND Filters
- Using the 5600K CC Filter
- Adjusting the White Balance
- Adjusting the Black Balance
- Displaying the Markers and Zebra Patterns
- Setting the Gain
- Setting the Electronic Shutter
- Adjusting the Iris
- Adjusting the Zoom
- Adjusting the Focus
- Reducing Flickers
- Setting the Time Data
- Recording Audio Signals
- Outputting the Color Bars and Reference Tone
- Recording Shot Marks
- Adding the OK Mark
- Rec Review
- Changing Functions of the Assignable Buttons
- Interval Recording
- Frame Recording
- Picture Cache Recording
- Slow & Quick Motion Recording
- Freeze Mix: Image Alignment
- Picture Profiles
- Deleting Clips
- Operating Planning Metadata
- Playback
- Thumbnail Screens
- Playing Back Clips
- Clip Operations
- Clip Operation Menus
- Basic Operations of the Clip Operation Menus
- Displaying the Detailed Information of a Clip
- Adding/Deleting the OK Mark to/from a Clip (HD Mode Only)
- Copying Clips
- Deleting Clips
- Displaying the EXPAND CLIP Screen
- Displaying the SHOT MARK Screen (HD Mode Only)
- Adding/Deleting Shot Marks (HD Mode Only)
- Changing the Index Frame (HD Mode Only)
- Dividing a Clip (HD Mode Only)
- Status Displays
- Menu Configuration and Detailed Settings
- Storing/Retrieving the Setting Data
- Connecting External Devices
- Appendixes

Adjusting the LCD Monitor and Viewfinder
26
Preparations
You can adjust the angle and the display
conditions of the LCD monitor for the best view
in various shooting situations.
These adjustments of the LCD monitor have no
effect on pictures being recorded.
Turning on/off the LCD monitor
The LCD monitor turns on when it is opened and
turns off when it is closed.
Adjusting the angle
Rotate the opened LCD monitor to the desired
angle.
It can be rotated as much as 180 degrees in the
direction facing the subject and as much as 90
degrees in the opposite direction.
When you rotate it exceeding 135 degrees toward
the subject, the image on the monitor becomes
upside down, indicating the mirror image of the
subject. The display direction of the textual
information is converted to the readable direction.
Adjusting the backlight
Turning the backlight on/off
The backlight may not be necessary for viewing
images on the LCD monitor under bright ambient
light, such as in an outdoor location. Set the LCD
B.LIGHT switch to OFF to turn off the backlight.
Adjusting the brightness of the backlight
When you set the LCD B.LIGHT switch to ON,
you can adjust the brightness of the backlight,
using the LCD BRIGHT + and – buttons.
Press the – button to darken the backlight. Press
the + button to make it brighter.
During adjustment, the backlight level bar
appears to indicate the adjustment value.
Adjusting the color, contrast, and
brightness
Using the menu
The color, contrast, and brightness of the LCD
monitor can be adjusted with the LCD/VF SET
Adjusting the LCD
Monitor and Viewfinder
Adjusting the LCD Monitor
Press the tab to the right to unlock.
90°
180°
LCD B.LIGHT switch
LCD BRIGHT +/
– buttons