
User Manual

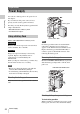
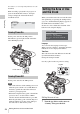
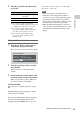
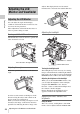

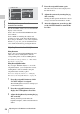

Table Of Contents
- Table of Contents
- Overview
- Preparations
- Recording
- Basic Operation Procedure
- Selecting the Video Format
- Switching the ND Filters
- Using the 5600K CC Filter
- Adjusting the White Balance
- Adjusting the Black Balance
- Displaying the Markers and Zebra Patterns
- Setting the Gain
- Setting the Electronic Shutter
- Adjusting the Iris
- Adjusting the Zoom
- Adjusting the Focus
- Reducing Flickers
- Setting the Time Data
- Recording Audio Signals
- Outputting the Color Bars and Reference Tone
- Recording Shot Marks
- Adding the OK Mark
- Rec Review
- Changing Functions of the Assignable Buttons
- Interval Recording
- Frame Recording
- Picture Cache Recording
- Slow & Quick Motion Recording
- Freeze Mix: Image Alignment
- Picture Profiles
- Deleting Clips
- Operating Planning Metadata
- Playback
- Thumbnail Screens
- Playing Back Clips
- Clip Operations
- Clip Operation Menus
- Basic Operations of the Clip Operation Menus
- Displaying the Detailed Information of a Clip
- Adding/Deleting the OK Mark to/from a Clip (HD Mode Only)
- Copying Clips
- Deleting Clips
- Displaying the EXPAND CLIP Screen
- Displaying the SHOT MARK Screen (HD Mode Only)
- Adding/Deleting Shot Marks (HD Mode Only)
- Changing the Index Frame (HD Mode Only)
- Dividing a Clip (HD Mode Only)
- Status Displays
- Menu Configuration and Detailed Settings
- Storing/Retrieving the Setting Data
- Connecting External Devices
- Appendixes

Adjusting the LCD Monitor and Viewfinder
28
Preparations
Switching between color and
monochrome modes
For the viewfinder screen, color or monochrome
display can be selected.
Select “VF” from the LCD/VF SET menu then
select “Mode.”
Select “B&W” if checking the subject and
focusing are easier on the monochrome display.
If you assign “VF Mode” to one of the assignable
buttons (see page 61), you can switch between
color and monochrome by pressing the button.
Adjusting the contrast and brightness
Using the menu
Select “VF” from the LCD/VF SET menu and
adjust the contrast and brightness with the
corresponding items: Contrast and Brightness.
For details on menu operations, see “Basic Menu
Operations” on page 107.
Using the assignable button
If you assign “LCD/VF Adjust” to one of the
assignable buttons, you can adjust the contrast
and brightness of the viewfinder, using the
assignable button and the jog dial.
For how to assign the function, see “Changing
Functions of the Assignable Buttons” on page 61.
1 Press the assignable button to which
“LCD/VF Adjust” is assigned.
The LCD Brightness Level bar is displayed
on the LCD monitor.
2 Press the assignable button twice to
display the VF Brightness Level bar.
3 Adjust the brightness by turning the jog
dial vertically.
Turning the dial upwards makes the
brightness brighter, and downwards makes it
darker.
4 Press the assignable button again.
The VF Contrast Level bar is displayed on
the LCD monitor.
5 Adjust the contrast by turning the jog
dial vertically.
Turning the dial upwards makes the contrast
stronger, and downwards makes it weaker.
6 After the adjustment, press the jog dial
or the CANCEL button to turn off the
level bar.
00:00
LCD
VF
Peaking
M
arker
Zebra
Display
O
n/
O
ff
LCD/VF
SET
Backl i ght
M
ode
C
ontrast
Br ightness
P
o
w
er
:
High
:
Color
:
0
:
0
:
Auto
B
B
B
B
B
B