
User Manual
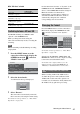

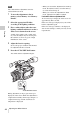
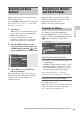
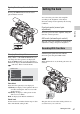
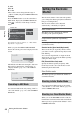
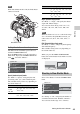
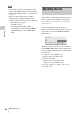
Table Of Contents
- Table of Contents
- Overview
- Preparations
- Recording
- Basic Operation Procedure
- Selecting the Video Format
- Switching the ND Filters
- Using the 5600K CC Filter
- Adjusting the White Balance
- Adjusting the Black Balance
- Displaying the Markers and Zebra Patterns
- Setting the Gain
- Setting the Electronic Shutter
- Adjusting the Iris
- Adjusting the Zoom
- Adjusting the Focus
- Reducing Flickers
- Setting the Time Data
- Recording Audio Signals
- Outputting the Color Bars and Reference Tone
- Recording Shot Marks
- Adding the OK Mark
- Rec Review
- Changing Functions of the Assignable Buttons
- Interval Recording
- Frame Recording
- Picture Cache Recording
- Slow & Quick Motion Recording
- Freeze Mix: Image Alignment
- Picture Profiles
- Deleting Clips
- Operating Planning Metadata
- Playback
- Thumbnail Screens
- Playing Back Clips
- Clip Operations
- Clip Operation Menus
- Basic Operations of the Clip Operation Menus
- Displaying the Detailed Information of a Clip
- Adding/Deleting the OK Mark to/from a Clip (HD Mode Only)
- Copying Clips
- Deleting Clips
- Displaying the EXPAND CLIP Screen
- Displaying the SHOT MARK Screen (HD Mode Only)
- Adding/Deleting Shot Marks (HD Mode Only)
- Changing the Index Frame (HD Mode Only)
- Dividing a Clip (HD Mode Only)
- Status Displays
- Menu Configuration and Detailed Settings
- Storing/Retrieving the Setting Data
- Connecting External Devices
- Appendixes

Selecting the Video Format
41
Recording
With “PAL Area” selected
For HD/SD switching use “HD/SD” under
“System” of the OTHERS menu.
When you change the menu setting, the
camcorder automatically restarts, executing the
switching.
Note
HD/SD switching is disabled during recording
and playback.
1 Press the MENU button to set the
camcorder to Menu mode, display the
OTHERS menu with , and select
“HD/SD” from “System.”
2 Select the desired mode.
A confirmation message is displayed.
3 Select “Execute.”
The camcorder is automatically turned off,
then is restarted, activating the menu setting.
For details on menu operations, see “Basic Menu
Operations” on page 107.
For the menu items “Format” of “System” of the
OTHERS menu and “SDI/HDMI/i.LINK I/O
Select” of the VIDEO SET menu the settings for
HD mode and those for SD mode are
independently stored in memory. When you
switch between HD and SD, these items are
automatically changed to the conditions
corresponding to the selected mode.
Press the MENU button to set the camcorder to
Menu mode, display the OTHERS menu with
, and select “Format” from “System.”
For details on menu operations, see “Basic Menu
Operations” on page 107.
Signals from the SDI OUT, VIDEO OUT, and
HDMI OUT connectors are also output according
to the format selected with this menu.
For details on the output formats, refer to the
Supplement in the supplied CD-ROM labeled
“Manuals for Solid-State Memory Camcorder.”
When recording in SP 1440 × 1080 mode at
23.98P in Progressive mode (indicated as SP
1440/23.98P on this camcorder), pictures are
recorded at 59.94 in Interlace mode (indicated as
SP 1440/59.94i) by pull-down processing.
Format Indication on this
camcorder
720 × 576
50 interlace, squeeze
DVCAM50i SQ
720 × 576
50 interlace, edge crop
DVCAM50i EC
720 × 576
25 Progressive, squeeze
DVCAM25P SQ
720 × 576
25 Progressive, edge crop
DVCAM25P EC
Switching between HD and SD
00:00
NTSC
(
J
)
A
rea
HD
HQ
1920/ 59.94i
O
THE
RS
IR
R
e
m
ot
e
B
attery
A
lar
m
Battery I
NFO
G
enlock
Tr i gger
M
ode
S
yste
m
C
lip
:
Off
B
B
B
:
Both
B
B
C
ountry
HD
/
SD
For
m
at
:
:
:
Change Mode?
HD > SD
Execute
C
ancel
Changing the Format
Note on recording format in SP 1440/23.98P
mode
00:00
O
THE
RS
IR
R
e
m
ot
e
B
attery
A
lar
m
Battery I
NFO
G
enlock
Tr i gger
M
ode
S
yste
m
C
lip
:
Off
B
B
B
:
Both
B
B
B
C
ountry
HD
/
SD
For
m
at
:
:
:
HQ
1920/59.94i
HQ
1440/59.94i
SP
1440/59.94i
HQ
1920/29.97P
HQ
1440/29.97P
HQ
1920/23.98P
HQ
1440/23.98P
B