
User Manual

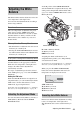
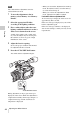
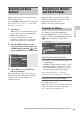
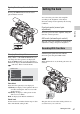
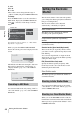
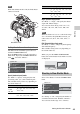
Table Of Contents
- Table of Contents
- Overview
- Preparations
- Recording
- Basic Operation Procedure
- Selecting the Video Format
- Switching the ND Filters
- Using the 5600K CC Filter
- Adjusting the White Balance
- Adjusting the Black Balance
- Displaying the Markers and Zebra Patterns
- Setting the Gain
- Setting the Electronic Shutter
- Adjusting the Iris
- Adjusting the Zoom
- Adjusting the Focus
- Reducing Flickers
- Setting the Time Data
- Recording Audio Signals
- Outputting the Color Bars and Reference Tone
- Recording Shot Marks
- Adding the OK Mark
- Rec Review
- Changing Functions of the Assignable Buttons
- Interval Recording
- Frame Recording
- Picture Cache Recording
- Slow & Quick Motion Recording
- Freeze Mix: Image Alignment
- Picture Profiles
- Deleting Clips
- Operating Planning Metadata
- Playback
- Thumbnail Screens
- Playing Back Clips
- Clip Operations
- Clip Operation Menus
- Basic Operations of the Clip Operation Menus
- Displaying the Detailed Information of a Clip
- Adding/Deleting the OK Mark to/from a Clip (HD Mode Only)
- Copying Clips
- Deleting Clips
- Displaying the EXPAND CLIP Screen
- Displaying the SHOT MARK Screen (HD Mode Only)
- Adding/Deleting Shot Marks (HD Mode Only)
- Changing the Index Frame (HD Mode Only)
- Dividing a Clip (HD Mode Only)
- Status Displays
- Menu Configuration and Detailed Settings
- Storing/Retrieving the Setting Data
- Connecting External Devices
- Appendixes

Adjusting the Black Balance / Displaying the Markers and Zebra Patterns
45
Recording
With this camcorder, you can adjust the black
balance using the menu.
Use the CAMERA SET menu for the adjustment.
For details on menu operations, see “Basic Menu
Operations” on page 107.
1 Close the iris.
When using a lens on which the iris can be
closed, such as the lens supplied with the
PMW-F3K, close the iris.
If a lens on which the iris cannot be
completely closed is used, cover the lens
entirely with the lens cap or equivalent.
2 Press the MENU button to set the
camcorder to Menu mode, display the
CAMERA SET menu with , and
select “Auto Black Bal.” from the menu.
3 Select “Execute” to start the black
balance adjustment.
During adjustment, an in-progress message is
displayed. When the adjustment is completed
successfully, the message changes to a
completion message.
During recording, various markers and zebra
patterns can be inserted into the image on the
LCD monitor/viewfinder screen.
This does not affect recording signals.
Use “Marker” of the LCD/VF SET menu.
Press the MENU button to set the camcorder to
Menu mode, display the LCD/VF SET menu with
, and select “Marker” from the menu.
Activating the marker indications
• Set “Setting” to “On” then turn the markers on/
off independently.
No marker is displayed when “Setting” is “Off.”
• Assigning the Marker on/off function to one of
the assignable buttons permits you to operate
“Setting: On/Off” by pressing the button.
For the assignable buttons, see “Changing
Functions of the Assignable Buttons” on page 61.
Displaying the safety-zone marker
Set “Safety Zone” to “On” to insert the safety-
zone marker to the screen.
With “Safety Area” you can select the size of the
safety-zone marker from among 80%, 90%,
92.5%, and 95% of the picture area.
Adjusting the Black
Balance
00:00
C
A
M
E
R
A
SET
A
uto
B
lack
B
al.
Gain
Setup
Shutter
S
lo
w
S
hutter
Color
B
ar
T
ype
Flicker
Reduce
Multi
B
B
B
:
B
Execute
C
ancel
Displaying the Markers
and Zebra Patterns
Displaying the Markers
00:00
LCD
VF
Peaking
M
arker
Zebra
Display
O
n/
O
ff
LCD/VF
SET
Setting
Safety
Z
one
Safety
Area
Center
M
arker
Aspec t
M
arker
Aspec t
Select
:
O
n
:
O
n
:
90
%
:
O
n
:
O
ff
:
4:3
B
B
B
B
B
B
B