
User Manual
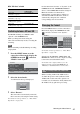

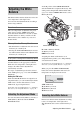
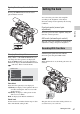
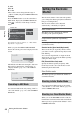
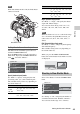
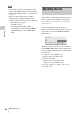
Table Of Contents
- Table of Contents
- Overview
- Preparations
- Recording
- Basic Operation Procedure
- Selecting the Video Format
- Switching the ND Filters
- Using the 5600K CC Filter
- Adjusting the White Balance
- Adjusting the Black Balance
- Displaying the Markers and Zebra Patterns
- Setting the Gain
- Setting the Electronic Shutter
- Adjusting the Iris
- Adjusting the Zoom
- Adjusting the Focus
- Reducing Flickers
- Setting the Time Data
- Recording Audio Signals
- Outputting the Color Bars and Reference Tone
- Recording Shot Marks
- Adding the OK Mark
- Rec Review
- Changing Functions of the Assignable Buttons
- Interval Recording
- Frame Recording
- Picture Cache Recording
- Slow & Quick Motion Recording
- Freeze Mix: Image Alignment
- Picture Profiles
- Deleting Clips
- Operating Planning Metadata
- Playback
- Thumbnail Screens
- Playing Back Clips
- Clip Operations
- Clip Operation Menus
- Basic Operations of the Clip Operation Menus
- Displaying the Detailed Information of a Clip
- Adding/Deleting the OK Mark to/from a Clip (HD Mode Only)
- Copying Clips
- Deleting Clips
- Displaying the EXPAND CLIP Screen
- Displaying the SHOT MARK Screen (HD Mode Only)
- Adding/Deleting Shot Marks (HD Mode Only)
- Changing the Index Frame (HD Mode Only)
- Dividing a Clip (HD Mode Only)
- Status Displays
- Menu Configuration and Detailed Settings
- Storing/Retrieving the Setting Data
- Connecting External Devices
- Appendixes

Setting the Electronic Shutter
48
Recording
L: 0 dB
M: 6 dB
H: 12 dB
These values can be changed in the range of
–3 dB to +18 dB, using the CAMERA SET menu.
To change
Press the MENU button to set the camcorder to
Menu mode, display the CAMERA SET menu
with , and select “Gain Setup” from the
menu.
For details on menu operations, see “Basic Menu
Operations” on page 107.
When you press the DISPLAY/BATT INFO
button, the current gain value is displayed on the
screen.
The indication in dB can be changed to that in an
ISO value by changing the “Gain Setting” of
“Display On/Off” (page 119) of the LCD/VF
SET menu.
You can turn AGC mode on by setting “AGC” to
“On” with “TLCS” (page 112) of the CAMERA
SET menu.
The electronic shutter of the camcorder permits
you to change the shutter speed (the accumulation
time per recording frame).
The electronic shutter can be adjusted
automatically or manually as required.
Auto Shutter mode
The shutter speed is automatically adjusted
according to the picture brightness.
Fixed Shutter (manual adjustment)
modes
Recording is made with a specified shutter speed
(accumulation time).
Standard modes (Speed mode/Angle mode)
These modes may be especially effective when
you wish to record a quick-moving subject with
little blurring.
You can select Speed mode or Angle mode. In
Angle mode, you can specify the shutter speed by
setting the shutter angle.
ECS (Extended Clear Scan) mode
Specify the shutter speed by frequency. This
mode may be used to shoot the monitor screen
eliminating horizontal bands.
Slow Shutter mode
The shutter speed is specified in the number of
accumulated frames.
You can turn Auto Shutter mode on by setting
“Auto Shutter” to “On” with “TLCS” (page 112)
of the CAMERA SET menu.
When you set the SHUTTER switch to ON, the
fixed shutter is turned on in the mode and with the
shutter speed you specified with “Shutter” of the
CAMERA SET menu.
Recording in AGC Mode
00:00
C
A
M
E
R
A
SET
Low
Mid
High
: 0dB
: 6dB
: 12dB
A
uto
B
lack
B
al.
Gain
Setup
Shutter
S
lo
w
S
hutter
Color
B
ar
T
ype
Flicker
Reduce
Multi
B
B
B
:
B
TLCS
.
ATW 4300K
PPOFF
++
T1.6
18dB
S
1 1.5 2 3 4 5 7 10
TLCS
.
ATW 4300K
PPOFF
++
T1.6
I
SO
:
6400
1 1.5 2 3 4 5 7 10
Setting the Electronic
Shutter
Shooting in Auto Shutter Mode
Shooting in a Fixed Shutter Mode