
User Manual

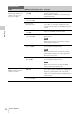
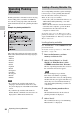
Table Of Contents
- Table of Contents
- Overview
- Preparations
- Recording
- Basic Operation Procedure
- Selecting the Video Format
- Switching the ND Filters
- Using the 5600K CC Filter
- Adjusting the White Balance
- Adjusting the Black Balance
- Displaying the Markers and Zebra Patterns
- Setting the Gain
- Setting the Electronic Shutter
- Adjusting the Iris
- Adjusting the Zoom
- Adjusting the Focus
- Reducing Flickers
- Setting the Time Data
- Recording Audio Signals
- Outputting the Color Bars and Reference Tone
- Recording Shot Marks
- Adding the OK Mark
- Rec Review
- Changing Functions of the Assignable Buttons
- Interval Recording
- Frame Recording
- Picture Cache Recording
- Slow & Quick Motion Recording
- Freeze Mix: Image Alignment
- Picture Profiles
- Deleting Clips
- Operating Planning Metadata
- Playback
- Thumbnail Screens
- Playing Back Clips
- Clip Operations
- Clip Operation Menus
- Basic Operations of the Clip Operation Menus
- Displaying the Detailed Information of a Clip
- Adding/Deleting the OK Mark to/from a Clip (HD Mode Only)
- Copying Clips
- Deleting Clips
- Displaying the EXPAND CLIP Screen
- Displaying the SHOT MARK Screen (HD Mode Only)
- Adding/Deleting Shot Marks (HD Mode Only)
- Changing the Index Frame (HD Mode Only)
- Dividing a Clip (HD Mode Only)
- Status Displays
- Menu Configuration and Detailed Settings
- Storing/Retrieving the Setting Data
- Connecting External Devices
- Appendixes

Picture Profiles
71
Recording
The camcorder is adjusted to the picture
quality specified by the selected Profile.
(If you select “OFF,” the camcorder will be
fixed at the standard picture quality, and no
picture adjustment is allowed.)
3 Press the PICTURE PROFILE button
to exit the menu.
The picture profile being selected is displayed
when you press the DISPLAY/BATT INFO
button.
You can copy the settings of a selected picture
profile to another picture profile.
1 Select the source picture profile as
mentioned in “Selecting a Picture
Profile using the P. PROFILE menu”.
2 Select “Copy” from “SET” of the
P.PROFILE menu.
The picture profile numbers are listed on the
screen.
3 Specify the target picture profile.
“Execute” and “Cancel” are displayed.
4 Select “Execute.”
Copying begins.
When copying ends, the completion message is
displayed for three seconds, and the original
screen display is restored.
You can reset a selected picture profile to the
factory settings (standard status).
1 Select the picture profile you wish to
reset as mentioned in “Selecting a
Picture Profile using the P.PROFILE
menu” on page 70.
2 Select “Reset” from “SET” of the
P.PROFILE menu.
“Execute” and “Cancel” are displayed.
3 Select “Execute.”
Resetting begins.
When resetting ends, the completion message is
displayed for three seconds, and the original
screen display is restored.
A picture profile can be sent to and stored on an
SxS memory card as a file (filename:
PPDATA.SUF).
Only one picture profile can be stored on the same
memory card. The stored picture profile can be
immediately reproduced by reading from the
memory card.
Storing a Picture Profile
1 Insert a recordable SxS memory card
into a slot.
Confirm that the corresponding access lamp
is lit in green.
2 Select the picture profile to be stored.
The selected picture profile number is
displayed at the bottom of the screen.
See “Selecting a Picture Profile using the
P.PROFILE menu” on page 70.
3 Select “SET” of the P. PROFILE menu.
4 Select “Store” of “PP Data.”
Copying the Settings of a Picture
Profile
Example:
P
.
PROF
I
LE
SEL
SET
OFF
PP1:
SceneA
PP2:
SceneB
PP3:
SceneC
PP4:
SceneD
PP5:
SceneE
PP6:
SceneF
TLCS
.
ATW 4300K
PP
1
++
T1.6
18dB
1 1.5 2 3 4 5 7
Resetting a Picture Profile
Storing a Picture Profile on an SxS
Memory Card