
User Manual

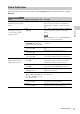
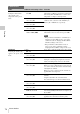
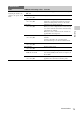
Table Of Contents
- Table of Contents
- Overview
- Preparations
- Recording
- Basic Operation Procedure
- Selecting the Video Format
- Switching the ND Filters
- Using the 5600K CC Filter
- Adjusting the White Balance
- Adjusting the Black Balance
- Displaying the Markers and Zebra Patterns
- Setting the Gain
- Setting the Electronic Shutter
- Adjusting the Iris
- Adjusting the Zoom
- Adjusting the Focus
- Reducing Flickers
- Setting the Time Data
- Recording Audio Signals
- Outputting the Color Bars and Reference Tone
- Recording Shot Marks
- Adding the OK Mark
- Rec Review
- Changing Functions of the Assignable Buttons
- Interval Recording
- Frame Recording
- Picture Cache Recording
- Slow & Quick Motion Recording
- Freeze Mix: Image Alignment
- Picture Profiles
- Deleting Clips
- Operating Planning Metadata
- Playback
- Thumbnail Screens
- Playing Back Clips
- Clip Operations
- Clip Operation Menus
- Basic Operations of the Clip Operation Menus
- Displaying the Detailed Information of a Clip
- Adding/Deleting the OK Mark to/from a Clip (HD Mode Only)
- Copying Clips
- Deleting Clips
- Displaying the EXPAND CLIP Screen
- Displaying the SHOT MARK Screen (HD Mode Only)
- Adding/Deleting Shot Marks (HD Mode Only)
- Changing the Index Frame (HD Mode Only)
- Dividing a Clip (HD Mode Only)
- Status Displays
- Menu Configuration and Detailed Settings
- Storing/Retrieving the Setting Data
- Connecting External Devices
- Appendixes

Picture Profiles
73
Recording
The values when “Off” is selected at “SEL” of the P.PROFILE menu are shown in bold face (example:
Standard).
Picture Profile Items
P. PROFILE SET
Items Subitems and setting values Contents
Profile Name
Changing the picture profile
name
Profile name Set the profile name in 8 characters at maximum.
You can use upper- and lowercase alphabetics,
numerics 0 to 9, - (hyphen), _ (underscore) and
space.
Matrix
Adjusting the color phase
over the entire area with
matrix operations
Setting
On / Off
Set to “On” to activate the color phase adjustment
function with matrix operations for the entire
picture.
Note
When this function is set to “Off,” Multi Matrix is
also set to “Off” in synchronization.
Select
Standard / High SAT / FL
Light / Cinema / F35 709 Like
Select the built-in preset matrix provided for
convenience.
Level
–99 to +99 (±0)
Adjust the color saturation for the entire picture
area.
Phase
–99 to +99 (±0)
Adjust the hue for the entire picture area.
R-G, R-B, G-R, G-B, B-R, B-G
–99 to +99 (±0)
Finely adjust the color phase for the entire picture
area by independently setting each of the factors.
Multi Matrix
Makes settings related to
multi-matrix correction.
Setting
On / Off
Set to “On” to enable the multi-matrix correction,
which allows specific colors to be selected for
saturation correction in a 16-axis hue space.
Area Indication
1)
On / Off
Set to “On” to display a zebra pattern in the areas of
the specified color for multi-matrix correction.
Color Detection
2)
Execute/Cancel
Execute to detect the target color on the screen for
multi-matrix correction.
Axis
B / B+ /MG- / MG / MG+ / R /
R+ / YL- / YL /YL+ / G- / G /
G+ / CY / CY+ / B-
Specify a color targeted by multi-matrix correction
(16-axis mode).
Hue
–99 to +99 (±0)
Set the the hue of the color targeted by multi-matrix
correction for each 16-axis mode.
Saturation
–99 to +99 (±0)
Adjust the saturation of the color targeted by multi-
matrix correction for each 16-axis mode.