4-074-715-03(1) Projector Suspension Support プロジェクターサスペンションサポート 特約店様用取付説明書 お買い上げいただきありがとうございます。この取付説明書は、特約店様用に書かれたも のです。 お客様へ 本製品の取り付けには、確実な作業が必要になります。必ず、販売店や工事店に依頼 して、安全性に充分考慮して確実な取り付けを行ってください。 安全のための注意事項を守らないと、火災や人身事故になることがあります。 この説明書には、事故を防ぐための重要な注意事項と製品の取り扱い かたを示してあります。この説明書をよくお読みのうえ、製品を安全 にお使いください。お読みになったあとは、いつでも見られるところ に必ず保管してください。 特約店様へ 本製品の取り付けには特別な技術が必要ですので、設置の際には取付 説明書をよくご覧の上、設置を行ってください。取り付け不備や取り 扱い不備による事故、損傷については、当社では責任を負いません。 なお、この取扱説明書は、取り付け作業後にお客様に渡してくださ い。 このプロジェクターサスペンションサポートはプロジェクター専用で す
English 日本語 耐用荷重:最大 15 kg PSS-610はソニーのLCDプロジェクター用の天井吊り下げ用サス ペンションサポートです。 安全のために 警告表示の意味 この取扱説明書および製品では、 次のような表示をしています。表 示の内容をよく理解してから本文 をお読みください。 この表示の注意事項を守らないと、 事故などにより死亡や大けがなど人 身事故につながることがあります。 行為を指示する記号 強制 強制 製品の落下による死亡、大けがなどの 事故を避けるため、下記の注意事項を 必ずお守りください。 ・ 設置は、お買い上げ店にご依頼ください。 ・ 天井は少なくとも85 kgの重量を支えられるように、必要に応じ て補強を行ってください。 ・ ブラケットを天井に直接取り付ける場合には、天井に合わせて、 市販のM10ボルトとナット、ワッシャーをご使用ください。M10 以外のボルト、ナット、ワッシャーで取り付けると落下する危険 があります。 ・ 取り付けは手順に従ってください。手順に従わないと落下する危 険や、死亡・大けがになることがあります。 ・ PSS-610はソニーのLCDプロジェ
Deutsch Maximale Belastbarkeit: 15 kg Die Aufhängung PSS-610 ist zur Verwendung mit den LCD-Projektoren von Sony konzipiert. Vorsicht • Wenden Sie sich bei der Installation an qualifizierte Fachkräfte von Sony. • Die Decke sollte für eine Tragfähigkeit von mindestens 85 kg ausgelegt ist. Andernfalls muß die Decke verstärkt werden. • Wenn Sie die Halterung direkt an der Decke befestigen, verwenden Sie handelsübliche M10Schrauben mit Muttern und Unterlegscheiben (je nach Decke).
目次/Table of contents/Table des matières/Inhalt/ Indice/Indice/ 日本語 English 部品表 ................................................................................. 5 Parts List ................................................................... 5 設置寸法 .............................................................................. 7 Installation Diagram .................................................. 7 天井への取り付けかた ........................................................ 8 Attaching to the ceiling ......
部品表/Parts List/Composants/Teileliste/Lista de componentes/Elenco dei componenti/ 天井用マウントブラケット (1) (a) Upper ceiling mount bracket (1) Support supérieur de montage au plafond (1) Obere Deckenmontagehalterung (1) Soporte superior de montaje en el techo (1) Staffa superiore di montaggio al soffitto (1) アジャストメントパイプ (1) (b) Adjustment pipe (1) Tube de réglage (1) Einstellrohr (1) Tubo de ajuste (1) Tubo di regolazione (1) アジャストメントパイプ (1) (c) Adjustment pipe (1) Tube de réglage (1) Einstellrohr (1) Tubo de
部品表/Parts List/Composants/Teile liste/Lista de componentes/ Elenco dei componenti/ ワッシャーM8用 (4) (h) Washer M8 (4) Rondelle M8 (4) Unterlegscheibe M8 (4) Arandela M8 (4) Rondella M8 (4) 部品番号/Parts number/ Numéro de pièce/ Teilenummer/ Número de componentes/ Numero dei componenti/ 4-047-748-11 歯付きワッシャーM8用(4) (i) Toothed lock washer M8 (4) Rondelle hélice M8 (4) Zahnscheibe M8 (4) Arandela de bloqueo dentada M8 (4) Rondella di fermo a denti M8 (4) 部品番号/Parts number/ Numéro de pièce/ Teilenummer/ Núme
設置寸法/Installation Diagram/Schéma d’installation/ Installationsdiagramm/Diagrama de instalación/ Schema dell’installazione/ スクリーンサイズと投射距離の寸法および天井からプロジェクターまでの距離の寸法については、以下の説明書をご覧ください。 - プロジェクター本体の取扱説明書 - プロジェクター本体の設置説明書 - レンズの取付説明書(別売のレンズ使用時) VPL-S900にサスペンションサポートを取り付ける場合は、この取付説明書の14 ページもご覧ください。 For details of screen size and installation measurement for projection and the distance between the ceiling and the projector, refer to the following manuals.
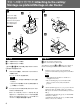
天井への取り付けかた/Attaching to the ceiling/ Montage au plafond/Montage an der Decke/ 1 2 A (e) A プロジェクター底面 Bottom of projector Base du projecteur Unterseite des Projektors Base del proyector Base del proiettore (b)/(c) (e) (f) (d) (h) (i) (d) (i) B (h)(j) B (e) (b)/(c) (e) (f) (d) (h) (i) (d) (i) (h) (j) 日本語 A レンズ側にネジ穴が1つの場合 B レンズ側にネジ穴が2つの場合 上記イラストAとBの取り付け作業上の違いはマウントブラケッ トの向きが180度違うだけです。 1 English A: One screw hole for the lens side B: Two screw holes for the lens side The difference betwee
Montaje en el techo/Montaggio al soffitto/ Français Deutsch A: Un orifice de vissage du côté de l’objectif B: Deux orifices de vissage du côté de l’objectif A: Eine Schraubenbohrung auf der Objektivseite B: Zwei Schraubenbohrungen auf der Objektivseite La différence entre A et B dans les figures ci-dessus est que le sens de montage du support est différent (180°). Der Unterschied zwischen der Abbildung A und B oben liegt in der unterschiedlichen Ausrichtung der Montagehalterung (180°).
天井への取り付けかた/Attaching to the ceiling/ Montage au plafond/Montage an der Decke/Montaje en el techo/ 4 3 A (f) (h) (i) (d) (i) (h)(j) スクリーン方向 Screen forward B (a) Ecran (f) Projektionsschirm (h) (i) Pantalla Direzione dello schermo (d) (i) (h)(j) 日本語 3 プロジェクターマウントブラケット(d)にアジャストメントパイ プを仮どめする。 English 3 プロジェクターが水平になるように取り付けます。角度を 多少調整することもできますが、 この場合投影される画面 は台形になります。 ボルトM8 × 50 (f)(1 本) 、歯付きワッシャーM8 用 (i) (2本) 、ワッシャーM8用 (h)(2本) 、ナットM8(j) (1本)を 使用します。 4 4 天井用マウントブラケット(a)を天井に取り付ける。 市販のM10ボルト、
Montaggio al soffitto/ Français 3 4 Montez les tubes de réglage sur le support de montage du projecteur (d) à l’aide d’un boulon M8 × 50 (f), de deux rondelles hélice M8 (i), de deux rondelle M8 (h) et d’un écrou M8 (j). Fixez les tubes de façon à mettre le projecteur à niveau. Vous pouvez incliner légèrement le projecteur, mais cette opération donnera un aspect trapézoïdal à l’image projetée. Fixez le support supérieur de montage au plafond (a) au plafond.
天井への取り付けかた/Attaching to the ceiling/ Montage au plafond/Montage an der Decke/Montaje en el techo/ 6 5 A A (k) (l) (g) B B (k) (l) (g) 日本語 5 アジャストメントパイプを天井用マウントブラケット(a)に差し 込み、仮どめする。 English 5 ピン6 mm (k) (2 本)とスナップピン (l) (2 本)を使用しま す。パイプ(b)は150/175/200 mm、パイプ(c)は250/275/ 300 mm の範囲で高さを調節できます。 6 手順5で仮どめした天井用マウントブラケット(a)とアジャス トメントパイプを固定する。 ネジM4×6 (g)(6 本)を使用します。 次に手順3で仮どめしたボルトをきつく締めて、アジャスト メントパイプを固定します。 12 6 Insert the adjustment pipe into the upper ceiling mount bracket (a).
Montaggio al soffitto/ Français 5 6 Introduisez le tube de réglage dans le support supérieur de montage au plafond (a). Fixez le tube à l’aide de deux goupilles de 6 mm (k) et de deux clavettes à ressort (l). Le tube (b) peut se régler selon une hauteur de 150/ 175/200 mm (6/7/7 7/8 pouces); le tube (c) peut se régler selon une longueur de 250/275/300 mm (9 7/8 / 10 7/8 /11 7/8 pouces). 5 6 Fixez le support supérieur de montage au plafond (a) et le tube d’ajustement qui sont attachés à l’étape 5.
天井への取り付けかた/Attaching to the ceiling/ Montage au plafond/Montage an der Decke/Montaje en el techo/ VPL-S900取付時の寸法 / Dimensions for attaching the projector suspension support to the VPL-S900 / Dimensions d’installation du support de suspension pour projecteur sur le VPL-S900 / Abmessungen zum Anbringen der Projektoraufhängung am VPL-S900 / Dimensiones para instalar el soporte de suspensión para proyector al VPL-S900 / Dimensioni per l’applicazione del supporto di sospensione del proiettore al modello VPL-S90
Montaggio al soffitto/ Français Vue du dessus a Alignez le centre de l’objectif sur le centre de l’écran. a) Distance entre l’écran et le centre de l’objectif 1 Centre de l’écran 2 Centre de l’appareil 3 Avant du meuble 4 Support supérieur de montage au plafond 5 Centre du pivot de support (Le centre du pivot de support est différent de celui de l’appareil) 6 Centre de I’objectif Español Deutsch Draufsicht a Richten Sie die Mitte des Objektivs an der Mitte des Projektionsschirms aus.
天井への取り付けかた/Attaching to the ceiling/ Montage au plafond/Montage an der Decke/Montaje en el techo/ c b 単位 : mm Units : mm (inches) Unité : mm (pouces) Einheit : mm Unidades : mm (pulgadas) Unità : mm 日本語 English 前から見た図 b レンズの中心は、支柱の中心より右側に49 mmずれ ています。天井に設置するときは、支柱の中心では なくレンズの中心とスクリーンの中心を合わせてく ださい。 1 天井 2 天井からプロジェクターマウントブラケット取り 付け面間での距離 アジャストメントパイプ(b)を使った場合: 150/175/200 mm アジャストメントパイプ(c)を使った場合: 250/275/300 mm 3 プロジェクターマウントブラケット取り付け面 4 レンズ中心 5 本体中心 6 支柱の中心(支柱は、本体中心とは異なりま す。) Front view b The lens is o
Montaggio al soffitto/ Français Vue frontal b L’objectif est décalé de 49 mm (1 15/16 pouces) vers la droite du centre du pivot de support. Au moment du montage, veillez à aligner correctement le centre de l’objectif sur le centre de l’écran; pas le centre du pivot de support.
天井への取り付け例/Installation Examples/Exemples d’installation au plafond/Installationsbeispiele/ 以下はサスペンションサポートが天井に取り付けられたとき の様子を示します。天井の材質によって補強方法は多少異な ります。 ご注意 取り付ける前に天井の最大耐用荷重が85 kg以上あることをお 確かめください。 Les illustrations suivantes représentent le support de suspension du projecteur fixé au plafond. L’installation s’effectue différemment en fonction de la constitution du plafond. Remarque The following illustrations show the projector suspension support attached to the ceiling.
Ejemplos de instalación en el techo/Esempi di installazione al soffitto/ 板天井に取り付ける場合/For wooden ceiling/Pour un plancher/Montage an einer Holzdecke/Para techos de madera/Montaggio ad un soffitto in legno/ 平屋または最上階の場合/For-one-story house or uppermost floor/Pour maison à un étage ou plafond sous un toit/Decke eines einstöckigen Hauses oder des obersten Stockwerks/ Para casas de una planta o plantas superiores/Montaggio in una casa a piano unico o all’ultimo piano/ キャビネット前面 Front of the cabinet Avant du meub
天井への取り付け例/Installation Examples/Exemples d’installation au plafond/Installationsbeispiele/ その他の階の場合/For other floors/Autres sols/Zwischendecken/Para otros suelos/Per altri piani/ キャビネット前面 Front of the cabinet Avant du meuble Vorderseite des Gehäuses Parte frontal de la caja Parte anteriore dell’apparecchio 上の階の床/Floor line/Niveau du plancher/ Bodenlinie/Línea de suelo/Livello del pavimento/ 250 (9 27/32) 125 (4 29/32) 梁/Joist (2” x 8”) /Traverse/Deckenbalken (ca.
Ejemplos de instalación en el techo/Esempi di installazione al soffitto/ コンクリート天井に取り付ける場合/For concrete ceiling/Pour un plafond en béton/Betondecke/Para techos de hormigón/Montaggio ad un soffitto di cemento/ コンクリート天井/Concrete ceiling/Plafond en béton/Betondecke/Techo de hormigón/Soffitto di cemento/ コンクリートアンカー(12 mm径以上)/Anchor for concrete (over 12 mm; 1/2 inch dia.
主な仕様/Specifications/Spécifications/Technische Daten/Especificaciones/Caratteristiche tecniche/ 外形寸法/Dimensions/Mesures/Abmessungen/Dimensiones/Dimensioni/ (a) 天井用マウントブラケット Obere Deckenmontagehalterung Soporte superior de montaje en el techo Staffa di montaggio al soffitto 216.6 (8 17/32) Support supérieur de montage au plafond 258.8 (10 3/16) Upper ceiling mount bracket 250 (9 27/32) 250 (9 27/32) 12.7(1/2) 25(31/32) 12.7(1/2) 250 (9 27/32) 317.5 (12 1/2) 94.
組み上げ時の寸法/Dimensions of the assembled bracket/Dimensions du support assemblé/ Abmessungen de montierten Halterung/Dimensiones del soporte de monitaje/Dimensioni della staffa montata/ 前から見た図/Front view/Vue frontale/Vorderansicht/Vista frontal/Vista frontale/ 317.5 (12 1/2) 317.
付録/Appendix/ Appendice/Anhang/Apéndice/Appendice/ 角度を調整するには/Adjusting the Angle of the Projector/Réglage de l’angle du projecteur/Anpassen des Projektorwinkels/Ajuste de ángulo del projector/Regolazione dell’angolazione del proiettore/ スクリーン方向 Screen forward Ecran Projektionsschirm Pantalla Direzione dello schermo (f) +15° –15° (d) English 日本語 設置条件によって、 プロジェクター底面と天井の角度を調整し、 2 本のボルト(f)を締めます。 2本のボルト(f)をゆるめることでプ ロジェクターマウントブラケット(d)を+15度∼−15度の範囲で 調整することができます。 Français Suivant les conditions d’installation,