
User Manual
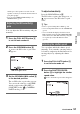

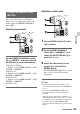


Table Of Contents
- Read this first
- About upgrade licenses and firmware versions
- Identifying parts and controls
- Screen indicators
- Table of Contents
- Getting Started
- Step 1: Checking supplied items
- Step 2: Using a battery pack or AC Adapter
- Step 3: Attaching the lens
- Step 4: Attaching the handle, accessory shoe, microphone, LCD screen, and grip
- Step 5: Turning on the camcorder and setting the date and time
- Step 6: Adjusting the LCD screen and viewfinder
- Step 7: Adjusting the angle of the grip
- Step 8: Inserting a memory card
- Recording
- Recording
- Adjusting the focus
- Changing the recording setting/image size
- Adjusting the brightness
- Adjusting the color tone
- High Dynamic Range (HDR)
- Using Direct Menu
- Slow & Quick Motion/Super Slow Motion recording
- Slow-Motion recording at High Frame Rate (HFR)
- Recording in RAW format using a RAW recorder (sold separately)
- MPEG HD recording
- Preparing to record in MPEG HD
- Recording in MPEG HD
- Slow & Quick Motion Recording
- Super Slow Motion Recording
- Playback in MPEG HD
- MPEG HD output formats
- Recommended memory cards
- Estimated recording time of movies
- Proxy recording supported formats
- Streaming supported formats
- About the MPEG format
- Specifications
- Audio setup
- Assigning functions to the ASSIGN buttons/dial
- Using the Wi-Fi function
- What you can do with the Wi-Fi function of the camcorder
- Downloading “Content Browser Mobile”
- Connecting the camcorder to an Android smartphone equipped with the NFC function using One-touch connection
- Using a smartphone as a camcorder remote control
- Connecting without using the NFC function (Android)
- Connecting without using the NFC function (iPhone/iPad)
- Using network functions
- Useful functions
- Selecting suitable settings automatically (full auto mode setting)
- Customizing the picture quality (Picture profile)
- Using the gamma display assist function
- Setting time data
- Preventing accidental operation (HOLD switch)
- Reviewing the most recently recorded scene (Last Scene Review)
- Inverting the LCD screen display
- GPS function
- Playback
- Editing
- Using the Menu
- Troubleshooting
- Additional Information

53
Recording
The camcorder features two ND filter
modes. You can switch between the two
modes using the PRESET/VARIABLE
switch B.
Adjusting in preset mode
Set the PRESET/VARIABLE switch
B to “PRESET,” and switch the ND
FILTER dial A as described below.
CLEAR: No ND filter
1: Density set in CAMERA/PAINT t ND
FILTER t PRESET1.
Default is 1/4.
2: Density set in CAMERA/PAINT t ND
FILTER t PRESET2.
Default is 1/16.
3: Density set in CAMERA/PAINT t ND
FILTER t PRESET3.
Default is 1/64.
Adjusting in variable mode
1 Set the ND/IRIS switch C to the
“ND” position.
2 Set the PRESET/VARIABLE
switch B to “VARIABLE,” and
switch the ND FILTER dial A to
position 1, 2, or 3.
3 Adjust the filter density in the
range 1/4 to 1/128 with the
ND/IRIS dial C.
The ND FILTER dial A 1/2/3 positions
have no effect on the filter density
adjustment.
z Tips
• Can be operated using Direct Menu (p. 61).
• You can assign this function to the ASSIGN dial
(p. 85).
• If you switch ND FILTER dial A during
recording, the image or sound may become
distorted.
• When shooting a bright subject, diffraction (a
common phenomenon in video cameras, caused
by closing the iris too much) may result in poor
focusing. Using the ND FILTER dial A
suppresses this phenomenon for better shooting
images.
To adjust the amount of light
(ND filter)
Continued ,