
User manual
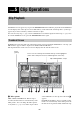
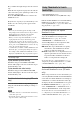
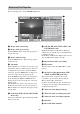
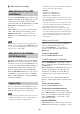
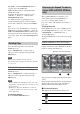

Table Of Contents
- Table of Contents
- Foreword
- Chapter 1: Overview
- Chapter 2: Preparations
- Chapter 3: Adjustments and Settings
- Chapter 4: Shooting
- Handling SxS Memory Cards
- Using a Media Adaptor
- Handling USB Flash Drives
- Operating via the REMOTE Connector
- Functions That Can Be Controlled from the RM-B170/B750
- Functions That Can Be Controlled from the RCP-1001/1501
- Connecting the Camcorder to Devices using the IFU-WLM3 USB Wireless LAN Module
- Connecting the Camcorder to Devices using the CBK-WA101 Wireless Adapter
- Basic Operations
- Advanced Operations
- Recording Shot Marks
- Setting OK Marks
- Recording Cached Video (Picture Cache Rec Function)
- Recording Time-lapse Video (Interval Rec Function)
- Shooting Stop Motion Animations (Frame Rec Function)
- Shooting with Slow & Quick Motion
- Recording with the Clip Continuous Rec Function
- Recording to 2 Slots Simultaneously (2-Slot Simul Rec Function)
- Framing Shots with the Freeze Mix Function
- Planning Metadata Operations
- Chapter 5: Clip Operations
- Clip Playback
- Thumbnail Operations
- THUMBNAIL Menu Configuration
- Basic THUMBNAIL Menu Operations
- Changing the Thumbnail Screen Type
- Displaying Clip Properties
- Adding/Deleting a Flag (UDF, exFAT Modes)
- Adding/Deleting the OK Mark (FAT-HD Mode Only)
- Copying Clips
- Deleting Clips
- Displaying the Expand Thumbnail Screen (UDF/exFAT/FAT-HD Mode only)
- Displaying the Shot Mark Thumbnail Screen (UDF/exFAT/FAT-HD Mode Only)
- Adding and Deleting Shot Marks (UDF/exFAT/FAT-HD Mode Only)
- Changing Clip Index Pictures (UDF/exFAT/FAT-HD Mode Only)
- Dividing Clips (FAT-HD Mode Only)
- Chapter 6: Menu and Detailed Settings
- Chapter 7: Saving and Loading User Setting Data
- Chapter 8: Connecting External Devices
- Chapter 9: Maintenance
- Appendix
- Important Notes on Operation
- Exchanging the Battery of the Internal Clock
- Output Formats and Limitations
- Output Signals and Operation Restrictions When a Camcorder System is Configured (in HD Mode Only)
- Software Downloads
- Specifications
- Peripheral Devices and Accessories
- About License
- About Bitmap Fonts
- About OpenSSL
- About JQuery,Sizzle.js
- Index

110
The same icons are also displayed beneath the
thumbnails. However, when several icons could
be displayed for the same frame, one icon is
selected for display, in the order of priority Index
picture t Shot Mark1 t Shot Mark2.
b Timecode display
This displays the timecode of the selected frame
in the expand thumbnail screen.
Expand thumbnail screen in SD mode
In SD mode, only in the case of clips that have
been split into partial files because the file size
was larger than 2 GB, a thumbnail of the first
frame of each partial file is displayed.
Clip properties are displayed at the bottom of the
screen.
Except for the items listed below, the information
displayed here is the same as the information
displayed in the normal thumbnail screen.
a Timecode display
This is the timecode of the selected partial file.
b Duration
This is the duration of the selected partial file.
To increase the number of divisions
When you press the EXPAND button, or select
“THUMBNAIL” > “Thumbnail View” >
“Forward Expansion,” the divided clip or file is
further divided into 12 equally-sized blocks (a
clip or file that has been divided into 12 is further
divided into 12, for 12 × 12 = 144 divisions). You
can repeat the same operation to increase the
number of divisions.
To return to the previous division level
Press the EXPAND button with the SHIFT button
held down, or select “THUMBNAIL” >
“Thumbnail View” > “Back Expansion.” The
expand thumbnail screen returns to the previous
division level.
You can search for shot marks in clips (see
page 103), change index pictures (see page 111),
and add and delete shot marks (see page 111).
1 In the thumbnail screen, select the
thumbnail of a clip, and press the
ESSENCE MARK button (see page 17)
or select “THUMBNAIL” >
“Thumbnail View” > “Essence Mark
Thumbnail.”
The shot mark thumbnail screen appears, and
a selection list is displayed.
2 Select the type of the essence mark
thumbnail screen.
All: Thumbnail display of all frames marked
with essence marks.
Shot Mark1: Display only frames marked
with Shot Mark1 marks.
Shot Mark2: Display only frames marked
with Shot Mark2 marks.
You can also select Shot Mark 0 and Shot
Mark 3 to Shot Mark 9.
If you have recorded clips by using planning
metadata that defined names for Shot Mark 0
to Shot Mark 9, the defined names are
displayed instead of the above item names in
the list.
Number of the selected frame
Displaying the Shot Mark
Thumbnail Screen (UDF/exFAT/
FAT-HD Mode Only)