4-121-123-11(1) Theatre Stand System Operating Instructions RHT-G550 ©2009 Sony Corporation
3 WARNING Do not install the appliance in a confined space, such as a bookcase or built-in cabinet. To reduce the risk of fire, do not cover the ventilation opening of the apparatus with newspapers, tablecloths, curtains, etc. Do not place the naked flame sources such as lighted candles on the apparatus. To reduce the risk of fire or electric shock, do not expose this apparatus to dripping or splashing, and do not place objects filled with liquids, such as vases, on the apparatus.
Table of Contents WARNING ..............................................4 CAUTION................................................5 Precautions ...............................................6 Main features ...........................................7 Getting Started Supplied accessories ................................8 Setting this stand ......................................9 Connecting components with HDMI jacks .................................................
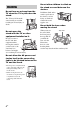
WARNING Do not lean on or hang from the TV when the TV is placed on the stand. The TV may fall from the stand causing an accident resulting in serious injury or death. Do not move the stand with the TV or other equipment installed on it. Be sure to remove the TV and other equipment when moving the stand. If you fail to do so, the stand may lose balance and topple over resulting in serious injury.
CAUTION Do not place any heated objects such as a hot pan or a kettle on the stand. It may cause damage to the stand. Do not step on the stand. You may fall and cause injury. Notes on installation • Be careful not to pinch your hand or fingers between the TV and the stand. • To prevent the stand from distorting, observe the following: – Install the stand on a solid and flat surface. – If you install the stand on a soft surface such as a mat, first lay a board under the stand.
On operation Precautions Before connecting other components, be sure to turn off and unplug the stand. On safety On cleaning • Do not place unspecified objects, such as a flower vase or pottery on the stand. • Do not make alterations to the stand. • Should any solid object or liquid fall into the stand, unplug the stand and have it checked by qualified personnel before operating it any further. Clean the stand, panel and controls with a soft cloth slightly moistened with a mild detergent solution.
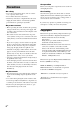
Main features B Easy connection with HDMI b The cords are all tangled up. Neat connections (page 13). B Easy operation with only one TV remote (“BRAVIA” Sync) b Separate remotes for each component. Consolidate operations on one remote (page 32). B Easy Surround settings b I need lots of cords and speakers. Easy set-up with S-Force PRO Front Surround.
Getting Started Supplied accessories Please check the following accessories in the package. Inserting batteries into the remote You can control the stand using the supplied remote. Insert two size AA (R6) batteries by matching the + and – ends on the batteries to the markings inside the compartment.
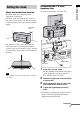
About the installation position Getting Started Preventing the TV from toppling over Setting this stand As a protective measure, secure the TV. Install the stand after connecting all the components to the stand. Install the stand after allowing for a space of more than 5 cm from the wall. This is to allow for heat dissipation and to prevent the TV from falling. More than 5 cm The stand has a back corner cut to fit in the corner of a room.
Installing the shelf board 1 3 Connect the cords to the AM antenna (aerial) terminals. The cords can be connected to either terminal. Insert the attaching shelf support pins (supplied) into the four holes in the stand squarely. You can set the position where the shelf board is to be installed at three different heights. 2 Install the shelf board with its four notches resting on the support pins. The beveled edge of the shelf board should face the front.
Connect the FM wire antenna (aerial) to the 75 Ω COAXIAL jack. Bundling the cables You can bundle all connecting cables of the stand and other components, using the cable tie (supplied). 1 Connect the components to the stand. For details, see pages 13 to 17. 2 Insert a cable tie (supplied) into the hole at the rear of the stand until it clicks. FM wire antenna (aerial) (supplied) 75 Ω COAXIAL jack Notes • Be sure to fully extend the FM wire antenna (aerial).
4 Tighten the cable tie by pulling its end. To unbind the cable tie 1 2 Push the lever of the cable tie. While pushing the lever, pull the cable tie from the slit. 2 1 To remove the cable tie from the rear of the stand 1 2 Pinch the two tabs of the cable tie. While pinching the tabs, pull off the cable tie.
We recommend that you connect components to the stand using an HDMI cable. With HDMI, you can easily enjoy both high quality sound and high quality images. However, you cannot enjoy the TV’s sound from the stand only with HDMI connection; it is necessary to connect the audio output of the TV to the audio input of the stand using an optical cable (or an audio cord*) in order to listen to the TV’s sound from the stand.
Tip • When the Control for HDMI function of this stand is set to on, even if the stand is turned off (active standby mode), the HDMI signal will be sent from the connected component to the TV via the HDMI connection. You can enjoy image and sound of the component on the TV. Notes • The HDMI jack has priority when you connect the component to the stand using INPUT OPT, INPUT COAX and HDMI together.
When you connect a DVD player (recorder), satellite tuner, “PlayStation 2,” etc., that has no HDMI jacks, connect its video signal jack directly to the TV, and its audio signal jack to the stand using the INPUT OPT jack or INPUT COAX jack. It is not necessary to connect all the cables. Connect the audio cords according to the jacks of your components. Connect the AC power cord (mains lead) last. TV monitor, projector, etc.
Notes • Set “CTRL: HDMI” to “OFF” in the AMP menu of the stand when connecting components without HDMI jacks (page 34). Even if “CTRL: HDMI” is set to “ON,” you can enjoy a video cassette recorder, etc., that does not have surround channels by connecting its audio and video output jacks directly to the TV instead of the stand. • The INPUT OPT jack has priority when you connect both the audio output of the TV to the INPUT OPT and INPUT ANALOG jack of the stand.
You can enjoy sound from the connected component on the stand by connecting the DIGITAL MEDIA PORT adapter. Connect the AC power cord (mains lead) last. : Signal flow DIGITAL MEDIA PORT adapter Notes • Do not connect or disconnect the DIGITAL MEDIA PORT adapter while the stand is turned on. • When you connect the DIGITAL MEDIA PORT adapter, be sure the connector is inserted with the arrow mark facing toward the arrow mark on the DMPORT jack.
Connecting the AC power cord (mains lead) Before connecting the AC power cord (mains lead) of the stand to a wall outlet (mains), connect all the other components or TVs to the unit. Note • Connect the unit to an easily accessible AC outlet. Should you notice an abnormality in the unit, disconnect the main plug from the AC outlet immediately.
Playback Options For more information, see the pages indicated in parentheses. Front panel display Front panel buttons and indicator Front panel buttons and indicator POWER/ ACTIVE STANDBY A POWER/ACTIVE STANDBY indicator Lights as follows: Green: The stand is turned on. Amber: Control for HDMI function is working while the stand is turned off. Off: The stand is turned off, and the Control for HDMI function is not working. INPUT SELECTOR VOLUME B ?/1 (on/standby) Press to turn the stand on or off.
Front panel display About the indications in the front panel display A Audio format indicators Light up according to the audio format that is being decoded. D : DolbyDigital PLII : Dolby Pro Logic II LPCM : Linear PCM DTS : DTS B SLEEP (41) Flashes when the Sleep Timer function is active. C TUNED (25) Lights up when a radio station is received. D HDMI (13, 43) Lights up when HDMI equipment is being used. E ST/MONO (25) Lights up according to the stereo or monaural status of the radio.
I SOUND FIELD +/– Remote control Press to select the sound field (page 29). J VOLUME +/– Press to adjust the volume. CENTER DISPLAY K MUTING SUBWOOFER LEVEL AMP MENU Press to turn off the sound. L NIGHT Press to activate the NIGHT mode function (page 31). RETURN MENU PRESET- NIGHT DIMMER PRESET+ TUNING- TUNING+ MUTING VOLUME M PRESET +/– Press to select a preset radio station (page 26). N O RETURN Press to return to the previous menu.
N O RETURN Press to return to the previous menu. Enjoying TV O DISPLAY Press to select the setting of the front panel display. INPUT SELECTOR INPUT SELECTOR +/– CENTER DISPLAY ?/1 SUBWOOFER LEVEL RETURN AMP MENU MENU PRESET- NIGHT DIMMER PRESET+ TUNING- TUNING+ MUTING VOLUME SOUND FIELD VOLUME +/– 1 Turn on the TV and choose a program. Refer to the operating instructions of your TV for details. 2 3 4 Turn the stand on.
Tip Enjoying other components • The sound may be output from the TV’s speaker. In this case, turn the volume of the TV’s speaker down to the minimum. INPUT SELECTOR +/– CENTER LEVEL DISPLAY ?/1 SUBWOOFER RETURN AMP MENU Enjoying Blu-ray Disc, DVD, “PlayStation 2” or “PlayStation 3” 1 2 MENU PRESET- NIGHT DIMMER PRESET+ TUNING- TUNING+ 3 MUTING VOLUME SOUND FIELD 4 VOLUME +/– Turn on the TV.
Notes • When you connect the video output jack of the DIGITAL MEDIA PORT adapter to the video input jack of the TV, set “CTRL: HDMI” to “OFF” in the AMP menu of the stand (page 34). The images of a component connected to the DIGITAL MEDIA PORT adapter will not be played on the TV if “CTRL: HDMI” is set to “ON.” • To enjoy the sound of a component without displaying the images when “CTRL: HDMI” is set to “ON,” turn off the TV first and then reset the power of the stand.
5 Press . A preset number appears in the front panel display. Tuner Functions Presetting radio stations 6 Press X/x to select the preset number you want. INPUT SELECTOR INPUT SELECTOR +/– CENTER DISPLAY 7 SUBWOOFER LEVEL AMP MENU Press . “Complete!” appears in the front panel display, and the station is stored. C, X, x, c, RETURN MENU MENU PRESET- NIGHT DIMMER PRESET+ TUNING- TUNING+ TUNING +/– MUTING VOLUME SOUND FIELD 8 9 Press MENU. Repeat 2 to 8 to store other stations.
Listening to the radio Preset radio stations in the stand’s memory first (see “Presetting radio stations” (page 25)). INPUT SELECTOR INPUT SELECTOR +/– DISPLAY CENTER DISPLAY ?/1 SUBWOOFER LEVEL For automatic tuning, press and hold TUNING + or –. Automatic tuning stops when the stand tunes in a station. To stop automatic tuning manually, press TUNING + or –. If an FM program is noisy If an FM program is noisy, you can select monaural reception.
Naming preset stations Tip • You can check the frequency in the front panel display by pressing DISPLAY repeatedly (page 28). Tuner Functions You can enter a name for a preset station. These names (for example, “XYZ”) appear in the front panel display when a station is selected. Note that no more than one name can be entered for each preset station. Note • You cannot enter a name for preset station of the Radio Data System (RDS) (page 28).
Viewing the station name or frequency in the front panel display When the stand is set to “FM” or “AM,” you can check the frequency using the front panel display. Press DISPLAY. Each time you press DISPLAY, the station name and the frequency alternate in the front panel display. Tips • The station name is displayed if you have entered a name for a preset station. • The frequency in the front panel display switches to the station name after several seconds.
Surround Function Enjoying the surround effect Selecting the sound field INPUT SELECTOR CENTER DISPLAY SUBWOOFER LEVEL RETURN AMP MENU MENU PRESET- NIGHT DIMMER PRESET+ TUNING- TUNING+ MUTING VOLUME SOUND FIELD SOUND FIELD +/– Press SOUND FIELD +/–. The present sound field appears in the front panel display.
Available sound fields Suitable source Sound field All STANDARD Suits various sources. Video source MOVIE* Recreates powerful and realistic sound, along with clear dialog. DRAMA* Best suited for TV dramas. Music source Effect NEWS* Produces the announcer’s voice clearly. SPORTS* Produces the play-by-play commentary clearly and realistic sound with surround effects, such as cheering, etc. GAME* Produces powerful and realistic sound, best suited for playing video games.
Enjoying the sound at low volume (NIGHT mode) You can enjoy sound effects and to hear the dialog clearly even at a low volume level using this function. This function is useful for enjoying sound at night. CENTER DISPLAY SUBWOOFER LEVEL RETURN AMP MENU MENU PRESET- NIGHT Surround Function INPUT SELECTOR NIGHT DIMMER PRESET+ TUNING- TUNING+ MUTING VOLUME SOUND FIELD Press NIGHT. To cancel the night mode, press NIGHT again.
“BRAVIA” Sync Features What is “BRAVIA” Sync? By connecting Sony components that are compatible with the “BRAVIA” Sync with an HDMI cable (not supplied), operation is simplified as below: • One-Touch Play: When you play back a component such as a Blu-ray Disc/DVD player (recorder), the TV turns on automatically and switches to the appropriate HDMI input. • System Audio Control: While watching TV, you can select to output the sound from the TV speaker or the speakers of the stand.
4 Display the list of the HDMI components on the TV menu, and set the Control for HDMI function to on for connected components. The Control for HDMI function for the stand and the connected component is simultaneously set to on. During the setting, “SCANNING” appears in the front panel display. After you finish the setting, “COMPLETE” appears in the front panel display. Wait until the setting is complete.
Setting the Control for HDMI function to off Set the Control for HDMI function to off when you connect components not compatible with the “BRAVIA” Sync, or that do not have HDMI jacks, etc. Enjoying Blu-ray Disc/DVD (One-Touch Play) Play back a connected component. The TV turns on automatically and switches to the appropriate HDMI input.
Using the Volume Limit function Enjoying the TV sound from the stand (System Audio Control) You can enjoy the TV sound from the speakers of the stand by means of a simple operation. For details, refer to the operating instructions of the TV. INPUT SELECTOR DISPLAY SUBWOOFER LEVEL AMP MENU AMP MENU C, X, x, c, RETURN MENU PRESET- 1 2 3 4 NIGHT DIMMER PRESET+ TUNING- Press X/x repeatedly until “SET HDMI” appears, then press or c. Press X/x repeatedly until “VOL LIMIT” appears, then press or c.
Turning off the stand, TV and the connected components (System Power Off) When you turn the TV off by using the POWER button on the TV’s remote, the stand and the connected components turns off automatically. Using the power saving function If a “BRAVIA” Sync-compatible TV is connected to the stand, and the stand is in active standby mode, if the TV is turned off, HDMI signal transmission stops, and power consumption is reduced.
Notes • The power saving function may not work for some TVs compatible with the “BRAVIA” Sync. In this case, set “POWER SAVE” to “OFF.” • Depending on your components, it may take time before image or sound is output.
3 Advanced Settings Tip Settings and adjustments using the amplifier menu You can set the following items with AMP MENU on the remote. The default settings are underlined. AMP MENU CTRL: HDMI VOL LIMIT** ON OFF MAX, 49, 48, ..... 2, 1, MIN POWER SAVE** DUAL MONO A/V SYNC ON OFF MAIN SUB MAIN/SUB ON OFF AUDIO DRC DISPLAY SLEEP MAX STD OFF ON OFF OFF, 10M, 20M, ….. 80M, 90M * See ““BRAVIA” Sync Features” (page 32). ** This setting appears only when “CTRL: HDMI” is set to “ON.
Enjoying multiplex broadcast sound (DUAL MONO) You can enjoy multiplex broadcast sound when the stand receives an AC-3 multiplex broadcast signal. Adjusting the delay between the sound and the image (A/V SYNC) You can delay the sound using this function when the image is slower than the sound. Note • To receive AC-3 signal, you need to connect a digital satellite tuner to the stand with an optical cable or coaxial cable, and set the digital output mode of the digital satellite tuner to AC-3.
Enjoying Dolby Digital sound at low volume (AUDIO DRC) Changing the display setting (DISPLAY) Narrows the dynamic range of the sound track. Useful for enjoying movies at low volume. AUDIO DRC only applies to Dolby Digital sources. You can change the display setting.
Using the sleep timer You can set the stand to turn off at a preset time when you sleep listening to music. You can preset the time in 10 minutes decrements. INPUT SELECTOR CENTER DISPLAY SUBWOOFER LEVEL AMP MENU AMP MENU C, X, x, c, RETURN MENU PRESET- NIGHT DIMMER PRESET+ Advanced Settings TUNING- TUNING+ MUTING VOLUME 1 2 3 SOUND FIELD Press AMP MENU. Press X/x repeatedly until “SLEEP” appears, then press or c. Press X/x to select the preset time you want.
Additional Information Troubleshooting If you experience any of the following difficulties while using the stand, use this troubleshooting guide to help remedy the problem before requesting repairs. Should any problem persist, consult your nearest Sony dealer. General The power is not turned on. • Check that the AC power cord (mains lead) is connected securely. If “PROTECTOR” and “PUSH POWER” appears alternately in the front panel display.
No image appears on the TV. • Check that the TV and this stand are connected correctly and securely. • Check that the TV is selected correctly. • Set the TV to the appropriate input mode. • Check the HDMI connection. • Check that the cords are fully inserted into the jacks on both the component and this stand. Control for HDMI If you experience any of the following difficulties while using the “BRAVIA” Sync, use this troubleshooting guide to help you remedy the problem.
OTHER The remote does not function. Specifications • Point the remote at the remote sensor on the stand. • Remove any obstacles in the path between the remote and the stand. • Replace both batteries in the remote with new ones, if they are weak. • Make sure you select the correct input on the remote. The volume turns down when the output method changes from the TV speaker to the stand speaker. • The Volume Limit function is working. For details, see “Using the Volume Limit function” (page 35).
Formats supported by this stand The following digital input formats are supported. Format Supported/Not supported Dolby Digital a DTS a Linear PCM-2ch* a Linear PCM-7.1ch 48k* (Only on HDMI) a Linear PCM-7.1ch 96k × Dolby Digital Plus × Dolby True HD × DTS-HD × FM tuner section Tuning range 87.5 – 108.0 MHz (50 kHz step) Antenna (aerial) FM wire antenna (aerial) Antenna (aerial) terminals 75 ohms, unbalanced Intermediate frequency 10.
General Power requirements 220 – 240 V, 50/60 Hz Power consumption On: 95 W Active Standby (power saving function is on and the TV connected to the stand is in standby mode): 0.5 W or less Standby (Control for HDMI is off): 0.3 W or less Dimensions (approx.) 1,000 × 550 × 400 mm (w/h/d) Mass (approx.
PCM (Pulse Code Modulation) A method of converting analog audio to digital audio for easy enjoyment of digital sound. S-Force PRO Front Surround Sony’s long-term involvement in surround technology (and the vast amounts of acoustic data accumulated as a result) has led to the development of all-new processing method and advanced DSP to handle this task effectively, which we call S-Force PRO Front Surround.
Index A S A/V SYNC 39 AMP menu 38 AUDIO DRC 40 Satellite tuner connecting 13, 15 Setting 9 S-Force PRO Front Surround 7 Sleep timer 41 Sound field 29 B Blu-ray Disc player (recorder) connecting 13 D DIGITAL MEDIA PORT connecting 17 DISPLAY 27, 40 DUAL MONO 39 DVD player (recorder) connecting 13, 15 N NIGHT mode 31 P “PlayStation 3” connecting 13 R Radio 26 Radio stations 25 Remote before use 8 operating 21 48GB
(1) Sony Corporation Printed in Malaysia