3-300-208-14 (1) Before operation Digital Photo Frame Basic operations Advanced operations DPF-V900/V700 Using an external device Error messages Troubleshooting Additional information Operating Instructions Before operating this unit, please read this manual thoroughly and retain it for future reference. Owner’s Record The model and serial numbers are located at the rear. Record the serial number in the space provided below.
WARNING To reduce fire or shock hazard, do not expose the unit to rain or moisture. IMPORTANT SAFEGUARDS For your protection, please read these safety instructions completely before operating the appliance, and keep this manual for future reference. Carefully observe all warnings, precautions and instructions on the appliance, or the one described in the operating instructions and adhere to them.
Installation Water and Moisture Do not use power-line operated sets near water – for example, near a bathtub, washbowl, kitchen sink, or laundry tub, in a wet basement, or near a swimming pool, etc. Power-Cord Protection Route the power cord so that it is not likely to be walked on or pinched by items placed upon or against them, paying particular attention to the plugs, receptacles, and the point where the cord exits from the appliance.
WARNING Do not expose the batteries to excessive heat such as sunshine, fire or the like. CAUTION Replace the battery with the specified type only. Otherwise, fire or injury may result. For the customers in the U.S.A. Declaration of Conformity Trade Name: Model No.: Responsible Party: Address: SONY DPF-V700 Sony Electronics Inc. 16530 Via Esprillo, San Diego, CA 92127 U.S.A. Telephone No.: 858-942-2230 This device complies with part 15 of the FCC Rules.
For the Customer in Europe This product has been tested and found compliant with the limits set out in the EMC Directive for using connection cables shorter than 3 meters (9.8 feet). Attention The electromagnetic fields at the specific frequencies may influence the picture of this digital photo frame. Notice If static electricity or electromagnetism causes data transfer to discontinue midway (fail), restart the application or disconnect and connect the communication cable (USB, etc) again.
Backup recommendations To avoid potential risk of data loss caused by accidental operation or malfunction of the digital photo frame, we recommend that you save a backup copy of your data. Information IN NO EVENT SHALL SELLER BE LIABLE FOR ANY DIRECT, INCIDENTAL OR CONSEQUENTIAL DAMAGES OF ANY NATURE, OR LOSSES OR EXPENSES RESULTING FROM ANY DEFECTIVE PRODUCT OR THE USE OF ANY PRODUCT.
Notice for users Program © 2008 Sony Corporation Documentation © 2008 Sony Corporation All rights reserved. This manual or the software described herein, in whole or in part, may not be reproduced, translated or reduced to any machine readable form without prior written approval from Sony Corporation.
Table of Contents Before operation Enjoy your photo frame in various ways .............................................10 Features ........................................12 Checking included items ...............13 Identifying the parts .....................13 Basic operations Preparing the remote control ........16 Connecting to the AC power source ..........................................17 Setting the stand ..........................18 Turning the photo frame on ..........19 Setting the clock ........
About the memory cards ..............48 “Memory Stick” ..............................48 SD memory card ............................49 xD-Picture Card .............................50 CompactFlash card ........................50 Notes on using a memory card .......50 Specifications ...............................51 Index ............................................
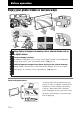
Before operation Enjoy your photo frame in various ways Easy display of images in a memory card or external device such as a digital camera Various display functions In addition to slideshows, you can enjoy various display modes easily including the single image, index, clock, and calendar modes. (.page 22) Adding important images to an album (saving to the internal memory) Images added to the album are saved in the internal memory. You can also export these images to a memory card or external device. (.
Before operation Enjoying images on a large TV screen If you connect the photo frame to a TV with an HDMI cable, you can enjoy slideshows and single image display on a large screen. (.page 36) Various devices you can use Connecting to your computer Images can be copied from a computer easily. You can also save images in the album to a computer as a backup. Images can also be exchanged with a memory card, USB memory, etc. and copied from a Bluetooth compatible device.
Features The Sony DPF-V900/V700 is a digital photo frame for easily displaying images taken with a digital camera or other device without using a computer. x Support for various memory cards* Supports various memory cards used by digital cameras and other devices, such as a “Memory Stick”, CompactFlash card, SD memory card, and xD-Picture Card. Just insert a memory card removed from a digital camera or other device, then you will be able to view the images immediately.
Checking included items For details, see the pages indicated in the parentheses. The illustrations are of the DPF-V900. The locations and names of buttons and connectors of the DPF-V700 are identical to those of the DPF-V900, although the LCD screen size is different. Front A LCD screen B Remote sensor When using the supplied remote control, point it at this sensor. Continued 13 GB Before operation Make sure that the following items are included.
Rear A Connector for USB A/Bluetooth adaptor (.page 38) You can transfer images wirelessly from a BLUETOOTH™ compatible mobile phone or digital camera by connecting a Bluetooth adaptor (optional: DPPA-BT1). You can also connect a digital camera, USB memory, or photo storage compatible with USB mass storage. B USB miniB connector (.page 40) Connect a USB cable when you want to use the photo frame with a computer. C HDMI OUT (output) connector (.
Remote control Before operation A VIEW MODE button B (clock) button (.page 25) C (slideshow) button (.page 23) D MENU button E BACK button F 1 (on/standby) button G (add to album) button (.page 29) H (zoom in)/ (zoom out) buttons (.page 28) I (index) button (.page 25) This button switches from the image preview screen to index view screen. J Direction (B/b/v/V) buttons K (enter) button L (rotation) button (.
Basic operations Preparing the remote control The supplied lithium battery (CR2025) has already been inserted into the remote control. Pull out the protective sheet before use as shown in the figure. Replacing the battery of the remote control If the remote control stops working, replace the battery (CR2025 lithium battery) with a new one. 1 Pull out the battery holder. While pressing in the tab of the battery holder, pull out the battery holder.
• Using a battery other than the specified one may result in the battery rupturing. • Dispose of used batteries as specified by the local authorities. • Do not leave the remote control in a very hot and humid place. • Take care that no foreign objects enter inside the remote control when you, for example, replace the battery. • Incorrect use of the battery may cause leaking and corrosion. – Do not recharge the battery.
To use your photo frame abroad - Power sources You can use your photo frame and the AC Adaptor (supplied) in any country or region where the power supply is within 100 V to 240 V AC, 50/60 Hz. Use a commercially available AC plug adaptor [a], if necessary, depending on the wall outlet (wall socket) [b]. Setting the stand Opening the stand Set the photo frame with opening the stand as below. AC-L200 Do not use an electronics transformer (travel converter), as this may cause a malfunction.
Turning the photo frame on Turning on the power Press 1 (on/standby) on the photo frame or remote control to turn on the power, and the standby indicator turns into green from red. Setting the clock 1 Press MENU on the remote control. The menu screen is displayed. 2 3 Press v/V to select [Various settings] and then press to display the Various settings screen. Press v/V to select [Date/time settings] and then press . The Date/time settings screen is displayed.
2 Press v/V to select a value and then press 6 . Adjust the time. 1 Press v/V to select [Time] and then press . 2 Press v/V to select a value and then press . Set the time in the order of hour, minute, and second. 7 Set the day to start the week for the calendar. You can set the day that appears on the very left when the calendar is displayed. 1 Press v/V to select [First Weekday] and then press . 2 Press v/V to select [Sunday] or . [Monday] and then press 8 Press MENU.
Notes Basic operations • When inserting the memory card, it will only insert the portion of the way, so do not try to force it as this could damage the memory card and/or photo frame. • This photo frame has “Memory Stick” standard and Duo size compatible slot, so you do not need a Memory Stick adaptor. • The SD memory card/xD-Picture Card dualpurpose slot automatically detects the card type. • Before using a memory card, see “About the memory cards” on page 48.
Displaying images x Overview of display You can press the buttons on the remote control to switch the display.* Clock display (page 25) Slideshow display (page 23) Single image display (page 24) Tips* • If the power is on and no memory card is inserted and no device is connected, the images in internal memory are displayed. If no images are saved to internal memory, demonstration mode starts automatically. Demonstration mode ends, if a memory card is inserted.
x Slideshow display Images in a memory card are automatically displayed one after another. Clock view mode Displays images with shooting date and time. To start the slideshow • To start a slideshow from single image, clock, or index image display, press (slideshow). Tip To perform this operation from the photo frame, press ENTER on the single image display mode. Basic operations There are several slideshow modes. Pressing VIEW MODE changes the modes in the following order.
x Single image display To display an image you want to display • During a slideshow, press at an image you want to display. • In the index image display, press B/b/v/V to select an image you want to display and then press . You can also press (zoom in). Fit to screen mode Displays an image over the whole screen. You can switch the images to display by pressing B/b. Tip To perform this operation from the photo frame, press ENTER at an image you want to display during a slideshow.
Icons Meaning You can select an image by pressing B/b/v/V. Associated file indication (Displayed when there is an associated file such as a motion file or a miniature e-mail image file.) 2 Image display order/Total number of images 3 Image details Large thumbnail mode Displays a list of large thumbnails (3 rows × 4 columns). You can select an image by pressing B/b/v/V. x Index image display The list of images in the selected memory card, internal memory or external device is displayed.
Tip To perform this operation from the photo frame, select the clock display in the menu on the single image display. Press VIEW MODE to switch the modes of the clock display. Analog clock mode Displays the time on analog clock. Digital clock mode Displays the date and time on digital clock. Calendar mode Displays a calendar for the current month. You can press v/V to display a calendar for the previous or next month.
Advanced operations AUTO TOUCH-UP What is AUTO TOUCH-UP? AUTO TOUCH-UP is a feature for performing the following four corrections automatically at the same time. It is not possible to adjust the level for each of the corrections manually. 1 2 Display the image you want to correct as single image display. Press MENU. The menu is displayed. 4 Press v/V to select [Save] and then press . The corrected image is saved as a new image.
Specifying the playback device You can specify the memory card or external device to be displayed. 1 Press MENU. Adjusting the image size and position Enlarging an image 1 The menu is displayed. 2 Press v/V to select [Select device] and then press . To enlarge an image, press (zoom in) on the remote control. To reduce an enlarged image, press (zoom out). Each press of the button enlarges the image further. You can enlarge an image to maximum 5 times the original scale.
2 Press v/V to select [Rotate] and then press . The Rotate menu is displayed. Adding to the internal memory You can use the photo frame as the digital album with saving important images in the internal memory. Tip 3 Press v/V to select the direction to rotate and then press . • 4 1 Press (add to album) on the remote control. The Add to album menu is displayed. Single image display Press v/V to select [OK] and then press .
Index image display To cancel the selection, select images to cancel and then press to delete check mark. 2 Press MENU. The confirmation screen whether to save or not to the internal memory is displayed. Tips • To perform this operation from the menu, press MENU on remote control, press v/V to select [Add to album], and then press . • Images in the internal memory cannot be added to the album. 2 Press v/V to select [This image], [Selected images] or [All images] and then press .
To cancel the selection, select images to cancel and then press to delete check mark. 2 Press MENU. The screen for selecting the device to which to export is displayed. Exporting an image You can export the images of the internal memory to a memory card or external device. 1 Press MENU. 5 The menu is displayed. 2 Press v/V to select the device to which to export the image and then press . Press v/V to select [Export] and then press . The Export menu is displayed.
Deleting an image 1 Press MENU. The menu is displayed. 2 Press v/V to select [Delete] and then press . The Delete menu is displayed. 3 Press v/V to select [This image], [Selected images] or [All images] and then press . [This image]: Deletes the image currently displayed. [Selected images]: Deletes the selected image from the image list. [All images]: Deletes all images in the device displayed. [Selected images] shows the images in the device which are currently displayed as index view.
4 Changing the various settings Press v/V to select the item you want to change and then press . This enables you to set each of the items (page 34). Note Setting procedure You can change display, slideshow, brightness, language, and other settings of the photo frame. It is also possible to reset the settings to their factory defaults and format the intenal memory. When the photo frame is, for instance, displaying a slideshow, some items are unavailable for changing the settings.
Items to set *: Factory default settings Item Setting Description Slideshow Settings Interval Set a value from 3 sec., 10 sec.*, 30 sec., 1 min., 5 min., 30 min., 1 hour, 3 hours, 12 hours, 24hours for the interval between images when the pattern is single view or calendar view. Effect Center cross Transitions to the next image as though the previous image is being pushed from the center to the four corners. Vert. blinds Transitions to the next image as though blinds are being lowered vertically.
*: Factory default settings Item Setting Description Screen Settings Listing Order Sets the display order of images. This setting affects [Order] in [Slideshow Settings]. General Settings Filename* Displays images in order of file name. Shoot. Date Displays images in order of shooting date. ON*/OFF: You can set the photo frame to automatically detect and rotate the orientation of images.
Connecting to a high definition TV to view images Connecting to a high definition TV The photo frame is capable of HDMI output. If you connect the photo frame to a TV with an HDMI input, you can display images in higher definition on the TV. High definition TV To HDMI input connector About “PhotoTV HD” The photo frame supports “PhotoTV HD”. “PhotoTV HD” is a function for expressing subtle textures and color tones in high definition, giving the appearance of real photos.
Using the television remote control for photo frame If your television supports the control for HDMI, you can use the remote control of your television to operate the photo frame. Notes x Basic operations of the photo frame with a TV remote control • Press %5$4 on the TV remote control to select the images on the single image display. • Press [Enter] button on the TV remote control to switch the single image display and the slideshow display.
Using an external device Using a Bluetooth device Transferring images from an external device You can connect a Bluetooth adaptor (optional) to the USB A connector of the photo frame and transfer images from a Bluetooth compatible mobile phone or other device. The transferred images are saved to internal memory. You can connect a digital camera, USB memory, or photo storage with support for mass storage to the photo frame and transfer images.
Connecting to a computer You can connect to a computer to view and copy images of the internal memory of the photo frame to the computer, and copy images of the computer to the photo frame. System requirements External memory or other external device To connect a computer to use the picture frame, your computer must satisfy the following recommended system requirements. x Windows x Macintosh Recommended OS: Mac OS X (10.
Connecting to a computer to exchange images 1 2 Connect the photo frame to the AC power source. (.page 17) Connect the computer and photo frame with a commercially available USB cable (optional: VMC14UMB2)*. To USB miniB connector Computer To USB connector * This cable may not be available in all countries. Note Use a mini B-Type USB cable that is less than 3 meters long. 3 4 Press 1 (on/standby) on the photo frame to turn on the power.
Error messages If an error message appears If an error occurs, one of the following error messages may be displayed on the LCD screen of the photo frame. Follow the corresponding solution below to solve the problem. Error message Meaning/Solutions No Memory Stick. / No CompactFlash card. / No SD Memory Card. / No xD-Picture Card. / No External Device. • A memory card is not inserted in a slot. Or, an external device is not connected to the A-Type USB connector.
Error message Meaning/Solutions The Memory Stick is protected. • A protected “Memory Stick” is inserted. To edit and save the images, use an external device to remove protection. Media format not supported. Cannot open the image. • The images cannot be displayed, if the image file is not supported by the photo frame. No more USB hubs can be connected. • Connect the device directly to the photo frame, or use a device without a built-in USB hub. Incompatible USB device. Check device’s USB settings.
Troubleshooting If trouble occurs Before submitting the photo frame for repair, try using the following guidance to solve the problem. If the problem persists, consult with your Sony dealer or Sony service facilities. Power supply Symptom Check item Cause/Solutions The power cannot be turned on. • Is the power plug inserted properly? c Insert the power plug properly.
Symptom Check item Cause/Solutions Some images are not displayed. • Are the images displayed in the index view? c If the image is displayed in the index view but cannot be displayed as single image, the image file may be damaged even though its thumbnail preview data is fine. c A file that is not compatible with DCF may not be able to be displayed with the photo frame, even if it can be displayed with a computer.
Symptom Check item The file name is not displayed properly. • Did you rename the file with c If you named or renamed the file on your a computer or other device? computer and the file name includes characters other than alphanumeric characters, the file name may not be able to be displayed properly on the photo frame. Also, for a file created on a computer or other device, a maximum of eight characters from the beginning of the file name can be displayed.
Connecting a digital camera or other external device Symptom Check item Cause/Solutions The camera is connected but nothing is displayed. • Is the cable connected properly? c Connect the cable properly. • Is the photo frame turned on? c Turn the photo frame on. Nothing happens even if the USB cable is disconnected and then connected. — Images are not • The input of the TV is set to displayed on the the external input. TV screen or LCD screen.
Additional information Precautions On safety • Be careful not to set or drop any heavy objects on the power cord, or to damage the power cord in any way. Never operate this photo frame with a damaged power cord. • Should any solid object or liquid fall into the cabinet, unplug the photo frame and have it checked by qualified personnel before operating it any further. • Never disassemble the photo frame. • To disconnect the power cord, pull it out by the plug. Never pull the power cord itself.
On restrictions on duplication TV programs, films, video tapes, portraits of other people or other materials may be copyrighted. Unauthorized use of such materials may infringe the provisions of the copyright law.
*6 protection technology developed by Sony using authentication and encryption. The photo frame does not support 8 bit parallel data transfer. • You cannot record, edit or delete data if you slide the write-protect switch to LOCK. Write-protect switch Write enable position Notes on use Place the label here. • Do not attach any other material than the supplied label on the labelling position. When you attach the supplied label, be sure to attach it to the labelling position.
Notes on use Data reading/recording that requires copyright protection cannot be performed. xD-Picture Card With the xD-Picture Card slot of the photo frame, you can use an xD-Picture Card*5. Not all the memory card operations are supported and we do not guarantee proper operations for all types of xD-Picture Card. *5 The photo frame has been demonstrated as operable with an xD-Picture Card with a capacity of 2 GB or less.
Specifications x Photo frame LCD screen LCD panel: DPF-V900: 9 inches, TFT active matrix DPF-V700: 7 inches, TFT active matrix Total number of dots: DPF-V900: 1 080 000 (750 × 3 (RGB) × 480) dots DPF-V700: 1 152 000 (800 × 3 (RGB) × 480) dots [With the stand spread out] DPF-V900: Approx. 245 × 162 × 145 mm (9 3/4 × 6 1/2 × 5 3/4 inches) Continued 51 GB Additional information Display aspect ratio 15:9 Effective display area DPF-V900: 8.
DPF-V700: Approx. 207 × 137 × 125 mm (8 1/4 × 5 1/2 × 5 inches) (width/height/depth) Mass DPF-V900: Approx. 800 g (1 lb 12 oz) DPF-V700: Approx. 550 g (1 lb 3 oz) (excluding the AC adaptor) Included accessories See “Checking included items” on page 13. x AC adaptor AC-L200 Power requirements - 100 V to 240 V, 50/60 Hz Power consumption 18 W Rated output voltage 8.4 V Dimensions Approx. 48 × 29 × 81 mm (1 15/16 × 1 3/16 × 3 1/4 inches) (width/height/depth) (excluding the protruding parts) Mass Approx.
Index A AC adaptor 17 Accessories 13 Adding to the internal memory 29 Auto display orientation 35 Auto image orientation 35 Auto power ON/OFF 35 AUTO TOUCH-UP 27 F Features 12 Format internal memory 35 H HDMI OUT 36 High definition TV 36 I Image file size 35 Index image display 25 Inserting a memory card 20 L C Changing the settings 33 Cleaning 47 Clock display 25 Analog clock mode 26 Calender mode 26 Digital clock mode 26 Connecting Computer 39 External device 38 TV 36 Connecting to the AC power source
Printed using VOC (Volatile Organic Compound)-free vegetable oil based ink.